- Sending file via netcat
- 6 Answers 6
- Команда Netcat (nc) с примерами
- Синтаксис Netcat
- Сканирование портов
- Отправка файлов через Netcat
- Создание простого чат-сервера
- Выполнение HTTP-запроса
- Выводы
- Use Netcat to Transfer Files
- Installing Netcat:
- Sending a file using Netcat:
- Showing progress in file transfers:
- Compress and send a directory using Netcat:
- Transferring a whole disk or partition using Netcat:
- Conclusion:
- About the author
- David Adams
Sending file via netcat
I’m using something like this to send file from one computer to another: To serve file (on computer A):
cat something.zip | nc -l -p 1234 netcat server.ip.here. 1234 > something.zip My question is. can I do the opposite? Let’s say I have file on computer B and I want to send it to A but not the way I wrote above, but by making computer that’s supposed to receive file (A) be ‘listening’ server and connect computer that’s ‘sending’ file (B) to server and send the file? Is it possible? I think it might be but I’m not sure how to do this. In case my above explanation is messed up: How do I send file TO ‘server’ instead of serving the file on server and then taking it FROM it (like I did above)?
Note: if you’re using nc because scp is too slow and you don’t need encryption, you may want to switch to udpcast : superuser.com/questions/692294/…
6 Answers 6
nc -l -p 1234 -q 1 > something.zip < /dev/null
cat something.zip | netcat server.ip.here 1234
Because netcat both reads stdin and writes stdout simultaneously, sending anything read from stdin out to the network and printing anything received from the network on stdout. The
if you have pv , I would suggest operating the "server client" as pv soemthing.zip | . , that will display the progress of the file read going into the pipe.
As a note, if you want to also preserve file permissions, ownership and timestamps, we use tar with netcat to do transfers of directories and files.
nc -l -p 12345 -q 1 | tar xz -C /path/to/root/of/tree tar czf - ./directory_tree_to_xfer | nc 12345 Couldn't add a comment above due to lack of Rep points on this sub-board, so I had to offer it as an answer, though apparently, you are allowed to comment on your own answers.
Computer A: nc -l -p 1234 > filename.txt
Computer B: nc server.com 1234 < filename.txt
Init the target listening to the port. AKA receiver end
nc -vl 44444 > pick_desired_name_for_received_file
Send the file to the target. AKA sender end
I cooked everything for you. Keep it handy for regular use case.
Make sure you change IP and port in this script.
There are 3 modes.
1. direct file transfer
2. compressed file transfer
3. folder transfer
receivefile() < [ $# -lt 1 ] && echo '$0 ' && return 1 local file=$1 local port=$ md5sum $file nc -v -l 0.0.0.0 -p $port > $file > sendfile() < [ $# -lt 1 ] && echo '$0 ' && return 1 local file=$1 local server=$ local port=$ md5sum $file nc -c $server $port < $file >receivefilecompressed() < [ $# -lt 1 ] && echo '$0 ' && return 1 local file=$1 local port=$ md5sum $file nc -v -l 0.0.0.0 -p $port | gunzip > $file > sendfilecompressed() < [ $# -lt 1 ] && echo '$0 ' && return 1 local file=$1 local server=$ local port=$ md5sum $file gzip -c $file | nc -c $server $port > receivefolder() < local port=$nc -v -l 0.0.0.0 -p $port | tar zxv > sendfolder() < [ $# -lt 1 ] && echo '$0 ' && return 1 local folder=$1 local server=$ local port=$ tar czp $folder | nc -c $server $port > Команда Netcat (nc) с примерами
Netcat (или nc ) — это утилита командной строки, которая считывает и записывает данные через сетевые соединения с использованием протоколов TCP или UDP. Это один из самых мощных инструментов в арсенале сетевых и системных администраторов, который считается швейцарским армейским ножом сетевых инструментов.
Netcat является кроссплатформенным и доступен для Linux, macOS, Windows и BSD. Вы можете использовать Netcat для отладки и мониторинга сетевых подключений, сканирования открытых портов, передачи данных в качестве прокси-сервера и многого другого.
Пакет Netcat предварительно установлен в macOS и популярных дистрибутивах Linux, таких как Ubuntu, Debian или CentOS.
Синтаксис Netcat
Самый простой синтаксис утилиты Netcat имеет следующий вид:
В Ubuntu вы можете использовать netcat или nc . Оба они являются символическими ссылками на версию Netcat для openBSD.
По умолчанию Netcat пытается запустить TCP-соединение с указанным хостом и портом. Если вы хотите установить UDP-соединение, используйте параметр -u :
Сканирование портов
Сканирование портов — одно из самых распространенных применений Netcat. Вы можете сканировать один порт или диапазон портов.
Например, чтобы сканировать открытые порты в диапазоне 20-80, вы должны использовать следующую команду:
Опция -z укажет nc сканировать только открытые порты, не отправляя им никаких данных, а опция -v предоставит более подробную информацию.
Результат будет выглядеть примерно так:
nc: connect to 10.10.8.8 port 20 (tcp) failed: Connection refused nc: connect to 10.10.8.8 port 21 (tcp) failed: Connection refused Connection to 10.10.8.8 22 port [tcp/ssh] succeeded! nc: connect to 10.10.8.8 port 23 (tcp) failed: Connection refused . nc: connect to 10.10.8.8 port 79 (tcp) failed: Connection refused Connection to 10.10.8.8 80 port [tcp/http] succeeded! Если вы хотите распечатать только строки с открытыми портами, вы можете отфильтровать результаты с помощью команды grep .
nc -z -v 10.10.8.8 20-80 2>&1 | grep succeededConnection to 10.10.8.8 22 port [tcp/ssh] succeeded! Connection to 10.10.8.8 80 port [tcp/http] succeeded! Вы также можете использовать Netcat для поиска серверного программного обеспечения и его версии. Например, если вы отправляете команду «EXIT» на сервер через SSH-порт 22 по умолчанию:
Результат будет выглядеть примерно так:
SSH-2.0-OpenSSH_7.6p1 Ubuntu-4 Protocol mismatch. Чтобы сканировать порты UDP, просто добавьте к команде параметр -u как показано ниже:
Как правило, Nmap — лучший инструмент, чем Netcat для комплексного сканирования портов.
Отправка файлов через Netcat
Netcat можно использовать для передачи данных с одного хоста на другой путем создания базовой модели клиент / сервер.
Это работает путем настройки Netcat для прослушивания определенного порта (с использованием параметра -l ) на принимающем хосте, а затем установления обычного TCP-соединения с другим хостом и отправки файла через него.
При получении выполните следующую команду, которая откроет порт 5555 для входящего соединения и перенаправит вывод в файл:
От отправляющего хоста подключитесь к принимающему хосту и отправьте файл:
Чтобы передать каталог, вы можете использовать tar для архивации каталога на исходном хосте и для извлечения архива на целевом хосте.
На принимающем хосте настройте инструмент Netcat для прослушивания входящего соединения через порт 5555. Входящие данные передаются команде tar , которая распаковывает архив:
На передающем хосте упакуйте каталог и отправьте данные, подключившись к слушающему процессу nc на принимающем хосте:
tar czvf - /path/to/dir | nc receiving.host.com 5555Вы можете наблюдать за процессом передачи на обоих концах. По завершении CTRL+C чтобы закрыть соединение.
Создание простого чат-сервера
Процедура создания онлайн-чата между двумя и более хостами такая же, как и при передаче файлов.
На первом хосте запустите процесс Netcat для прослушивания порта 5555:
Со второго хоста выполните следующую команду для подключения к слушающему порту:
Теперь, если вы наберете сообщение и нажмете ENTER оно будет отображаться на обоих хостах.
Чтобы закрыть соединение, введите CTRL+C
Выполнение HTTP-запроса
Хотя есть гораздо лучшие инструменты для HTTP-запросов, такие как curl , вы также можете использовать Netcat для отправки различных запросов на удаленные серверы.
Например, чтобы получить справочную страницу Netcat с веб-сайта OpenBSD, вы должны ввести:
printf "GET /nc.1 HTTP/1.1rnHost: man.openbsd.orgrnrn" | nc man.openbsd.org 80Полный ответ, включая заголовки HTTP и HTML-код, будет напечатан в терминале.
Выводы
В этом руководстве вы узнали, как использовать утилиту Netcat для установления и тестирования соединений TCP и UDP.
Для получения дополнительной информации посетите страницу руководства Netcat и прочтите обо всех других мощных параметрах команды Netcat.
Если у вас есть вопросы или замечания, пожалуйста, оставьте комментарий ниже.
Use Netcat to Transfer Files
![]()
This tutorial offers an easy explanation of how to use Netcat to transfer files between devices.
Netcat is a command-line network tool used to establish TCP/UDP connections and network analysis. Netcat features include:
- Outgoing and incoming connections, TCP or UDP, to or from any ports
- It can be used to open local ports
- Supports file transference between devices
- Netcat can be used to scan ports.
- Netcat can be used for banner grabbing
- Full DNS forward/reverse checking, with appropriate warnings
- Ability to use any locally configured network source address
- Built-in port-scanning capabilities, with randomization
- Built-in loose source-routing capability
- Slow-send mode, one line every N seconds
- Hex dump of transmitted and received data
- Optional ability to let another program service establish connections
- Optional telnet-options responder
Installing Netcat:
Before starting, I want to clarify that although I use the command “netcat” in this tutorial, you can also use the command “nc.”
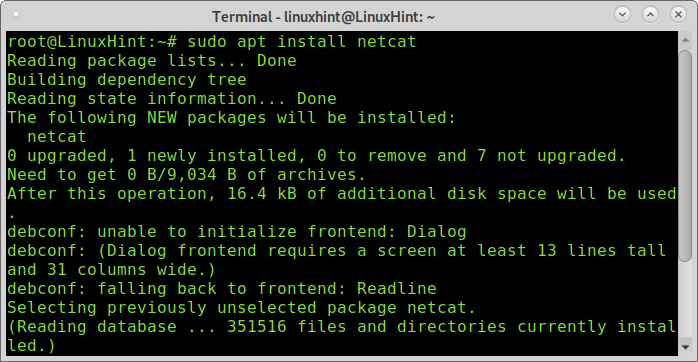
To start, install Netcat by running the command shown below in Debian-based Linux distributions.
To install Netcat on Red Hat or Centos run:
You need to repeat the process in all devices you want to transfer data between. For this tutorial, I created a virtual machine with IP 192.168.1.102.
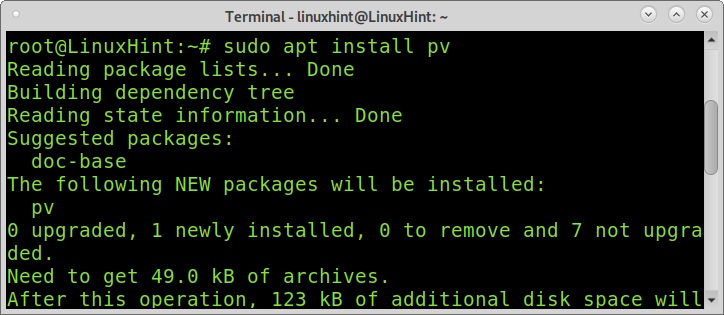
For this tutorial, I will also use the command pv that defaults in Linux distributions. This command is used to show the progress file transfer progress.
Sending a file using Netcat:
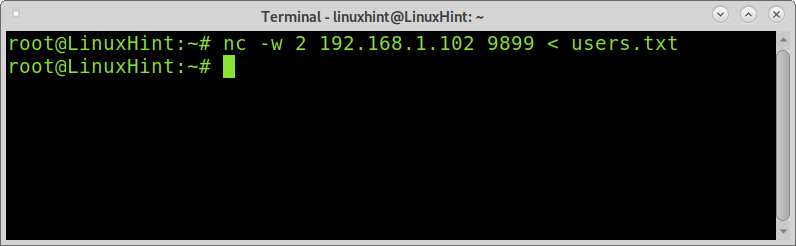
In this example, the device 192.168.1.102 will receive the file; another device will send it. From the receiving device, run the following command replacing linuxhint.deb with the name of the actual file you want to transfer. The -l (Listening for inbound connections) option instructs Netcat to listen for incoming connections on port 9899.

As you can see, Netcat stays listening on port 9899, waiting for the file. Now, from the sender device, run the command below, replacing the IP address with the IP of your receiver device and linuxhint.deb with the file name. The option -w is used to define the timeout in seconds.

As you can see below, the file linuxhint.deb was transferred to the current directory of the receiving side.

If you don’t have the file to send in the current directory, or the receiver doesn’t want to store it in the current directory, it is possible to define a path.
In the example below, the receiver will store the file linuxhint.deb into the directory linuxhint.

In the example below, the sender has the file he wants to send in the subdirectory linuxhint2:


As you can see, the file was successfully stored in the receiver’s linuxhint directory.
Showing progress in file transfers:
You also can implement the command pv to show the progress in file transfers. On the receiving side, add a pipe followed by the command pv used to monitor the progress of data through a pipe and the inbound file specification.

Then on the sender device, run the command explained in previous examples as shown below.
Pv output can be edited to change the file units; check the man page of this command to show the progress in other units than bytes.
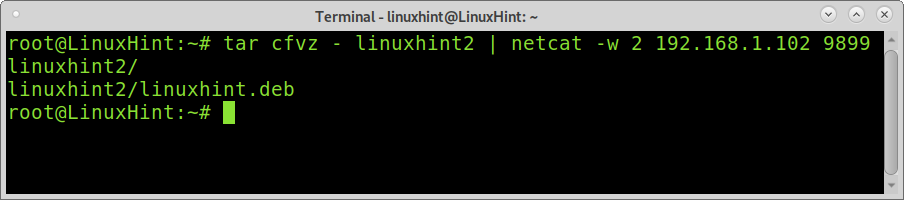
Compress and send a directory using Netcat:
Using the commands below, you can compress and send a directory.

On the receiver device, type the command below, replacing linuxhint2 for the name of the compressed directory you want to receive from this device.
On the sender device, run the command below, replacing linuxhint2 with the name of the directory you want to compress and send. Also, replace the IP 192.168.1.102 with your receiver’s IP address.
As you can see, the file was received properly and extracted using the command below:
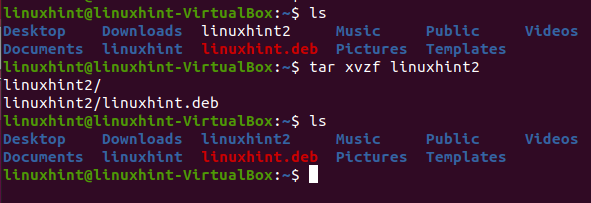
The directory linuxhint2 was extracted with its content.
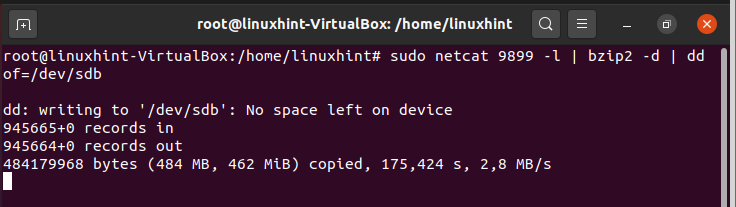
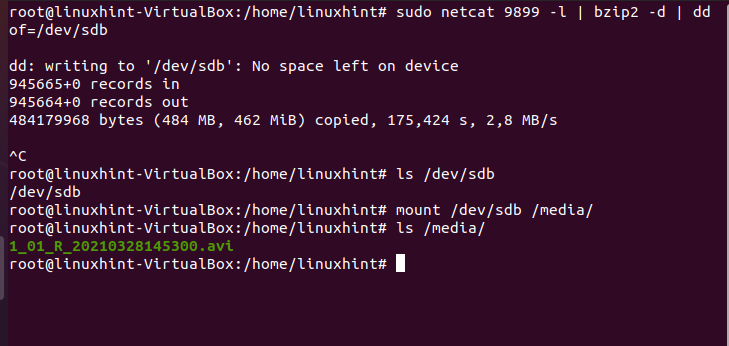
Transferring a whole disk or partition using Netcat:
You can also transfer a whole disk or partition using Netcat with the commands shown below. In the example below, I will transfer an external disk partition to a receiving side partition.
On the receiving side, type the following command, replacing the port with the one you are using and the destination disk or partition with yours.

On the sending side, run the following command replacing the disk or partition (sdb1), your receiver IP address and port.

In my case, my drive device was full, but we can see the procedure finished.
If you mount the device where you stored the backup, you must see the data in the mount point.
Conclusion:
Files transference is one of the best Netcat features.
In the previous tutorial on Netcat for port scan, the conclusion wasn’t favorable for this program before alternatives like Nmap. Among Netcat’s general limitations, we see it doesn’t support scanning multiple ports. File transfers are not encrypted, and an attacker may launch a Man in the MIddle attack to intercept the data in a Netcat file transfer.
It is important to clarify transferring files over Netcat isn’t a safe choice if encryption measures aren’t implemented. Netcat doesn’t include encryption features, but it can be combined with PGP or alternatives approaching this issue like Cryptcat, which is very similar to Netcat with few differences: Cryptcat doesn’t support options -t for Telnet negotiation and does not support stdin timeout (-q). On the other side, Cryptcat adds new functionalities like encryption. Other secure alternatives include file transfers over the ssh protocol (scp).
I hope this tutorial was useful. Keep following Linux Hint for more Linux tips and tutorials.
About the author
David Adams
David Adams is a System Admin and writer that is focused on open source technologies, security software, and computer systems.