- How to Install netstat Command in Linux
- How to Install netstat Command in Linux
- Using netstat Command in Linux
- Conclusion
- How to Install netstat Command in Linux
- How to Install netstat Command in Linux
- How to Use netstat Command in Linux
- 1. Viewing the Network Routing Table
- 2. Display Network Interface Statistics
- 3. Show Network Connections
- 4. Show Network Services
- How to Install netstat on Ubuntu 20.04 LTS (Focal Fossa)
- How to Install netstat on Ubuntu 20.04 LTS (Focal Fossa)
- Step 1: Prerequisites
- Step 2: Update Your Server
- Step 3: Install Netstat
- Step 4: Check Version
- Step 5: Verify Installation
- Step 6: Using Netstat
- Step 7: Check all the available options
- How to Install netstat on Ubuntu 20.04 LTS
- Update Your Server
- Install Netstat
- Check Version
- Check Installation
- Use of netstat
- More info of netstat
How to Install netstat Command in Linux
The netstat command generates displays that show network status and protocol statistics. It is a cross-platform utility available for Linux, macOS, or Windows systems. Which is very helpful troubleshooting the network configuration and issues. Identifying the application using ports on a system.
The latest Linux operating systems have default installed this tool. But some of the minimal installation may not contain this tool in your system. In that case, this tutorial will help you to install netstat command on Linux system.
How to Install netstat Command in Linux
Generally the net-tools package provides the netstat command for most of the popular Linux distributions. Use one of the below command to install the netstat command on your system.
- Install netstat on Fedora & CentOS/RHEL 8 systems: Use dnf command line package manager to install netstat from default package repositories.
sudo dnf install net-tools sudo yum install net-tools sudo apt update && sudo apt install net-tools sudo zypper install net-tools Using netstat Command in Linux
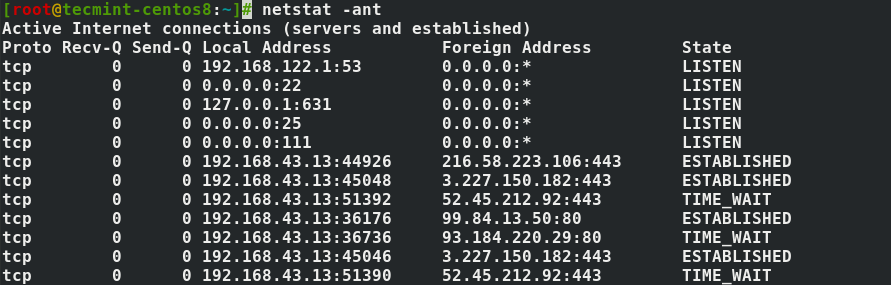
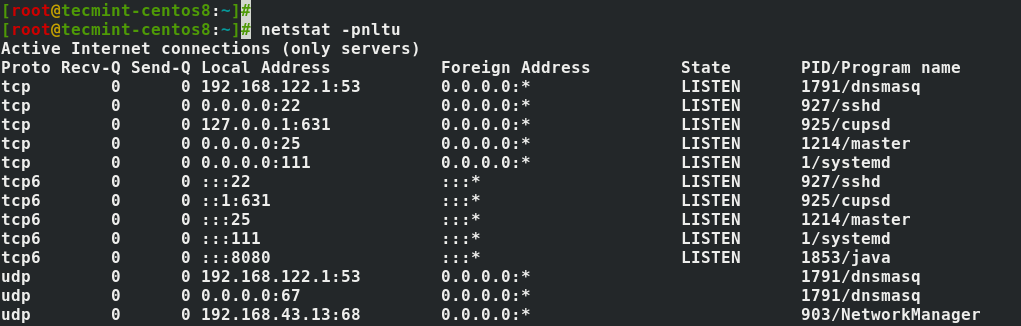
Netstat is a widely used command line utility for printing network connections, routing table, interfaces and interfaces statistics. Personally, I use this command for displaying PID/Program name for socket or listening server sockets on a systems.
My frequently used command is:
The above command help me find services running on various ports. With this its easier to identify if any service is listing on any port or not. The command parameters are:
- -t – is used to print TCP connections
- -u – is used to print UDP connections
- -l – Print all listening server sockets
- -p – Print all PID/Program name for sockets
- -n – Don’t resolve names from IPs
Conclusion
This tutorial describes you to how to install missing netstat command on your Linux system. Additionally shared my favorite use case of the netstat command.
How to Install netstat Command in Linux
Netstat – derived from the words network and statistics – is a command-line utility used by system administrators for analyzing network statistics. It displays a whole manner of statistics such as open ports and corresponding addresses on the host system, routing table, and masquerade connections.
In this article, we will walk you through how you can install the netstat command in different Linux distributions.
How to Install netstat Command in Linux
The package that contains netstat is called net-tools. On modern systems, the netstat utility comes pre-installed and there’s no need to install it.
On older systems, however, you are likely to bump into an error when you run the netstat command. Therefore, to install netstat on Linux distributions, run the command.
# yum install net-tools [On CentOS/RHEL] # apt install net-tools [On Debian/Ubuntu] # zypper install net-tools [On OpenSuse] # pacman -S net-tools [On Arch Linux]
Once installed, run the command below to check the version of netstat installed.
How to Use netstat Command in Linux
You can invoke the netstat command on any of the Linux distributions to get different statistics on your network.
1. Viewing the Network Routing Table
You use the -r flag to show the network routing table to get something similar to the output below.

The -n option forces netstat to print addresses separated by dots instead of using symbolic network names. The option is useful for avoiding address lookups over a network.
2. Display Network Interface Statistics
Use the -i flag to get an output of statistics of a network interface that is configured. The -a option prints all present interfaces in the kernel.

3. Show Network Connections
The netstat command utility supports options that display active or passive sockets using the options -t , -n , and -a . The flags show RAW, UDP, TCP, or UNIX connection sockets. Adding the -a option, it will sow sockets ready for connection.
4. Show Network Services
To list services, their current state, and their corresponding ports, run the command.
In this article, we shed light on how you can install netstat command and how it is used to checking a wide array of network statistics. It’s also important to point out that netstat has been deprecated and instead ss utility has taken its place in displaying more refined network statistics.
How to Install netstat on Ubuntu 20.04 LTS (Focal Fossa)

In this article, I will take you through the steps to install netstat on Ubuntu 20.04 LTS. netstat is a free and open source command line tool to list the port and protocol statistics. It can be used to display the status of TCP and UDP endpoints in table format, routing table information, and interface information. It is a very famous tool used mostly by Unix and Linux administrators all over the globe to troubleshoot any port and network interface issues.
It is shipped as part of net-tools package so to install this utility, you need to actually install net-tools package. It can be easily installed on almost all the Linux distribution but here we will see the steps to install netstat on Ubuntu 20.04 LTS System.
How to Install netstat on Ubuntu 20.04 LTS (Focal Fossa)
Step 1: Prerequisites
a) You should have a running Ubuntu 20.04 LTS Server.
b) You should have sudo or root access to run privileged commands.
c) You should have apt or apt-get utility available in your Server.
Step 2: Update Your Server
Before installing a new package in the system, it is wise to first sync the system packages with the latest available updates from Ubuntu repo by using sudo apt update && sudo apt upgrade command as shown below.
cyberithub@ubuntu:~$ sudo apt update && sudo apt upgrade [sudo] password for cyberithub: Hit:1 https://downloads.plex.tv/repo/deb public InRelease Get:2 https://dl.google.com/linux/chrome/deb stable InRelease [1,811 B] Get:3 http://security.ubuntu.com/ubuntu focal-security InRelease [114 kB] Get:4 https://dl.google.com/linux/chrome/deb stable/main amd64 Packages [1,093 B] Hit:5 http://in.archive.ubuntu.com/ubuntu focal InRelease Get:6 http://in.archive.ubuntu.com/ubuntu focal-updates InRelease [114 kB] Get:7 http://security.ubuntu.com/ubuntu focal-security/main amd64 Packages [1,892 kB] Get:8 http://in.archive.ubuntu.com/ubuntu focal-backports InRelease [108 kB] Get:9 http://security.ubuntu.com/ubuntu focal-security/main i386 Packages [530 kB] Get:10 http://security.ubuntu.com/ubuntu focal-security/main amd64 DEP-11 Metadata [40.7 kB] Get:11 http://security.ubuntu.com/ubuntu focal-security/main amd64 c-n-f Metadata [11.5 kB] Get:12 http://security.ubuntu.com/ubuntu focal-security/universe i386 Packages [574 kB] . Step 3: Install Netstat
Next step is to install netstat utility from default Ubuntu repo by using sudo apt install net-tools command as shown below. This will download and install the package along with all its dependencies.
cyberithub@ubuntu:~$ sudo apt install net-tools [sudo] password for cyberithub: Reading package lists. Done Building dependency tree Reading state information. Done The following packages were automatically installed and are no longer required: libfwupdplugin1 libllvm11 libxmlb1 Use 'sudo apt autoremove' to remove them. The following NEW packages will be installed: net-tools 0 upgraded, 1 newly installed, 0 to remove and 45 not upgraded. Need to get 196 kB of archives. After this operation, 864 kB of additional disk space will be used. Get:1 http://in.archive.ubuntu.com/ubuntu focal/main amd64 net-tools amd64 1.60+git20180626.aebd88e-1ubuntu1 [196 kB] Fetched 196 kB in 1s (138 kB/s) Selecting previously unselected package net-tools. (Reading database . 201454 files and directories currently installed.) Preparing to unpack . /net-tools_1.60+git20180626.aebd88e-1ubuntu1_amd64.deb . Unpacking net-tools (1.60+git20180626.aebd88e-1ubuntu1) . Setting up net-tools (1.60+git20180626.aebd88e-1ubuntu1) . Processing triggers for man-db (2.9.1-1) .
Step 4: Check Version
After successful installation, you can check the installed version by using netstat —version command as shown below.
cyberithub@ubuntu:~$ netstat --version net-tools 2.10-alpha Fred Baumgarten, Alan Cox, Bernd Eckenfels, Phil Blundell, Tuan Hoang, Brian Micek and others +NEW_ADDRT +RTF_IRTT +RTF_REJECT +FW_MASQUERADE +I18N +SELINUX AF: (inet) +UNIX +INET +INET6 +IPX +AX25 +NETROM +X25 +ATALK +ECONET +ROSE -BLUETOOTH HW: +ETHER +ARC +SLIP +PPP +TUNNEL -TR +AX25 +NETROM +X25 +FR +ROSE +ASH +SIT +FDDI +HIPPI +HDLC/LAPB +EUI64
Step 5: Verify Installation
You can also verify the installed files path by using dpkg -L net-tools command as shown below.
cyberithub@ubuntu:~$ dpkg -L net-tools /. /bin /bin/netstat /sbin /sbin/ifconfig /sbin/ipmaddr /sbin/iptunnel /sbin/mii-tool /sbin/nameif /sbin/plipconfig /sbin/rarp /sbin/route /sbin/slattach /usr /usr/sbin /usr/sbin/arp /usr/share /usr/share/doc /usr/share/doc/net-tools /usr/share/doc/net-tools/NEWS.Debian.gz /usr/share/doc/net-tools/README /usr/share/doc/net-tools/TODO /usr/share/doc/net-tools/changelog.Debian.gz /usr/share/doc/net-tools/copyright /usr/share/man . Step 6: Using Netstat
Now that netstat utility is successfully installed, let’s use it to list the status of TCP Port 32400 using sudo netstat -ntlp | grep -i 32400 command as shown below.
cyberithub@ubuntu:~$ sudo netstat -ntlp | grep -i 32400 tcp6 0 0 . 32400 . * LISTEN 5768/Plex Media Ser
Step 7: Check all the available options
To check all the options available with netstat command, you need to use netstat —help command as shown below.
cyberithub@ubuntu:~$ netstat --help usage: netstat [-vWeenNcCF] [] -r netstat <-V|--version|-h|--help>netstat [-vWnNcaeol] [ . ] netstat < [-vWeenNac] -i | [-cnNe] -M | -s [-6tuw] >-r, --route display routing table -i, --interfaces display interface table -g, --groups display multicast group memberships -s, --statistics display networking statistics (like SNMP) -M, --masquerade display masqueraded connections -v, --verbose be verbose -W, --wide don't truncate IP addresses -n, --numeric don't resolve names --numeric-hosts don't resolve host names --numeric-ports don't resolve port names --numeric-users don't resolve user names -N, --symbolic resolve hardware names -e, --extend display other/more information -p, --programs display PID/Program name for sockets -o, --timers display timers -c, --continuous continuous listing -l, --listening display listening server sockets -a, --all display all sockets (default: connected) -F, --fib display Forwarding Information Base (default) -C, --cache display routing cache instead of FIB -Z, --context display SELinux security context for sockets How to Install netstat on Ubuntu 20.04 LTS

instructions on how to instal netstat on a computer running Ubuntu 20.04 LTS. netstat is a utility that can be run from the command line that provides statistics about ports and protocols. It is possible to use it to display the current state of TCP and UDP endpoints in table format, as well as information regarding routing tables and interfaces. It is a highly well-known programme that is predominantly utilised by Unix and Linux administrators all over the world to troubleshoot any port and network interface problems that may arise.
Because it is distributed as a component of the Net Tools package, the installation of this tool requires that the Net Tools package itself be installed first. However, for the purpose of this tutorial, we will focus on installing netstat on Ubuntu 20.04 LTS because its installation is quite straightforward across the majority of Linux distributions.
Update Your Server
Use sudo apt update and sudo apt upgrade before installing a new package in the system to sync the system packages with the most recent available updates from the Ubuntu repo.
# sudo apt update && sudo apt upgrade
Install Netstat
Using the command sudo apt instal net-tools, you can download and instal the netstat programme that is included in the default Ubuntu repository. The package, as well as any and all of its dependencies, will be downloaded and installed as a result of this action.
# sudo apt install net-tools
Check Version
If the installation went well, you can use the netstat —version command to check the version that was installed.

Check Installation
Using the dpkg -L net-tools command, you can also check the installed file path.

Use of netstat
Let’s make use of the fact that the netstat tool has been successfully installed by listing the current status of TCP ports using it.

More info of netstat

I sincerely hope that you have a complete understanding of everything