How to Add Missing Network Cards on Cloned Linux Virtual Machines
Cloning virtual machines from template is commonplace when managing a significantly sized vSphere environment. If you’re new to vSphere templates, do have a look at my 4-part guide on the blog titled vSphere VM Templates, a Complete Guide. Particularly relevant to today’s subject matter is Part 2 since it covers the process of creating Linux templates, a must read if this is all new to you. Today, we tackle one issue you might possibly face when cloning Linux virtual machines from template. I’m referring to the dreaded missing network card instance where Linux basically fails to recognize the network card or fails to activate it if it does. This post tackles the issue of adding (or activating) network cards on Linux virtual machines cloned from template.
Where’s my missing network card?
By default, the first network interface on a Linux box is labeled eth0. This, however, depends on the Linux distro in use and the configuration abuse it’s been subjected to. Regardless, one frequent error message you’ll come across is Device eth0 does not seem to be present, delaying initialization. This error pops up when a primary interface fails to initialize when issuing something like ifup eth0 or during the OS booting up process.
So, why is my interface missing? Well, in general, it’s not really missing. The problem is that when you clone a VM from template, the network card on the resulting VM is given a new MAC address. In truth, this is exactly what we want. Duplicate MAC addresses on a network are synonymous with trouble! We do, however, have a problem when looking it at it from the guest OS perspective. This is because the VM’s network configuration still includes the old MAC address, the one assigned to the template’s network interface.
So, what you end up with is a failed network interface due to a mismatch between the MAC address specified in guest OS network configuration and the physical MAC assigned to the VM.
Replicating the issue
To replicate the issue, I converted an existing Centos VM to a template. I then created a new Centos VM using this template via the New VM from This Template option. For illustrative purposes, I recorded the template’s MAC address as shown in the next screenshot.
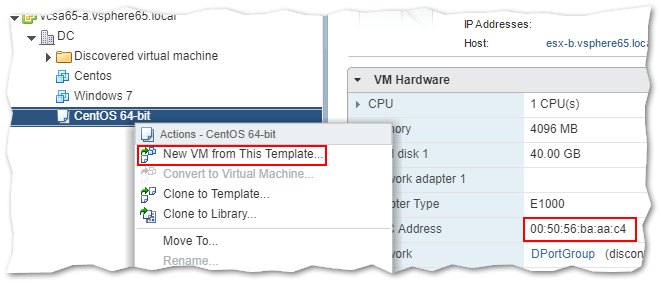
Figure 1 – Cloning a Linux VM from template. Note the highlighted MAC address bottom right
In this example, the Centos VM happens to be running with an interface called ens33 instead of the standard eth0. In Linux, each network interface has a corresponding configuration file called ifcfg- .
In our case, the config file is called ifcfg-ens33 which is found in the default location /etc/sysconfig/network-scripts. Don’t worry too much about naming conventions and such as these might vary according to the Linux distro in question.
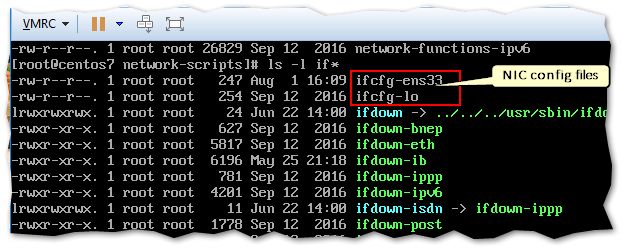
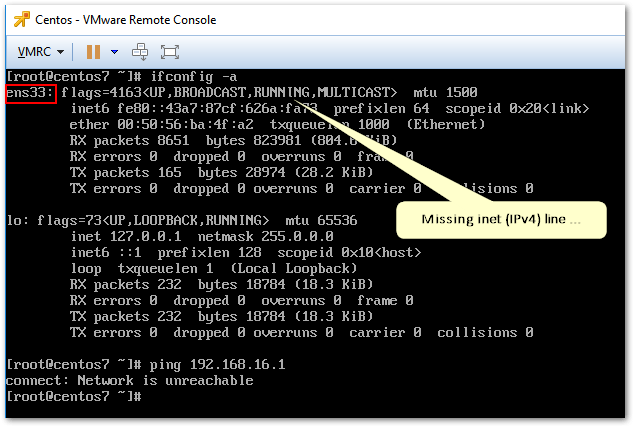
Figure 4 – Checking the interface configuration
In order to fix this, we need to change the value of HWADDR to reflect the MAC address assigned to the VM.
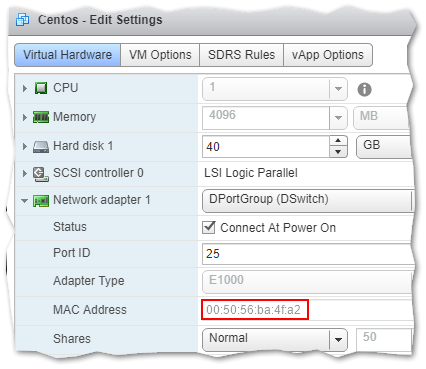
Figure 5 – Determining the MAC address assigned to a VM’s network interface using the vSphere client
How to fix it!
Fixing the problem is easy.
Note: The following steps apply to Centos and Redhat but the idea is basically the same for different distros even though the commands used and file paths will differ. This KB article covers SUSE Linux as well.
Step 1 – Determine the name of the failing interface. Use any of the following commands ip a, ifconfig or nmcli device show. I’ve used the nmcli command, the output of which shows that network card ens33 is failing to connect.

Step 2 – Edit the configuration file for the network interface using the vi editor and replace the HWADDR value with the correct one. Copy the MAC address from the VM’s network interface settings.
vi /etc/sysconfig/network-scripts/ifcfg-ens33
Just in case you’re new to using vi:
- Use the arrow keys to move to the end of the line starting HWADDR.
- Press the Insert key on your keyboard.
- Use the Backspace key to delete the MAC address. Replace it with the correct one.
- Press ESC.
- Type wq and press Enter to save the changes.
Step 3 – Run the following command. This deletes the MAC address to interface name association at startup.
rm -f /etc/udev/rules.d/70-persistent-net.rules
At this point, running service network restart should bring up the interface and establish network connectivity to the VM.
Step 4 – Type reboot to restart the VM. This allows you to verify that the network changes persist after reboots.
The following video takes you through these 4 steps. Keep in mind that there are different variations to this issue. In some instances, it’s only the loopback interface that’s listed, in which case I suggest using the nmtui tool to fix the problem.
Conclusion
Deploying a VM from a poorly prepared Linux template can result in virtual machines with missing or inactive network interfaces. In today’s post, we saw just how to fix this issue. There are a few more things you could do to prevent the issue from reoccurring. The easiest is to remove the HWADDR line from the template ifcfg- configuration file. It’s best to test this fix first if you’re using the Linux box as a load balancer and similar. This solution also looks promising though I have yet to have a go at it. If I do, I’ll update the post accordingly.
Regardless, fixing network card issues on Linux VMs is easy when you know where to look. As always, prevention is better than cure, so one should always clone from well-prepared templates.
If you liked this post, have a look at the remaining list of VMware posts or drop us a comment if you have any questions.
How to find Ethernet network interface card information in Linux
Sometimes you may want to know the product name or hardware settings of the network interface cards (NICs) attached to your Linux system. For example when you check whether a particular network device driver or a kernel module is compatible with your Ethernet adapter, you need to know its hardware specification such as NIC model/vendor (e.g., Broadcom NetXtreme, Intel I350), speed (e.g., 1GB/s, 10GB/s), link mode (e.g., full/half duplex), etc.
In this tutorial, I will describe how to find Ethernet NIC information from the command line in Linux.
Method One: ethtool
The first method is to use ethtool , a command-line tool for checking or modifying PCI-based Ethernet card settings.
To install ethtool on Ubuntu or Debian:
$ sudo apt-get install ethtool
To install ethtool on Fedora, CentOS or RedHat:
To display hardware settings of a network interface card with ethtool , run the following command. It is assumed that the NIC card is assigned the name eth0 . The reason for sudo access in this case is to allow ethtool to obtain wake-on-LAN settings and link status.
Settings for eth0: Supported ports: [ TP ] Supported link modes: 10baseT/Half 10baseT/Full 100baseT/Half 100baseT/Full 1000baseT/Full Supports auto-negotiation: Yes Advertised link modes: 10baseT/Half 10baseT/Full 100baseT/Half 100baseT/Full 1000baseT/Full Advertised pause frame use: No Advertised auto-negotiation: Yes Speed: 1000Mb/s Duplex: Full Port: Twisted Pair PHYAD: 1 Transceiver: internal Auto-negotiation: on MDI-X: Unknown Supports Wake-on: g Wake-on: g Link detected: yes
To find Ethernet device driver and firmware information:
driver: bnx2 version: 2.1.6 firmware-version: bc 5.2.3 NCSI 2.0.6 bus-info: 0000:03:00.0 supports-statistics: yes supports-test: yes supports-eeprom-access: yes supports-register-dump: yes
To find factory-default MAC address information:
Permanent address: 9c:8e:99:12:2d:8a
Method Two: lshw
The second method is via lshw , a command-line utility for showing detailed hardware specification of a Linux machine.
To install lshw on Ubuntu or Debian:
To install lshw on CentOS or RedHat, first set up Repoforge repository on your system, and then run:
To install lshw on Fedora, simply run:
To show detailed vendor information of your NIC, run the following.
*-network description: Ethernet interface product: NetXtreme II BCM5709 Gigabit Ethernet vendor: Broadcom Corporation physical id: 0 bus info: [email protected]:03:00.0 logical name: eth0 version: 20 serial: d4:85:64:77:f3:54 size: 1GB/s capacity: 1GB/s width: 64 bits clock: 33MHz capabilities: pm vpd msi msix pciexpress bus_master cap_list rom ethernet physical tp 10bt 10bt-fd 100bt 100bt-fd 1000bt-fd autonegotiation configuration: autonegotiation=on broadcast=yes driver=bnx2 driverversion=1.7.5 duplex=full firmware=5.2.3 NCSI 2.0.6 ip=192.168.10.78 latency=0 link=yes multicast=yes port=twisted pair speed=1GB/s resources: irq:16 memory:f4000000-f5ffffff memory:e6100000-e610ffff(prefetchable)
Method Three: lspci
If all you need to know is the product/vendor name of your Ethernet card, you can use lspci command which displays information about PCI buses and connected PCI devices.
To install lspci on Ubuntu or Debian:
$ sudo apt-get install pciutils
To install lspci on CentOS, Fedora or RedHat:
$ sudo yum install pciutils
To find the name of Ethernet card(s) available on your system, run the following.
03:00.0 Ethernet controller: Broadcom Corporation NetXtreme II BCM5709 Gigabit Ethernet (rev 20)
Support Xmodulo
This website is made possible by minimal ads and your gracious donation via PayPal or credit card
Please note that this article is published by Xmodulo.com under a Creative Commons Attribution-ShareAlike 3.0 Unported License. If you would like to use the whole or any part of this article, you need to cite this web page at Xmodulo.com as the original source.