- How to create bridges on bonds (with and without VLANs) using NetworkManager
- Create the bridge for the bond
- Create the bond and attach to the bridge
- Bridging a VLAN on a bond
- Create the bridge for the VLAN on the bond
- Create the VLAN on the bond and attach to bridge
- Add network bridge on ubuntu 20.04 LTS with Network Manager cli
- Partners
- Categories
- How to configure a Linux bridge with Network Manager on Ubuntu
- Requirement
- Create a Bridge
- Support Xmodulo
How to create bridges on bonds (with and without VLANs) using NetworkManager
Some production systems you face might make use of bonded network connections that you need to bridge in order to get VMs onto them. That bond may or may not have a native VLAN (in which case you bridge the bond), or it might have VLANs on top (in which case you want to bridge the VLANs), or perhaps you need to do both.
Let’s walk through an example where we have a bond that has a native VLAN, that also has the tagged VLAN 123 on top (and maybe a second VLAN 456 ), all of which need to be separately bridged. This means we will have the bond ( bond0 ) with a matching bridge ( br-bond0 ), plus a VLAN on the bond ( bond0.123 ) with its matching bridge ( br-vlan123 ). It should look something like this.
+------+ +---------+ +---------------+ | eth0 |---| | +------------+ | Network one | +------+ | |----------| br-bond0 |---| (native VLAN) | | bond0 | +------------+ +---------------+ +------+ | | | eth1 |---| | +------+ +---------+ +---------------+ | | +---------+ +------------+ | Network two | | +---| vlan123 |---| br-vlan123 |---| (tagged VLAN) | | +---------+ +------------+ +---------------+ | | +---------+ +------------+ +---------------+ +-----| vlan456 |---| br-vlan456 |---| Network three | +---------+ +------------+ | (tagged VLAN) | +---------------+
To make it more complicated, let’s say that the native VLAN on the bond needs a static IP and to operate at an MTU of 1500 while the other uses DHCP and needs MTU of 9000 .
Start by creating the bridge, then later we create the interface that attaches to that bridge. When creating VLANs, they are created on the bond, but then attached as a slave to the bridge.
Create the bridge for the bond
First, let’s create the bridge for our bond. We’ll export some variables to make scripting easier, including the name, value for spanning tree protocol ( SPT ) and MTU. Note that in this example the bridge will have an MTU of 1500 (but the bond itself will be 9000 to support other VLANs at that MTU size.)
BRIDGE=br-bond0 BRIDGE_STP=yes BRIDGE_MTU=1500
OK so let’s create the bridge for the native VLAN on the bond (which doesn’t exist yet).
nmcli con add ifname "$" type bridge con-name "$" nmcli con modify "$" bridge.stp "$" nmcli con modify "$" 802-3-ethernet.mtu "$"
By default this will look for an address with DHCP. If you don’t want that you can either set it manually:
nmcli con modify "$" ipv4.method static ipv4.address 192.168.0.123/24 ipv6.method ignore
nmcli con modify "$" ipv4.method disabled ipv6.method ignore
Finally, bring up the bridge. Yes, we don’t have anything attached to it yet, but that’s OK.
You should be able to see it with nmcli and brctl tools (if available on your distro), although note that there is no device attached to this bridge yet.
Next, we create the bond to attach to the bridge.
Create the bond and attach to the bridge
Let’s create the bond. In my example I’m using active-backup ( mode 1 ) but your bond may use balance-rr (round robin, mode 0 ) or, depending on your switching, perhaps something like link aggregation control protocol (LACP) which is 802.3ad ( mode 4 ).
Let’s say that your bond (we’re going to call bond0 ) has two interfaces, which are eth0 and eth1 respectively. Note that in this example, although the native interface on this bond wants an MTU of 1500 , the VLANs which sit on top of the bond need a higher MTU of 9000 . Thus, we set the bridge to 1500 in the previous step, but we need to set the bond and its interfaces to 9000 . Let’s export those now to make scripting easier.
BOND=bond0 BOND_SLAVE0=eth0 BOND_SLAVE1=eth1 BOND_MODE=active-backup BOND_MTU=9000
Now we can go ahead and create the bond, setting the options and the slave devices.
nmcli con add type bond ifname "$" con-name "$" nmcli con modify "$" bond.options mode="$" nmcli con modify "$" 802-3-ethernet.mtu "$" nmcli con add type ethernet con-name "$-slave-$" ifname "$" master "$" nmcli con add type ethernet con-name "$-slave-$" ifname "$" master "$" nmcli con modify "$-slave-$" 802-3-ethernet.mtu "$" nmcli con modify "$-slave-$" 802-3-ethernet.mtu "$"
OK at this point you have a bond specified, great! But now we need to attach it to the bridge, which is what will make the bridge actually work.
nmcli con modify "$" master "$" slave-type bridge
Note that before we bring up the bond (or afterwards) we need to disable or delete any existing network connections for the individual interfaces. Check this with nmcli con and delete or disable those connections. Note that this may disconnect you, so make sure you have a console to the machine.
Now, we can bring the bond up which will also activate our interfaces.
We can check that the bond came up OK.
And this bond should also now be on the network, via the bridge which has an IP set.
Now if you look at the bridge you can see there is an interface ( bond0 ) attached to it (your distro might not have brctl ).
nmcli con ls /sys/class/net/br-bond0/brif/ brctl show
Bridging a VLAN on a bond
Now that we have our bond, we can create the bridged for our tagged VLANs (remember that the bridge connected to the bond is a native VLAN so it didn’t need a VLAN interface).
Create the bridge for the VLAN on the bond
Create the new bridge, which for our example is going to use VLAN 123 which will use MTU of 9000 .
VLAN=123 BOND=bond0 BRIDGE=br-vlan$ BRIDGE_STP=yes BRIDGE_MTU=9000
OK let’s go! (This is the same as the first bridge we created.)
nmcli con add ifname "$" type bridge con-name "$" nmcli con modify "$" bridge.stp "$" nmcli con modify "$" 802-3-ethernet.mtu "$"
Again, this will look for an address with DHCP, so if you don’t want that, then disable it or set an address manually (as per first example). Then you can bring the device up.
Create the VLAN on the bond and attach to bridge
OK, now we have the bridge, we create the VLAN on top of bond0 and then attach it to the bridge we just created.
nmcli con add type vlan con-name "$.$" ifname "$.$" dev "$" id "$" nmcli con modify "$.$" master "$" slave-type bridge nmcli con modify "$.$" 802-3-ethernet.mtu "$"
If you look at bridges now, you should see the one you just created, attached to a VLAN device (note, your distro might not have brctl ).
And that’s about it! Now you can attach VMs to those bridges and have them on those networks. Repeat the process for any other VLANs you need on to of the bond.
Add network bridge on ubuntu 20.04 LTS with Network Manager cli
All my virtual machine hosts are using networkd bridging to announce IPs of their vms in my network and now I just found the easiest way to configure this without manually changing any config files like I always did before.
Here is how I added a bridge br0 to my physical interface enp1s0:
sudo nmcli con add ifname br0 type bridge con-name br0 sudo nmcli con add type bridge-slave ifname enp1s0 master br0 sudo nmcli con up br0Works already after bringing it up but to make sure nothing is mixed up I rebooted the host before using it.
Partners
Categories
Copyright © 2023 blog.coffeebeans.at | Powered by Astra WordPress Theme
To provide the best experiences, we use technologies like cookies to store and/or access device information. Consenting to these technologies will allow us to process data such as browsing behavior or unique IDs on this site. Not consenting or withdrawing consent, may adversely affect certain features and functions.
The technical storage or access is strictly necessary for the legitimate purpose of enabling the use of a specific service explicitly requested by the subscriber or user, or for the sole purpose of carrying out the transmission of a communication over an electronic communications network.
The technical storage or access is necessary for the legitimate purpose of storing preferences that are not requested by the subscriber or user.
The technical storage or access that is used exclusively for statistical purposes. The technical storage or access that is used exclusively for anonymous statistical purposes. Without a subpoena, voluntary compliance on the part of your Internet Service Provider, or additional records from a third party, information stored or retrieved for this purpose alone cannot usually be used to identify you.
The technical storage or access is required to create user profiles to send advertising, or to track the user on a website or across several websites for similar marketing purposes.
How to configure a Linux bridge with Network Manager on Ubuntu
Question: I need to set up a Linux bridge on my Ubuntu box to share a NIC with several other virtual machines or containers created on the box. I am currently using Network Manager on my Ubuntu, so preferrably I would like to configure a bridge using Network Manager. How can I do that?
Network bridge is a hardware equipment used to interconnect two or more Layer-2 network segments, so that network devices on different segments can talk to each other. A similar bridging concept is needed within a Linux host, when you want to interconnect multiple VMs or Ethernet interfaces within a host. That is one use case of a software Linux bridge.
There are several different ways to configure a Linux bridge. For example, in a headless server environment, you can use brctl to manually configure a bridge. In desktop environment, bridge support is available in Network Manager. Let’s examine how to configure a bridge with Network Manager.
Requirement
To avoid any issue, it is recommended that you have Network Manager 0.9.9 and higher, which is the case for Ubuntu 15.04 and later.
$ apt-cache show network-manager | grep Version
Version: 0.9.10.0-4ubuntu15.1 Version: 0.9.10.0-4ubuntu15
Create a Bridge
The easiest way to create a bridge with Network Manager is via nm-connection-editor . This GUI tool allows you to configure a bridge in easy-to-follow steps.
To start, invoke nm-connection-editor .
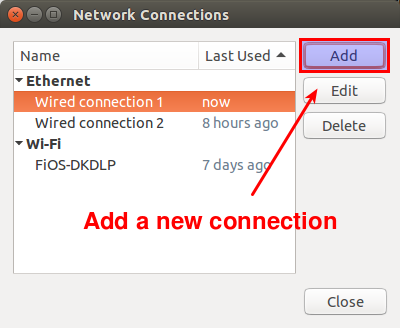
The editor window will show you a list of currently configured network connections. Click on Add button in the top right to create a bridge.
Next, choose Bridge as a connection type.

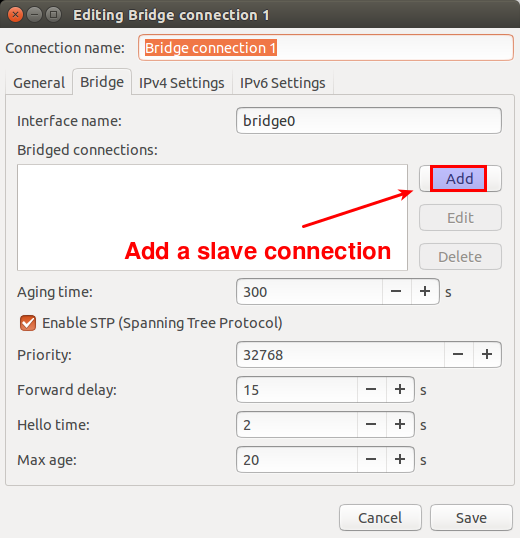
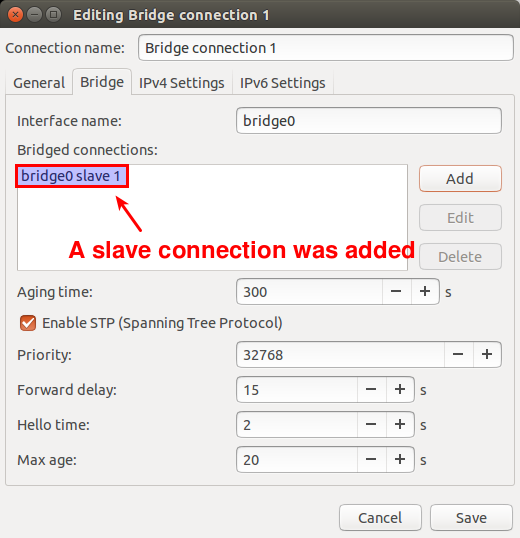
Now it’s time to configure a bridge, including its name and bridged connection(s). With no other bridges created, the default bridge interface will be named bridge0 .
Recall that the goal of creating a bridge is to share your Ethernet interface via the bridge. So you need to add the Ethernet interface to the bridge. This is achieved by adding a new bridged connection in the GUI. Click on Add button.
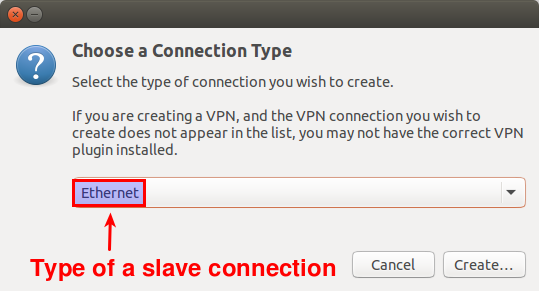
Choose Ethernet as a connection type.
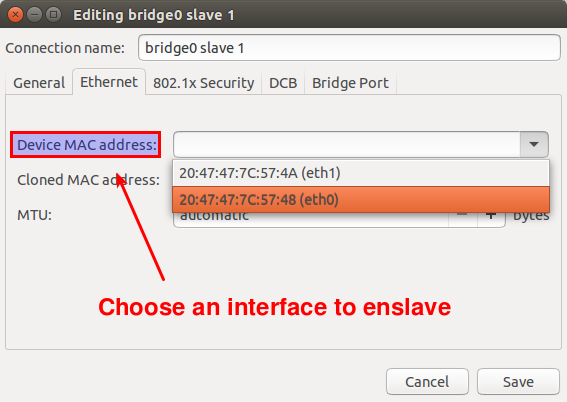
In Device MAC address field, choose the interface that you want to enslave into the bridge. In this example, assume that this interface is eth0 .
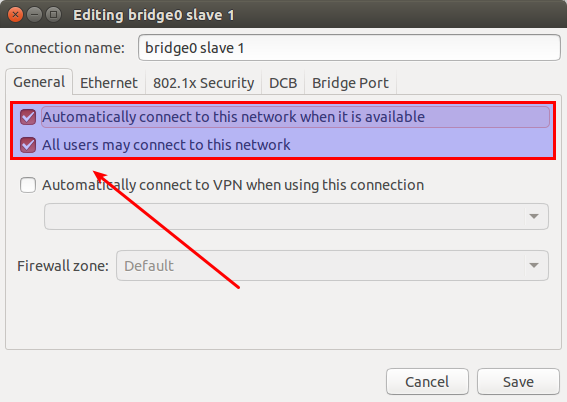
Click on General tab, and enable both checkboxes that say Automatically connect to this network when it is available and All users may connect to this network .
Now you will see a new slave connection created in the bridge.
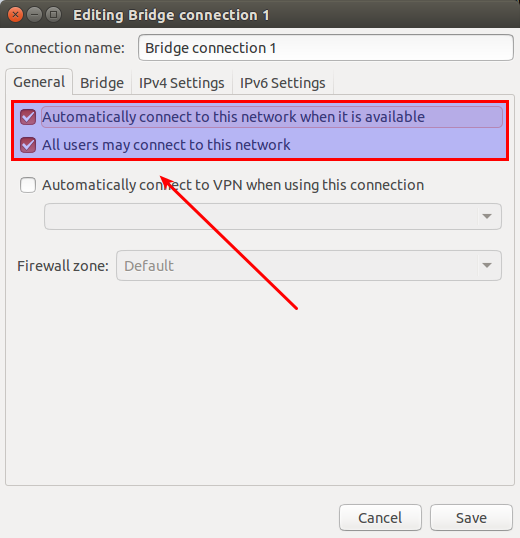
Click on General tab of the bridge, and make sure that top-most two checkboxes are enabled.
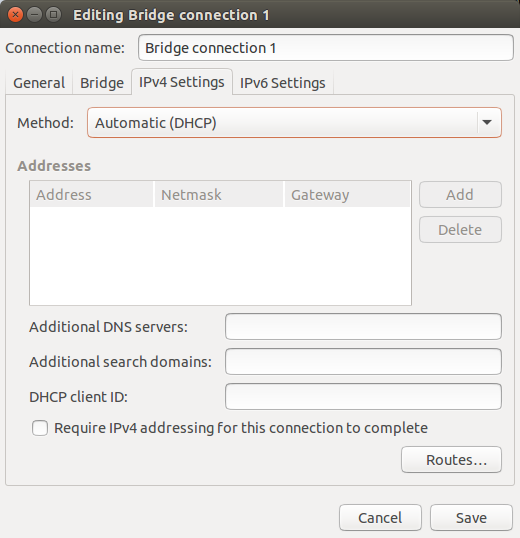
Go to IPv4 Settings tab, and configure either DHCP or static IP address for the bridge. Note that you should use the same IPv4 settings as the enslaved Ethernet interface eth0 . In this example, we assume that eth0 is configured via DHCP. Thus choose Automatic (DHCP) here. If eth0 is assigned a static IP address, you should assign the same IP address to the bridge.
Finally, save the bridge settings.
Now you will see an additional bridge connection created in Network Connections window. You no longer need a previously-configured wired connection for the enslaved interface eth0 . So go ahead and delete the original wired connection.
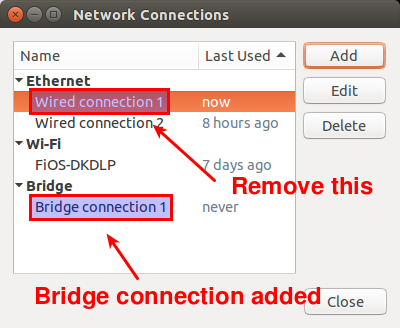
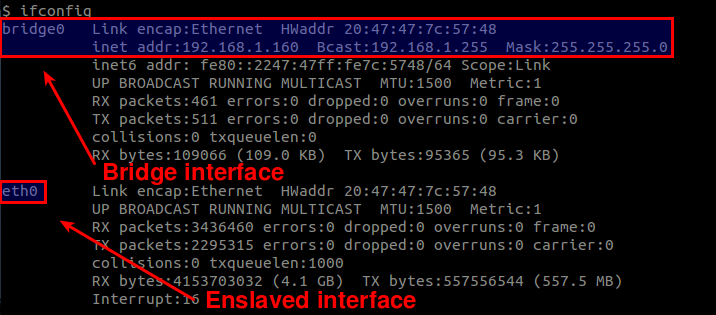
At this point, the bridge connection will automatically be activated. You will momentarily lose a connection, since the IP address assigned to eth0 is taken over by the bridge. Once an IP address is assigned to the bridge, you will be connected back to your Ethernet interface via the bridge. You can confirm that by checking Network settings.
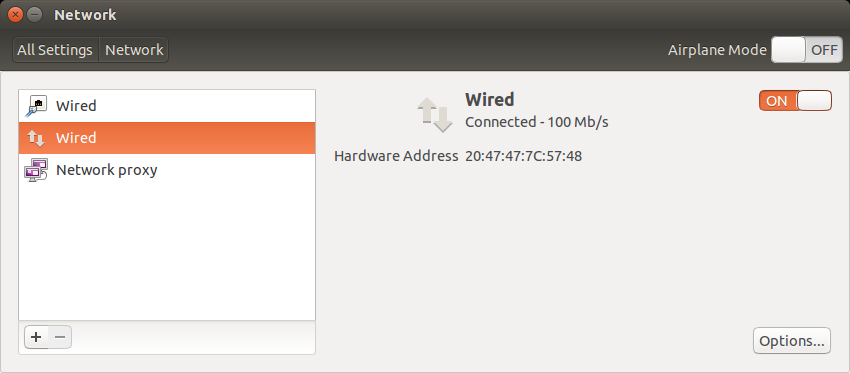
Also, check the list of available interfaces. As mentioned, the bridge interface must have taken over whatever IP address was possessed by your Ethernet interface.
That’s it, and now the bridge is ready to use!
Support Xmodulo
This website is made possible by minimal ads and your gracious donation via PayPal or credit card
Please note that this article is published by Xmodulo.com under a Creative Commons Attribution-ShareAlike 3.0 Unported License. If you would like to use the whole or any part of this article, you need to cite this web page at Xmodulo.com as the original source.