Sharing Files & Folders Between Linux, Mac and Windows
In today’s world of business computing, systems must be able to communicate and interact with one another. During its years of immaturity, Linux had a very difficult time with this. And it seemed every time Linux developers made strides in getting Linux to communicate with another system, the developers of said system would change something to break that connectivity.
Today is different. Today Linux offers plenty of means for connecting with other systems and the users of those other systems. From the plain obvious to the not-so-obvious, Linux can interact with both Mac and Windows so that business can move forward seamlessly.
In this article I am going to discuss ways in which you can have your Linux machine interacting with your co-workers’ Mac and PC machines to keep you and your company working without a hitch.
Office Documents
Believe it or not, one of the primary means of interaction between machines is through the office document. By office document, I refer to the documents created using word processing, spreadsheet, presentation, formula and database applications. In the land of Microsoft, there are Microsoft Office and OpenOffice. In the land of Mac there are both Microsoft Office, iWork, and OpenOffice. In the land of Linux there are OpenOffice, KOffice and GNOME Office. It is OpenOffice that I will focus on in this portion of the article.
Believe it or not, the interaction between OpenOffice and Microsoft Office has become nearly seamless. The primary tools of OpenOffice offer nearly 100 percent functionality between Microsoft Office. But out of the box, there is one step that you should take before creating, saving and sending that document to a Microsoft Office user. Change the default document type.
Although I would much rather work in the native file format of OpenOffice, the truth is the majority of business users are still using Microsoft Office. And that most likely will not change any time soon. And since MS Office doesn’t like to play well with others, it’s always best to help your tool play along with theirs. To do this you are going to change the default “Save” format for the word processor, spreadsheet, and presentation document type.
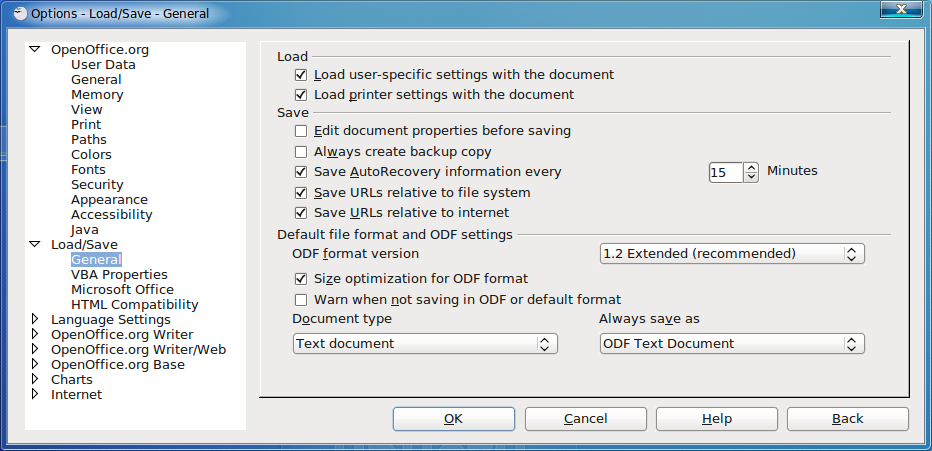
To do this open up any of the OpenOffice tools and click on Tools > Options and then click on Load/Save > General in the left pane navigation tree (see Figure 1). Select from the “Document Type” dropdown “Text document” and then from the “Always save as” dropdown “Microsoft Word 97/2000/XP.” Next select “Spreadsheet” from the “Document type” dropdown and then select “Microsoft Excel 97/2000/XP” from the “Always save as” dropdown. Finally, select “Presentation” from the “Document type” dropdown and “Microsoft PowerPoint 97/2000/XP” from the “Always save as” dropdown.
Now OpenOffice will, by default, save in the native Microsoft Office format. Your office documents will have no problem interacting with your co-workers’ Microsoft Office suite.
Sharing Folders on a Network
This is often thought of as one of the more difficult aspects of trying to use Linux on a mostly-Windows network. Just a few short years ago this was truth. But now things are very different and sharing files and folders with Linux is as simple (if not simpler) than it is on a Windows machine. I will demonstrate how to share out folders using the GNOME desktop.
Of course sharing folders between Linux, Windows and Mac requires the help of a very powerful tool called Samba. Since I want to illustrate just how easy the process of sharing folders I won’t go into the details of Samba – it can quickly become overwhelming. Instead I will show you how this is done from the perspective of an end- ser.
Naturally this can only work with the correct software installed. Samba is, obviously, a must. So let’s get all of the software installation out of the way. Click on System > Administration > Synaptic Package Manager and then do the following:
- Search for “samba” (no quotes).
- Mark the following packages for installation: samba, libpam-smbpass, nautilus-share (these should pick up all the dependencies you need for installation).
- Click Apply to install.
That’s it. You are now ready to set up file sharing.
Let’s take a look at the steps for file sharing with the GNOME desktop.
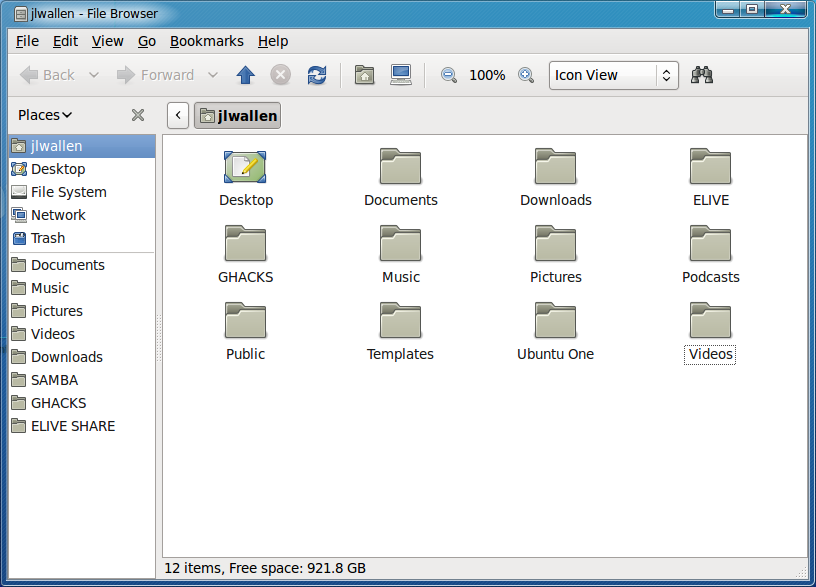
Step 1: Open up Nautilus.
Nautilus is the file manager for GNOME. Say you want to share out the folder ~/Documents. Click on Places > Home Folder and Nautilus will open in your ~/ directory (see Figure 2).
Step 2: Open up folder sharing settings.
Right click on the Documents folder. This will bring up a menu where you will find listed Sharing Options. Select that option from the menu.
Step 3: Configure sharing.
From the Folder Sharing window you will want to configure the following:
Share this folder: Enable this by clicking the checkbox.
Share name: Give the share a name.
Comment: Give the share a comment (this is optional, but useful in case there are similar share names on your network).
Allow others to create and delete files in this folder: Check this if you want to allow others to add and remove files in this share.
Guest access: If you want to allow everyone access to this share (even people without an account on your machine), check this box.
Once you have filled out all of the information click “Create Share.” When you click this button a warning window will appear informing you that Nautilus needs to add some permissions to the target folder. Allow this (or the share won’t work) by clicking “Add the permissions automatically.”
When you have successfully shared out this folder you will know because 1) The icon on the share will change (the new icon will have a small hand below the icon indicating it is a shared folder) and 2) It will (after a moment) appear in your Windows My Network Places window. If the share doesn’t show up there you can easily find it by entering \IP_ADDRESS_OF_SHARE in the Explorer address bar, at which point the share will certainly show up. If you would like these shares to show up in My Network Places (in Windows) and they don’t automatically, it means you might have to edit your /etc/samba/smb.conf file. But don’t worry; it’s so simple anyone can do it. Open up a terminal window and follow these steps:
- Enter the command sudo nano /etc/samba/smb.conf
- Search for the line workgroup = WORKGROUP
- Change the section of the above line (to the right of the “=” sign) to match the workgroup you are working with.
- Save and close the file by hitting x followed by hitting the y key (for “yes”).
- Restart Samba with the command sudo /etc/init.d/samba restart
That’s it. Now your Ubuntu machine will be seen in the Windows “My Network Places.”
To connect to this share on a Mac you would simply follow these steps:
- Open up Finder.
- Click k.
- Enter the IP address of your share and click Connect.
- In the new window select the share you want to connect to.
- Enter the authentication information and click OK.
You are now connected to that share. You can save this connection as a bookmark in Finder to make things easier.
But what about connecting to shared folders that reside on a Windows machine? This is equally as easy. In the GNOME desktop click Places > Connect to Server. When the new window opens up (see Figure 3) fill out the following:
- Service type: Windows Share
- Server: IP Address of machine with Share
- Share: Name of folder that is shared
Once you have that all filled out, click Connect and you should be connected to that shared folder. This, of course, will only work if said folder on the Windows machine is shared out onto the network.
Final Thoughts
Linux has come a long way from being an isolated island in a sea of Windows machines. Now the Linux box can interact with both Windows and Mac easily. Either by sharing documents with the right office suite settings, or by sharing out files and folders across a network, Linux plays well with others!
Network file sharing between Linux and OS X
I want to share a drive/folder over the internet from my Debian machine back home, such that I can mount it on my Macbook when I am on the move. Basically I want to store my music at home and just access it over the network, instead of having two separate libraries, one on each computer. I will not go into why I would prefer a shared drive as opposed to a streaming application (that would be another question). What I want to know is, what do you think would be the best and/or easiest way to do this? NFS? Samba? Are there security risks involved, since I want to share over a public network as opposed to sharing over LAN, and if so, what are they? [Update] The answers indicated I should use sshfs, since it is easy to set up and uses an already established ssh connection. I have tried this, but I am having bad latency problems on file access. In other words, the transfer speed is ok, but applications have to wait until the file is fully downloaded to access it. This is very inconvenient behavior: if I try and play music off the mounted drive I will have about 20 seconds of pause before every song. Now, I have tested the same setup on a linux machine on the same network as the OS X machine. The latency problem is almost non-existent, that is I cannot distinguish it from regular throughput bottle necking. This makes me think it is an OS X specific issue. Which brings me back to my original question: what is a good way to mount a remote folder that’s on a linux server under an OS X client?
Samba and NFS exposed to the internet both seem a bit unwise. A secure protocol is probably best if you’re hosting the files yourself.
You could potentially do nfs or samba sharing across an SSH tunnel, but sftp protocol is sufficiently integrated in most systems that it is probably easier than tunneling and then using a different protocol.
A lot of Linux/Mac filemanagers will often include an option to connect to an SSH server. I don’t even know the name of the filemanager that was installed with Linux Mint (Debian), but it includes the option very easy to access.