- Networking in Linux
- How to configure Network on Ubuntu?
- List all Network Interfaces
- Temporary IP Address setting using ip command
- Deletion of an IP Address using ip command
- Set the interface link up or down using ip command
- Configure a default gateway using ip command
- Flush IP settings from an interface using ip command
- Setting Static IP, DNS and Gateway Address in Ubuntu
- Static host names setting
- How to configure Network on CentOS or Red Hat Linux?
- List all the interfaces
- Configuring Static IP
- Static Hostname setting
- Temporary IP Address setting using ip command
- Basic Network utilities in Linux
- Did you find this article valuable?
Networking in Linux
Networking is an essential part as we start learning about any operating system.
Networks can be as small as two computers connected at your home and as large as in a large company or connected systems worldwide known as Internet.
Linux operating system has a very strong set of networking instruments to provide and manage routing, bridging, virtual networks and monitoring.
In this article I am going to demonstrate the step by step procedure to configure Network interfaces, DNS and gateway settings on Linux operating systems.
How to configure Network on Ubuntu?
Netplan is the tool to configure Network interfaces on Ubuntu systems starting from Ubuntu 17.10. Netplan is based on YAML based configurations. Earlier configuration file /etc/network/interfaces used to use to configure network interfaces in Ubuntu.

Here I am using Ubuntu 18.04 LTS server.
root@lco-linux-master:~# cat /etc/os-release 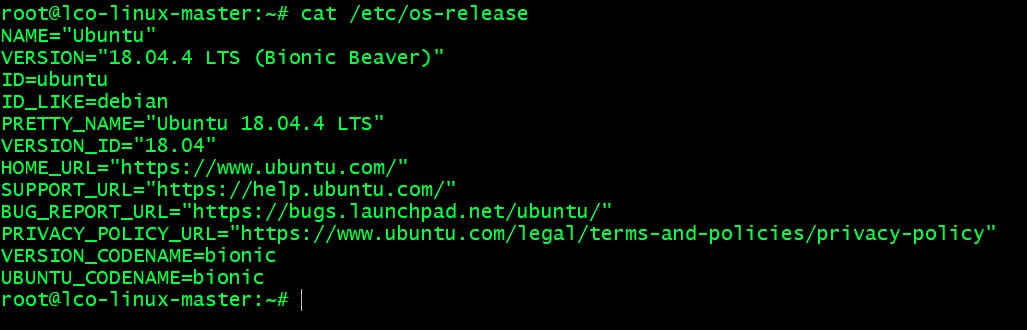
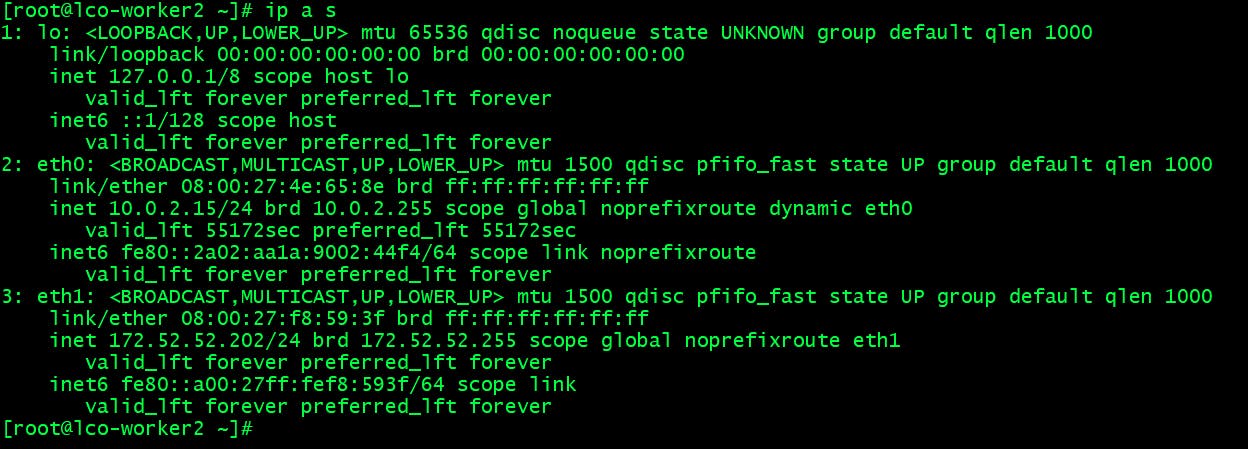
List all Network Interfaces
ifconfig command only shows enabled interfaces whereas ip command shows all the interfaces whether enabled or disabled.
root@lco-linux-master:~# ip a s 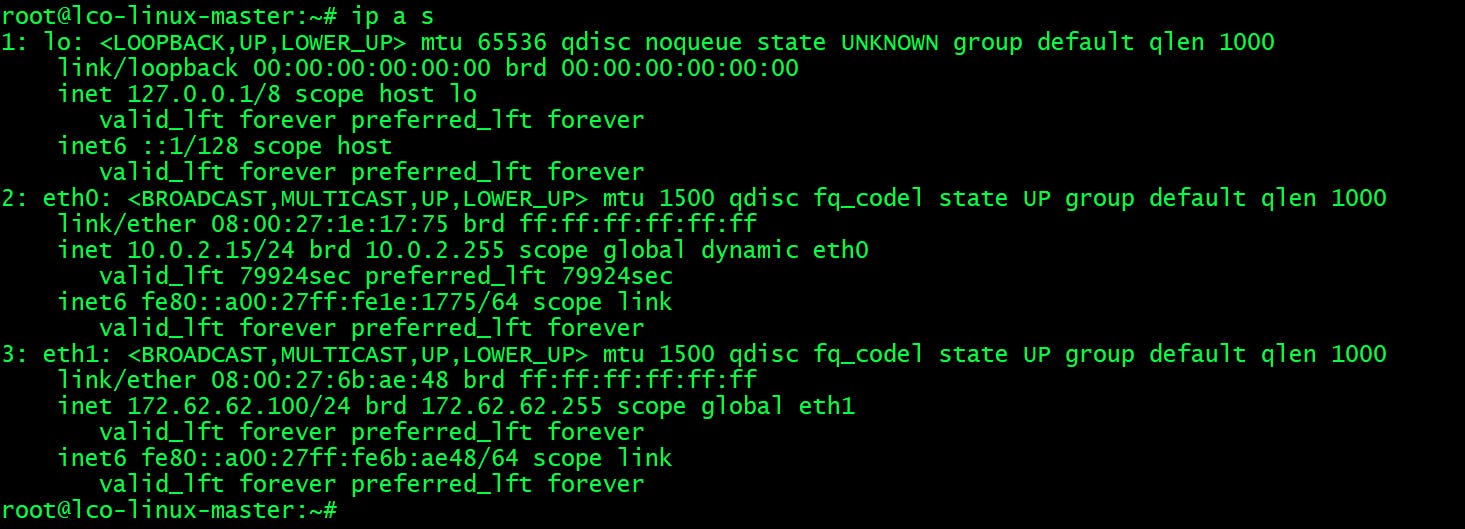
root@lco-linux-master:~# ifconfig -a 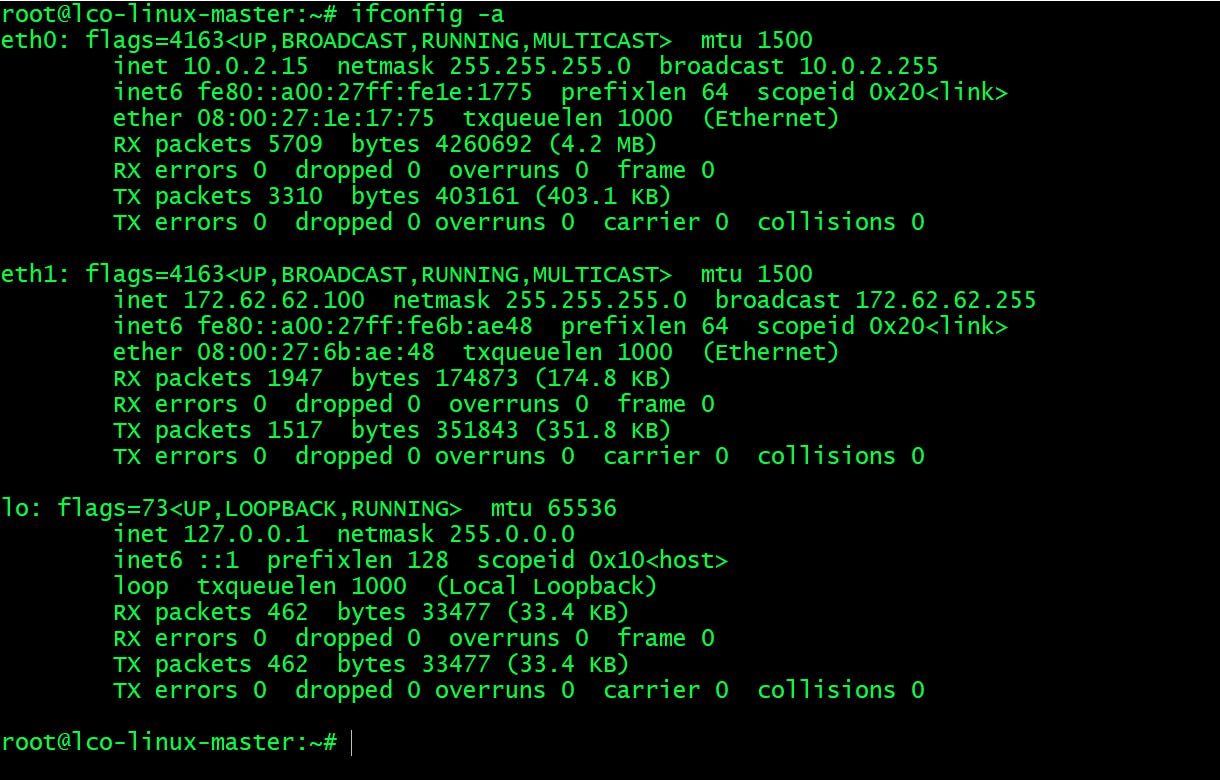
Temporary IP Address setting using ip command
We can set temporary IP address to any interface using ip command. The changes made with ip command will be immediately effective, however they will not be persistent and will be lost after a reboot operation.
root@lco-linux-master:~# ip a s | grep eth1 root@lco-linux-master:~# ip addr add 172.62.62.200/24 dev eth1 root@lco-linux-master:~# ip a s | grep eth1 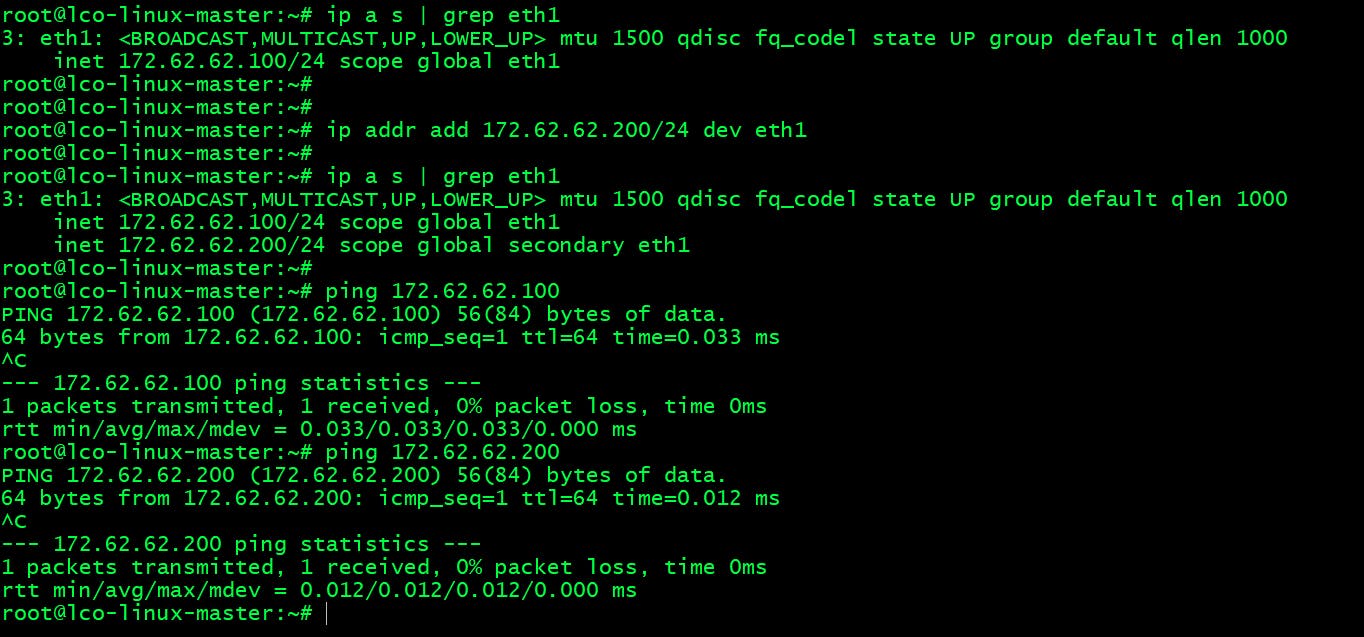
Deletion of an IP Address using ip command
You can remove or delete ip address assignment from an interface using ip command.
root@lco-linux-master:~# ip a s | grep eth1 root@lco-linux-master:~# ip addr del 172.62.62.200/24 dev eth1 root@lco-linux-master:~# ip a s | grep eth1 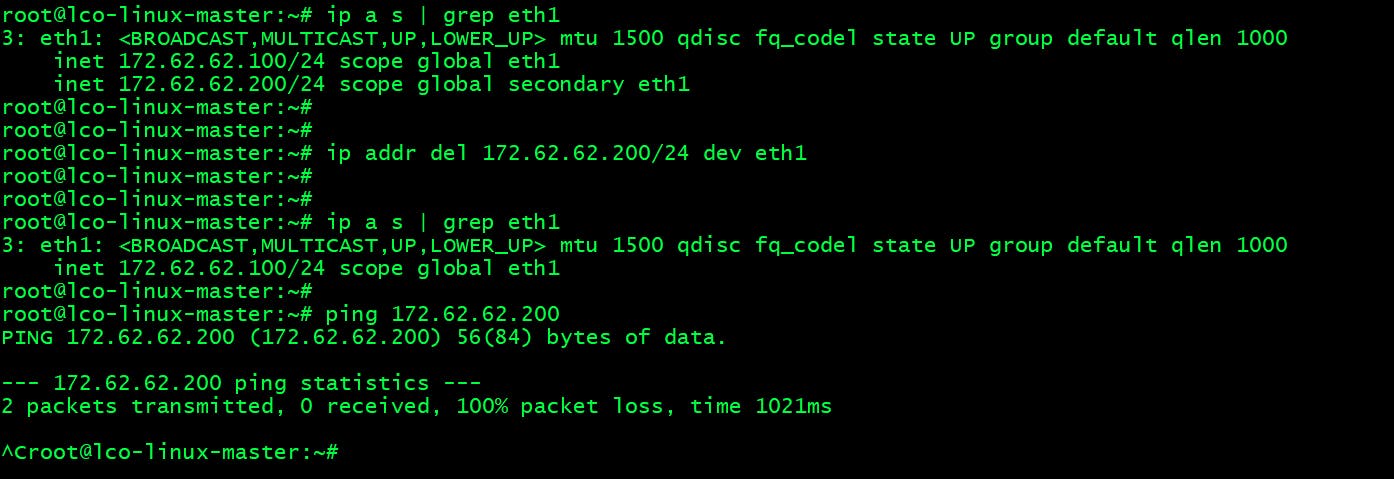
Set the interface link up or down using ip command
The ip command can be used to set the interface link up or down as well.
root@lco-linux-master:~# ip a s | grep eth1 root@lco-linux-master:~# ip link set dev eth1 down root@lco-linux-master:~# ip a s | grep eth1 root@lco-linux-master:~# ip link set dev eth1 up root@lco-linux-master:~# ip a s | grep eth1 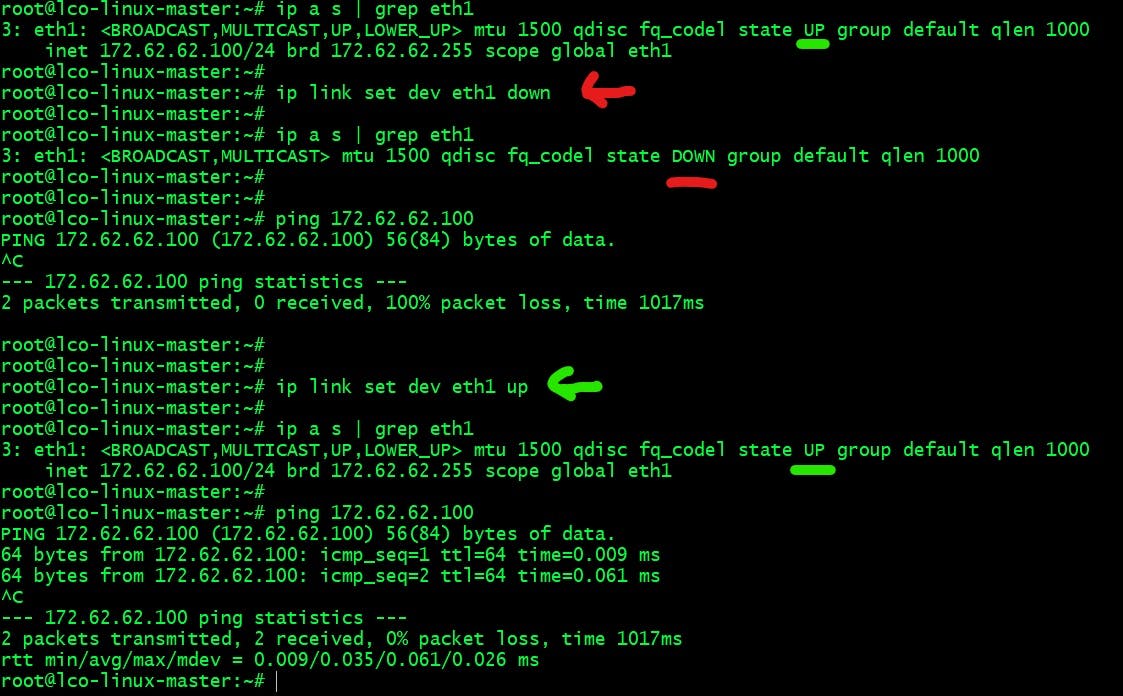
Configure a default gateway using ip command
We can configure/modify the default gateway in order to to match our network requirements.
To verify your default gateway configuration run the following command:
root@lco-linux-master:~# ip route show Run the following commands to add and delete default gateway address.
root@lco-linux-master:~# ip route show root@lco-linux-master:~# ip route add default via 172.62.62.1 root@lco-linux-master:~# ip route show root@lco-linux-master:~# ip route del default via 172.62.62.1 root@lco-linux-master:~# ip route show 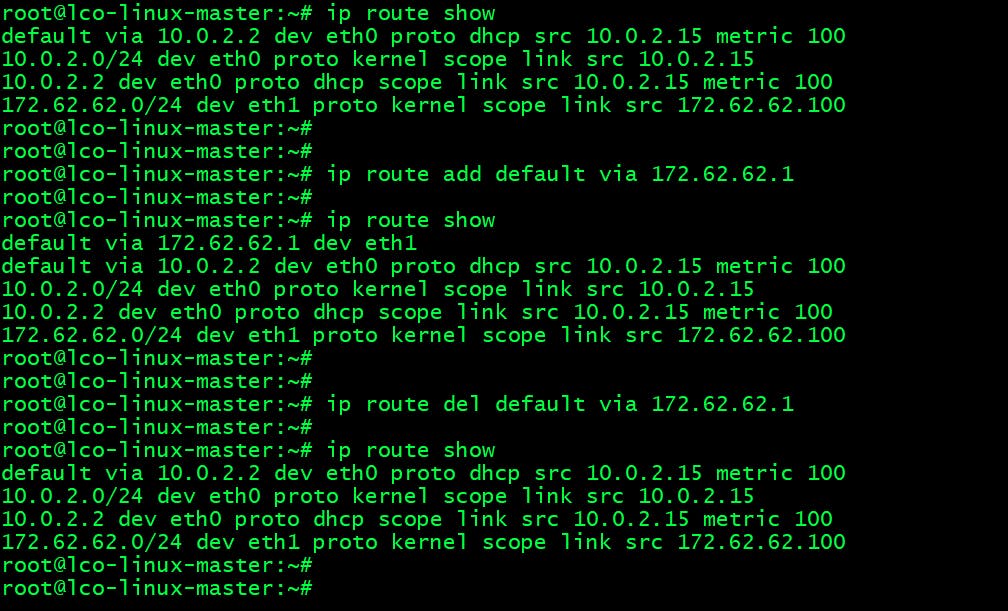
Flush IP settings from an interface using ip command
When you no longer need the interface configuration you can purge all configuration from an interface using following command.
root@lco-linux-master:~# ip addr flush eth1 
Setting Static IP, DNS and Gateway Address in Ubuntu
As we know network interfaces in Ubuntu 18.04 are configured via NetPlan using YAML configuration files stored under /etc/netplan directory with a .yaml extension.
The default file for interfaces on a new Ubuntu system deployed over VirtualBox using Vagrant are ->
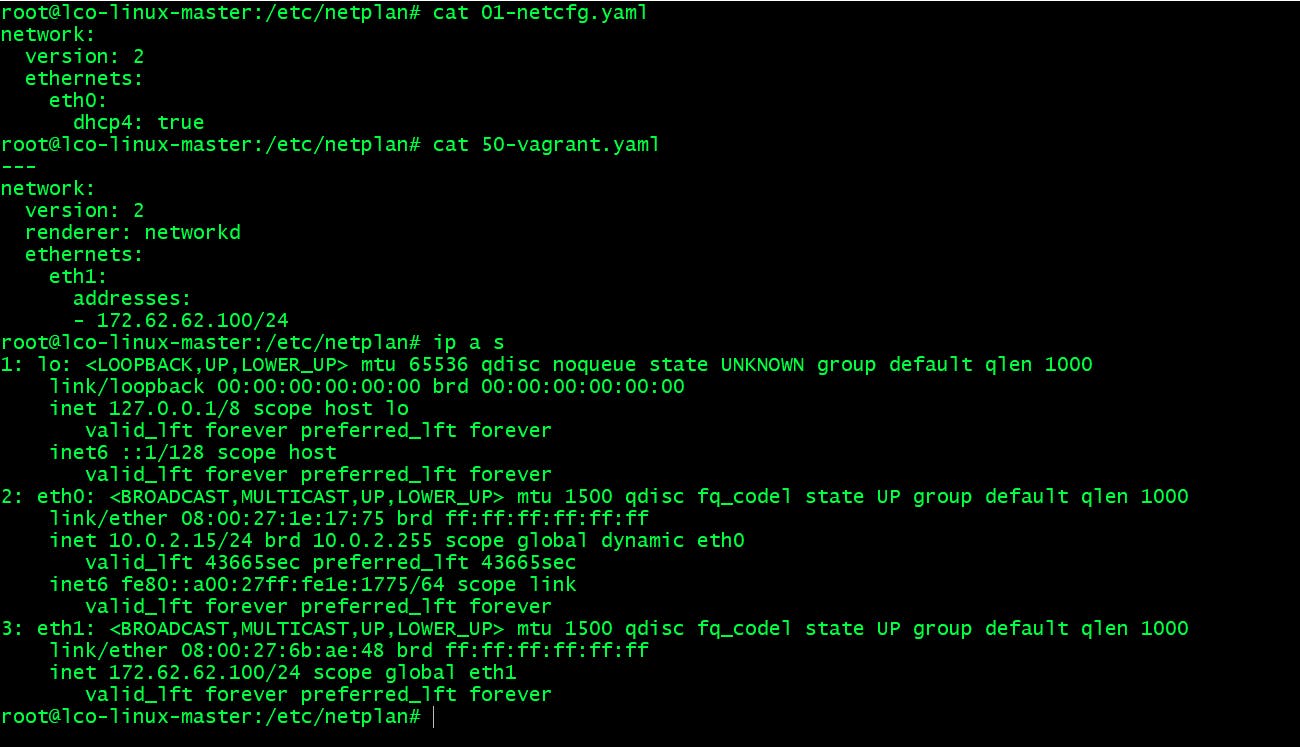
Above we can see we have two interfaces eth0 and eth1 configured in two separate files.
I will show here how to change/configure the static IP address for an interface.
First let us understand the netplan config file.
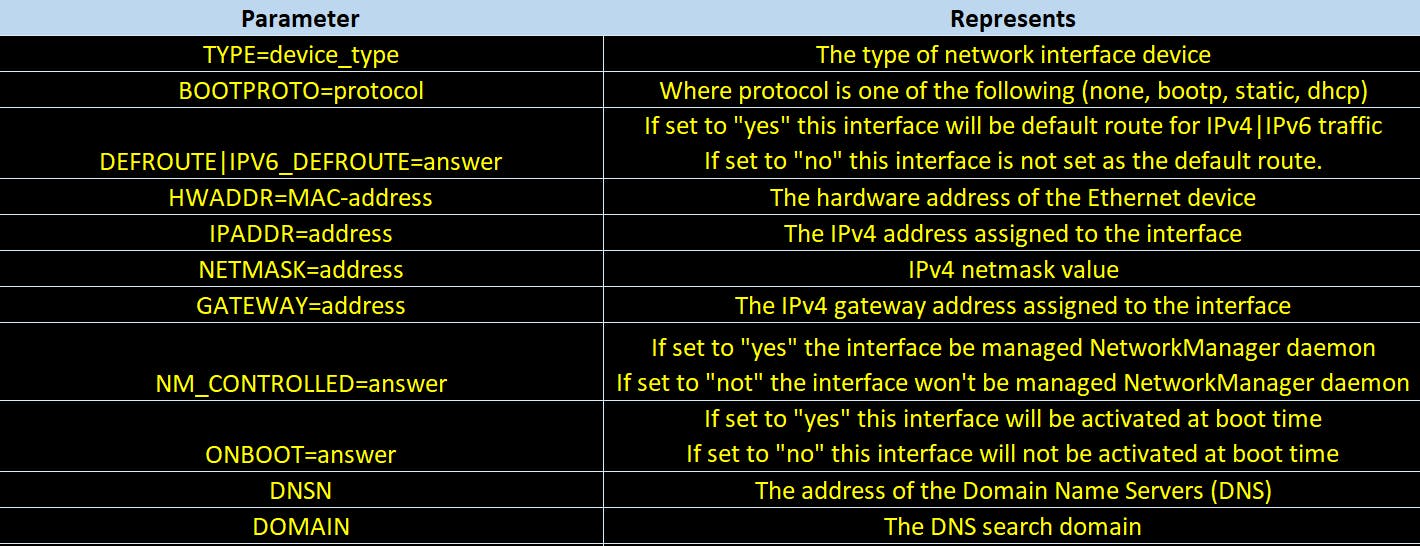
--- network: version: 2 renderer: networkd ethernets: eth1: addresses: - 172.62.62.100/24 nameservers: search: [example.com] addresses: [ "8.8.8.8", "8.8.4.4", "127.0.0.53" ] Each of the field explained in below table:

You can only have one default gateway per system (not per interface). Your current gateway is set to 10.0.2.2 (probably the Vagrant master) over eth0 (Vagrant’s management interface)

Let us now change the IP address for this interface to some other address and apply the changes.
Open and edit the file /etc/netplan/50-vagrant.yaml and update the addresses field with new IP address. (Earlier it was set to 172.62.62.100)
--- network: version: 2 renderer: networkd ethernets: eth1: addresses: - 172.62.62.111/24 nameservers: search: [example.com] addresses: [ "8.8.8.8", "8.8.4.4", "127.0.0.53" ] Save and close the file and apply the netplan changes.
root@lco-linux-master:~# netplan apply 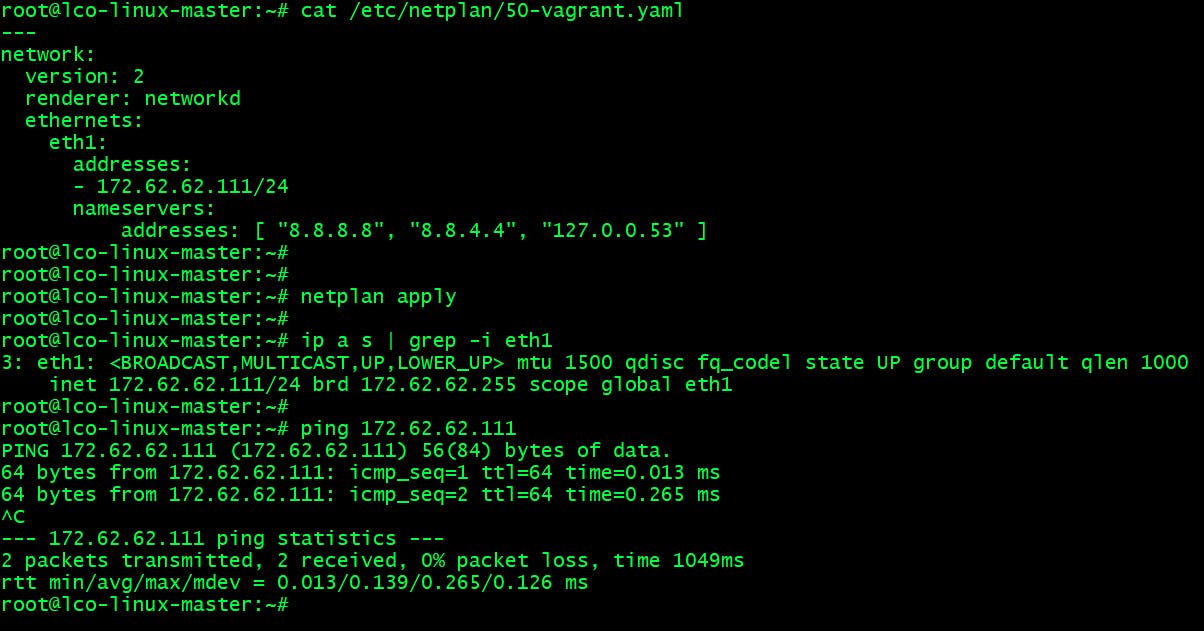
- Similarly you can configure multiple IP addresses for an interface, update gateway address, DNS addresses etc. in netplan config files.
- To set dhcp IP address you should add dhcp4: true under interface configuration.
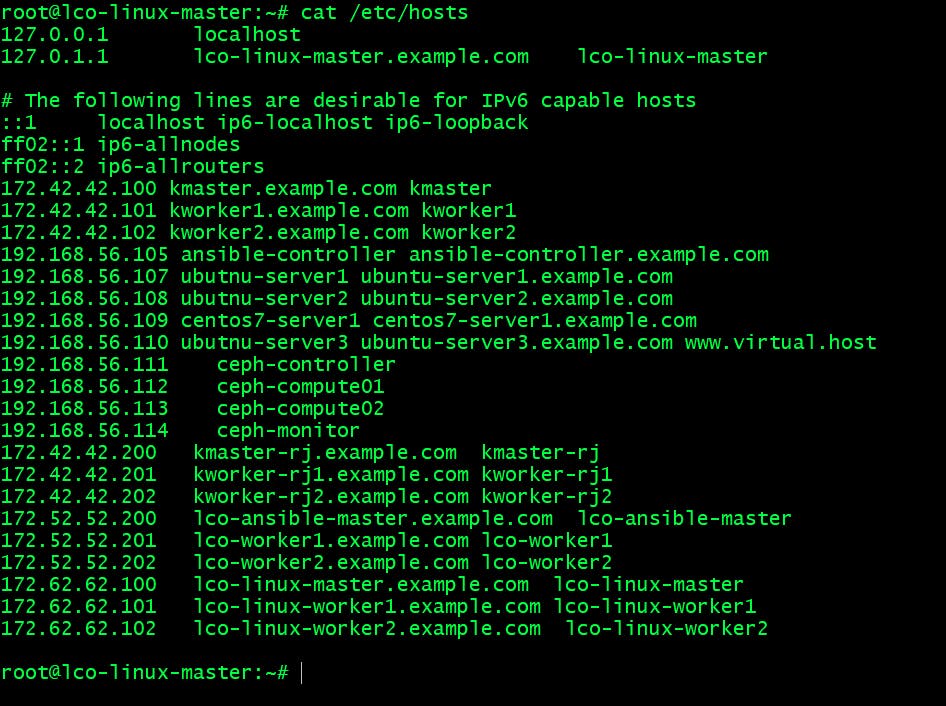
Static host names setting
It acts as a local DNS server. Static hostnames can be locally defined in /etc/hosts file. They provide hostname-to-IP mappings. These entries gets precedence over DNS by default while host lookups.
How to configure Network on CentOS or Red Hat Linux?
In this section I will show you how to configure network settings on CentOS 7 system using command line.
List all the interfaces
Run following commands to list down all the interfaces available on server.
[root@lco-worker2 ~]# ifconfig -a [root@lco-worker2 ~]# ip a s [root@lco-worker2 ~]# nmcli d 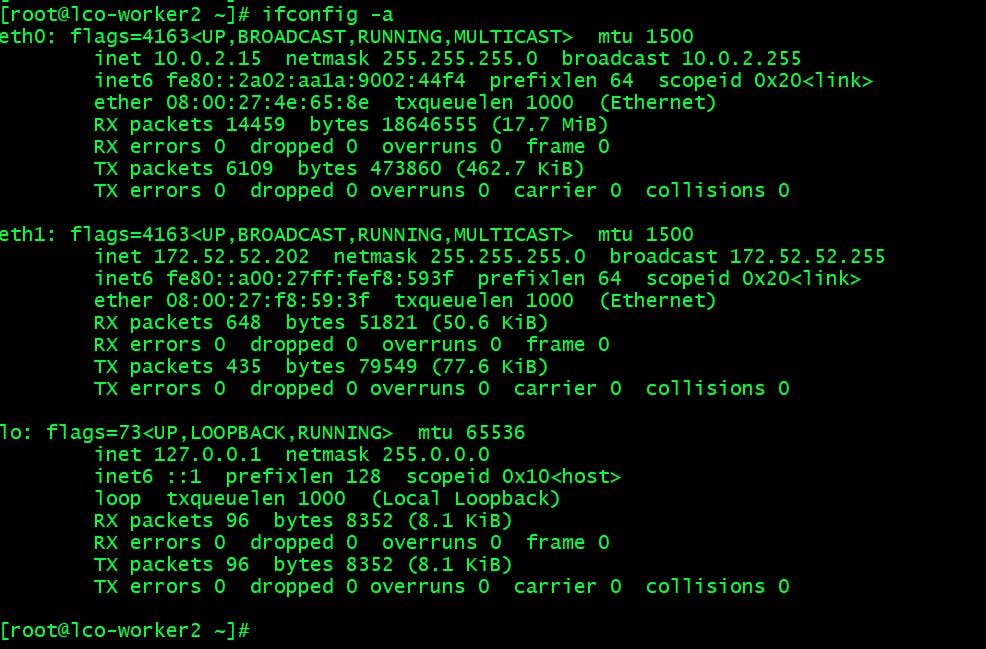

Configuring Static IP
In order to configure static IP for an interface you need to open and edit configuration file for your network interface.
For example here we will configure static IP address for eth1 interface. In Red Hat based systems the interface configuration files can be found under /etc/sysconfig/network-scripts directory. Those files starts with ifcfg prefix.
[root@lco-worker2 ~]# cd /etc/sysconfig/network-scripts [root@lco-worker2 network-scripts]# ls -l ifcfg-* 
Now open and start editing the eth1 interface file.
[root@lco-worker2 network-scripts]# cat ifcfg-eth1 TYPE=Ethernet NM_CONTROLLED=yes BOOTPROTO=none ONBOOT=yes IPADDR=172.52.52.202 NETMASK=255.255.255.0 DEVICE=eth1 PEERDNS=no DEFROUTE=yes HWADDR=08:00:27:f8:59:3f DNS1=127.0.0.53 DNS2=8.8.8.8 DNS3=4.2.2.2 DOMAIN=example.com We will change the current ip address to 172.52.52.203.
Before doing that let’s first understand the parameters part of this file.
Now let us change the IP address to 172.52.52.203 and save and exit the file.
[root@lco-worker2 network-scripts]# cat ifcfg-eth1 TYPE=Ethernet NM_CONTROLLED=yes BOOTPROTO=none ONBOOT=yes IPADDR=172.52.52.203 NETMASK=255.255.255.0 DEVICE=eth1 PEERDNS=no DEFROUTE=yes HWADDR=08:00:27:f8:59:3f DNS1=127.0.0.53 DNS2=8.8.8.8 DNS3=4.2.2.2 DOMAIN=example.com Now run following commands to make the IP to be effective.
[root@lco-worker2 network-scripts]# ifdown eth1 [root@lco-worker2 network-scripts]# ip a s | grep eth1 [root@lco-worker2 network-scripts]# ifup eth1 [root@lco-worker2 network-scripts]# ip a s | grep eth1 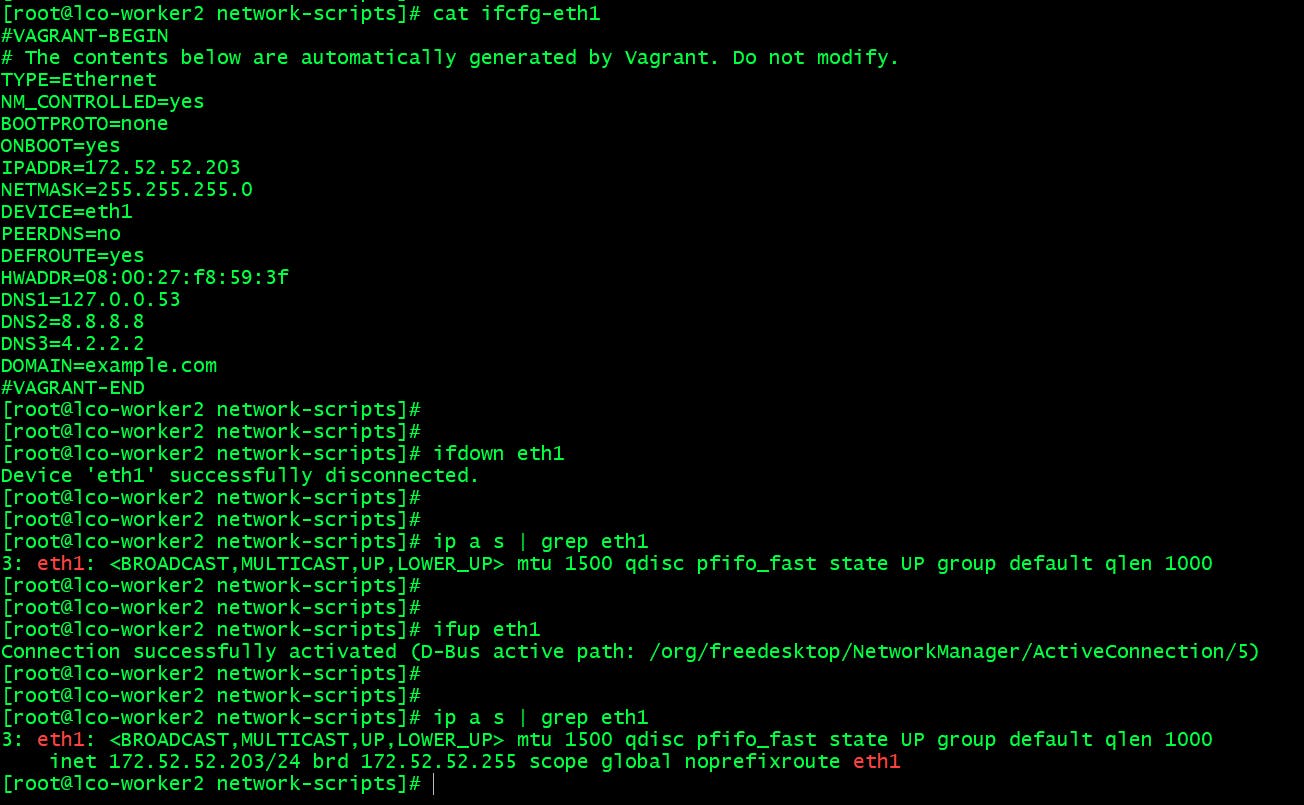
DNS server can be configured in /etc/resolv.conf file as well.
[root@lco-worker2 network-scripts]# cat /etc/resolv.conf # Generated by NetworkManager search example.com nameserver 127.0.0.53 nameserver 8.8.8.8 nameserver 4.2.2.2 Static Hostname setting
The same way as Ubuntu static hostnames can be set in /etc/hosts file which acts as a DNS resolver for the system and gets preference over it.
[root@lco-worker2 ~]# cat /etc/hosts 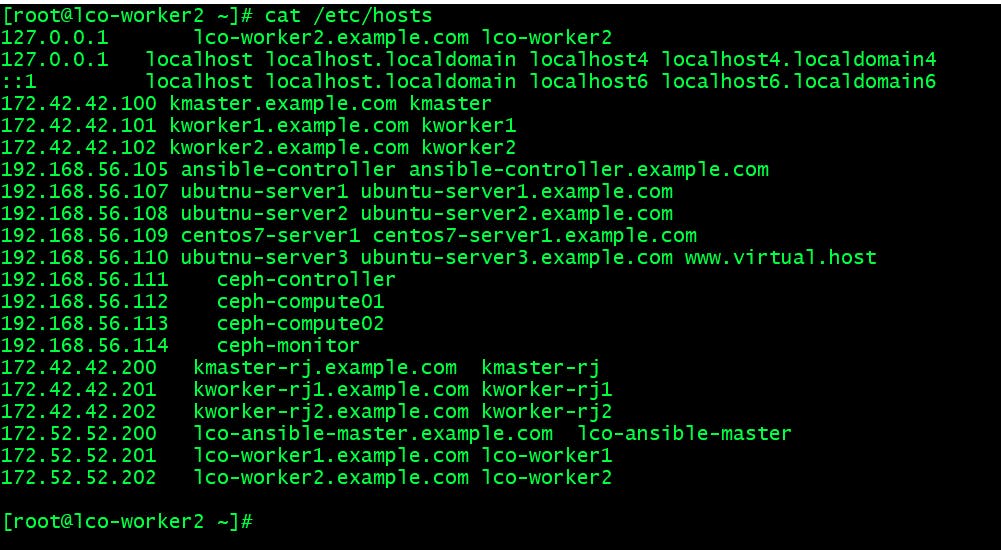
Static hostname on the current host can be set via hostnamectl command as well.
[root@lco-worker2 ~]# hostnamectl set-hostname lco-worker2.example.com [root@lco-worker2 ~]# hostnamectl 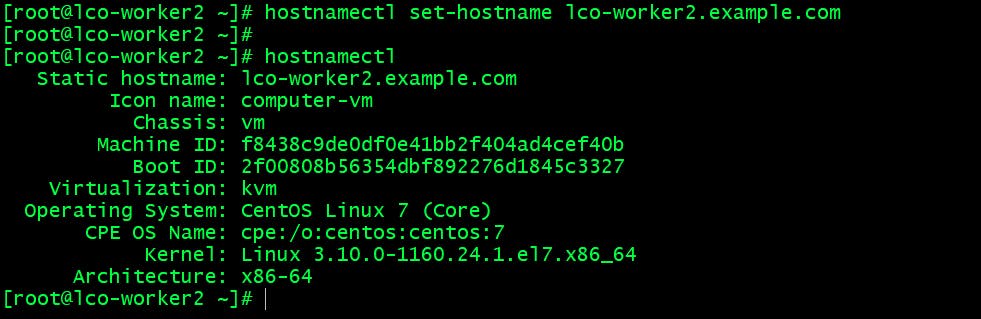
Temporary IP Address setting using ip command
Temporary IP address assignments will remain same as we did in Ubuntu server above.
Basic Network utilities in Linux
There are many network tools to gather information about different systems on your network, accessing and communicating with them.
The ping command is used to check if a remote system is in up state or not.
[root@lco-worker2 ~]# ping 172.62.62.100 [root@lco-worker2 ~]# ping lco-linux-master.example.com 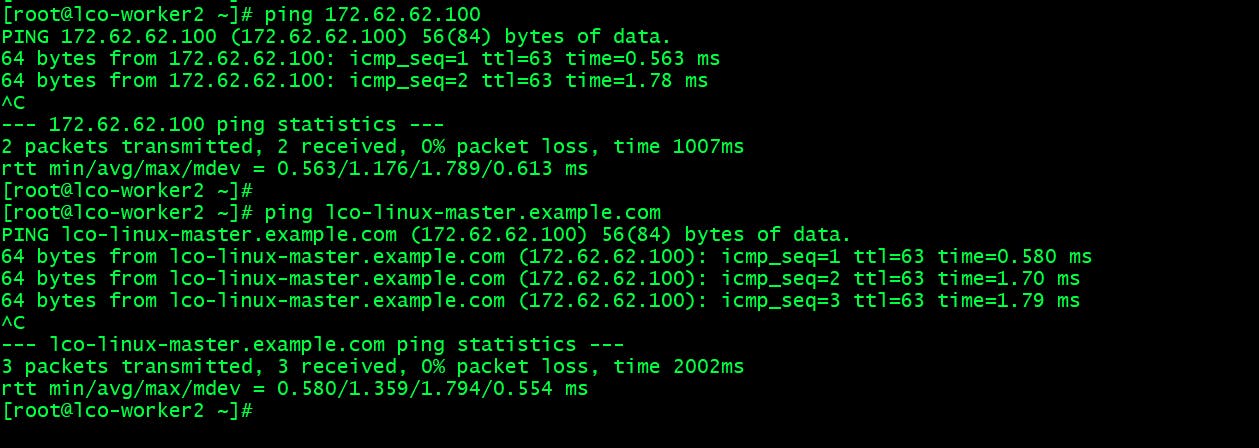
A ping command can fail if ping access is denied by a network firewall.
It’s a DNS lookup utility. This command is used to obtain network address information (IP, DNS and mail server) about a remote system.
[root@lco-worker2 ~]# host google.com 
This utility when used displays active TCP/UDP connections, ports on which the computer is listening, ethernet statistics, the IP routing table, IPv4/IPv6 statistics etc.
#Display Ethernet statistics and the statistics for all protocols [root@lco-worker2 ~]# netstat -e -s #Display statistics for only the TCP and UDP protocols [root@lco-worker2 ~]# netstat -n -o #Display all tcp/udp connection, listening port information with their IP addresses [root@lco-worker2 ~]# netstat -tulpn 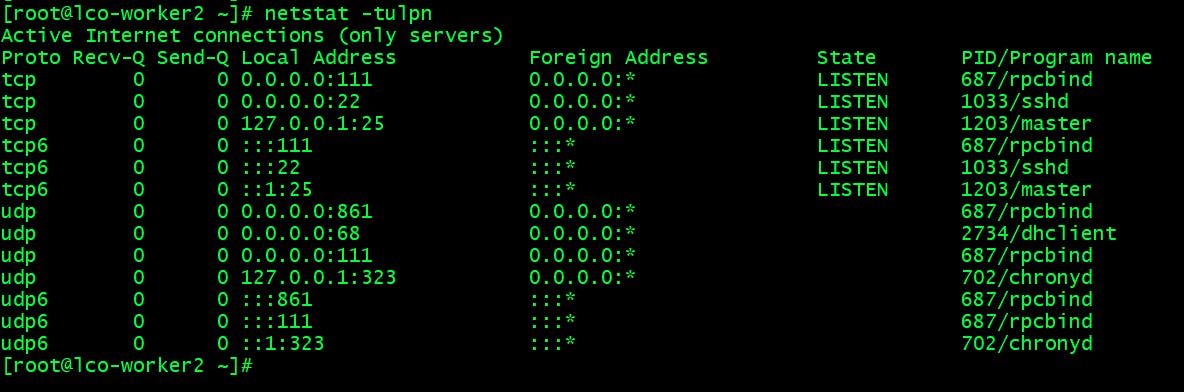
Covering all the network utilities is out of scope of this tutorial but there are many which can be used to monitor, capture and analyze inbound and outbound network traffic.
That’s all for this detailed guide covering all aspects of Network configuration on Linux systems.
Hope you like the article. Stay Tuned for more.
Did you find this article valuable?
Support Learn Code Online by becoming a sponsor. Any amount is appreciated!