- Windows Server 2016 as an NFS server for Linux clients
- A bit of background first…
- Installing NFS Server on Windows Server 2016
- Creating an NFS share (export)
- Mounting the NFS share on the client-side
- Configuring fstab to mount our NFS share on system boot
- Как подключить NFS каталог в Windows 10
- Установка клиента NFS (службы для NFS)
- Как разрешить запись в NFS каталог анонимному пользователю
- Как подключить NFS каталог в Windows 10
Windows Server 2016 as an NFS server for Linux clients
In this post I will explain how you can configure an NFS Server on a Windows 2016 Server and connect/mount the NFS exports on Linux clients, in my case I wanted to run a Linux virtual machine whist ensuring that the actual data resides on physical disks on my host machine ensuring that the data is automatically part of my nightly backup routine and did not need to run separate backup scripts on the VM(s).
A bit of background first…
In my home network I have a single (in an attempt to be eco-friendly) Intel i7 server running Windows Server 2016 Standard edition, I use this server for hosting my family media, files and various database engines and ActiveDirectory for local development (I’m a software engineer by trade!) in addition to several Hyper-V virtual machines that do various tasks, all of the virtual machines are running a derivative of Linux.
I currently have the following virtual machines setup and running on it (under Hyper-V):
- A Web Server and reverse proxy running Ubuntu Server 16.04 LTS – Hosting Gogs, Minio and various Nginx reverse proxy configurations for sites, services and API’s that sit on other VM’s in my network.
- An OpenVPN server running CentOS 7 – Providing secure VPN tunnel access for me when away from home.
- A Jenkins server running Ubuntu Server 16.04 LTS– Used for automated code testing and continuous integration.
- A MineCraft server running Ubuntu Server 16.04 LTS – Used by my daughter and friend to play online together.
In the past I used to run VMWare ESXi and hosted everything in their own virtual machine for better isolation and performance although since then, I had tested and was extremely happy with the performance of running virtual machines on top of Hyper-V and Windows Server so when I re-built my home server several months ago I decided to go down that route instead.
Anyway, enough of all that, let me explain why I have such a need for this kind of set-up…
My home server has 1x SDD (500GB for the host operating system and local applications) in addition to 2x WD Red 4TB hard drives in a hardware RAID1 configuration, I periodically backup this array over my LAN to a Buffalo NAS device.
My plan is to install a new VM running Ubuntu Server 16.04 that will host an instance of NextCloud, this will provide me, my family and friends with a free alternative to DropBox with masses of space in addition to all the other cool things that NextCloud offer such as encrypted video calls and the like.
By setting up an NFS server on the host operating system, instead of provisioning this Linux VM with a massive virtual hard disk (and taking drive space away from the host OS) I have instead provisioned it with a single 20GB virtual hard drive and will then use NFS shares on my Windows Server to host the files on the physical disk and thus be automatically part of my backup routine and alleviate the need for using rsync or rsnapshot etc. on the VM and transferring it at regular intervals.
Installing NFS Server on Windows Server 2016
First up, we need to login to our Windows Server and open up the Server Management tool, once open, click on the large text link labelled “Add Roles and Features” as shown here:
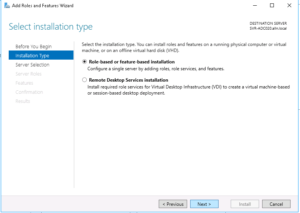
Once you have clicked on the “Add Roles and Features” link you should then be presented with this wizard:
Accept the default “Role-based or feature based installation” and then click Next…
On the next screen you’ll be asked to choose the server that you want to add the role or feature to, select your server from the list that appears (you’ll probably only have one in the list anyway!) and then click Next…
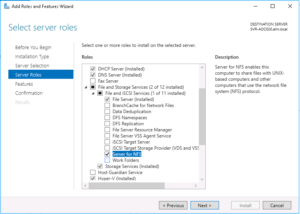
You will now be presented with a screen titled “Select server roles“, expand the following sections, then check the “Server for NFS” option as shown in the screenshot below:
Once checked, click on the “Next” button…
The next screen will just ask you to “Select features“, you can simply click “Next“!
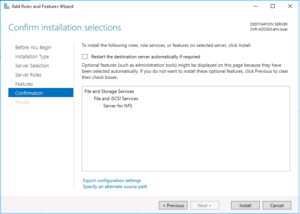
Finally, you’ll be shown a screen asking you to confirm the installation items, we now choose “Install“, this screen and the selection of features and roles to add should look as follows:
Great! We now have an NFS server running on our Windows 2016 Server!
Creating an NFS share (export)
Now that we have the NFS server installed we can now go and share (or “export” as NFS likes to call it) a directory, as per my intro notes to this blog post, I plan to add this to my data RAID array.
So first up, lets go and create a new directory on our data disk (in my case this is my D: drive), I’ve decided to call the directory “NFS” and then, inside that folder we’ll create another directory called “VSVR-WEB040_data” – This folder will be explicitly shared with my VM (that is named ‘VSVR-WEB040‘, the “_data” portion I’ve just named as that is what I will mount the share locally on the VM as eg. /data).
Now that you have an NFS server installed you can share/export numerous directories to individual or multiple VM’s or even other physical servers in your network.
The result of setting up this directory structure is as follows:-
Next up, we’ll right-click on the newly created folder and choose “Properties” – This will enable us to “Share” it as well as lock down the access to only a specific IP address (that being my NextCloud VM)…
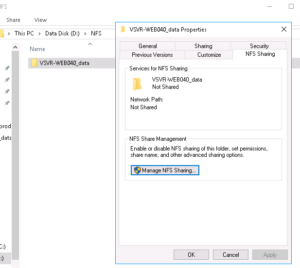
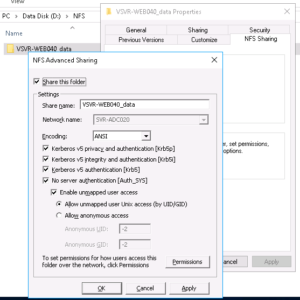
From the Properties window, select the “NFS Sharing” tab and then click on the button named “Manage NFS Sharing” this should then display the following window:
Ensure that the above screenshot matches your folder (eg. select all the checkboxes as per the above)
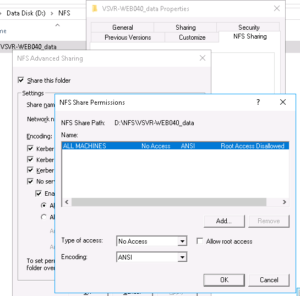
Next we’ll configure the permissions for the share, clicking on the “Permissions” button in the above screenshot will then display the following window:
As you can see from the above screenshot, the permissions for this share are very restrictive by default, this is basically saying that for ALL MACHINES trying to access this share they WILL NOT be granted any access.
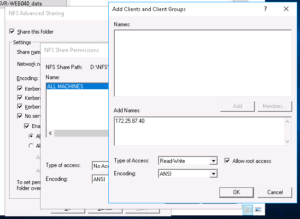
We should leave the defaults as is as we will instead create another permission only granting our specific VM access, to do this click on the “Add” button, the following screen should then appear:
I’ve entered my virtual server IP address in to the “Add names” field already (172.25.87.40), you’ll then need to change the “Type of access” drop-down box to “Read/Write” and check the “Allow root access” checkbox.
Once completed, click the “OK” button!
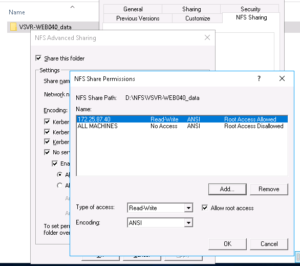
That’s great, our Permissions form should now look as follows:-
Perfect! – We’re all done on the NFS server side configuration now!
Mounting the NFS share on the client-side
We can now mount the NFS share on our Ubuntu Server (the virtual machine), first we need to install the NFS tools, so we’ll login to our server (I’m using root but you should really use a user with sudo rights!)…
sudo apt-get install -y nfs-common
So before we configure fstab to automatically mount our NFS share at system boot, we’ll first test using the command line to make sure everything works as expected…
Before we can mount the NFS share we must first create a mount point, we will do this like so:
Now that we have created the mount point, we can mount the remote file-system as follows:
sudo mount -t nfs 172.25.87.20:/VSVR-WEB040_data /data
Once mounted you should be able to run the following commands, these commands will essentially create a file on our server and a text file with some content…
echo "This is a test file" > /data/test.txt
We can now jump back over to our Windows server and check our NFS server directory, we should see a file named test.txt and when we open it in Notepad, the contents should appear as follows:-
All going well, that has hopefully worked a charm for you and we can now move on to ensuring that our VM automatically mounts the NFS share at boot.
If for whatever reason wish to un-mount the share you can do it like so:
Configuring fstab to mount our NFS share on system boot
Using a text editor on the Linux VM we will open up the /etc/fstab file and add the following line to the bottom of the file:
172.25.87.20:/VSVR-WEB040_data /data nfs auto,nofail,noatime,nolock,intr,tcp,actimeo=1800 0 0
You’ll obviously need to replace your server’s IP address with your own 😉
The result should look something like the below:
Once completed, save the file and you can now either attempt to automatically mount the share using this command:
…or you can reboot your server!
Once rebooted, login and you can then check and confirm that you have re-mounted your /data directory to the remote server by checking the output of:
You should be able to see and confirm the remote disk usage as demonstrated here:
OK, well that’s it, I hope this has been useful for you 🙂
Как подключить NFS каталог в Windows 10
В Unix-подобных операционных системах подключить каталога NFS (Network File System) довольно просто, однако если вам понадобится использовать NFS шару в Windows, придется выполнить ряд дополнительных действий. В этой статье мы покажем, как в Windows 10 подключить NFS каталог, который находинся на UNIX системе. Все описанные инструкции будут работать в Windows 10 Pro (версия 10.0.14393 и выше).
Установка клиента NFS (службы для NFS)
В первую очередь в Windows 10 нужно установить клиент NFS. Для установки необходимо выполнить следующие шаги:
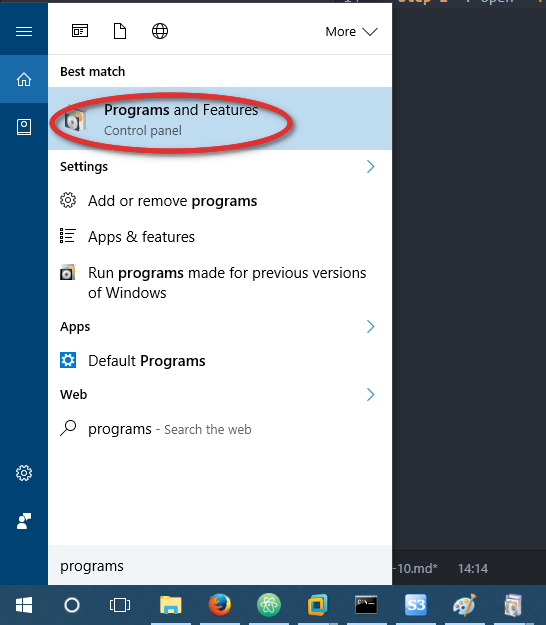
- Откройте раздел «Programs and Features».
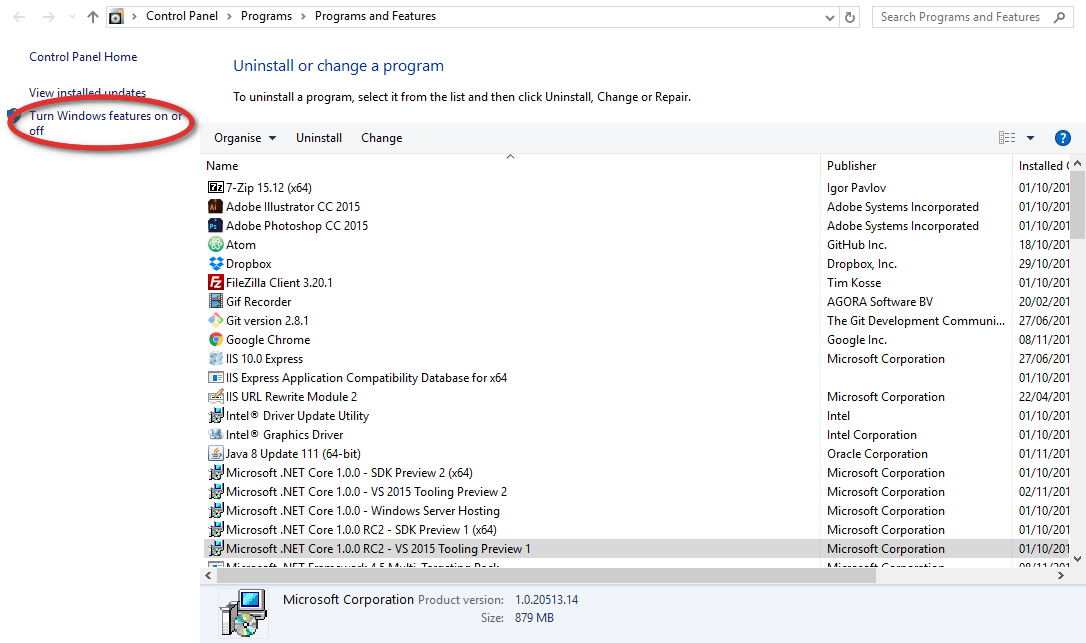
- Щелкните по пункту «Turn Windows features on or off».
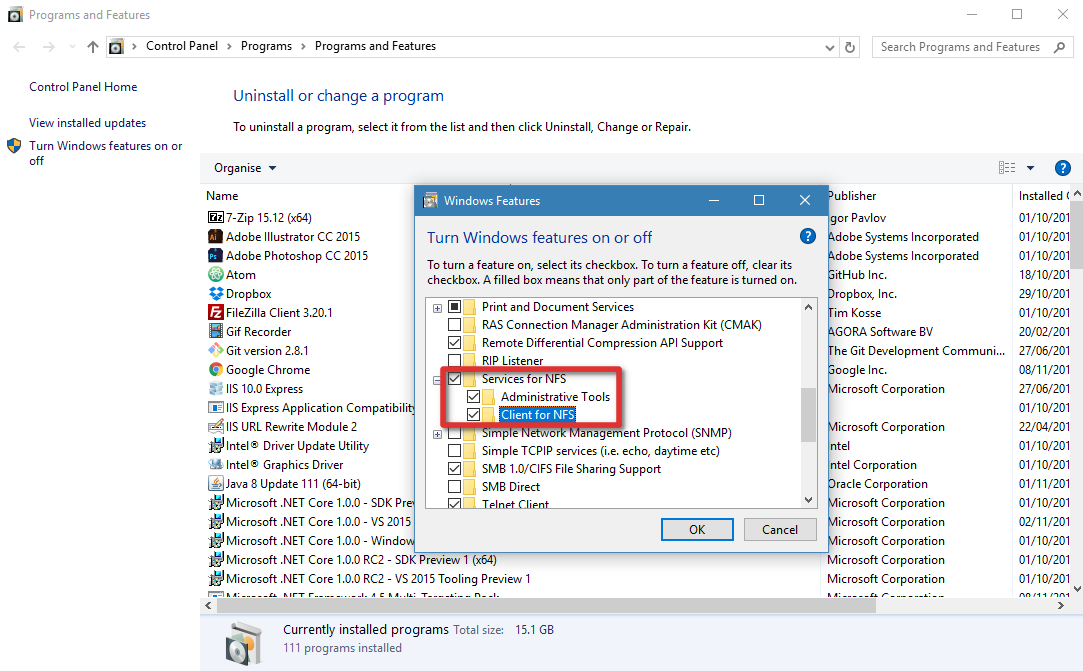
- В появившемся списке в разделе Services for NFS включите NFS клиента (Client for NFS), а затем нажмите «ОК».
- После установки нажмите кнопку «Close» и вернитесь на рабочий стол.
Как разрешить запись в NFS каталог анонимному пользователю
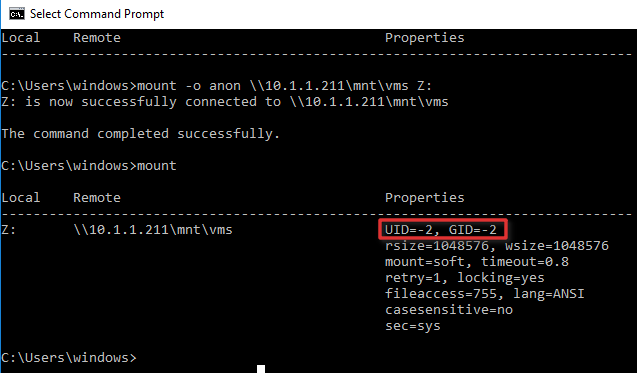
По умолчанию при подключении NFS каталога с UNIX системы, анонимному пользователю (anonymous) предоставляются права только на чтение. Чтобы предоставить анонимным пользователям право записи, необходимо изменить значения UID и GID, которые используются для монтирования NFS каталога в Windows. Пример стандартных настроек представлен на рисунке ниже.
Чтобы изменить значение полей UID и GID, нам потребуется внести изменения в реестр Windows.
- Откройте редактор реестра regedit.
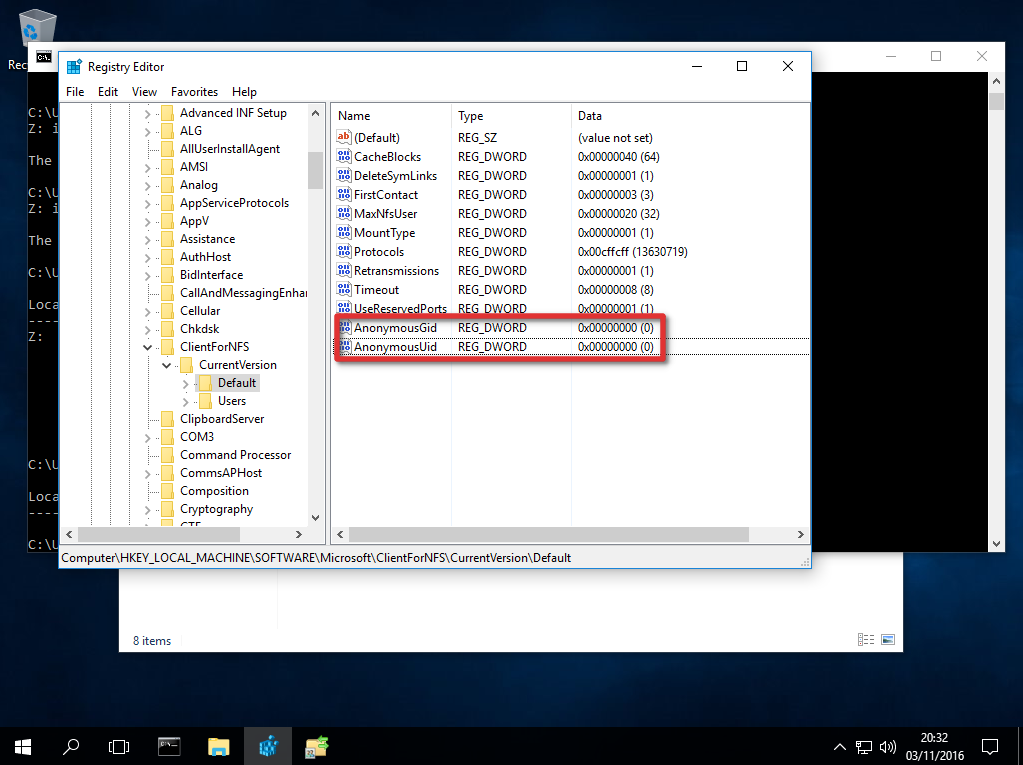
- Перейдите в ветку реестра — HKEY_LOCAL_MACHINE\SOFTWARE\Microsoft\ClientForNFS\CurrentVersion\Default.
- В каталоге «Default» создайте новый параметр типа DWORD (32бит) с именем AnonymousUid и назначьте UID, назначенный на каталог в UNIX, к которому открыт доступ через NFS.
- В ветке Default создайте ещё один параметр DWORD (32-бит) с именем AnonymousGid и назначьте GID, назначенный данному каталогу в UNIX.
- Для того, чтобы изменения вступили в силу вам необходимо перезапустить клиент NFS или перезагрузить компьютер.
Список подключенных NFS каталогов и параметры монтирования можно вывести с помощью команды Mount без параметров.
Результат работы команды mount теперь должен выглядеть следующим образом:
Local Remote Properties
——————————————————————————-
Z: \\10.1.1.211\mnt\vms UID=0, GID=0
rsize=1078756, wsize=1078756
mount=soft, timeout=1.6
retry=1, locking=yes
fileaccess=755, lang=ANSI
casesensitive=no
sec=sys
Обратите внимание на значение полей UID и GID, которое равно 0. UID=0, GID=0 — означает, что общий ресурс монтируется под пользователем root.
Как подключить NFS каталог в Windows 10
Смонтировать NFS каталог в Windows 10 можно с помощью команды mount. Например, смонтируем NFS каталог и назначим ему букву диска Z:. Предположим, что ваше NAS устройство находится в той же сети, что и ваш компьютер с установленной операционной системы Windows, а IP-адрес устройства — 10.1.1.211. С помощью следующей команды можно смонтировать общий ресурс NFS в /mnt/vms.
Mount –o anon \\10.1.1.211\mnt\vms Z:
Z: is now successfully connected to \\10.1.1.211\mnt\vms
The command completed successfully .
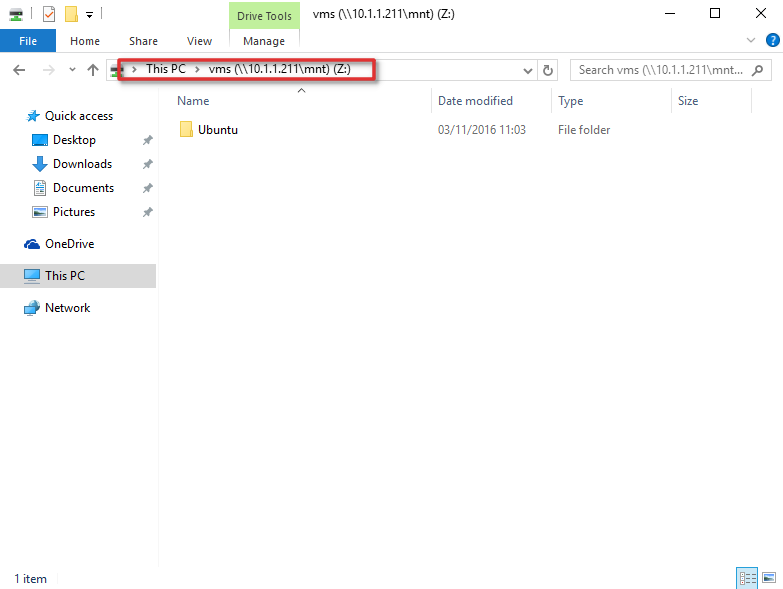
Теперь общий ресурс создан, и мы можем получить доступ к данным. В нашем примере сетевой ресурс (диск) обозначается буквой «Z».
На этом настройка NFS завершена и вы сможете сохранять данные на свое NAS устройство через смонтированный NFS каталог. Обратите внимание, что при в первый раз открытие этого каталога выполняется довольно долго.
