- NFS Server Setup
- Portmap
- Exports
- NFSv4 only
- Listening only on particular IPs
- How to Mount NFS share on Debian 10
- Pre-Requisites
- NFS Server
- NFS Client
- Install NFS Client Package on Debian 10 Client Machine
- Step 1: Create a Mount Point for the NFS Server’s Shared Directory
- Step 2: Mount the NFS Server Shared Directory on the Client
- Step 3: Test NFS share
- Mounting an NFS File System Automatically
- Unmounting an NFS File System
- About the author
- Karim Buzdar
NFS Server Setup
The following do not specify NFS version 2 versus 3 versus 4; the steps below worked for me using NFS version 3 support built into the kernels of the server and the client (server is a Debian Etch machine, the client was another Linux distribution, PLD «rescue».)
If you’re looking to set up NFSv4 with Kerberos, please see: NFS/Kerberos.
Make sure you have NFS server support in your server’s kernel (kernel module named «knfsd.ko» or «nfsd.ko» under your /lib/modules/uname -r/ directory structure). The config file will confirm if the kernel was compiled with NFS enabled.
$ grep NFSD /boot/config-`uname -r`
Note that the config file might be found somewhere else in the directory structure (perhaps in /usr/src/linux/.config).
Then, note that there are at least two mainstream NFS server implementations at present (excluding those implemented in Python and similar): one implemented in user space (slower, easier to debug), and the other implemented in kernel space (faster.) The below shows the setup of the kernel-space one. If you wish to use the user-space server, then install the similarly-named package.
First, the packages to begin with:
$ apt install nfs-kernel-server portmap
NOTE: The portmap package is only required if you want to run an NFSv2 or NFSv3 server. If all your clients support NFSv4, you can disable NFSv2 and NFSv3 (as described in the «NFSv4 only» section below) and skip the «Portmap» section below.
Portmap
Note that portmap defaults to only listening for NFS connection attempts on 127.0.0.1 (localhost), so if you wish to allow connections on your local network, then you need to edit /etc/default/portmap, to comment out the «OPTIONS» line. Also, we need to ensure that the /etc/hosts.allow file allows connections to the portmap port. For example:
$ perl -pi -e 's/^OPTIONS/#OPTIONS/' /etc/default/portmap $ echo "portmap: 192.168.1." >> /etc/hosts.allow $ /etc/init.d/portmap restart
See ‘man hosts.allow’ for examples on the syntax. But in general, specifying only part of the IP address like this (leaving the trailing period) treats the specified IP address fragment as a wildcard, allowing all IP addresses in the range 192.168.1.0 to 192.168.1.255 (in this example.) You can do more «wildcarding» using DNS names, and so on too. Note, ‘portmap’ is provided by the ‘rpcbind’ deb package (at least on Stretch).
Exports
Edit the /etc/exports file, which lists the server’s filesystems to export over NFS to client machines. And create the NFS table with «exportfs -a». The following example shows the addition of a line which adds the path «/example», for access by any machine on the local network (here 192.168.1.*).
$ echo "/example 192.168.1.0/255.255.255.0(rw,no_root_squash,subtree_check)" >> /etc/exports $ exportfs -a $ /etc/init.d/nfs-kernel-server reload
This tells the server to serve up that path, readable/writable, with root-user-id connecting clients to use root access instead of being mapped to ‘nobody’, and to use the ‘subtree_check’ to silence a warning message. Then, reloads the server.
Note: If you want /etc/exports to share an NFS share to multiple, discrete entries, use space-separate entries. The syntax looks like this:
$ echo "/multi-example 192.168.1.0/24(rw) 172.16.1.0/24(ro) 10.11.12.0/24(rw)" >> /etc/exports
Check which versions of NFS the server is running this way: root@deb9:/# cat /proc/fs/nfsd/versions -2 -3 +4 +4.1 +4.2 In this case, nfs2, nfs3 are disabled. NFS 4, 4.1, and 4.2 are enabled. Any client trying to connect with NFSv2 or NFSv3 should get an error.
From the client side (for example, I used a PLD «rescue» disk to boot up a Windows machine for some diagnostics, and used its built-in NFS client support to mount a path from my other computer), you need to ensure that portmap is running, and that the NFS client support is built into the kernel or the proper module («nfs.ko») is loaded, and then mount the server’s path like so:
$ mount 192.168.1.100:/example /mnt/example
- try running ‘rpcinfo -p‘ from the server (and from clients ‘rpcinfo -p '), as you should see a largish list of information, including 'nfs' and 'portmapper' as some of the lines. If you get messages about not being able to connect, then you may have firewall rules blocking access to portmap. See this related NFS-HOWTO section for further details on decyphering the output of 'rpcinfo.'
- You could also 'cat /proc/fs/nfs/exports' to see the list of filesystems exported by the NFS file server.
NFSv4 only
To enable only NFSv4 or higher (and thus disabling v2 and v3), set the following variables in /etc/default/nfs-common:
NEED_STATD="no" NEED_IDMAPD="yes"
And the following in /etc/default/nfs-kernel-server. Please note that RPCNFSDOPTS is not present by default, and needs to be added.
RPCNFSDOPTS="-N 2 -N 3" RPCMOUNTDOPTS="--manage-gids -N 2 -N 3"
Additionally, rpcbind is not strictly needed by NFSv4 but will be started as a prerequisite by nfs-server.service. This can be prevented by masking rpcbind.service and rpcbind.socket.
sudo systemctl mask rpcbind.service sudo systemctl mask rpcbind.socket
If you later choose to unmask rpcbind.service and rpcbind.socket execute the commands below. For example choose to unmask if 'sudo showmount' returns the error 'clnt_create: RPC: Unable to receive'.
sudo systemctl unmask rpcbind.service sudo systemctl unmask rpcbind.socket
NFSv4 only requires a single port (TCP/UDP 2049) and does not require the portmap service to be installed.
Listening only on particular IPs
By default, NFS will listen for connections on all ports. To only listen for NFS(v4) connections on a particular IP address, add the -H option to RPCNFSDOPTS in /etc/default/nfs-kernel-server:
RPCNFSDOPTS="-N 2 -N 3 -H 10.0.1.1"
Alternatively, a hostname may be provided instead of an IP address. The -H option can also be provided multiple times to listen on multiple different IPs.
Refer to the rpc.nfsd manpage to see all the options available for RPCNFSDOPTS.
How to Mount NFS share on Debian 10
![]()
The network file system NFS is an efficient way of sharing files and directories to other machines in a network. It is based on client-server architecture, where the server directory is mounted onto client systems. NFS allows clients to access shared directories as if they are a part of their own system, and remains a popular way of sharing files among Linux systems.
In this article, we will mount a NFS share on a Debian client machine manually, as well as automatically, upon system boot.
We will use Debian 10 Buster system to run the commands and procedures discussed in this article.
Pre-Requisites
Before proceeding, be sure that:
- NFS server is installed and running on the remote machine
- NFS shared directory on the remote server is exported
- Firewall is allowing access to NFS clients
For the purpose of this article, we have set up two Debian10 machines with the following hostnames and IP addresses:
NFS Server
NFS Client
- Hostname: nfs-client
- IP address: 192.168.72.145
- Mount point: mnt/client_sharedfolder
Install NFS Client Package on Debian 10 Client Machine
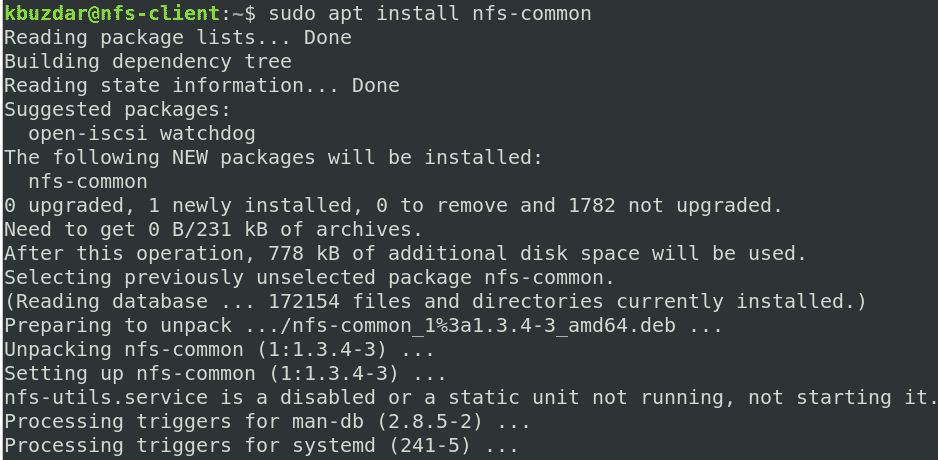
To mount share directories on the client machine, you must first install the NFS client package on it. On the client machine, run the following commands in the Terminal to install the NFS client package:
Step 1: Create a Mount Point for the NFS Server’s Shared Directory
To make the NFS server’s shared directory available to the client, you will need to mount the NFS server’s directory on an empty directory on the client machine.
First, create an empty mount point directory on the client machine. This empty directory will serve as the mount point for the remote shared directories.
We have created the new mount directory “client_sharedfolder” under the /mnt directory using the following command:

Step 2: Mount the NFS Server Shared Directory on the Client
Mount the NFS shared directory to the mount point directory on the client using the following syntax:
- NFS_IP is the NFS server’s IP address
- NFS_export is the shared directory on the NFS server
- Local_mountpoint is the mount point directory on the client’s system
Based on our setup, we ran the following command:
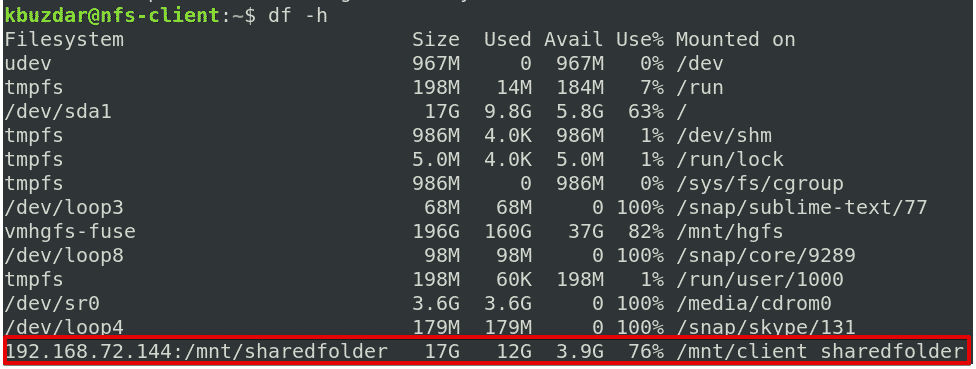
After mounting the NFS shared directory, you can confirm it using the following command in the Terminal:
Step 3: Test NFS share
Next, test the NFS share on the client machine. To perform a test create some files or directories under the NFS shared directory on the server machine and then access them from the client machine. Follow the procedure below to do this yourself:
1. On the NFS server machine, open the Terminal and use the cd command to navigate to the NFS shared directory:
Next, create some test files:

2. On the NFS client machine, verify whether the same files exist in the local mount point directory.

Note that the mount command does not permanently mount the NFS file system on the mount point. You will have to mount it manually every time you reboot the system. In the next step, we will look at how to automatically mount the NFS file system at boot time.
Mounting an NFS File System Automatically
Automatically mounting an NFS file system saves you the trouble of having to manually mount the file system each time you boot your system. Below is the procedure to do so:
Next, add an entry in the /etc/fstab file, as follows:
NFS server:directory mountpoint nfs defaults 0 0
- NFS server is the IP address of the NFS server
- directory is the shared directory on the NFS server
- mountpoint is the mount point on the NFS client’s machine
- nfs defines the file system type
Based on our setup, we have added the following entry:
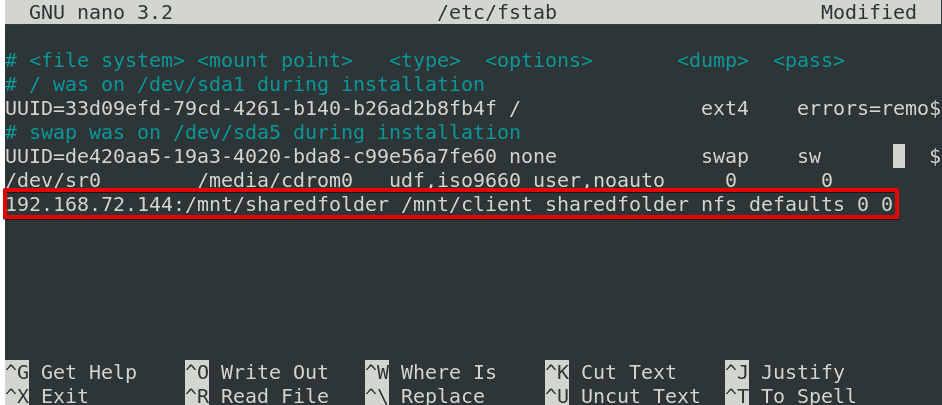
After adding the above entry in the /etc/fstab file, save and exit the file by Ctrl + o and Ctrl + x, respectively.
The NFS share will be mounted automatically at the specified mount point the next time you boot your system.
Unmounting an NFS File System
You can easily unmount the NFS shared directory from your system if you no longer need it. To do so, type umount, followed by the name of the mount point, as follows:
Based on our setup, it would be:
Note: The command is “umount,” not unmount (there is no “n” present in the command).
Keep in mind that if you have added the entry in the /etc/fstab file for mounting the NFS, it will be automatically mounted again the next time you boot your system. If you want to prevent it from automatically mounting on the next boot, remove the entry from the /etc/fstab file.
Remember that if the NFS file system is busy, you cannot unmount it, such as if any files are opened on it or you are working on some directory.
There you have it! A simple procedure to mount and unmount the NFS share on the Debian 10 Buster system, both manually and automatically. I hope you liked the article!
About the author
Karim Buzdar
Karim Buzdar holds a degree in telecommunication engineering and holds several sysadmin certifications. As an IT engineer and technical author, he writes for various web sites. He blogs at LinuxWays.