- How to Remove Nginx from Ubuntu
- Remove Nginx
- Purge Nginx
- Reinstall Nginx
- How to Uninstall Nginx Completely
- 1. Overview
- 2. Uninstalling NGINX in Debian Systems
- 2.1. Remove NGINX
- 2.2. Purge Nginx
- 2.3. Nginx Failed to Remove
- 3. Uninstalling NGINX in RPM Systems
- 4. Conclusion
- Как удалить Nginx в Ubuntu
- Удаление Nginx в Ubuntu
- What is the best way to uninstall nginx
- 2 Answers 2
- You must log in to answer this question.
- Linked
- Related
- Hot Network Questions
- Subscribe to RSS
How to Remove Nginx from Ubuntu
This brief tutorial shows students and new users how to remove Nginx and purge from Ubuntu 20.04 | 18.04.
The steps below will show you if you’re a webmaster and want to remove the Nginx web server from your host.
There are two ways to uninstall or remove programs from Ubuntu and Linux systems.
You can either run the apt remove or apt purge.
When you use the remove option with apt, the command will delete the software package from the system but leave the configuration files behind.
Purge with apt will delete the software package, including all configuration files and settings.
When you want to delete Nginx from Ubuntu, follow the steps below:
Remove Nginx
Again, running apt with the remove option will delete Nginx from the host computer but keep all configuration files intact.
If you think of removing Nginx to reinstall, you may want to use the purge option.
If you simply want to remove the Nginx package but critical all configuration files, then run the commands below:
The commands above delete Nginx but site configuration files in the /etc/nginx directory are left alone, including the content directory at /var/www.
Purge Nginx
The purge option with apt will delete Nginx and all configuration files from Ubuntu.
If you want to delete Nginx, including configuration files and settings, use the purge option.
The files in /etc/nginx directory will be removed. However, the site content at /var/www will be left alone.
Run the commands below to remove Nginx along with its configuration files.
Reinstall Nginx
The command will delete Nginx and install when you use the reinstall option with apt.
The reinstall option won’t change or delete any configuration file or the site content at /var/www.
It will simply delete and reinstall the Nginx packages.
To reinstall Nginx, run the commands below:
This post showed you how to delete, purge or reinstall Nginx. If you find any error above, please use the comment form below to report.
You may also like the post below:
Richard W
I love computers; maybe way too much. What I learned I try to share at geekrewind.com.
How to Uninstall Nginx Completely
![]()
The Kubernetes ecosystem is huge and quite complex, so it’s easy to forget about costs when trying out all of the exciting tools.
To avoid overspending on your Kubernetes cluster, definitely have a look at the free K8s cost monitoring tool from the automation platform CAST AI. You can view your costs in real time, allocate them, calculate burn rates for projects, spot anomalies or spikes, and get insightful reports you can share with your team.
Connect your cluster and start monitoring your K8s costs right away:
1. Overview
In this article, we’ll be going over the steps to follow when uninstalling the NGINX web server. We’ll cover both Debian and RPM-based systems.
2. Uninstalling NGINX in Debian Systems
Due to different reasons, we might decide to uninstall NGINX. This might result from wrong configurations or us just wanting it out of our systems.
To uninstall NGINX in our Debian-based system, we have two options to choose from. To begin with, we can either use the apt remove command or choose the apt purge command. Before we look at either of these commands, let’s check the state of our NGINX server. To check the status, we’ll use the systemctl status command since it works for both the Debian- and RPM-based systems and any other Linux system that uses systemd:
$ sudo systemctl status nginx.service ○ nginx.service - A high performance web server and a reverse proxy> Loaded: loaded (/lib/systemd/system/nginx.service; disabled; v> Active: inactive (dead) This command shows us if the server is active (running) or if it’s inactive (dead/ not running). Now, let’s go ahead and look at how to uninstall it.
2.1. Remove NGINX
We can use apt remove to uninstall NGINX:
This removes NGINX from the system but leaves the configuration files behind. In other words, the site configuration files found in the /etc/nginx folder are left and aren’t removed. The site files placed in the /var/www won’t be wiped out during this process. Using apt remove for the job is only beneficial if we plan to reinstall NGINX in the future.
When issuing this command, we can further add separate NGINX packages that we’d want to be removed at the same time. For example. we can run:
$ sudo apt remove nginx nginx-commonsWhen we check the status of the server now, we find out that it has been masked:
$ sudo systemctl status nginx.service ○ nginx.service Loaded: masked (Reason: Unit nginx.service is masked.) Active: inactive (dead) 2.2. Purge Nginx
Apart from the remove command, we can also use purge to remove NGINX:
The apt purge command completely removes NGINX from our system. It will uninstall the NGINX server and delete the /etc/nginx folder with all its contents. This command also deletes all the configuration files and settings associated with the NGINX server.
Using apt purge to uninstall NGINX is the best option if we don’t expect to use NGINX in the near future. It’s also the preferred way if we want to perform a clean re-installation of the same version of NGINX or a later one.
After running purge, if we check the status, we won’t find the nginx.service unit, thus confirming that the server has been deleted completely:
$ sudo systemctl status nginx.service Unit nginx.service could not be found. After uninstalling NGINX using the purge command, we have to remove all the remaining dependencies that were used by NGINX but are not required anymore:
2.3. Nginx Failed to Remove
We need to note that, in some occurrences, running the above commands may not wipe out NGINX completely, and upon restart, NGINX may still be running. This may be caused by us removing the wrong variant of the installed NGINX server.
NGINX has different flavors available. These flavors are nginx-core, nginx-full, nginx-light, nginx-extras, nginx-naxsi, and nginx-common (NGINX is a meta package). In such a precedent, we can run:
$ sudo apt-get remove --purge nginx*This will remove anything installed that is related to NGINX. It’ll also remove the configuration files, and additionally, it will list packages available in repositories that matched the regex “nginx*” (these packages are just listed and aren’t installed). If we check the status, it will give us similar output to that of the purge command.
Again, if the autoremove command doesn’t purge auto-removable packages by default, then we can use:
$ sudo apt-get autoremove --purge3. Uninstalling NGINX in RPM Systems
For RPM-based distros like CentOS7, RHEL7, and Fedora, if we want to remove NGINX, we go through a different set of steps. First, we have to stop and disable the NGINX service from running:
$ sudo systemctl stop nginx.service $ sudo systemctl disable nginx.serviceSecondly, we remove the auto-start from NGINX:
Following, we proceed to remove all NGINX files, including binary files, configuration files, and even jpg files:
$ sudo rm -rf /etc/nginx $ sudo rm -rf /etc/init.d/nginx $ sudo rm -rf /var/log/nginx $ sudo rm -rf /var/cache/nginx/ $ sudo rm -rf /usr/sbin/nginxWe also have to remove the NGINX service from our system:
$ sudo rm -rf /usr/lib/systemd/system/nginx.serviceLastly, we remove nginx from our system:
Let’s note that dnf works similarly to yum. Likewise, we could instead run:
If we had created a user for NGINX, then we’d need to delete it together with its directories:
If we check the status of our server, we won’t find the nginx.service unit, thus confirming that the server has been successfully uninstalled.
4. Conclusion
In this article, we’ve looked at how to uninstall NGINX from both Debian- and RPM-based distributions.
While looking at Debian, we noted that we have two options, apt purge and apt remove. If we don’t want to lose the settings while uninstalling, then we should use remove. Otherwise, we use purge. If we want to remove it completely or we want to perform a clean re-installation, we should use the purge command.
We further saw how to remove NGINX in RPM-based systems.
Как удалить Nginx в Ubuntu
Если в вашей системе установлен и запущен веб-сервер Nginx, то при попытке установить Apache, OpenLiteSpeed или Lighttpd и запустить его вы получите ошибку Address already in use. Это означает, что порт 80 или 443 занят Nginx и другой веб-сервер не может его использовать.
Вы можете использовать другой порт или просто остановить Nginx, но если он вам больше не нужен, то можно его удалить. В этой небольшой статье мы рассмотрим как удалить Nginx Ubuntu полностью.
Удаление Nginx в Ubuntu
Для того чтобы остановить сервис Nginx и удалить его из автозагрузки выполните такие команды:
sudo systemctl stop nginx
sudo systemctl disable nginx
Этого будет вполне достаточно, чтобы ничего не удаляя в вашей системе начал работать другой веб-сервер. Если же вы хотите именно удалить его выполните такую команду:
sudo apt purge nginx nginx-common
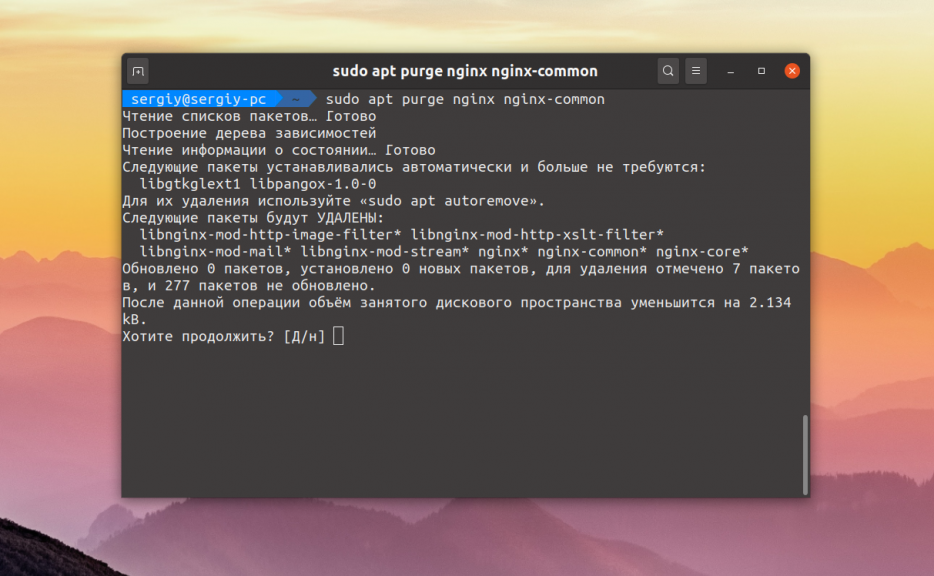
Для того чтобы удалить пакеты, которые были установлены во время установки Nginx, но больше не требуются, надо выполнить:
Если вы создавали файлы конфигурации сайтов в каталоге /etc/ вручную, то они не удаляться пакетным менеджером. Для их удаления используйте:
Теперь вы знаете как полностью удалить Nginx Ubuntu из вашей системы. В этом совсем нет ничего сложного. Если у вас остались вопросы, спрашивайте в комментариях!
Обнаружили ошибку в тексте? Сообщите мне об этом. Выделите текст с ошибкой и нажмите Ctrl+Enter.
What is the best way to uninstall nginx
I’m trying to add new module to nginx with naxsi, but I should reinstall nginx. What is the better way of removing nginx?
2 Answers 2
Removes all but config files.
sudo apt-get remove nginx nginx-common Removes everything.
sudo apt-get purge nginx nginx-common After using any of the above commands, use this in order to remove dependencies used by nginx which are no longer required.
Uninstall everything and install once again
sudo apt remove --purge nginx* sudo apt autoremove sudo apt update sudo apt install nginx You must log in to answer this question.
Highly active question. Earn 10 reputation (not counting the association bonus) in order to answer this question. The reputation requirement helps protect this question from spam and non-answer activity.
Linked
Related
Hot Network Questions
Subscribe to RSS
To subscribe to this RSS feed, copy and paste this URL into your RSS reader.
Site design / logo © 2023 Stack Exchange Inc; user contributions licensed under CC BY-SA . rev 2023.7.14.43533
Ubuntu and the circle of friends logo are trade marks of Canonical Limited and are used under licence.
By clicking “Accept all cookies”, you agree Stack Exchange can store cookies on your device and disclose information in accordance with our Cookie Policy.