- Создание HTML-проекта с использованием Bash
- Другие заметки
- Резервное копирование данных одной командой Shell
- Автоматическая настройка Live-USB Ubuntu
- How to Host a Website on an Apache Web Server
- Install Apache Web Server in Linux
- Host a Simple HTML Website on Apache
- Linux Shell Tips
- Manage Apache Web Server in Linux
- Create first web page on Fedora Core Web Server.
- Hello World .
- Troubleshoot.
- Forbidden
- How to Create an HTML file?
- Method 1: Create an HTML File Using a Text Editor
- Method 2: Create an HTML File Using Source Code Editor
- Conclusion
Создание HTML-проекта с использованием Bash
Работа над новым HTML-проектом начинается с создания структуры директорий и стандартного набора файлов со стандартным содержанием. Клонирование Git-репозитория или установка пакета с использованием менеджера пакетов — путь современного веб-разработчика, автоматизирующего начало работы над проектом. Этот путь быстр, удобен, но требует специального программного обеспечения и доступа к сети интернет. Альтернативное решение — собственный скрипт, для выполнения которого требуется только командная оболочка.
Приведу пример Bash скрипта, автоматизирующего создание структуры и содержания простого HTML-проекта в заданной директории.
Скрипт принимает один необязательный параметр, задающий корневую директорию создаваемого проекта. Если параметр не задан, используется текущая директория. В результе выполнения скрипта будет создан HTML-проект, состоящий из:
- трёх стандартных для HTML-проекта директорий: css, img, js;
- корневого индексного файла index.html, содержащего базовую HTML разметку;
- подключаемого файла каскадной таблицы стилей css/style.css;
- подключаемого файла JavaScript js/script.js.
#!/bin/bash FOLDER=$ mkdir -p "$FOLDER/" cat "$FOLDER/index.html" Новая страница
Время создания:
HTML cat "$FOLDER/css/style.css" @charset "utf-8"; html < box-sizing: border-box; >*, :before, :after < box-sizing: inherit; >body < background: blue; color: white; >CSS cat "$FOLDER/js/script.js" document.addEventListener('DOMContentLoaded', function() < console.log('Документ загружен'); >, false); JS Одна команда в консоли и будет получен скелет готового к дальнейшей работе HTML-проекта.
./create-html-project.sh /home/dmitry/www/my-html-project Использование собственных Bash скриптов — решение, способное упростить работу веб-разработчика. При этом, это решение универсально, так как Bash работает в современных операционных системах для рабочих станций: Microsoft Windows, Apple MacOS и многочисленных операционных системах на основе ядра Linux. А зная принципы написания Bash скриптов и функциональные возможности доступных утилит, можно гибко управлять результатом, с легкостью автоматизируя рутинные задачи веб-разработки, полагаясь исключительно на встроенные инструменты.
Другие заметки
Резервное копирование данных одной командой Shell
Полное осознание значения резервного копирования данных, как правило, приходит слишком поздно. Часто это случается уже после полной утраты данных. Эта заметка посвящена клиенту и коллеге, веб-разработчику, чьи проекты, к счастью, удалось восстановить после сбоя в работе накопителя информации рабочего компьютера. Не испытывайте судьбу, уделите внимание вопросу резервного копирования, тем более, что это может быть не так сложно, как кажется на первый взгляд.
Автоматическая настройка Live-USB Ubuntu
В течение последнего месяца часто приходится работать, загружая операционную систему Ubuntu 17.10 с USB-флешки в режиме Live-USB, что делает возможным использование рабочей станции, без установленной операционной системы. Такой вариант подходит для работы с необходимым набором программ: текстовый редактор gedit, веб-браузер FireFox, клиент удалённого доступа к рабочему столу Remmina, файловый менеджер GNOME Files для работы с файлами, включая файлы на удалённых серверах, доступных по протоколам FTP, FTPS и WebDAV. Главный минус такого решения — рутинная настройка после каждой загрузки. Здесь поможет автоматизация.
dimayakovlev.ru © 2023 — Личная территория внутри всемирной паутины
Сайт создан и поддерживается мною с целью сохранения и распространения в свободном доступе опубликованных на нём материалов. Авторство разработок, текстов и изображений, принадлежит мне, если иное не указано отдельно.
При копировании материалов с сайта, не забывайте о важности обратных ссылок.
Размещение обратной индексируемой ссылки показывает интерес к содержанию сайта, что мотивирует к работе над новыми материалами.
How to Host a Website on an Apache Web Server
The Apache HTTP Server (commonly referred to simply as Apache), is a free and open-source web server software brought to you by the Apache Software Foundation. Apache has been around for more than 2 decades and is considered beginner-friendly.
In this tutorial, you will learn how to install an Apache webserver to host a simple HTML website running on a Linux platform.
Install Apache Web Server in Linux
On Ubuntu Linux and other Debian-based distributions such as Linux Mint, Apache can be installed with the following command.
$ sudo apt install apache2 -y
On Red Hat Enterprise Linux and related distributions such as CentOS, Fedora, and Oracle Linux, Apache can be installed with the following command.
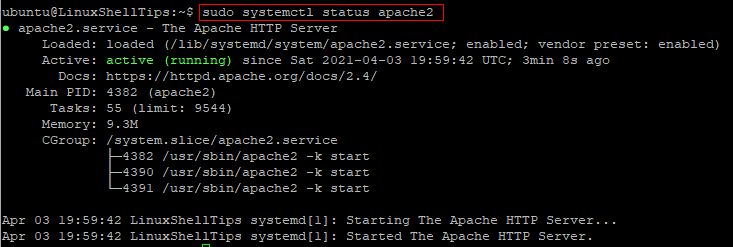
On Ubuntu Linux and other Debian-based distributions, you can start and check the status of the Apache webserver by running the commands below.
$ sudo systemctl start apache2 $ sudo systemctl status apache2
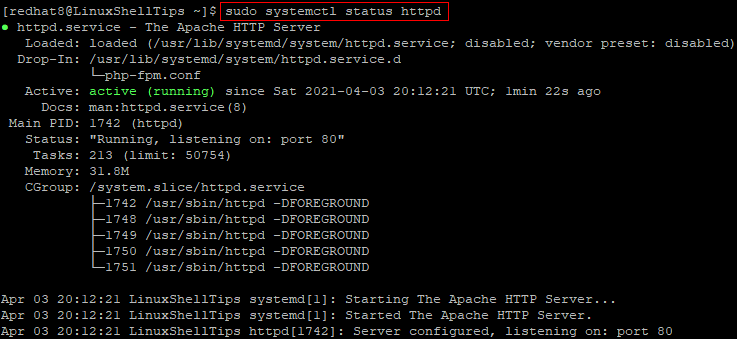
On Red Hat Enterprise Linux and related distributions, run the following commands to start and check the status of Apache.
$ sudo systemctl start httpd $ sudo systemctl status httpd
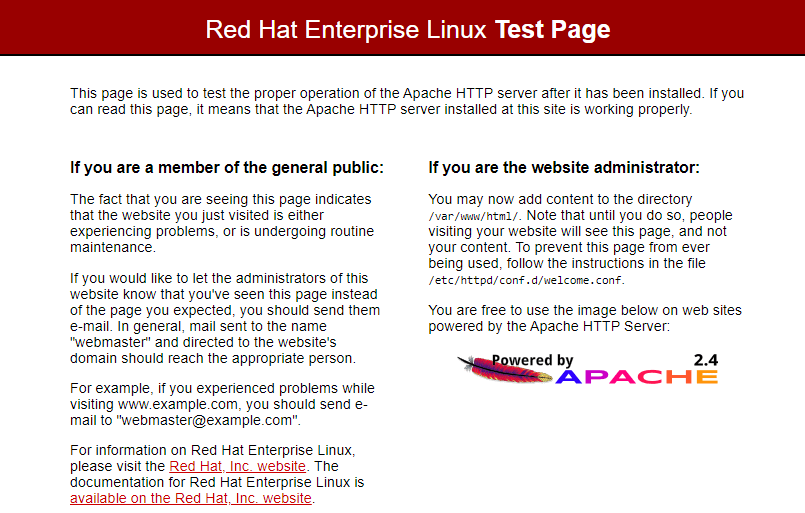
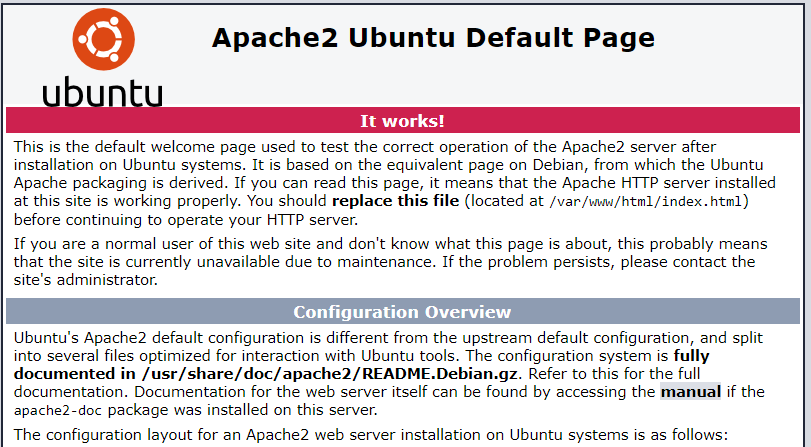
Once you have confirmed that Apache is active, open a web browser and enter the IP address of your Linux server. You may also enter localhost in place of your server IP.
You should see a test page that confirms that Apache is up and running properly.
http://IP-Addresss OR http://localhost
Host a Simple HTML Website on Apache
After you have confirmed that Apache is working properly, you are now ready to add your website content. On Apache, the default location where publicly accessible web content is stored in /var/www/html. This is commonly referred to as the website root.
The first page that is loaded when users visit your website is called the index page. Let us create one as follows.
Firstly, change into the website root with the command below.
On Ubuntu Linux, run the command below to rename the default index page file.
$ sudo mv index.html index.html.bk
On Red Hat, there is nothing to rename here as the default index page file is not stored in this location.
Next, create a new index file with:
Copy and paste the sample HTML code below into the open text editor.
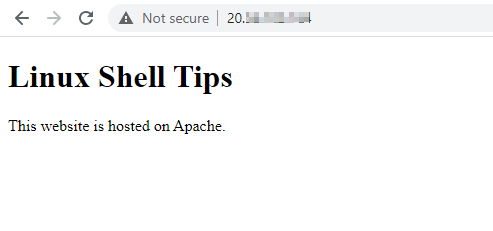
Linux Shell Tips
This website is hosted on Apache.
Save and close the index.html file.
Now, go back to your web browser and refresh the page. You should see your new website as shown in the image below.
Manage Apache Web Server in Linux
As we wrap up this tutorial, let us highlight some basic commands for managing Apache in addition to the ones that we have already used. As you may have noticed, the Apache web service is referred to as apache2 on Ubuntu while it is called httpd on Red Hat Linux.
To configure Apache to automatically start when the Linux server is rebooted, run:
$ sudo systemctl enable apache2 $ sudo systemctl enable httpd
To disable automatic starting of Apache when the Linux server is rebooted, run:
$ sudo systemctl disable apache2 $ sudo systemctl disable httpd
$ sudo systemctl restart apache2 $ sudo systemctl restart httpd
$ sudo systemctl stop apache2 $ sudo systemctl stop httpd
Conclusion
In this tutorial, we have described how to install Apache on Ubuntu Linux as well as Red Hat Linux. We also showed you how to replace the default Apache web page with your own content.
Create first web page on Fedora Core Web Server.
Step by step guide to create your own first web page on Fedora Core Linux Apache web server.
1. Open desktop x-terminal, then using the nautilus program go to the directory where you should put your web contents; Please note that the example show in this article use the /var/www/html/ directory as the web contents directory.
[root@localhost ~]# nautilus /var/www/html/

figure 01: php/open_nautilus.png
2. Point mouse pointer inside the html directory and right mouse click button, point to and click Create Document -> Empty File to create new empty text document inside the /var/www/html/ directory.

figure 02: php/empty_file.png
3. Click on the «new file» that you just create and rename the file to «index.html«.

figure 03: web/index_html.png
4. Right click mouse button on the index.html page and point the mouse pointer to Open With and choose the text editor that you want to use to edit the index.html page from the list.
Note: The figure below show that the «text editor» (gedit) is the editor that use in this article.

figure 04: web/text_editor.png
5. Type in the «html code» as on example below or you can copy and paste the html code below or create your own html code using the text editor.
Note: Make sure that you click the «Save» button after finish the editing process.
Hello World .
Hello World . This is my first web page,
On Fedora Core Linux using Apache web server.
Editing html code using «gedit» editor:

figure 05: web/html_editor.png
6. Open web browser and point the address field to your web server address or domain name (fqdn) and click Go button to start browsing.
The example below show my first web page that I’m wrote earlier.
Example of index.html page:

figure 06: web/first_web_page.png
Troubleshoot.
If your browser display the Forbidden page look like example below:
Forbidden
You don’t have permission to access /index.html on this server.
Apache/2.2.3 (Fedora) Server at 127.0.0.1 Port 80
Check the index.html page permission, make sure that the index.html readable by world (others).
1. Using the Linux » ll » command to check the permission of the index.html, from the output of the » ll » command show that the index.html page not readable by world (others).
[root@localhost html]# ll
-rw——- 1 root root 212 Feb 27 02:38 index.html
2. Change the permisson of index.html page using Linux «chmod» command to make the index.html readable by word (others).
[root@localhost html]# chmod 644 index.html
3. Issue the «ll» command again to verify the changes.
[root@localhost html]# ll
-rw-r—r— 1 root root 212 Feb 27 02:38 index.html
Keywords: create web page, first web page, display web page, web page, html page, edit html code, html code, index.html, index page, first page, index.html, edit web page, edit page, edit html, forbidden page.
How to Create an HTML file?
HTML (an acronym of Hypertext markup Language) file is a collection of symbols and text to display the content on the web. An HTML file can be created in any source code editor or the default text editor of an operating system.
Most modern computer programmers tend to use modern source code editors to create an HTML file. However, it can be created using a simple text editor. Here , we have demonstrated both methods to create an HTML file. The outcomes of this post are:
Method 1: Create an HTML File Using a Text Editor
As an example, we are using the default text editor of Windows 11. The following steps are carried out to create an HTML file using the text editor:
Step 1: Open the text editor
Firstly, navigate to the directory where you want to create a file. Right click and click on the New option to create a Text Document:
Step 2: Write HTML
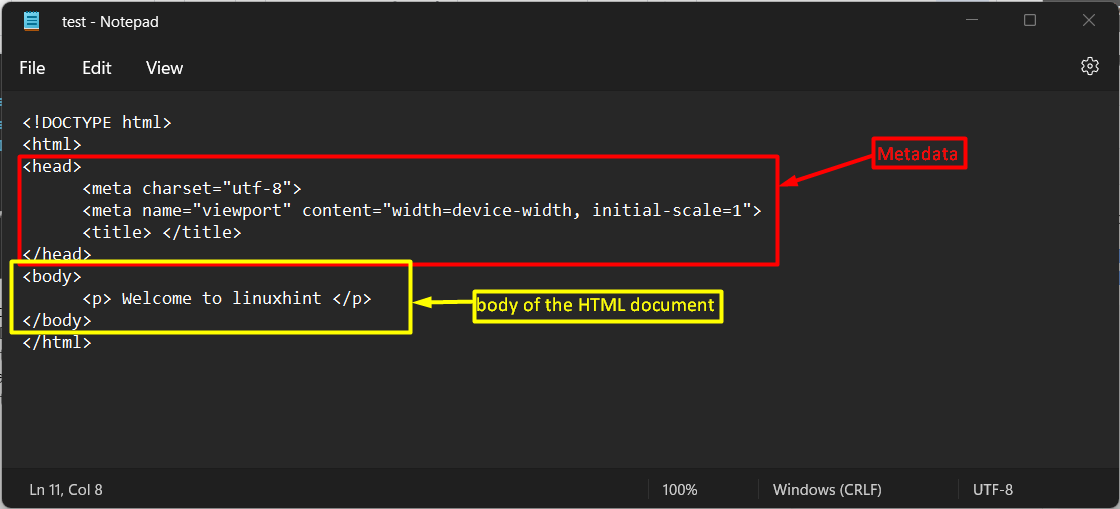
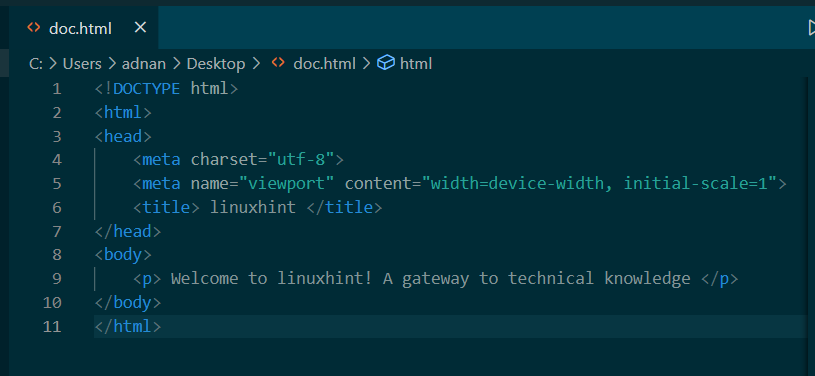
After creating a text file, write a few mandatory lines of HTML. As an example, we have used the following HTML code lines:
- The defines that the file belongs to an HTML category.
- Inside the tag, the character set and the size of the content is defined.
- Title can be defined inside the tag.
- Inside the tag, a paragraph is created in the
tag.
- Lastly, the and tags are closed.
The screenshot of the code is provided below:
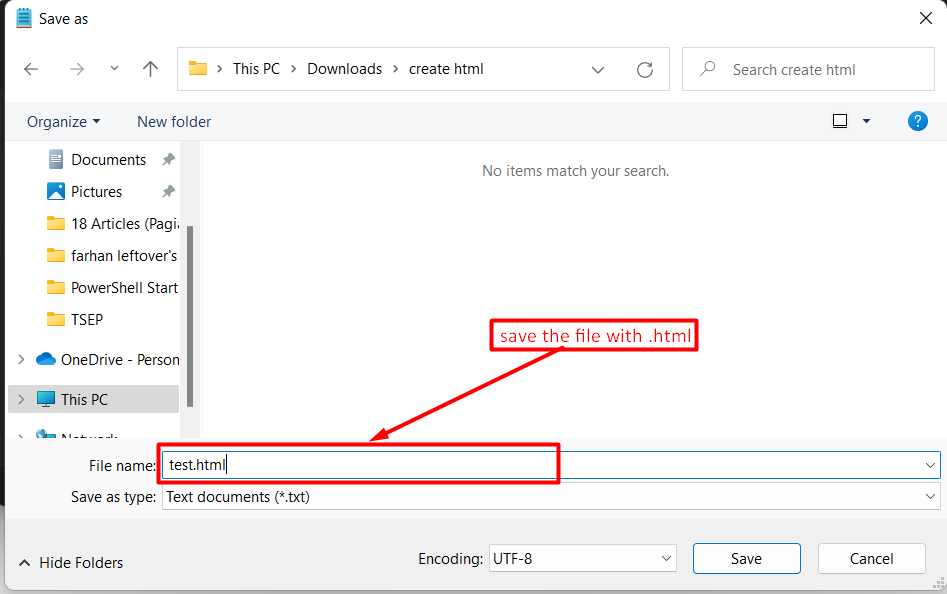
Step 3: Save the file
Lastly, save the file with any name but with “.html” extension:
As soon as the file is saved, the file icon (as of your default browser) will appear as shown below:
You can run the HTML file to observe what is inside it. By running the file, the following web interface appears:
Method 2: Create an HTML File Using Source Code Editor
As discussed earlier, an HTML file can be created using any source code editor. Here, we are using the Visual Studio Code editor to create an HTML file:
Step 1: Create an HTML file
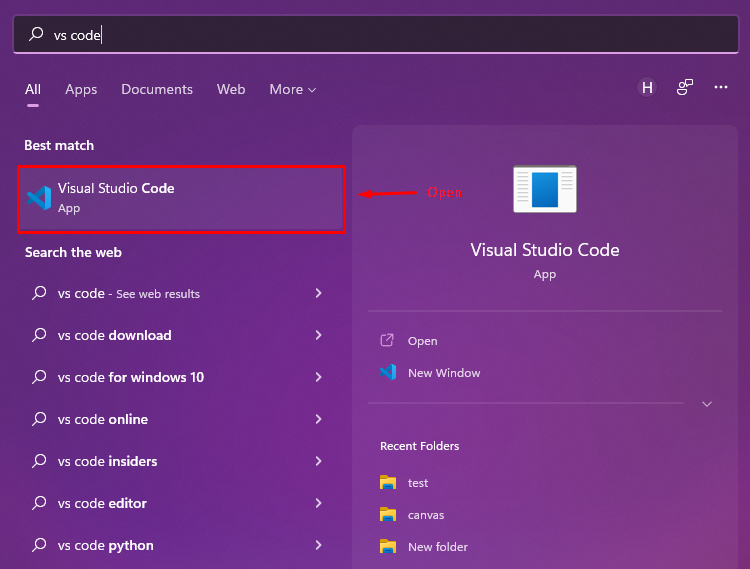
Open the editor by searching it from the windows search bar:
Step 2: Create a file
After opening the text editor, go to the File option and choose New Text File to create a text file:
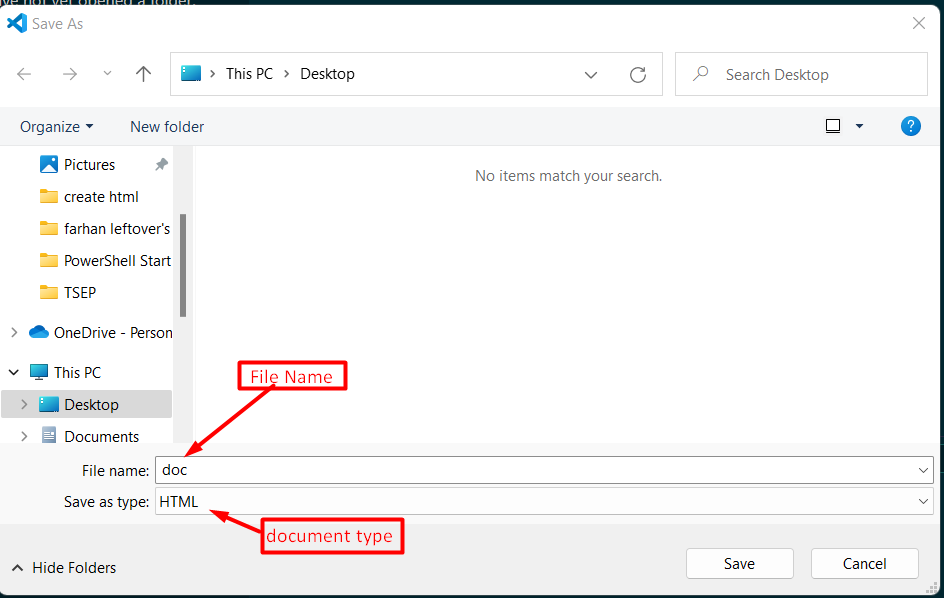
Now, save the file with any name. Make sure to change the file type to HTML:
Step 3: Write HTML
It’s time to write HTML code in the file. The pattern of writing the code is the same as we have described in the previous section. The following image represents the lines of code used to create an HTML file:
Here you go! The HTML file has successfully been created using a source code editor.
Conclusion
We can create an HTML file by writing the HTML code in any text editor or the source code editor. After that, the file needs to be saved as a .html extension. We have used the notepad (simple text editor) the Visual Studio (a source code editor) to create an HTML file.
