- Setting an NTFS file to be read only from Linux
- 3 Answers 3
- Note
- How to Mount NTFS Partition in Linux
- Mount NTFS Partition with Read-Only Permission
- Identify NTFS Partition
- Create Mount Point and Mount NTFS Partition
- Mount NTFS Partition with Read-and-Write Permissions
- Update Package Repositories
- Install Fuse and ntfs-3g
- Mount NTFS Partition
Setting an NTFS file to be read only from Linux
but when I then right click on the folderand go Properties>Permissions, it is still showing as read and write. I also tested by modifying a file, and the modification succeeds. In addition, when I try to change the permission in the filemanager gui to read only, it immediately flips back to read and write. I am under the impression that 4 means read only access. Is this correct? EDIT: I think my issue has to do with how the drive is mounted. Here is the fstab entry.
UUID=6F7C5E910607D747 /media/storage1 ntfs-3g uid=1000,gid=1000,umask=0022,auto,rw 0 0 @JaroslavKucera If they own the folder then they shouldn’t need root, and they’d get some error, which they presumably report here.
3 Answers 3
Note
This post was made before OP gave the additional info that he’s using a windows filesystem (NTFS) on a linux machine. I was under the impression he’s using a native linux filesystem.
You need to set the read, write and executable flag for the owner, and the read, executable flag for the group for mydirectory. The executable flag is needed to enter the folder. Without it you get a «permission denied» when trying to cd myfolder as a user belonging to the group or other.
chmod 755 myfolder is giving access for the group and others, or chmod 750 myfolder just giving access for the group and lock others out.
Set the ownership to root and the group to users:
sudo chown root:users myfolder Now, only root can create new files in myfolder ie. sudo touch mytest the new file gets the ownership root and the group root .
To force new files getting the group users, you need to set the SGID bit to myfolder.
this can be done in two ways, which results are equal
sudo chmod +s myfolder (adding the sgid bit) or sudo chmod 2755 myfolder (same + user, group, others)
doing a ls -l should show something like this:
drwsr-sr-x myfolder # last x optional depending on your others setting if you now sudo touch mytest2 in myfolder , mytest2 belongs to root , and the group users with the permission 644
Existing Files in myfolder would be treated like this:
cd myfolder sudo chown root:users * sudo chmod 644 * 1 = execute 2 = write 4 = read P.S.: You can replace root with any user, users with any group
Update as requested by @Rastapopoulos a further explaination
Let’s assume myfolder belongs to tom
When doing a chmod -R 444 myfolder/ you set the folder for user (tom), group, others to read only and all files within it, too So no nobody would be able to enter the folder, even tom (except root) because it’s lacking the executable flag.
When doing a chmod 644 myfolder tom still can’t enter the folder. The correct way would be to set the read, write, executable flag for tom, and the read executable flag for the group/others.
ie. chmod 755 myfolder (only setting permission for myfolder, not files)
To change only the permission for files in myfolder but not the permission for myfolder you’d do a:
But you might probably still want to edit/write your files as owner/tom so you’d rather do a
chmod 644 myfolder/* (or 640) Thanks for the instructive answer. Could you by any chance explain what was the problem in OP’s command?
Yes, I think that must be the issue too, but OP said that he’s not elevated to root, so I was wondering whether there might have been another possibility. Thanks! 🙂
The /etc/fstab entry in your update is rather important in this problem:
UUID=6F7C5E910607D747 /media/storage1 ntfs-3g uid=1000,gid=1000,umask=0022,auto,rw 0 0 This means it’s a NTFS filesystem, and the uid , gid and umask options will essentially hard-code all the Linux-visible permissions on that disk, independently of the real NTFS ACLs. Essentially, these mount options will give one user total access to that filesystem and all of its files. The normal commands cannot change the permissions assigned by mount options.
With a bit of one-time work, you could switch to using the real NTFS file and directory permissions instead.
First, find the device name corresponding to that UUID:
sudo blkid | grep 6F7C5E910607D747 | cut -d : -f 1 Then unmount that filesystem, and run ntfsusermap /dev/ . It will list some files on that filesystem and ask you to identify the user or group that would best correspond to the Windows user/group that owns the file. Once enough users/groups have been identified, the command will produce a UserMapping file in the current directory. (Example run: http://jp-andre.pagesperso-orange.fr/ntfsusermap.html )
Now mount the NTFS filesystem again, make a directory named exactly like /media/storage1/.NTFS-3G and place the UserMapping file in that directory. Unmount the NTFS filesystem again, and remove the uid , gid and umask options.
Mount the NTFS filesystem for the third time, and now the file permissions will reflect the real NTFS ACLs. You can now modify the file and directory permissions using the usual Linux commands, and those changes will also be effective when you’re using that filesystem with Windows too.
How to Mount NTFS Partition in Linux
NTFS stands for New Technology File System. This file-storing system is standard on Windows machines, but Linux systems also use it to organize data.
Most Linux systems mount the disks automatically. However, in dual-boot setups, where file exchange is required between two systems with NTFS partitions, this procedure is performed manually.
This article will show you how to mount an NTFS partition in Linux with read-only or read-and-write permissions.
- A system running Linux
- A user account with sudo or root privileges
- Access to a terminal window / command line (Activities >Search >Terminal)
Mount NTFS Partition with Read-Only Permission
Follow the steps below to mount an NTFS partition with read-only access.
Note: A read-only partition allows users to read files. To enable writing to an NTFS partition, refer to the second section of the article.
Identify NTFS Partition
Before mounting an NTFS partition, identify it by using the parted command:
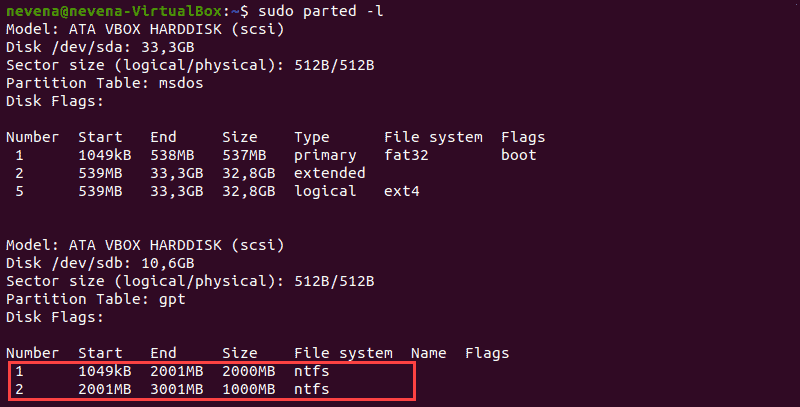
In the example above, two NTFS partitions are on the /dev/sdb disk. Note the partition number you want to mount before you proceed.
You can also use the fdisk and grep commands to show only NTFS partitions on a disk:
Create Mount Point and Mount NTFS Partition
In this example, we will mount the /dev/sdb1 partition with read-only permission.
First, create the mount point with the mkdir command:
Next, mount the partition to the directory you created. Use the mount command and the partition path you noted earlier:
sudo mount -t ntfs /dev/sdb1 /mnt/ntfs1Use the disk free tool to check the details of all filesystems and verify you mounted the partition successfully:
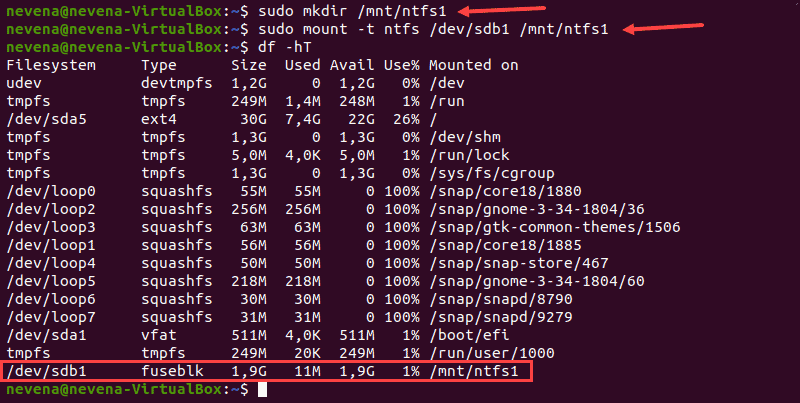
The /dev/sdb1 partition shows as mounted at the bottom of the list. You now have read-only access for this NTFS partition.
Mount NTFS Partition with Read-and-Write Permissions
To mount an NTFS partition with read-and-write permissions, you need to install fuse and ntfs-3 on your system.
Follow the steps below to complete the mounting process.
Note: Some Linux distributions may have fuse and ntfs-3g already installed by default.
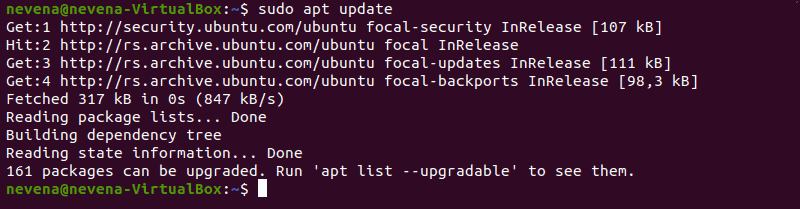
Update Package Repositories
Run the following command to download and update the package repositories:
Install Fuse and ntfs-3g
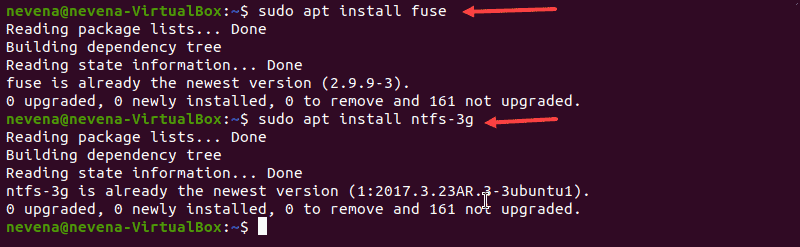
To install fuse on your Linux system from the default repository, use the appropriate package manager. In our example, we use apt in Ubuntu.
When the installation completes, install ntfs-3g by running:
In case both fuse and ntfs-3g are already installed, the output looks similar to the one below:
Mount NTFS Partition
After you install the fuse and ntfs-3g software packages, mount your NTFS partition.
First, create a mount point by using the mkdir command :
Next, use the mount command to mount the partition you want. For example, /dev/sdb2 :
sudo mount -t ntfs-3g /dev/sdb2 /mnt/ntfs2/To check if the partition is mounted, run the df command:
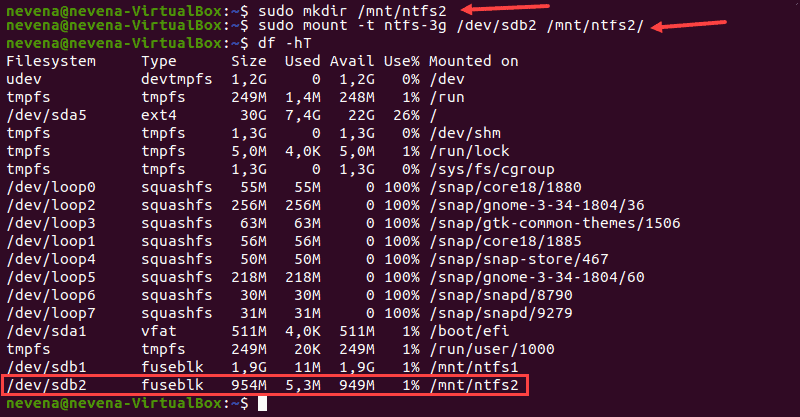
You now have the read/write permissions for the NTFS partition you mounted.
Note: Linux kernel version 2.6.20 or newer is recommended for mounting a partition via ntfs-3g. Learn on how to update the kernel on Ubuntu or how to update the kernel on CentOS.
After reading this article, you should have learned to mount an NTFS partition. Partition manipulation is crucial in a Linux system, and next, we recommend learning how to delete a partition in Linux and how to format disk partitions in Linux.
Dejan is the Head of Content at phoenixNAP with over 8 years of experience in Web publishing and technical writing. Prior to joining PNAP, he was Chief Editor of several websites striving to advocate for emerging technologies. He is dedicated to simplifying complex notions and providing meaningful insight into data center and cloud technology.
In Linux systems, in order to use storage devices such as Hard Drives and USB drives, you need to understand.
The ls command (short for ‘list’) lists information about directories and any type of files in the working.
A list of all the important Linux commands in one place. Find the command you need, whenever you need it or.