- Синхронизация времени по NTP
- [edit] Серверы времени
- RouterOS version 6
- Client settings example:
- NTP Server settings:
- RouterOS version 7
- NTP Client properties:
- NTP Server settings:
- Log messages
- Инструкции по настройке MikroTik
- Что даст настройка SNTP на MikroTik для локальной сети
- Нужно настроить SNTP клиент (сервер времени) в MikroTik?
- Как настроить SNTP client, синхронизация времени в MikroTik
- Установка сервера времени на роутере MikroTik
- Базовый набор пакетов пришивки
- Скачать пакет NTP
- Cкопировать NTP
- Представление сервера времени NTP
- Новый вид NTP client
- Включить NTP сервер в MikroTik
- Распространить NTP сервер в локальной сети
Синхронизация времени по NTP
Клиент NTP (Network Time Protocol) — это программный клиент, который позволяет маршрутизатору синхронизировать время с сервером в интернете. Текущее время маршрутизатора отображается в правом верхнем углу веб-интерфейса DD-WRT. Некоторые функции, такие как Ограничение доступа и график трафика по месяцам «Traffic by Month» в разделе Status, будут работать неправильно, если на маршрутизаторе установлено неправильное время из-за того, что он не синхронизирован с сервером времени. Или если синхронизирован, но не был задан правильный часовой пояс. Нельзя установить время вручную, поэтому нужно сделать это по протоколу NTP. Не думайте, что если задана настройка часового пояса в разделе Setup → Basic Setup → Time Settings, то всё нормально. Этот параметр предназначен только для подстройки времени, полученного с сервера в соответствии с местным временем.
Как утверждает разработчик DD-WRT Brainslayer: «If NTP is disabled the time starts at zero which is 1 January 1970». Это означает, что если синхронизация времени по NTP отключена, при запуске маршрутизатора время начинается с нуля для значения даты в системах Linux, т.е. с 1 января 1970 года.
Как уже упоминалось, нельзя просто задать время на маршрутизаторе, а затем забыть об этом. Однако можно настроить его на синхронизацию с общедоступным сервером времени с помощью NTP-клиента, а затем забыть об этом. Для настройки клиента NTP войдите в веб-интерфейс маршрутизатора и перейдите в «Setup» → «Basic Setup» → «Time Settings». После этого:
- Для параметра NTP Client задайте значение Enable.
- Выберите подходящий часовой пояс Time Zone для вашего региона.
- Установите летнее время (DST) соответствующим образом (см. Настройки часового пояса ниже).
- Введите доменное имя или IP-адрес выбранного сервера времени (см. Серверы времени ниже).
Не забудьте сохранить и применить настройки.
Как часто происходит синхронизация по NTP? Согласно сообщению на форуме от пользователя redhawk0, синхронизация происходит первый раз при запуске маршрутизатора, а затем через каждые 120 секунд.
Только что произошел переход на летнее или зимнее время в вашем регионе, но часы DD-WRT всё ещё отстают или спешат на час? Откройте командную строку Telnet или SSH и выполните следующие три команды (подробнее об этом можно прочитать на форуме):
- ntpclient pool.ntp.org
- stopservice process_monitor
- startservice process_monitor
Примечание. Сервер времени жестко запрограммирован в прошивке DD-WRT. Если вы включите NTP-клиент (включен по умолчанию), но оставите поле Server IP / Name пустым, маршрутизатор всё равно будет синхронизироваться. Один участник форума сообщил о сервере времени ntp2.usno.navy.mil в своём файле конфигурации. Только разработчик Brainslayer специалист в этом вопросе.
[edit] Серверы времени
Рекомендуется использовать ближайший сервер времени для снижения интернет-трафика. Актуальный адрес сервера для вашего региона или страны вы можете найти по адресу http://www.pool.ntp.org/ . Далее приведены примеры для ряда областей:
Соединенные штаты Америки
RouterOS version 6
IP address of the NTP server that has to be used for time synchronization. If both values are non-zero, then the SNTP client will alternate between the two server addresses, switching to the other when the request to the current server times out or when the «KoD» packet is received, indicating that the server is not willing to respond to requests from this client.
The following formats are accepted:
- active-server (IP address; read-only property) : Currently selected NTP server address. This value is equal to primary-ntp or secondary-ntp.
- poll-interval (Time interval; read-only property) : Current interval between requests sent to the active server. The initial value is 16 seconds, and it is increased by doubling to 15 minutes.
Last received packet information
Values of the following properties are reset when the SNTP client is stopped or restarted, either because of a configuration change, or because of a network error.
- last-update-from (IP address; read-only property) : Source IP address of the last received NTP server packed that was successfully processed.
- last-update-before (Time interval; read-only property) : Time since the last successfully received server message.
- last-adjustment (Time interval; read-only property) : Amount of clock adjustment that was calculated from the last successfully received NTP server message.
- last-bad-packet-from (IP address; read-only property) : Source IP address of last received SNTP packed that was not successfully processed. Reason of the failure and time since this packet was received is available in the next two properties.
- last-bad-packet-before (Time interval; read-only property) : Time since the last receive failure.
- last-bad-packet-reason (Text; read-only property) : Text that describes the reason of the last receive failure. Possible values are:
- bad-packet-length — Packet length is not in the acceptable range.
- server-not-synchronized — Leap Indicator field is set to «alarm condition» value, which means that clock on the server has not been synchronized yet.
- zero-transmit-timestamp — Transmit Timestamp field value is 0.
- bad-mode — Value of the Mode field is neither ‘server’ nor ‘broadcast’.
- kod-ABCD — Received «KoD» (Kiss-o’-Death) response. ABCD is the short «kiss code» text from the Reference Identifier field.
- broadcast — Received proadcast message, but mode=unicast.
- non-broadcast — Received packed was server reply, but mode=broadcast.
- server-ip-mismatch — Received response from address that is not active-server.
- originate-timestamp-mismatch — Originate Timestamp field in the server response message is not the same as the one included in the last request.
- roundtrip-too-long — request/response roundtrip exceeded 1 second.
Client settings example:
To check the status of the NTP client in CLI, use the «print» command
[admin@ntp-example_v6] > /system ntp client print enabled: no primary-ntp: 0.0.0.0 secondary-ntp: 0.0.0.0 server-dns-names: mode: unicast
To enable the NTP client and set IP addresses or FQDN of the NTP servers:
[admin@ntp-example_v6] > /system ntp client set enabled=yes [admin@ntp-example_v6] > /system ntp client print enabled: yes primary-ntp: 0.0.0.0 secondary-ntp: 0.0.0.0 server-dns-names: mode: unicast dynamic-servers: x.x.x.x, x.x.x.x poll-interval: 15s active-server: x.x.x.x last-update-from: x.x.x.x last-update-before: 6s570ms last-adjustment: -1ms786us [admin@ntp-example_v6] > /system ntp client set primary-ntp=162.159.200.123 [admin@ntp-example_v6] > /system ntp client print enabled: yes primary-ntp: 162.159.200.123 secondary-ntp: 0.0.0.0 server-dns-names: mode: unicast dynamic-servers: x.x.x.x, x.x.x.x poll-interval: 16s active-server: x.x.x.x
NTP Server settings:
Server configuration is located in /system ntp server
enabled (yes or no; default value: no)
broadcast (yes or no; default value: no)
multicast (yes or no; default value: no)
manycast (yes or no; default value: no)
broadcast-addresses (IP address; default value: )
Set up an NTP server for the local network that is 192.168.88.0/24
/system ntp server set broadcast=yes broadcast-addresses=192.168.88.255 enabled=yes manycast=no
RouterOS version 7
NTP Client properties:
NTP servers
The list of NTP servers. It is possible to add static entries.
The following formats are accepted:
— FQDN («Resolved Address» will appear in the «Servers»- window in an appropriate column if the address is resolved) or IP address can be used. If DHCP-Client property use-peer-ntp=yes — the dynamic entries advertised by DHCP
— ipv4
— ipv4 @ vrf
— ipv6
— ipv6 @ vrf
— ipv6-linklocal % interfaceA detailed table of dynamically and statically added NTP servers (Address, Resolved address, Min Poll, Max Poll, iBurst, Auth. Key)
To set the NTP server using its FQDN. The domain name will be resolved each time an NTP request is sent. Router has to have /ip/dns configured.
[admin@ntp-example_v7] > /system/ntp/monitor-peers type="ucast-client" address=x.x.x.x refid="y.y.y.y" stratum=3 hpoll=10 ppoll=10 root-delay=28.869 ms root-disp=50.994 ms offset=-0.973 ms delay=0.522 ms disp=15.032 ms jitter=0.521 ms -- [Q quit|D dump|C-z pause]
NTP symmetric keys, used for authentication between the NTP client and server. Key Identifier (Key ID) — an integer identifying the cryptographic key used to generate the message-authentication code.
- synchronized, stopped, waiting, using-local-clock — Current status of the NTP client
- Frequency drift — The fractional frequency drift per unit time.
- synced-server — The IP address of the NTP Server.
- synced-stratum — The accuracy of each server is defined by a number called the stratum, with the topmost level (primary servers) assigned as one and each level downwards (secondary servers) in the hierarchy assigned as one greater than the preceding level.
- system-offset — This is a signed, fixed-point number indicating the offset of the NTP server’s clock relative to the local clock, in seconds.
NTP Server settings:
Server configuration is located in /system ntp server
broadcast (yes or no; default value: no)
multicast (yes or no; default value: no)
manycast (yes or no; default value: no)
broadcast-addresses (IP address; default value: )
vrf (default: main)
use-local-clock (yes or no ; default value: no)
local-clock-stratum
auth-key ( default value: none)
Log messages
SNTP client can produce the following log messages. See the article «log» on how to set up logging and how to inspect logs.
Explanation of log message fields
- OFFS — difference of two NTP timestamp values, in hexadecimal.
- PKT — dump of NTP packet. If the packet is shorter than the minimum 48 bytes, it is dumped as a hexadecimal string. Otherwise, the packet is dumped as a list of field names and values, one per log line. Names of fields follow RFC4330.
- IP — remote IP address.
NOTE: the above logging rules work only with the built-in SNTP client, the separate NTP package doesn’t have any logging facilities.
Инструкции по настройке MikroTik

Что даст настройка SNTP на MikroTik для локальной сети
Стоит ли вообще поднимать такой вопрос как время на устройствах локальной сети. Самый ближний родственник обязательного применения этой настройки это Active Directory от Windows. Хотя даже Chrome и антивирус перестанут функционировать, если после запроса времени на устройстве в ответе будет значение 01.01.2011. Для системного администратора этот процесс можно автоматизировать посредством оборудования настройки NTP на роутере MikroTik.
Нужно настроить SNTP клиент (сервер времени) в MikroTik?
Мы поможем настроить: маршрутизатор(роутер), точку доступа или коммутатор.
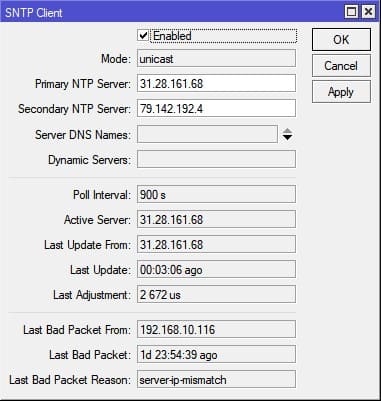
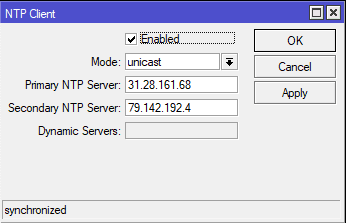
Как настроить SNTP client, синхронизация времени в MikroTik
Это настройка обеспечит синхронизацию времени на роутере MikroTik. Как SNTP клиент MikroTik будет подключиться к NTP серверу. Стабильную работу на протяжении многих лет демонстрируют NTP сервера с сайта https://www.ntppool.org
Настройка находится System→SNTP Client

/system ntp client set enabled=yes primary-ntp=31.28.161.68 secondary-ntp=79.142.192.4
Установка сервера времени на роутере MikroTik
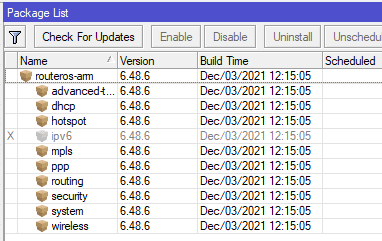
Базовый пакет прошивки не содержит опцию NTP сервера. К примеру так выглядит типичная прошивка роутера MikroTik
Настройка находится System→Packages
Базовый набор пакетов пришивки

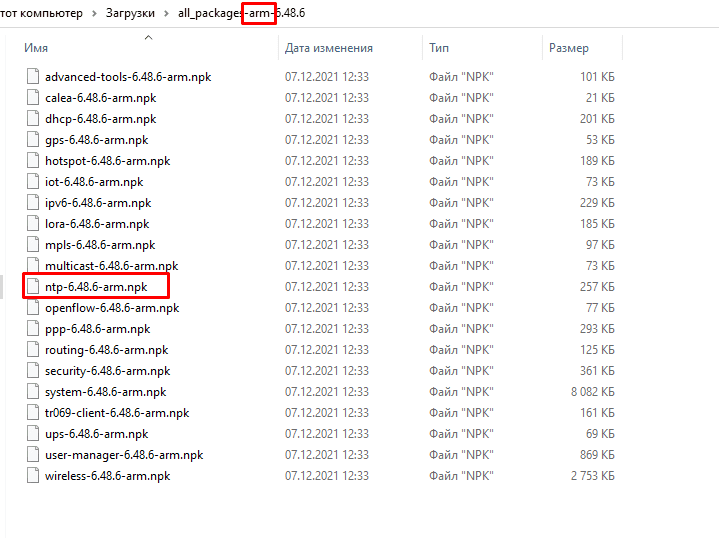
И для установки сервера времени на роутере MikroTik, необходимо скачать и установить пакет NTP в соответствии с текущим видом CPU.
Скачать пакет NTP

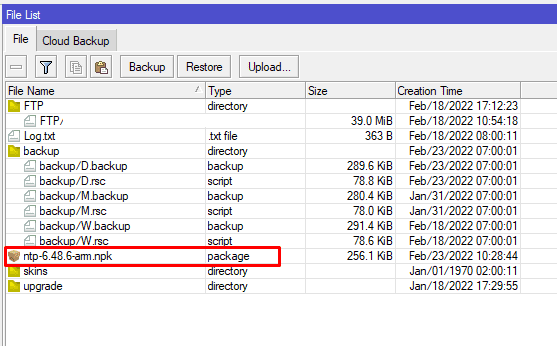
Далее нужно скопировать пакет во внутреннюю память MikroTik
Настройка находится Files→File
Cкопировать NTP

И перезагрузить роутер MikroTik. На этапе загрузки в RoutesOS будет установлен пакет NTP и сервер времени в MikroTik будет иметь вид
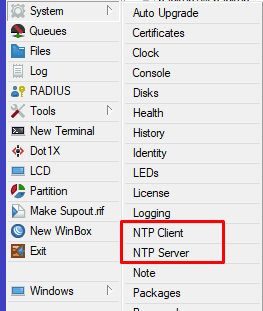
Представление сервера времени NTP

NTP client преобразится и его обновленная форма будет также содержать сервера NTP, с которыми роутер MikroTik будет синхронизироваться.
Настройка находится System→NTP client
Новый вид NTP client

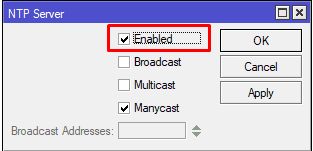
Следующим этапом необходимо активировать сервер времени(NTP), в роли которого будет выступать сам роутер MikroTik.
Настройка находится System→NTP server
Включить NTP сервер в MikroTik

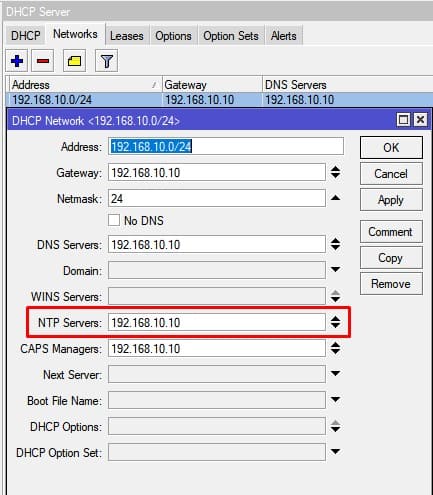
На завершающем этапе настроек нужно распространить NTP сервер через настройки DHCP сервера.
Настройка находится IP→DHCP Server→Networks
Распространить NTP сервер в локальной сети

Есть вопросы или предложения по настройке SNTP клиента в MikroTik? Активно предлагай свой вариант настройки! Оставить комментарий →