- NoMachine
- Installation
- Usage
- Troubleshooting
- Headless server
- Separate NoMachine X session in parallel with existing X session
- Problems with default keyboard in display manager
- Connecting via SSH
- Virtualbox guest audio stream lost on reconnection
- See also
- Install NoMachine on Ubuntu 20.04
- Install NoMachine on Ubuntu 20.04
- Download NoMachine Installation Package
- Install NoMachine on Ubuntu 20.04
- Running NoMachine on Ubuntu 20.04
- Configuring NoMachine on Ubuntu 20.04
- Allow NoMachine Remote Connection
- Open NoMachine Server Port on Firewall
- Connecting to Remote Desktop Computer using NoMachine
- Create NoMachine New Connection
- NoMachine Remote Desktop Address
- NoMachine Authentication Method
- NoMachine Connections
- Enterprise Products Evaluation
- Enterprise Products Evaluation
NoMachine
NoMachine enables you to access a graphical desktop of a computer over the network.
Until version 3.x, NoMachine was known as NX and available under GPL. There are derivatives based on core NX libraries like FreeNX and X2Go. The major drawback of these is that they utilise a built-in X server of nxagent, which originates from the year 2005 and some current X applications cannot run due to unsupported features available only in newer versions of X libraries.
Unlike some other remote desktop solutions (e.g. TeamViewer), NoMachine does not require an intermediary server to establish the connection.
Since NoMachine version 4, the software is proprietary and currently two editions are available: Free and Enterprise. Clients exist for Linux, MS Windows, macOS, Android and iOS.
The free edition allows to connect to an existing X display (also known as display shadowing of a live session with a physical display) or, if no X display is available (e.g. on head-less machines), NoMachine tries to start its own X server with the default Desktop environment automatically. The major limitation of the free edition is that only a single remote desktop session may run on the server.
Installation
It includes both server and client tar balls. Note that the setup actually takes place by a post-installation script and therefore the list of files shown by command pacman -Ql nomachine is not complete!
In particular, the majority of NoMachine files are kept within /usr/NX directory, but a few more are added:
/etc/NX /etc/pam.d/nx /usr/lib/systemd/system/nxserver.service /usr/local/share/applications/NoMachine*.desktop /usr/share/polkit-1/actions/org.freedesktop.pkexec.nomachine.policy
The files created by NoMachine Player are stored in:
$HOME/.nx $HOME/Documents/NoMachine
The post-install script also creates a new user nx .
If you have X2Go or FreeNX installed as well, do not get confused that some files use similar names (i.e. /usr/bin/nx ).
The nxserver.service does not need to be enabled and started on computers which will be used only as the client, but it must run on the server.
Usage
On the target computer, start/enable nxserver.service via systemd, or via menu in your desktop: Internet > NoMachine > NoMachine Service, which does the same via a GUI and offers extra info and configuration.
On the client, start the «Player» (menu Internet > NoMachine > NoMachine. Or start it with
It will search the LAN for available NoMachine servers or, if disabled or in a different subnet/WAN, you can type in the target hostname or IP address manually. The login credentials are the same as used for the user on the target computer.
Troubleshooting
Headless server
For correct environment setup those changes are needed:
auth include system-remote-login account include system-remote-login password include system-remote-login session include system-remote-login
Change DefaultDesktopCommand in /usr/NX/etc/node.cfg and add the following in front of your starting command:
env DBUS_SESSION_BUS_ADDRESS=unix:path=/run/user/$(id -u)/bus
DefaultDesktopCommand "env DBUS_SESSION_BUS_ADDRESS=unix:path=/run/user/$(id -u)/bus /usr/bin/startxfce4"
Separate NoMachine X session in parallel with existing X session
In default setup, the Free edition of NoMachine connects the client directly to an existing X session on the remote computer, even if it runs the X Display Manager only. This may be unwanted, because no other user may use the target computer locally at the same moment and because any person with physical access to the target computer can see on the physical display, what the remotely connected user is doing.
However, it is possible to setup NoMachine to check only for a particular DISPLAY, e.g. DISPLAY :10 and it will ignore the existing X session on DISPLAY :0 (standard setup in Arch Linux) and start a new virtual session for the remotely connecting user.
To do so, edit the key PhysicalDisplays in /usr/NX/etc/node.cfg :
Problems with default keyboard in display manager
When NoMachine connects to the display manager on the target computer and the user tries to login as if sitting at the target computer, the user authentication may fail due to a different keymap. A workaround is to type the user’s password e.g. in a text editor and copy it via clipboard to the NoMachine session.
Once the user is logged in to the remote desktop environment, running setxkb cz (‘cz’ stands for the Czech keyboard as an example) should resolve the problem with key mappings.
Connecting via SSH
The free edition of NoMachine does not allow to use the SSH protocol to connect to the target computer and only NX protocol (listening on port 4000 by default) is used.
If it is not preferred to open yet another port on the firewall, a workaround is to create a standard SSH tunnel between client and target computer and connect through it:
On the client computer, for example:
$ ssh -L 4000:localhost:4000 user@targetmachine -fN
Then, start NoMachine Player and try to connect to localhost with the NX protocol. The connection will be tunneled to the targetmachine and redirected to the server’s localhost port 4000 .
Virtualbox guest audio stream lost on reconnection
If using PulseAudio audio interface, nxserver will restart pulseaudio on client disconnection, virtualbox guest machine can not connect to the new pulseaudio automatically, thus audio stream lost. A workaround is to provide a dummy pulseaudio in your PATH for nxserver.
$ ln -s /usr/bin/true /some/path/prior/to/usr/bin/pulseaudio $ which -a pulseaudio /some/path/prior/to/usr/bin/pulseaudio /usr/bin/pulseaudio
Then reinstall the nomachine AUR package to regenerate /usr/NX/etc/node.cfg , and recheck the pulseaudio start command.
$ grep -i pulse /usr/NX/etc/node.cfg AudioInterface pulseaudio CommandStartPulseAudio "/some/path/prior/to/usr/bin/pulseaudio --high-priority=no"
See also
Install NoMachine on Ubuntu 20.04

Welcome to our tutorial on how to install NoMachine on Ubuntu 20.04. NoMachine is a remote desktop tool just like VNC, TeamViewer. It is designed to work across several platforms such as Windows, Mac and Linux to give users access to the physical desktop of the remote computer. NoMachine provides the best, fastest and highest quality remote desktop experience.
Read more about the features of NoMachine on NoMachine Free Desktop for Everybody page.
Note that in order for NoMachine to work, you need to install both on the remote desktop system you need to access as well as on the desktop system you are connecting from.
Install NoMachine on Ubuntu 20.04
Download NoMachine Installation Package
NoMachine is not available on Ubuntu 20.04 default repositories. Therefore, you need to download the DEB binary package from NoMachine For Linux Downloads page.
On the Download page, select the version of NoMachine for your respective Ubuntu 20.04 system architecture.
To find your Ubuntu system architecture type, use hostnamectl or uname -m command;
Static hostname: ubuntu20.kifarunix-demo.com Icon name: computer-vm Chassis: vm Machine ID: d91cc24f09bc439190b19b1fe11365b0 Boot ID: bf5cd9c49eed4e46a7903d183303cb84 Virtualization: oracle Operating System: Ubuntu 20.04.1 LTS Kernel: Linux 5.4.0-65-generic Architecture: x86-64 In our case, we will download the DEB binary package for the 64-bit Ubuntu 20.04 system. You can simply navigate to NoMachine x86_64 Debian Binary packages page and grab your package. Or simply execute the command below to download NoMachine version 7.1.3_1, which is the current stable release version of NoMachine as of this writing. You can verify the versions and replace accordingly.
wget https://download.nomachine.com/download/7.1/Linux/nomachine_7.1.3_1_amd64.debInstall NoMachine on Ubuntu 20.04
Once the download is done, run either of the commands below to install the package;
sudo dpkg -i nomachine_7.1.3_1_amd64.debsudo apt install ./nomachine_7.1.3_1_amd64.deb. Unpacking nomachine (7.1.3-1) . Setting up nomachine (7.1.3-1) . NX> 700 Starting install at: Tue Feb 09 19:48:34 2021. NX> 700 Installing: nxclient version: 7.1.3. NX> 700 Using installation profile: Ubuntu. NX> 700 Install log is: /usr/NX/var/log/nxinstall.log. NX> 700 Compiling the USB module. NX> 700 Installing: nxplayer version: 7.1.3. NX> 700 Using installation profile: Ubuntu. NX> 700 Install log is: /usr/NX/var/log/nxinstall.log. NX> 700 To connect the remote printer to the local desktop, NX> 700 the user account must be a member of the CUPS System Group: lpadmin. NX> 700 Installing: nxnode version: 7.1.3. NX> 700 Using installation profile: Ubuntu. NX> 700 Install log is: /usr/NX/var/log/nxinstall.log. NX> 700 Creating configuration in: /usr/NX/etc/node.cfg. NX> 700 Installing: nxserver version: 7.1.3. NX> 700 Using installation profile: Ubuntu. NX> 700 Install log is: /usr/NX/var/log/nxinstall.log. NX> 700 Creating configuration in: /usr/NX/etc/server.cfg. NX> 700 Install completed at: Tue Feb 09 19:49:22 2021. NX> 700 NoMachine was configured to run the following services: NX> 700 NX service on port: 4000Running NoMachine on Ubuntu 20.04
Once the installation completes, the NoMachine package is now available in your system.
You can launch it from the applications menu. Also, you should be able to see the !M icon on the system tray.

Configuring NoMachine on Ubuntu 20.04
NoMachine can be configured as a server or a client depending on how you are using it.
To access the NoMachine settings, click on the !M icon in the system tray and click Show the server status.
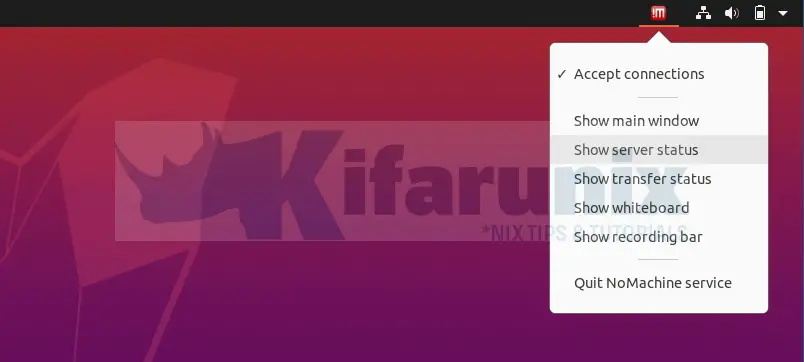
Similarly, you can access the settings by clicking the NoMachine service from the system apps as shown in the screenshot above.
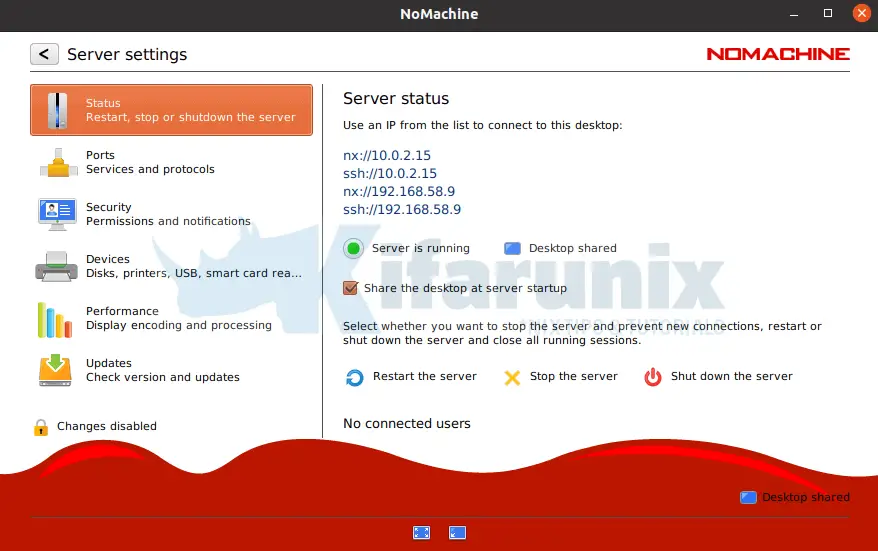
You can access various settings for NM as shown in the screenshot above.
Allow NoMachine Remote Connection
NoMachine installed on a remote system acts as the server. If the server is running unattended, then you need to disable the need for permission to connect to it remotely. Otherwise, if it is being managed, then you can leave the default settings to be prompted on whether to allow remote access.
So, since in our case we are running our Ubuntu 20.04 system unattended, we uncheck the Require permission to let users connect option.
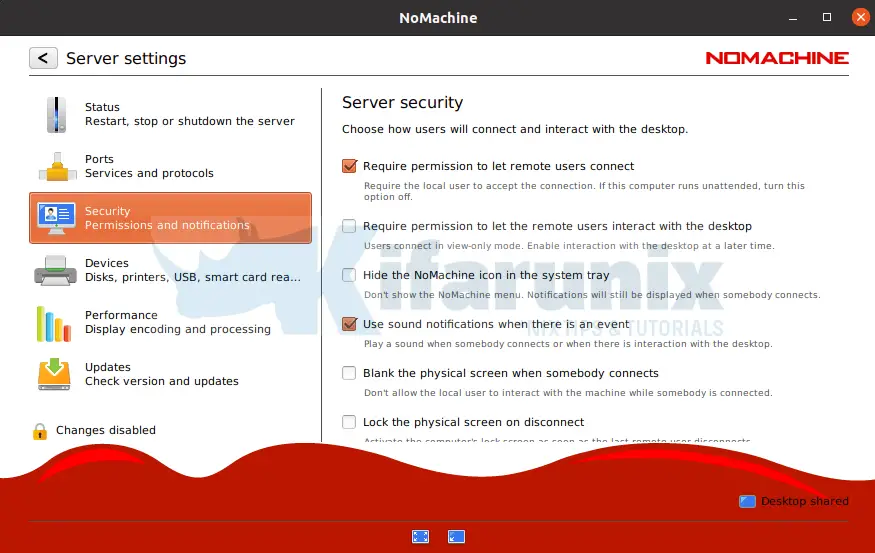
Go through other tabs for more configuration options.
Click Done when done setting up NoMachine on your Ubuntu 20.04.
Open NoMachine Server Port on Firewall
If you are running NoMachine on a remote desktop as a server and you have UFW running, then you need to open the ports to allow external connections.
Connecting to Remote Desktop Computer using NoMachine
As stated above, for NoMachine remote connections to work, both desktop computers must have NoMachine software installed.
Create NoMachine New Connection
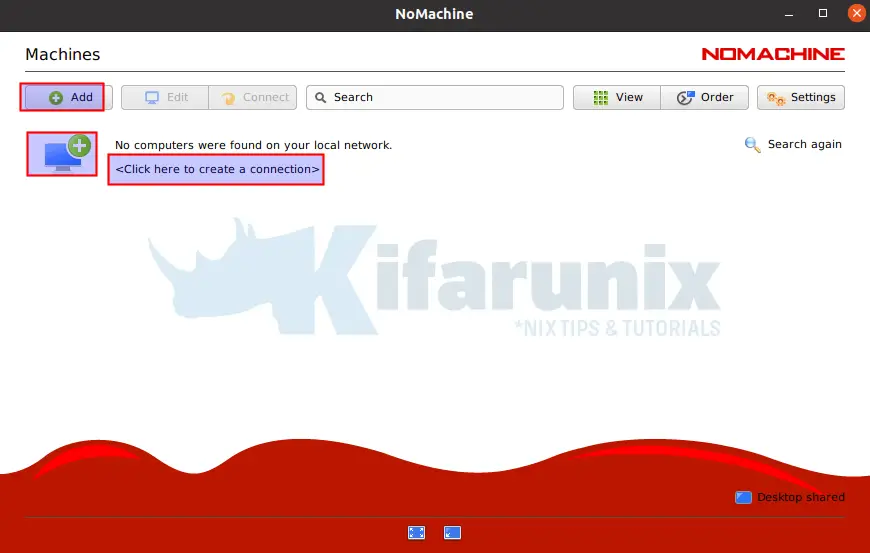
Assuming your remote computer has NoMachine already installed and running as a server, on the remote desktop to which you are connecting from, here in referred to as NoMachine client, launch the NoMachine client from system apps menu.
NoMachine try to search for any local NoMachine connections.
If it dont find any, click on the +Add button to create new connection or simply click on the desktop computer with + sign or simply click .
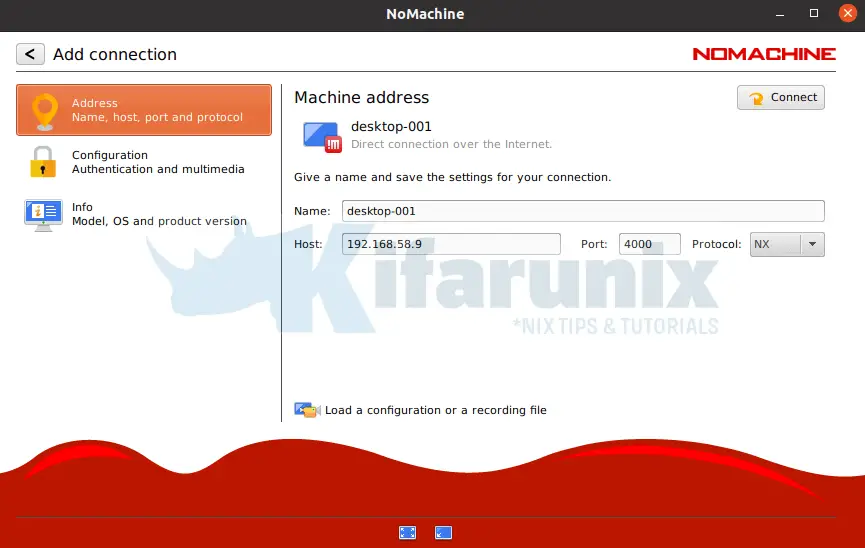
NoMachine Remote Desktop Address
Enter the remote desktop address, the port, the host and the connection protocol.
NoMachine Authentication Method
Select NoMachine authentication method.

NoMachine Connections
Once you are done, you can click connect button to connect to remote desktop system.
You can as well click the back arrow to see created connections.
Initiating NoMachine Remote Desktop Connection
To initiate a remote connection, select the connection name and click Connect or simply right a connection name and start a connection.
Enterprise Products Evaluation
All products of the NoMachine for the Enterprise range are available as evaluation software without registration for 30 days, and install with all corresponding features available with the exception of H.264 support. This will be activated upon purchasing the relevant product. Simply click the download button for the product you wish to evaluate.

![]()
![]()
![]()
![]()
![]()
![]()
![]()
Enterprise Products Evaluation

All products of the NoMachine for the Enterprise range are available as evaluation software without registration for 30 days, and install with all corresponding features available. Simply click the download button for the product you wish to evaluate. Choose from Enterprise Desktop for hassle-free remote control of any computer, Cloud Server for secure centralized access to desktops and applications, or the Terminal Server range for server-based computing solutions on Linux.