- How do you run update-grub?
- 3 Answers 3
- Phase 1 — Note: don’t use a Live CD.
- Phase 2 — After you have logged into your system
- Как обновить загрузчик GRUB в Debian и производных дистрибутивах (Kali Linux, Ubuntu, Linux Mint)
- Когда нужно обновлять загрузчик GRUB в /boot/grub/
- Проверка, используется ли GRUB в операционной системе
- Как обновить загрузчик GRUB в /boot/grub/
- Связанные статьи:
- Как обновить загрузчик GRUB в Arch Linux и производных дистрибутивах (Manjaro, BlackArch)
- Когда нужно обновлять загрузчик GRUB в /boot/grub/
- Проверка, используется ли GRUB в операционной системе
- Как обновить загрузчик GRUB в /boot/grub/
- Близкие статьи
How do you run update-grub?
I went into Live CD and activated Terminal. Then, I typed gksu nautilus to gain temporary access to my root directory. Once the Manager window opened, I clicked on File System and navigated to the /etc/default/grub directory. I then double clicked on the Grub file to make changes to the TIMEOUT and TIMEOUT_QUIET . I saved the file after I made the changes. Then I went back to the terminal mode and typed:
I’m not sure what to do at this point. How can I run update-grub to update the changes? Thanks in advance for your help. Please be very detailed and specific with your response as I am totally new to this environment.
3 Answers 3
Phase 1 — Note: don’t use a Live CD.
- In your Ubuntu open a terminal (press Ctrl + Alt + T at the same time)
- Type gedit admin:///etc/default/grub
This will run text-editor gedit, if you’re using another one just type the name of it instead of gedit . - Make the changes you would like to make and save them.
- Close gedit.
Your terminal should still be open. - In the terminal type sudo update-grub , wait for the update to finish.
- Reboot your computer.
Phase 2 — After you have logged into your system
- Open a terminal again ( Ctrl + Alt + T ).
- Type in the terminal gksu gedit /etc/default/grub
- To see the grub-menu at boot time,
comment or remove the following line: GRUB_HIDDEN_TIMEOUT=0- To comment, add # at the beginning of this line, the result will be #GRUB_HIDDEN_TIMEOUT=0
If seeing the grub menu at boot is the only thing you want you should undo earlier changes to the file.
Thanks for your response. The original problem that I’m trying to solve is that I can’t get the grub menu to open. So I thought that I had to use the Live CD to access the grub config file and make my changes. I read that if I change the TIMEOUT to 10 and TIMEOUT_QUIT to true, that I’ll be able to access the Grub menu. When I boot the system, I hold down the shift key. I do see the words GRUB MENU pop up just for a split second. So without being able to use the Live CD to access Terminal, I’m at a loss as to how to modify the GRUB config file. Any suggestions on how to accomplish this?
You are getting that message because the Live CD doesn’t mount a writeable filesystem. It’s only meant to be used to try-out Ubuntu or to rescue a damaged system. Executing a sudo update-grub only works on an installed version of Ubuntu, where you have write access to the underlying GRUB files (and on a Live CD, you do not).
Good info, but the OP would also like to know how he can make the changes he wants in /etc/default/grub and then update-grub .
You can do update-grub from a live CD on an installed Ubuntu Distro (although I assume this works with any [debian-based?] linux distro. It is «required» (there may be other methods but knowing this one, I don’t care about them at all) if you clone your drive and have already installed the new one in the computer. I mention cloning here extensively, because in a sense the update-grub step is a subset of it and the approaches have the same basis during a live session. Also this method was discovered through searching in the context of cloning. You can take what you need from it if you are not cloning, and your process will be simplified.
I should qualify this here; importantly for cloning, not importantly for just doing update-grub: I have done this on BIOS systems only. I have not attempted it on a UEFI system. The UEFI system requires a FAT partition for boot loading and I have not tested whether this partition should just come along for the ride during the cloning copy steps. I expect that it does affect the required [bind-]mounting that synthesizes the native grub environment during the live session.
This is detailed on this page: http://frugaltech.happystoic.com/ssdlinux. I have used this method many times, and you can swap hard drives around ad-infinitum using it. Swapping physical hard drives becomes so trivial this way, it is tempting to make it its own hobby and/or try to fix other people’s messed-up computers.
The following may be a helpful paraphrase of what you will find there:
- Ctrl + Alt + T for Bash terminal and enter a superuser shell ( sudo -s ) during a live session.
- mount the full install drive partition (that which is [or will become] your permanent Linux filesystem root directory). 2a. If the full install already exists on your hard drive, skip to (2). IF you are CLONING: [based on the assumption that you are not doing a fresh install, since this is all entirely automatic in that case] if your full install does not already exist on this partition, now is the time to simply
rsync -a /existing/linux/filesystem/live-mount-point/ /new/linux/filesystem/live-mount-point/You should now be done. I have simultaneously cloned Windows (XP and 7) in various permutations alongside Ubuntu and Puppy using this method and it has not failed me. I think you can use a live medium of a different distro (I have only used different Ubuntu flavors and Mint for this however) as long as they provide the version of GRUB you intend to use. You can move partitions around, swap drives, combine other OS installs, and clone to or from SSD using this. I can only speak to it working in the same machine however. I assume drivers that might be required for a different machine might have been skipped during your previous full install. My rule of thumb is switching drives in a computer requires this method, but switching computers with a drive requires a full [re-]install.
Perhaps someone can debunk this.
Как обновить загрузчик GRUB в Debian и производных дистрибутивах (Kali Linux, Ubuntu, Linux Mint)
Загрузчик операционной системы GRUB устанавливается и обновляется в Linux как и любой другой пакет программного обеспечения. Но особенностью загрузчика является то, что даже после обновления пакета, фактически работающие файлы загрузчика, которые находятся в разделе, монтируемом по пути /boot/grub/, не обновляются автоматически.
То есть при выходе новых версий GRUB, пакет в вашей ОС обновляется автоматически.

Но сам загрузчик, который устанавливается на отдельном разделе диска и монтируется по пути /boot/grub/, не обновляется.
Чтобы начать использовать новые функции, которые добавлены в новые версии GRUB, вам нужно вручную обновить загрузчик.
Когда нужно обновлять загрузчик GRUB в /boot/grub/
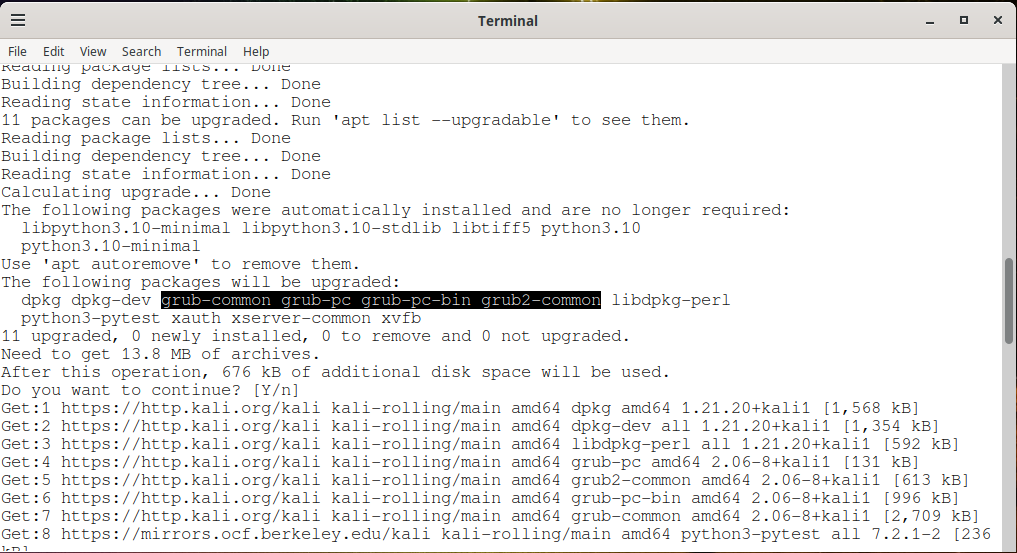
Сигналом, что вышла новая версия GRUB, является примерно следующие сообщения:
Setting up grub-common (2.06-8+kali1) . . Setting up grub2-common (2.06-8+kali1) . . Setting up grub-pc-bin (2.06-8+kali1) …
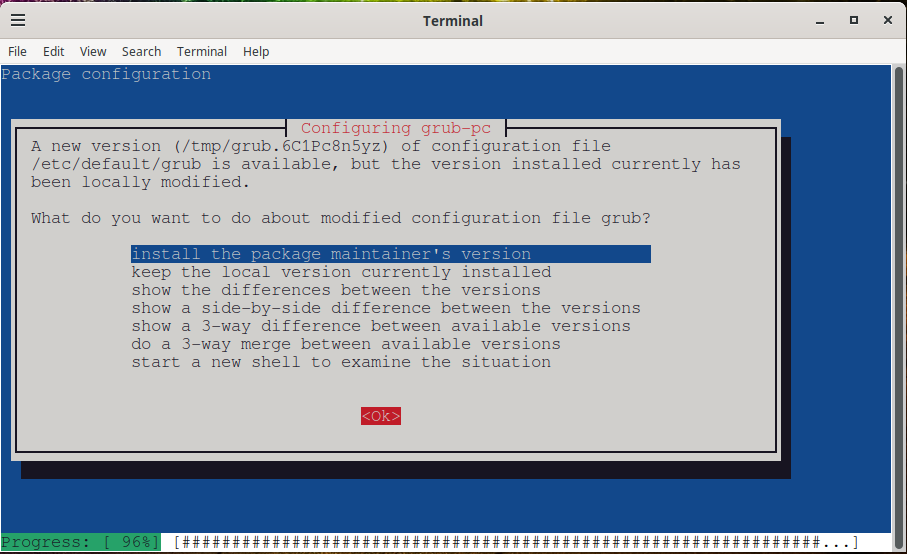
Ещё один признак, что обновился пакет GRUB — запрос на обновление дефолтного файла конфигурации GRUB.
Чтобы использовать новые функции, представленные в этом обновлении GRUB, рекомендуется установить его в MBR или UEFI. Из-за потенциальной несовместимости конфигурации рекомендуется выполнить как установку, так и создание конфигурации.
То есть если вы видите эти сообщения, значит вам нужно обновить загрузчик в /boot/grub/.
Проверка, используется ли GRUB в операционной системе
Чтобы убедиться, что в качестве загрузчика используется именно GRUB, выполните следующую команду:
Если файл /boot/grub/grub.cfg найден, значит используется GRUB, если файл grub.cfg не найден, значит GRUB не используется и обновлять его не нужно. То есть не нужно выполнять действия, показанные в данной статье!
Как обновить загрузчик GRUB в /boot/grub/
Для обновления загрузчика нужно выполнить команду вида:
grub-install --recheck /dev/DISK
Где в качестве /dev/DISK нужно указать имя вашего диска.
Имена дисков можно проверить командой:
Disk /dev/vda: 50 GiB, 53687091200 bytes, 104857600 sectors Units: sectors of 1 * 512 = 512 bytes Sector size (logical/physical): 512 bytes / 512 bytes I/O size (minimum/optimal): 512 bytes / 512 bytes Disklabel type: dos Disk identifier: 0x00000000 Device Boot Start End Sectors Size Id Type /dev/vda1 * 2048 104857566 104855519 50G 83 Linux Disk /dev/vdb: 450 KiB, 460800 bytes, 900 sectors Units: sectors of 1 * 512 = 512 bytes Sector size (logical/physical): 512 bytes / 512 bytes I/O size (minimum/optimal): 512 bytes / 512 bytes
В данном случае именем диска является /dev/vda. Обратите внимание, что /dev/vda — это не загрузочный или какой-то другой раздел — это весь диск.
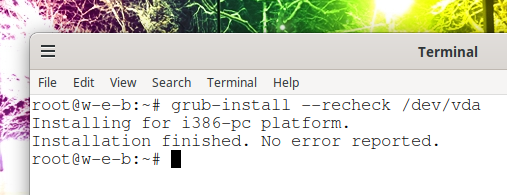
Итак, команда для обновления GRUB в /boot/grub/ в моём случае следующая:
grub-install --recheck /dev/vda
Installing for i386-pc platform. Installation finished. No error reported.
Также необходимо создать новый файл конфигурации следующей командой:
grub-mkconfig -o /boot/grub/grub.cfg
Generating grub configuration file . Found linux image: /boot/vmlinuz-6.0.0-kali6-cloud-amd64 Found initrd image: /boot/initrd.img-6.0.0-kali6-cloud-amd64 Found linux image: /boot/vmlinuz-6.0.0-kali5-cloud-amd64 Found initrd image: /boot/initrd.img-6.0.0-kali5-cloud-amd64 Warning: os-prober will not be executed to detect other bootable partitions. Systems on them will not be added to the GRUB boot configuration. Check GRUB_DISABLE_OS_PROBER documentation entry. done
Обновление загрузчика GRUB и обновление конфигурации GRUB завершилось успешно. При следующей загрузке, ваша операционная система будет использовать новые функции, которые были добавлены обновлением GRUB.
Связанные статьи:
Как обновить загрузчик GRUB в Arch Linux и производных дистрибутивах (Manjaro, BlackArch)
Загрузчик операционной системы GRUB устанавливается и обновляется в Linux как и любой другой пакет программного обеспечения. Но особенностью загрузчика является то, что даже после обновления пакета, фактически работающие файлы загрузчика, которые находятся в разделе, монтируемом по пути /boot/grub/, не обновляются автоматически.
То есть при выходе новых версий GRUB, пакет в вашей ОС обновляется автоматически.
Но сам загрузчик, который устанавливается на отдельном разделе диска и монтируется по пути /boot/grub/, не обновляется.
Чтобы начать использовать новые функции, которые добавлены в новые версии GRUB, вам нужно вручную обновить загрузчик.
Когда нужно обновлять загрузчик GRUB в /boot/grub/
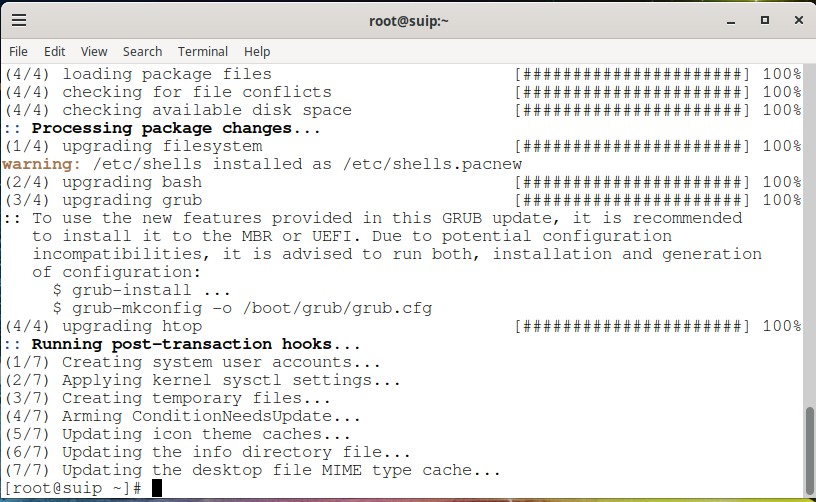
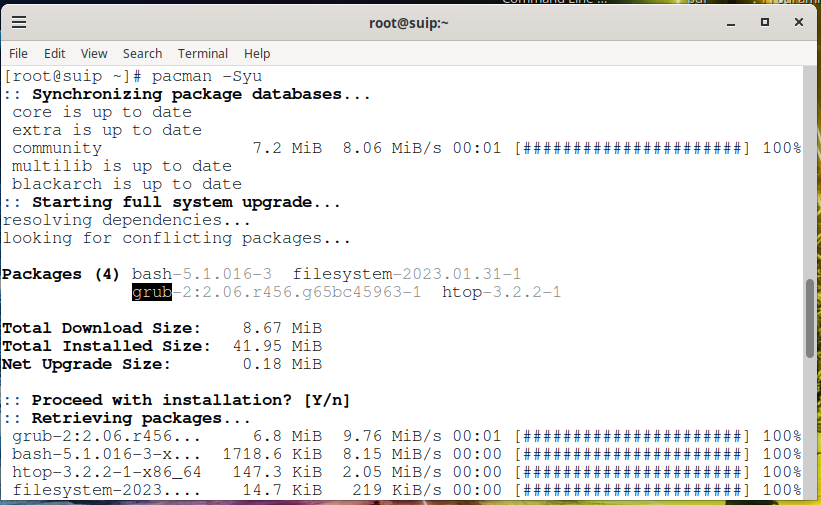
Сигналом, что вышла новая версия GRUB, является примерно следующее сообщение:
(3/4) upgrading grub [######################] 100% :: To use the new features provided in this GRUB update, it is recommended to install it to the MBR or UEFI. Due to potential configuration incompatibilities, it is advised to run both, installation and generation of configuration: $ grub-install . $ grub-mkconfig -o /boot/grub/grub.cfg
В этом сообщении говориться, чтобы использовать новые функции, представленные в этом обновлении GRUB, рекомендуется установить его в MBR или UEFI. Из-за потенциальной несовместимости конфигурации рекомендуется выполнить как установку, так и создание конфигурации. А также даны примерные команды.
То есть если вы видите это сообщение, значит вам нужно обновить загрузчик в /boot/grub/.
Проверка, используется ли GRUB в операционной системе
В Arch Linux и производных дистрибутивах пакет GRUB может быть установлен, но при этом не используется, поскольку загрузчиком является systemd-boot.
Чтобы убедиться, что в качестве загрузчика используется именно GRUB, выполните следующую команду:
Если файл /boot/grub/grub.cfg найден, значит используется GRUB, если файл grub.cfg не найден, значит GRUB не используется и обновлять его не нужно. То есть не нужно выполнять действия, показанные в данной статье!
Как обновить загрузчик GRUB в /boot/grub/
Для обновления загрузчика нужно выполнить команду вида:
grub-install --recheck /dev/DISK
Где в качестве /dev/DISK нужно указать имя вашего диска.
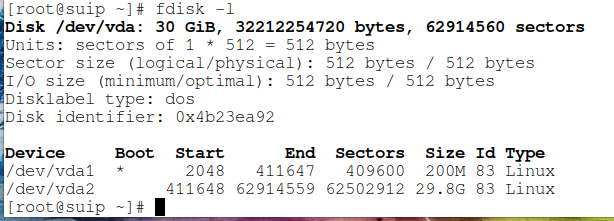
Имена дисков можно проверить командой:
Disk /dev/vda: 30 GiB, 32212254720 bytes, 62914560 sectors Units: sectors of 1 * 512 = 512 bytes Sector size (logical/physical): 512 bytes / 512 bytes I/O size (minimum/optimal): 512 bytes / 512 bytes Disklabel type: dos Disk identifier: 0x4b23ea92 Device Boot Start End Sectors Size Id Type /dev/vda1 * 2048 411647 409600 200M 83 Linux /dev/vda2 411648 62914559 62502912 29.8G 83 Linux
В данном случае именем диска является /dev/vda. Обратите внимание, что /dev/vda — это не загрузочный или какой-то другой раздел — это весь диск.
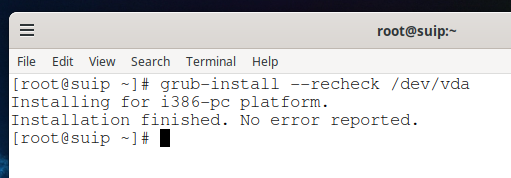
Итак, команда для обновления GRUB в /boot/grub/ в моём случае следующая:
grub-install --recheck /dev/vda
Также необходимо создать новый файл конфигурации следующей командой:
grub-mkconfig -o /boot/grub/grub.cfg
Generating grub configuration file . Found linux image: /boot/vmlinuz-linux Found initrd image: /boot/initramfs-linux.img Found fallback initrd image(s) in /boot: initramfs-linux-fallback.img Warning: os-prober will not be executed to detect other bootable partitions. Systems on them will not be added to the GRUB boot configuration. Check GRUB_DISABLE_OS_PROBER documentation entry. Adding boot menu entry for UEFI Firmware Settings . done
Обновление загрузчика GRUB и обновление конфигурации GRUB завершилось успешно. При следующей загрузке, ваша операционная система будет использовать новые функции, которые были добавлены обновлением GRUB.
Близкие статьи