- Ocs inventory agent linux запустить
- Installing UNIX Agent with APT
- Installing UNIX Agent with RPM
- Install the OCSInventory agent on Ubuntu 18.04 / Linux Mint 19?
- Install OCSInventory agent on Ubuntu 18.04 / Linux Mint 19
- Configuring the OCSInventory agent
- Conclusion
- Install OCS Inventory Agent on Debian 10/Ubuntu 18.04
- Install OCS Inventory Agent on Debian 10/Ubuntu 18.04
- Run system update
- Install Required Libraries
- Install OCS Inventory Agent from APT
- Install OCS Agent from Source
- OCS Agent-Server Communication
- Reference;
- Related Tutorials
- SUPPORT US VIA A VIRTUAL CUP OF COFFEE
Ocs inventory agent linux запустить
OCS Inventory has now his own repository for Debian based and Redhat based distributions. You will find below how to install OCS Inventory agent unix using our repository
Installing UNIX Agent with APT
On Debian-based distributions you can install the agent with APT
You need to add our repository using the following command
$ curl -sS http://deb.ocsinventory-ng.org/pubkey.gpg | sudo apt-key add - $ echo "deb http://deb.ocsinventory-ng.org/debian/ main" | sudo tee /etc/apt/sources.list.d/ocsinventory.list $ sudo apt update You will have to replace by one of the following term depending on the installation context :
- bullseye | stable
- buster | oldstable
- stretch | oldoldstable
- sid | unstable
Then install the agent using :
$ sudo apt install ocsinventory-agent On Ubuntu-based distributions you can install the agent with APT
You need to add our repository using the following commands :
$ curl -sS http://deb.ocsinventory-ng.org/pubkey.gpg | sudo apt-key add - Note : apt-key is now deprecated as of Ubuntu 22.04, and will issue a warning. We recommend using the below gpg alternative :
$ curl -fsSL http://deb.ocsinventory-ng.org/pubkey.gpg | sudo gpg --dearmor -o /etc/apt/trusted.gpg.d/ocs-archive-keyring.gpg $ echo "deb http://deb.ocsinventory-ng.org/ubuntu/ main" | sudo tee /etc/apt/sources.list.d/ocsinventory.list $ sudo apt update You will have to replace by one of the following term depending on the installation context :
Then install the agent using :
$ sudo apt install ocsinventory-agent Installing UNIX Agent with RPM
On Redhat/Centos 7 you can install the unix agent with RPM
You need to have «wget» to download the repo of EPEL and OCS
$ sudo wget https://dl.fedoraproject.org/pub/epel/epel-release-latest-7.noarch.rpm $ sudo wget https://rpm.ocsinventory-ng.org/ocsinventory-release-latest.el7.ocs.noarch.rpm You can install the repo with «yum»
$ sudo yum install ocsinventory-release-latest.el7.ocs.noarch.rpm epel-release-latest-7.noarch.rpm To install the unix agent and requirement use this command:
$ sudo yum install ocsinventory-agent On Redhat/Centos 8 you can install the unix agent with RPM
You need to have «wget» to download the repo of EPEL and OCS
$ sudo wget https://dl.fedoraproject.org/pub/epel/epel-release-latest-8.noarch.rpm $ sudo wget https://rpm.ocsinventory-ng.org/ocsinventory-release-latest.el8.ocs.noarch.rpm You can install the repo with «dnf»
$ sudo dnf install ocsinventory-release-latest.el8.ocs.noarch.rpm epel-release-latest-8.noarch.rpm To install the unix agent and requirement use this command:
$ sudo dnf --enablerepo=PowerTools --enablerepo=epel-playground install ocsinventory-agent On Oracle Linux 8 and superior, you’ll have to enable the CodeReady Builder repository instead of Powertools to install the agent, e.g. for Oracle Linux 8 :
$ sudo dnf --enablerepo=ol8_codeready_builder install ocsinventory-agent On Rocky/Alma and RHEL 9 you can install the unix agent with RPM
You need to have «wget» to download the repo of EPEL and OCS
$ sudo wget https://dl.fedoraproject.org/pub/epel/epel-release-latest-9.noarch.rpm $ sudo wget https://rpm.ocsinventory-ng.org/ocsinventory-release-latest.el9.ocs.noarch.rpm You can install the repo with «dnf»
$ sudo dnf install ocsinventory-release-latest.el9.ocs.noarch.rpm epel-release-latest-9.noarch.rpm To install the unix agent and requirement use this command:
$ sudo dnf install yum-utils $ sudo yum-config-manager --enable crb $ sudo dnf install ocsinventory-agent On Fedora you can install the unix agent with RPM
You need to have «wget» to download the OCS’s repo
$ export FEDORA_VERSION=$(awk '' /etc/fedora-release) $ sudo wget https://rpm.ocsinventory-ng.org/ocsinventory-release-latest.fc$FEDORA_VERSION.ocs.noarch.rpm You can install the repo with «dnf»
$ sudo dnf install ocsinventory-release-latest.fc$FEDORA_VERSION.ocs.noarch.rpm To install the unix agent and requirement use this command:
$ sudo dnf install ocsinventory-agent Note : The unix agent gonna be installed with default settings.
Install the OCSInventory agent on Ubuntu 18.04 / Linux Mint 19?

Recently, I taught you how to install OCSInventory on Debian 10. But as you know, that was the server. Now, I will teach you how to install the OCSInventory agent in Ubuntu 18.04 and how to make the server register it.
Install OCSInventory agent on Ubuntu 18.04 / Linux Mint 19
First of all, the system needs to be upgraded.
Open a terminal session and run the following command:
:~$ sudo apt update :~$ sudo apt upgrade
This step is vital for the agent to do the job properly. It also allows him to gather more and better information from the computer.
This client is also written in Perl language, so we have to install some libraries first:
:~$ sudo apt install libmodule-install-perl dmidecode libxml-simple-perl libcompress-zlib-perl libnet-ip-perl libwww-perl libdigest-md5-perl libdata-uuid-perl
Then, we can install the OCSInventory agent in two ways.
The first is by manually compiling the source code. This option has the advantage that we can get the latest version of it, but it is something more complex and in a business environment may not be suitable.
On the other hand, the program is available from official repositories. This method sacrifices a little bit of the novelties for the sake of stability and ease of installation.
To install it, we will use the second option, therefore, run the following command
:~$ sudo apt install ocsinventory-agent

So, we need to configure it.
Configuring the OCSInventory agent
During installation, a customer configuration screen will be displayed. This first screen asks where the server is.
If the agent is being installed in the same computer where the server is, choose the first option. If not, choose the second one.

Then, you will see another screen where you have to indicate the IP address or the hostname of the computer where the OCSInventory server is installed.

Then the installation will be finished.
In case you make a mistake in this step, do not worry, you can always rectify it by modifying the file /etc/ocsinventory/ocsinventory-agg .
The synchronization with the server is done via crontab daily. However, we can force this synchronization with the following command:
:~$ sudo ocsinventory-agent --server [server]
You’ll see something like this:

Now, access your OCSInventory server and you’ll see that it’s been added correctly.


And that’s it. Now we invite you to explore all the new possibilities with this tool.
Conclusion
Thanks to OCSInventory for the inventory work, and it makes it much easier. And always with a fairly high degree of accuracy. So today, you have learned how to install the OCSInventory agent on Ubuntu 18.04 and Linux Mint 19. So all that remains is for you to get the most out of the tool.
Please share our post and join our Telegram channel.
Install OCS Inventory Agent on Debian 10/Ubuntu 18.04

Once you have setup your OCS Inventory server, you can now add agents for managing. In this guide, we are going to learn how to Install OCS-NG Inventory Agent on Debian 10/Ubuntu 18.04.
Learn how to setup OCS Inventory server on Fedora 30/Fedora 29 by following the link below;
Install OCS Inventory Agent on Debian 10/Ubuntu 18.04
Run system update
Install Required Libraries
To install OCS Inventory agent will all the required packages, run the command below;
apt install libmodule-install-perl dmidecode libxml-simple-perl libcompress-zlib-perl libnet-ip-perl libwww-perl libdigest-md5-perl libdata-uuid-perlInstall OCS Inventory Agent from APT
Run the command below to install OCS agent.
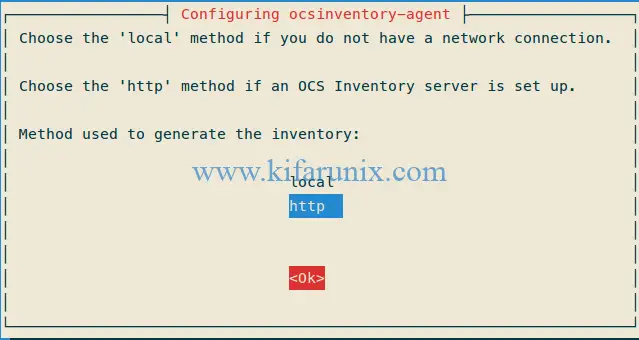
apt install ocsinventory-agentDuring the installation, you are prompted to choose how the OCS agent will communicate with OCS server. Since we already setup the OCS server, select the http method and proceed.
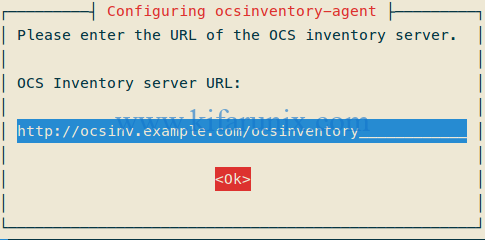
Next, set the OCS server URL. The syntax is http[s]://ocsinventory-ng-server[:port]/ocsinventory usually for http(s) methods.
This will be written to /etc/ocsinventory/ocsinventory-agent.cfg configuration file.
Install OCS Agent from Source
Note that OCS agent installed from default system packages might be older. Also, installing OCS agent from source requires that some build tools and dependencies be installed first.
apt install make gcc libmodule-install-perl dmidecode libxml-simple-perl libcompress-zlib-perl openssl libnet-ip-perl libwww-perl libdigest-md5-perl libdata-uuid-perl libcrypt-ssleay-perl libnet-snmp-perl libproc-pid-file-perl libproc-daemon-perl net-tools libsys-syslog-perl pciutils smartmontools read-edid nmap libnet-netmask-perlTo install a newer version of OCS Agent, navigate to the OCS Inventory downloads page and grab the source file for the new version. For example, this guide uses OCS Agent v2.4.2 and can be downloaded as follows;
wget https://github.com/OCSInventory-NG/UnixAgent/releases/download/v2.4.2/Ocsinventory-Unix-Agent-2.4.2.tar.gzOnce the download is done, extract the source code.
tar xzf Ocsinventory-Unix-Agent-2.4.2.tar.gzNavigate to OCS Inventory agent source directory
cd Ocsinventory-Unix-Agent-2.4.2OCS Agent can be installed interactively or non-interactively.
To install OCS agent non-interactively, simply run the commands below;
sudo env PERL_AUTOINSTALL=1 perl Makefile.PLTo install OCS agent interactively, simply run the commands below;
While setting up the address of your ocs server, if you are using hostname, ensure that it is resolvable.
. Do you want to configure the agent Please enter 'y' or 'n'?> [y] y Where do you want to write the configuration file? 0 -> /etc/ocsinventory 1 -> /usr/local/etc/ocsinventory 2 -> /etc/ocsinventory-agent ?> 2 Do you want to create the directory /etc/ocsinventory-agent? Please enter 'y' or 'n'?> [y] y Should the old unix_agent settings be imported ? Please enter 'y' or 'n'?> [y] y [info] The config file will be written in /etc/ocsinventory-agent/ocsinventory-agent.cfg, What is the address of your ocs server?> https://ocs.kifarunix-demo/ocsinventory Do you need credential for the server? (You probably don't) Please enter 'y' or 'n'?> [n] n Do you want to apply an administrative tag on this machine Please enter 'y' or 'n'?> [y] y tag?> test-deb10 Do yo want to install the cron task in /etc/cron.d Please enter 'y' or 'n'?> [y] y Where do you want the agent to store its files? (You probably don't need to change it)?> [/var/lib/ocsinventory-agent] Do you want to create the /var/lib/ocsinventory-agent directory? Please enter 'y' or 'n'?> [y] y Should I remove the old unix_agent Please enter 'y' or 'n'?> [n] y Do you want to activate debug configuration option ? Please enter 'y' or 'n'?> [y] n Do you want to use OCS Inventory NG UNix Unified agent log file ? Please enter 'y' or 'n'?> [y] y Specify log file path you want to use?> /var/log/ocs-agent.log Do you want disable SSL CA verification configuration option (not recommended) ? Please enter 'y' or 'n'?> [n] Do you want to set CA certificate chain file path ? Please enter 'y' or 'n'?> [y] Specify CA certificate chain file path?> /etc/ocsinventory-agent/cacert.pem Do you want to use OCS-Inventory software deployment feature? Please enter 'y' or 'n'?> [y] Do you want to use OCS-Inventory SNMP scans feature? Please enter 'y' or 'n'?> [y] Do you want to send an inventory of this machine? Please enter 'y' or 'n'?> [y] . OCS Agent-Server Communication
By default, OCS agent is set to communicate with the server once a day via the daily cron job, /etc/cron.daily/ocsinventory-agent.
To force the agent to communicate to the server immediately, you can run;
ocsinventory-agent --server http://OCS-ADDRESS[:port]/ocsinventoryocsinventory-agent --server http://ocsinv.example.com/ocsinventory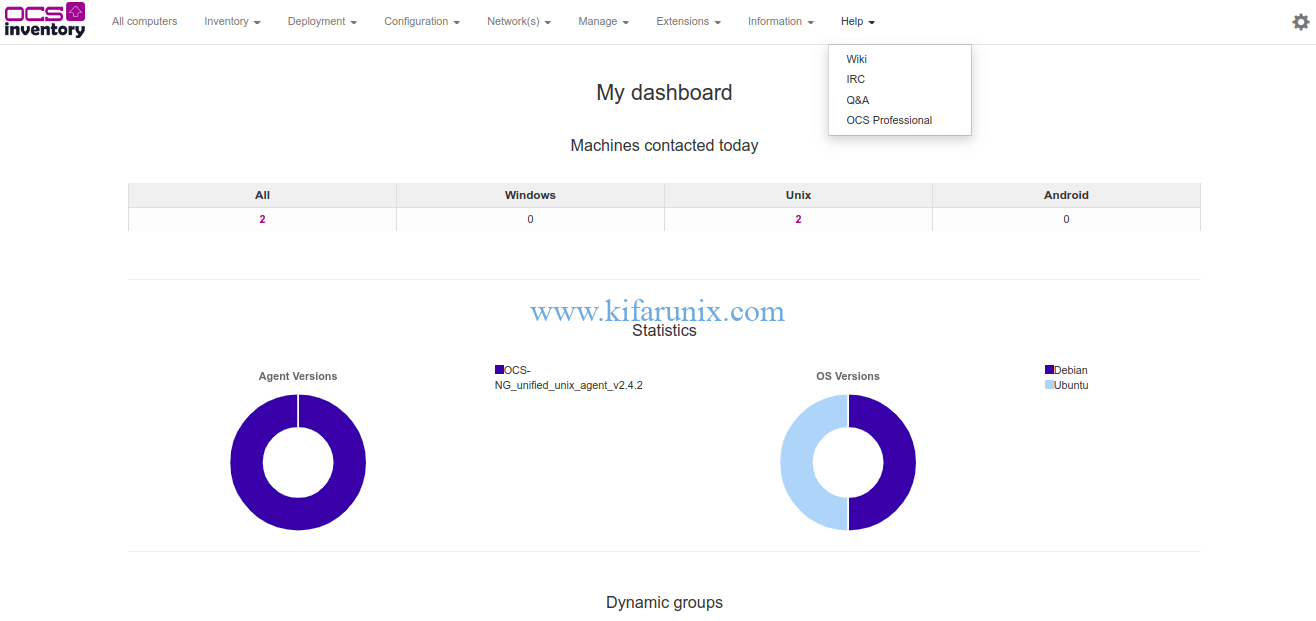
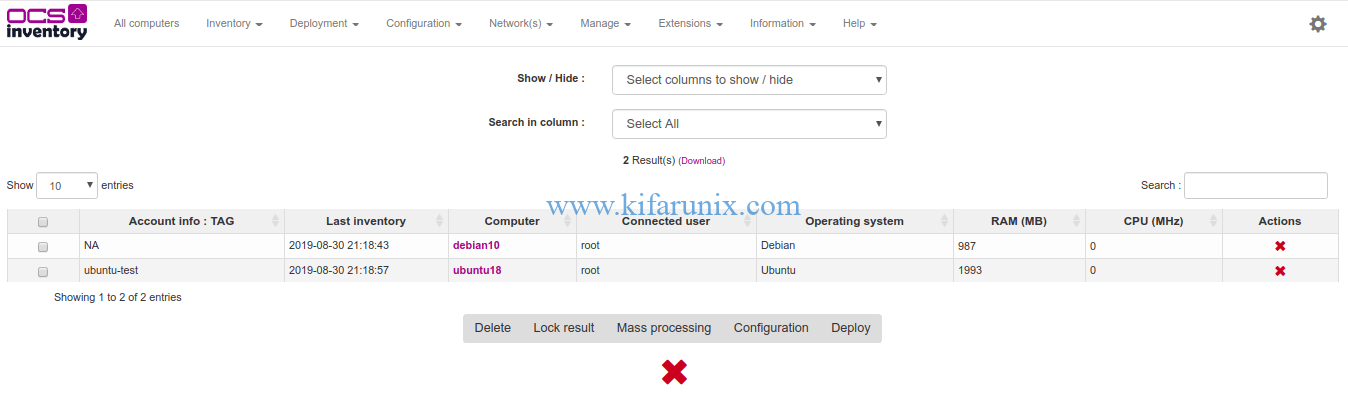
You can now login to your OCS Inventory server and verify that the assets have been inventoried.
Click on All Computers tab to see a list your assets.
You can also configure OCS Agent to inventory the system hourly via the cron job.
mv /etc/cron.daily/ocsinventory-agent /etc/cron.hourlyWell, that is just it on how to install OCS Agent on Debian 10/Ubuntu 18.04. Feel free to explore this tool further.
Reference;
Related Tutorials
SUPPORT US VIA A VIRTUAL CUP OF COFFEE
We’re passionate about sharing our knowledge and experiences with you through our blog. If you appreciate our efforts, consider buying us a virtual coffee. Your support keeps us motivated and enables us to continually improve, ensuring that we can provide you with the best content possible. Thank you for being a coffee-fueled champion of our work!