- Is there a ONVIF Device Manager alternative for Ubuntu 16.04LTS
- Бюджетное видеонаблюдение для прижимистых «чайников»
- onvif remote viewer
- Onvif Camera Viewer. local or remote
- Details for onvif remote viewer
- Share this snap
- Share embeddable card
- Install onvif remote viewer on your Linux distribution
- Arch Linux
- CentOS
- Debian
- elementary OS
- Fedora
- KDE Neon
- Kubuntu
- Manjaro
- Pop!_OS
- openSUSE
- Red Hat Enterprise Linux
- Ubuntu
- Raspberry Pi
- Where people are using onvif remote viewer
- Users by distribution (log)
- Report onvif remote viewer
- Report submitted successfully
- Error submitting report
- Saved searches
- Use saved searches to filter your results more quickly
- License
- Quedale/OnvifDeviceManager
- Name already in use
- Sign In Required
- Launching GitHub Desktop
- Launching GitHub Desktop
- Launching Xcode
- Launching Visual Studio Code
- Latest commit
- Git stats
- Files
- README.md
Is there a ONVIF Device Manager alternative for Ubuntu 16.04LTS
xeoma has a tar.gz installer. 32-bit and 64-bit. It only has 1 file and worked straight out of the box for me.
Mind though: it is payware (and monthly even, if I read the license correctly).
Open source and free: zoneminder They have a warning: don’t use our repos since they are out of date and to use their PPA. Pity it has not been updated to 16.04 so is out of date as well ( 😛 ).
Note that xeoma requires VM installs to have internet access 247 or be tied to a licence server that requires internet access 247. Not private enough for me and the reason i’m looking for a replacement NVR is to eliminate another hardware box so buying a dedicated machine for this is out. felenasoft.com/xeoma/en/description/#activation_virtual
You can try Lingodigits’ ONVIF Device Tool, has Ubuntu 16.04 64bit version ONVIF Device Tool passed ONVIF Client Test Tool v16.01 and free to download.
I tried to install onvif-device-tool, but from deb file, and I get a following error: onvif-device-tool: error while loading shared libraries: libvlccore.so.8: cannot open shared object file: No such file or directory
I tried Shinobi. Looks nice, buggy non-intuitive interface (features spread across different logins (/, /admin, /super) instead of centralized with permission based view changes), documentation unorganized. read github.com/PharkMillups/beautiful-docs, getting help on discord is sporadic and unorganized. The efforts there would be better suited in a traditional forum where questions and responses aren’t overlapping and easily lost, $75/mo for pro if you want help as appose to paying $35+ (4cams) perpetual xeoma licence (best software i’ve seen). Shinobi was a frustrating experience.
Бюджетное видеонаблюдение для прижимистых «чайников»
Скоро будет 7 лет с момента написания статьи «Видеонаблюдение под Ubuntu для «чайников» (ZoneMinder)». За эти годы она не раз корректировалась и обновлялась в связи с выходом новых версий, но кардинальная проблема, а именно — стоимость IP видеокамер, оставалась прежней. Её обходили оцифровывая аналоговые потоки и эмулируя IP камеры с помощью USB «вебок».
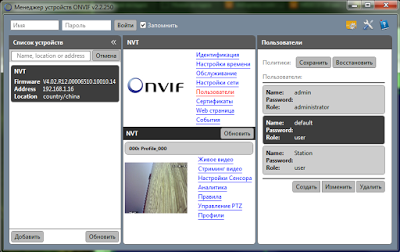
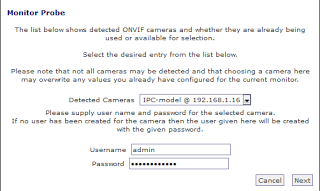
Ситуация изменилась с появлением китайских камер стандарта ONVIF 2.0 (Open Network Video Interface Forum). Теперь любую камеру отвечающую стандарту вы можете настроить с помощью ONVIF Device Manager.
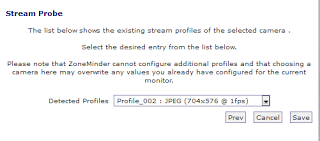
Более того, вы сразу можете увидеть адреса и параметры потоков вещания с камеры. Да, да. Теперь потоков, как минимум — 2, не считая звука. Один архивный — в максимальном качестве, другой — рабочий в меньшем разрешении.
Я буду рассказывать на примере камеры MISECU IPC-DM05-1.0 Купил её в «чёрную пятницу» по цене 1059,15 руб. Сейчас они подняли цену и я бы скорее приобрел GADINAN. Что в прочем, одно и то-же. В любом случае, аппаратная часть моей камеры определяется как hi3518e_50h10l_s39 не зависимо от того, какой логотип написан на коробке. Камера купольная, по факту представляет из себя шарик «на верёвочке» легко вынимаемый из гнезда-держателя. Если будете заказывать, обратите внимание, что блок питания надо покупать отдельно (DC 12V/2A). Я использовал БП от сгоревших китайских-же настольных часов. К сожалению, звука и управления позицией в камере нет. Для этих целей подойдет какой-нибудь беби-монитор типа этого или этого. Главное, что бы в названии было слово Onvif.
После распаковки и включения надо выставить IP адрес каждой камеры (по умолчанию у всех жестко 192.168.1.10), чтобы они не конфликтовали между собой. Это можно сделать в ONVIF Device Manager или штатной утилитой General Device Manage которая идет в комплекте, на мини CD. Далее, выставляем временную зону, параметры отображения дат и имя для каждой камеры. Создаем пользователей с правами «только для просмотра».
Веб-интерфейс камеры, программы CMS и интерфейс облака в браузере совершенно одинаковы, неудобны и требуют IE c ActiveX.

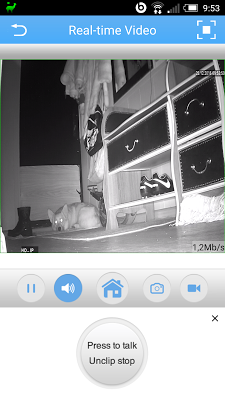
Благо, их можно с успехом заменить приложением XMeye установленным на Android или iOS. Но, прежде необходимо сделать нашу камеру видимой для облака. Для этого откройте порт по которому работает Onvif (8899) на вашем коммутаторе. В моём случае — это NAT Setting-Virtual Server. Если камер несколько, то внутренний порт для каждого IP оставляете прежним, а внешний меняете на пару значений. Далее, камера сама постучится в облако и предъявит свой индивидуальный CloudID. Вам нужно будет только добавить его в свой профиль в облаке.
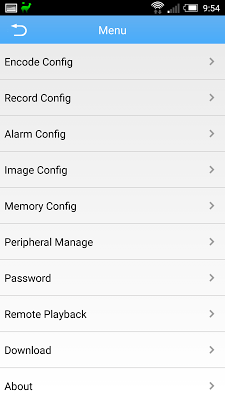
Собственно, сама по себе камера уже может детектить движение, стримить видео и отправлять аллармы. Вкупе с облачным сервисом XMeye — это готовый сервис мониторинга.
Если вам хочется иметь свой собственный регистратор с архивами, и вы любите Windows, то ставьте бесплатные iSpy, или SecurOS Lite (до 32 камер) или бесплатную-же версию (до 8 камер) Xeoma. Кстати, у последней есть версии для Mac OS X, Linux включая ARM и Android.

С настройками не должно возникнуть проблем, так что можете дальше не читать. Остальная часть статьи написана для Linux.
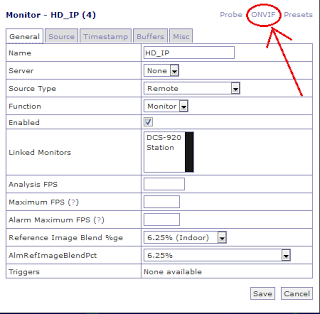
Я был приятно удивлен обнаружив в Zoneminder v.1.30.0 визард для настройки ONVIF камер. Он позволяет подключить к консоли любой из потоков идущих с камеры в зависимости от аппаратных возможностей и потребностей оператора.
Установка и настройка Zoneminder никогда не были лёгким занятием. Последняя версия вышла особо капризной и требует предварительной установки веб-сервера LAMP, с последующим выполнением ряда дополнительных действий. Поэтому, приведу старый «джедайский» способ подключения камеры для более старых версий:
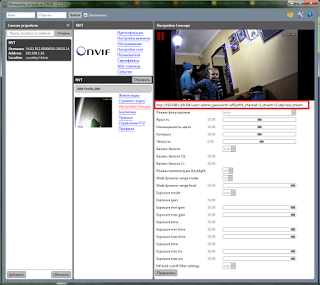
1. Определите адреса потоков через ONVIF Device Manager или Xeoma. У вас должно получиться что-то похожее:
rtsp://192.168.1.1*/user=****_password=****_channel=1_stream=1.sdp?real_streamНе забудьте заменить звездочки (*) своими данными.
2. Проверьте адреса в проигрывателе VLC. Меню-Медиа-Открыть IRL
3. Добавьте новый монитор с параметрами:
Source Type — Remote
Remote Host Path — rtsp://192.168.1.1*/user=****_password=****_channel=1_stream=1.sdp?real_stream
onvif remote viewer
Make sure snap support is enabled in your Desktop store.
Install using the command line
Onvif Camera Viewer. local or remote
Onvif Camera Viewer,add onvif device wtih this plugin,and viewer on https://github.com/OpenIoTHub/OpenIoTHub app remotely or locally
Details for onvif remote viewer
License
Last updated
Links
Share this snap
Generate an embeddable card to be shared on external websites.
Share embeddable card
Customise your embeddable card using the options below.
Install onvif remote viewer on your Linux distribution
Choose your Linux distribution to get detailed installation instructions. If yours is not shown, get more details on the installing snapd documentation.
Arch Linux
CentOS
Debian
elementary OS
Fedora
KDE Neon
Kubuntu
Manjaro
Pop!_OS
openSUSE
Red Hat Enterprise Linux
Ubuntu
Raspberry Pi
Where people are using onvif remote viewer
Users by distribution (log)
Is there a problem with onvif remote viewer? Report this app
Report onvif remote viewer
Report submitted successfully
Thanks for bringing this to our attention. Information you provided will help us investigate further.
Error submitting report
There was an error while sending your report. Please try again later.
© 2023 Canonical Ltd.
Ubuntu and Canonical are registered trademarks of Canonical Ltd.
Powered by Charmed Kubernetes
Join the forum, contribute to or report problems with, snapd, Snapcraft, or this site.
Saved searches
Use saved searches to filter your results more quickly
You signed in with another tab or window. Reload to refresh your session. You signed out in another tab or window. Reload to refresh your session. You switched accounts on another tab or window. Reload to refresh your session.
Onvif Device Manager for Linux
License
Quedale/OnvifDeviceManager
This commit does not belong to any branch on this repository, and may belong to a fork outside of the repository.
Name already in use
A tag already exists with the provided branch name. Many Git commands accept both tag and branch names, so creating this branch may cause unexpected behavior. Are you sure you want to create this branch?
Sign In Required
Please sign in to use Codespaces.
Launching GitHub Desktop
If nothing happens, download GitHub Desktop and try again.
Launching GitHub Desktop
If nothing happens, download GitHub Desktop and try again.
Launching Xcode
If nothing happens, download Xcode and try again.
Launching Visual Studio Code
Your codespace will open once ready.
There was a problem preparing your codespace, please try again.
Latest commit
Git stats
Files
Failed to load latest commit information.
README.md
Onvif Device Manager for Linux

The goal of this project is to implement a Onvif Device Manager similar to the windows client, compatible for linux. I’m also working on adding some Profile T capabilities, such as bidirectional audio.
- Onvif WS-Discovery (gsoap)
- Soap Client for Onvif Device and Media service
- Vew RTSP Stream with backchannel (Push-to-talk)
- Prototype Soundlevel indicator
- WS-Security
- Support system and static libraries. (static recommended)
- Support Multiple ONVIF Profiles
- EventQueue : Interupt pending events when needed
- Support MJPEG stream
- Credential Storage
- Add option to scale up stream.
- Edit Onvif device identification
- Display Onvif network information
- Display Media information
- Better Look&Feel
- Testing with a variety of camera
- Record video
- JPEG Snapshot
- Check for better backchannel audio support. (PCMU@8000 might be Onvif’s spec limit)
- Doorbell-like security camera terminal
- Babymonitor terminal (I hope to add common baby monitor feature like playing music)
- Cross-room communication terminal
git clone https://github.com/Quedale/OnvifDeviceManager.git cd OnvifDeviceManager Autogen, Configure, Download and build dependencies
autogen.sh will attempt download and build missing dependencies.
[Mandatory] The following package dependencies are mandatory and are not yet automatically built:
sudo apt install make sudo apt install bison sudo apt install flex sudo apt install libtool sudo apt install pkg-config sudo apt install libgtk-3-dev sudo apt install g++ [Optional] The following package are optional, but will reduce the runtime of autogen.sh if installed.
sudo apt install python3-pip python3 -m pip install meson python3 -m pip install ninja sudo apt install libssl-dev sudo apt install zlib1g-dev sudo apt install libasound2-dev sudo apt install libgudev-1.0-dev sudo apt install gettext sudo apt install libpulse-dev sudo apt install nasm If your system already has gstreamer pre-installed, I strongly recommend using —enable-latest to download the latest gstreamer release supported.
Note that autogen will automatically call «./configure».
./autogen.sh --prefix=$(pwd)/dist --enable-latest Compile and install GUI App
I have very little spare time to work on any personal project, so this might take a while. This is my very first C project, so I’m learning as I go.
Feedback is more than welcome