- Building your own OpenDirectory server on Linux
- 6 thoughts on “ Building your own OpenDirectory server on Linux ”
- Install OpenLDAP Server and Administer with phpLDAPadmin in Debian/Ubuntu
- Installation Of OpenLDAP Server In Linux
- Configure OpenLDAP Server
- LDAP Administration with phpLDAPadmin
- Reference Links
Building your own OpenDirectory server on Linux
OpenDirectory is a feature included with Mac OS X Server. Wouldn’t it be nice if you could use it without having to spend hundreds of dollars on a server license? Wouldn’t it be great if you could add it into your existing Linux-based OpenLDAP server? It’s actually quite easy because OpenDirectory is a standard OpenLDAP server with a special Apple schema.
0. Prerequisites
– OpenLDAP server with Samba integration (I’m runnig it on a Ubuntu 8.04 server, using the standard OpenLDAP and Samba packages). I won’t go into the details of how to set this up, there are lots of tutorials around the web on this.
– some kind of LDAP admin tool, I used phpLDAPAdmin
– Mac OS X 10.5 Leopard clients
1. Adding the Apple schema to your OpenDirectory server
It is located in /etc/openldap/schema/apple.schema on any Mac. Copy this file to your OpenLDAP server and add it to your slapd.conf.
You may run into the problem that apple.schema references some samba.schema entries that were deprecated with Samba 3. Specifically, these are acctFlags, pwdLastSet, logonTime, logoffTime, kickoffTime, homeDrive, scriptPath, profilePath, userWorkstations, smbHome, rid and primaryGroupID, so you’ll need to editapple.schema and replace these with their Samba 3 counterparts.
Now, restart the OpenLDAP daemon so it recognizes the changes.
2. Adding some Mac-specific attributes to your LDAP server
Add an ou=macosx branch to your LDAP tree, under which you’ll need to create ou=accesscontrols, ou=augments, ou=automountMap, ou=autoserversetup, ou=certificateauthorities, ou=computer_groups, ou=computer_lists, ou=computers, ou=filemakerservers, ou=locations, ou=machines, ou=maps, ou=mount, ou=neighborhoods, ou=places, ou=preset_computer_groups, ou=preset_computer_lists, ou=preset_computers, ou=preset_groups, ou=preset_users, ou=printers, and ou=resources.
To all your LDAP groups, add the apple-group objectClass. To all your LDAP users, add the apple-user objectClass.
3. Connecting your Mac to the LDAP directory
On your Mac, go into Directory Access and add your LDAP server. Choose OpenDirectory as the server type and adjust the Samba mappings to match your changes from step 1. Here is a plist you can import into Directory Access that already has these mappings corrected: LDAPv3_Unix_Samba3_OD.plist.
If you want your other clients to automatically use this mapping, create a cn=config branch in your LDAP tree and use the Write to Server button in Directory Access.
4. Use Workgroup Manager to set network home folders, managed preferences, …
Now, you can use Workgroup Manager to manage network home folders and managed preferences, just like you would on a Mac server. You’ll need to authenticate using an LDAP user who has full write privileges to the directory (as set in slapd.conf). The standard cn=admin,dc=example,dc=com user will NOT work.
5. Conclusion
Almost everything works, except for:
– adding new users and group through Workgroup Manager
– solution: unknown
– assigning directory admin privileges to users through Workgroup Manager
– solution: using an OpenLDAP server set up to use cn=config instead of slapd.conf. This will also require going into Directory Access again and adding the OLCBDBConfig, OLCFrontEndConfig, OCGlobalConfig, OLCSchemaConfig and OLCOverlayDynamicID record types back in (they are included in the OpenDirectory mapping, but I deleted them from mine because they only cause error messages on an OpenLDAP server with slapd.conf configuration).
7. Further Information
Since you’re not using Kerberos for authentication, you may want to look at securing your LDAP connections with SSL. Here are some links that talk about it:
http://www.novell.com/coolsolutions/feature/19965.html
http://www.afp548.com/article.php?story=20071203011158936
Someone else also wrote a blog post about Setting up a Linux server for OS X clients, in which they also describe how to incorporate Kerberos into the whole equation. That’s certainly something worth considering.
6 thoughts on “ Building your own OpenDirectory server on Linux ”
- Rob2011-01-14 at 02:35 This helps alot… I’m nearly there it seems. I have a question about “5. Conclusion” How can I set a user to have full write privileges to the directory when I’m using a cn=config setup as you describe? On my config tree I see… olcDatabase=frontend, olcDatabase=config & olcDatabasehdb but none of those attributes you list. Where do I enter these and how do I specify a user instead of the cn=admin,dc=example,dc=com for the olcRootDN and also… can I have more than one olcRootDN? Is it a different attribute? That seems to be the missing link to getting the connection to happen with Workgroup Manager.
Install OpenLDAP Server and Administer with phpLDAPadmin in Debian/Ubuntu
LDAP stands for Lightweight Directory Access Protocol which can be used in numerous ways such as for authentication, shared directory (for mail clients), address book, etc. The LDAP protocol can be used to establish and store any kind of information. The OpenLDAP server gives you the possibility to access the information which is stored in a tree structure.
In this article we will show you how to install and configure an OpenLDAP server and how to administer it with phpLDAPadmin on Debian, Ubuntu and Linux Mint systems.
Installation Of OpenLDAP Server In Linux
By default the OpenLDAP server is in repositories under the package “slapd“. You can easily install it with the help of package manager tool called apt-get. But before installing the OpenLDAP server, make sure your system is up-to-date.
During installation, it will ask you to enter a password for the admin entry in your LDAP directory. Enter a strong password and confirm it by selecting OK.
$ sudo apt-get update $ sudo apt-get install slapd ldap-utils

Configure OpenLDAP Server
In order to configure the OpenLDAP server you need to edit the ldap.conf file, which is stored under the /etc directory. To edit the ldap.conf file you need a text editor like vim, nano etc. Run the following command to open the ldap configuration file for editing.
$ sudo nano /etc/ldap/ldap.conf
The output of the above command is shown in the below section.
# # LDAP Defaults # # See ldap.conf(5) for details # This file should be world readable but not world writable. #BASE dc=example,dc=com #URI ldap://ldap.example.com ldap://ldap-master.example.com:666 #SIZELIMIT 12 #TIMELIMIT 15 #DEREF never # TLS certificates (needed for GnuTLS) TLS_CACERT /etc/ssl/certs/ca-certificates.crt
Uncomment the BASE and URI lines, so you can edit them with your own domain name and IP address. Since this is a testing installation and configuration I will use tecmint123.com as my domain name.
# # LDAP Defaults # # See ldap.conf(5) for details # This file should be world readable but not world writable. BASE dc=tecmint123,dc=com URI ldap://ldap.example.com ldap://ldap-master.example.com:666 #SIZELIMIT 12 #TIMELIMIT 15 #DEREF never # TLS certificates (needed for GnuTLS) TLS_CACERT /etc/ssl/certs/ca-certificates.crt
Save the file and run the following command to reconfigure the LDAP package.
$ sudo dpkg-reconfigure slapd
To construct the base DN of the LDAP directory you need a DNS domain name.
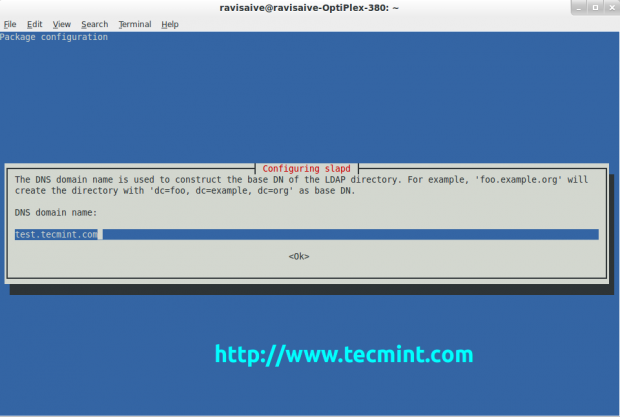
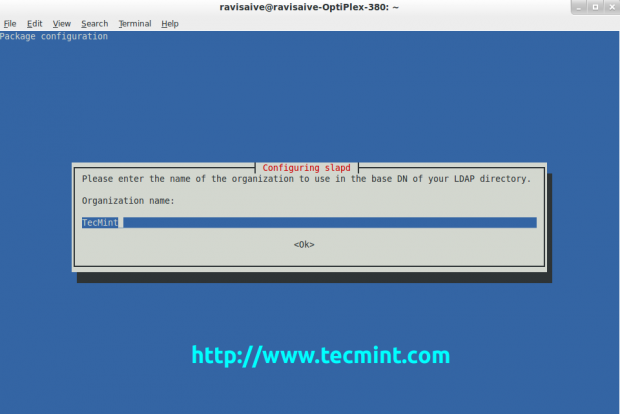
Enter your DNS domain name and hit Enter to confirm it. Then the ldap will ask to enter the name of the organization to use in the base DN of your LDAP directory. Enter the name of your company or organisation and hit Enter again.
After the organisation or company name is added, the package configuration will ask to enter the password for the admin entry in your LDAP
directory. You need to enter the password for the admin which you created in the previous steps.

After you have confirmed the administrator’s password, you have to select the database. There are two databases to select from, the BDB and HDB database. They both support the same configuration options, use similar storage formats, but since the HDB database adds support for sub-tree renames it is the recommended one.
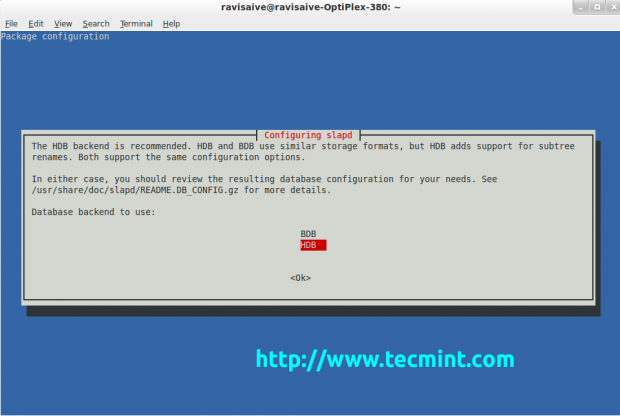
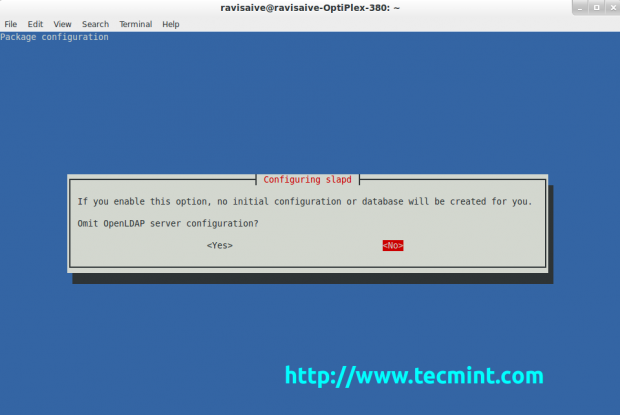
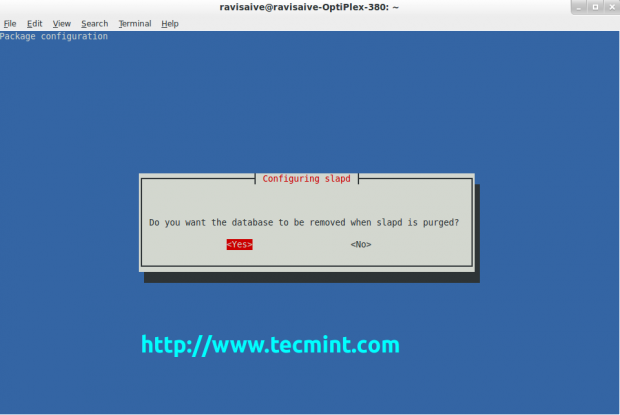
You can select the database you think will work better for you. After you have decided which database you will use, hit Enter to confirm the selection. Then you will be prompted with another question. Select Yes to remove the database when slapd is purged.
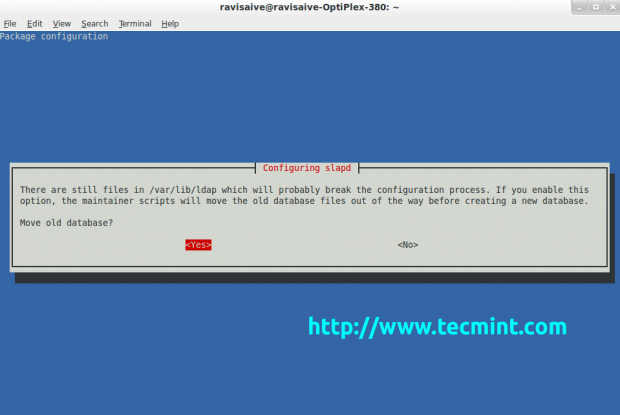
Select again Yes and press Enter.
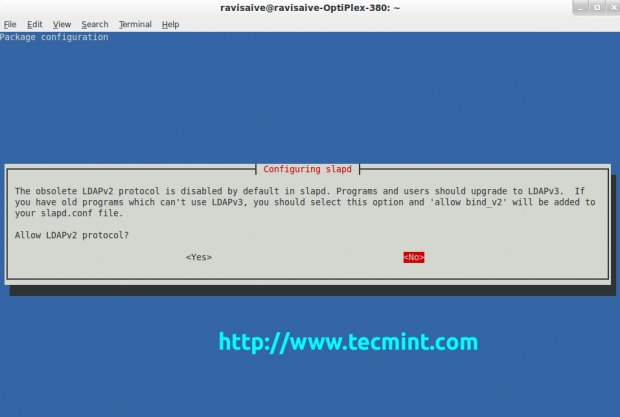
Select No and the LDAP server will start running.
[sudo] password for ravisaive: * Stopping OpenLDAP slapd [ OK ] Moving old database directory to /var/backups: - directory unknown. done. Creating initial configuration. done. Creating LDAP directory. done. * Starting OpenLDAP slapd [ OK ] Processing triggers for libc-bin .
To test the LDAP server, the ldapsearch -x command is used.
It produces the following output.
# extended LDIF # # LDAPv3 # base (default) with scope subtree # filter: (objectclass=*) # requesting: ALL # # tecmint123.com dn: dc=tecmint123,dc=com objectClass: top objectClass: dcObject objectClass: organization o: tecmint dc: tecmint123 # admin, tecmint123.com dn: cn=admin,dc=tecmint123,dc=com objectClass: simpleSecurityObject objectClass: organizationalRole cn: admin description: LDAP administrator # search result search: 2 result: 0 Success # numResponses: 3 # numEntries: 2
LDAP Administration with phpLDAPadmin
phpLDAPadmin is a GUI administration tool for LDAP server administration. This GUI tool will help us to interact with your LDAP server through a web interface. It is available in the default repositories, it can be installed with the apt-get command.
But before installing phpLDAPadmin, you must have Apache web server and PHP installed and running. If not, install it using following command.
$ sudo apt-get install apache2 php5 php5-mysql
Next install the “phpldapadmin” package as shown below.
$ sudo apt-get install phpldapadmin
The same way we configured the ldap.conf file, we need to configure the phpldapadmin web interface configuration files before using it. Run the following command to open the phpldapadmin config.php file.
$ sudo nano /etc/phpldapadmin/config.php
All you need to do is to replace the domain names with your own values. The configuration part needed for this case is under the “Define your LDAP servers” section.
$servers = new Datastore(); $servers->newServer('ldap_pla'); $servers->setValue('server','name','Tecmint LDAP Server'); $servers->setValue('server','host','127.0.0.1'); $servers->setValue('server','base',array('dc=tecmint123,dc=com')); $servers->setValue('login','bind_id','cn=admin,dc=tecmint123,dc=com'); After you have finished editing the config.php configuration file, open a tab in your web browser and tpye the “http://ip_address_here/phpldapadmin” URL. Enter your ldap login credentials and click login.