- Saved searches
- Use saved searches to filter your results more quickly
- License
- mohdforever/GpuTest
- Name already in use
- Sign In Required
- Launching GitHub Desktop
- Launching GitHub Desktop
- Launching Xcode
- Launching Visual Studio Code
- Latest commit
- Git stats
- Files
- README.md
- About
- Saved searches
- Use saved searches to filter your results more quickly
- License
- hermetikos/OpenGL-Cross-Platform-Benchmark
- Name already in use
- Sign In Required
- Launching GitHub Desktop
- Launching GitHub Desktop
- Launching Xcode
- Launching Visual Studio Code
- Latest commit
- Git stats
- Files
- README.md
- About
- Тестирование видеокарты в Linux
- Проверка видеокарты в Linux
- 1. Утилита glxgears
- 2. GLMark2
- 3. GpuTest
- 4. Набор программ Unigine
- Выводы
Saved searches
Use saved searches to filter your results more quickly
You signed in with another tab or window. Reload to refresh your session. You signed out in another tab or window. Reload to refresh your session. You switched accounts on another tab or window. Reload to refresh your session.
GPU stress test and OpenGL benchmark
License
mohdforever/GpuTest
This commit does not belong to any branch on this repository, and may belong to a fork outside of the repository.
Name already in use
A tag already exists with the provided branch name. Many Git commands accept both tag and branch names, so creating this branch may cause unexpected behavior. Are you sure you want to create this branch?
Sign In Required
Please sign in to use Codespaces.
Launching GitHub Desktop
If nothing happens, download GitHub Desktop and try again.
Launching GitHub Desktop
If nothing happens, download GitHub Desktop and try again.
Launching Xcode
If nothing happens, download Xcode and try again.
Launching Visual Studio Code
Your codespace will open once ready.
There was a problem preparing your codespace, please try again.
Latest commit
Git stats
Files
Failed to load latest commit information.
README.md
GPU stress test and OpenGL benchmark Geeks3D GpuTest — GPU stress test and OpenGL benchmark. Copyright (c) 2012-2014 Geeks3D, All rights reserved.
THIS SOFTWARE IS PROVIDED ‘AS-IS’, WITHOUT ANY EXPRESS OR IMPLIED WARRANTY. IN NO EVENT WILL THE AUTHOR BE HELD LIABLE FOR ANY DAMAGES ARISING FROM THE USE OF THIS SOFTWARE.
1 — Unzip the archive where you want.
2 — Open a terminal in GpuTest folder.
3 — Launch a test by typing for example: $ sh ./start_furmark_windowed_1024x640.sh or $ sh ./start_tessmark_benchmark_fullscreen_1920x1080.sh
A GUI (graphical user interface made with Python / tkinter) is available since GpuTest 0.6.0+. To launch the GUI, run the following command:
$ python gputest_gui.py #for python2 or $ python3 gputest_gui.py #for python3
Under some Linux distributions, you might need to install the Tk package otherwise you will have:
Traceback (most recent call last): File «madshaders.py», line 4, in import Tkinter as tk # gives tk namespace File «/usr/lib/python2.7/lib-tk/Tkinter.py», line 42, in raise ImportError, str(msg) + ‘, please install the python-tk package’ ImportError: No module named _tkinter, please install the python-tk package
To install the python-tk package, just enter in command line:
$ sudo apt-get install python-tk or $ sudo apt-get install python3-tk
GpuTest Linux, random notes
- If needed, you can change the permissions of GpuTest.exe to make it executable: $ chmod u+x GpuTest.exe
- GpuTest 0.7.0 for Linux has been compiled under Linux Mint 16 64-bit with gcc version 4.8.1 (Ubuntu/Linaro 4.8.1-10ubuntu9).
- GpuTest 0.5.0 for Linux has been compiled under Linux Mint 15 64-bit with g++ 4.7.3 (Ubuntu/Linaro 4.7.3-1ubuntu1).
- All command line parameters can be found here: http://www.geeks3d.com/forums/index.php/topic,3092.0.html
About
GPU stress test and OpenGL benchmark
Saved searches
Use saved searches to filter your results more quickly
You signed in with another tab or window. Reload to refresh your session. You signed out in another tab or window. Reload to refresh your session. You switched accounts on another tab or window. Reload to refresh your session.
A simple OpenGL benchmark for testing OpenGL performance cross-platform
License
hermetikos/OpenGL-Cross-Platform-Benchmark
This commit does not belong to any branch on this repository, and may belong to a fork outside of the repository.
Name already in use
A tag already exists with the provided branch name. Many Git commands accept both tag and branch names, so creating this branch may cause unexpected behavior. Are you sure you want to create this branch?
Sign In Required
Please sign in to use Codespaces.
Launching GitHub Desktop
If nothing happens, download GitHub Desktop and try again.
Launching GitHub Desktop
If nothing happens, download GitHub Desktop and try again.
Launching Xcode
If nothing happens, download Xcode and try again.
Launching Visual Studio Code
Your codespace will open once ready.
There was a problem preparing your codespace, please try again.
Latest commit
Git stats
Files
Failed to load latest commit information.
README.md
OpenGL Cross Platform Benchmark
A tool for testing the performance of OpenGL across different operating systems
Part of Stan Slupecki’s Senior Research
This is a simple OpenGL benchmark tool written in C++. It is meant for use in Windows 10, Mac OSX, and Fedora. However, there is no reason to believe it shouldn’t be portable to other systems. The benchmark is simply a system of rotating gears that will increase in complexity at set intervals. The framerate will be used as a metric for how each system handles the benchmark, and will also be recorded at set intervals.
- OpenGL
- FreeGLUT for IO management
- GLEW for loading OpenGL functions
- GLM for mathematics
This program is intended to be built on a Unix style environment with g++, even on Windows. I used Cygwin to build this program in Windows. Asides from setting up X Windows/X Org on Windows (which I will leave up to whoever builds this, I used Cygwin and it’s xinit package), running the runExperiment.sh script should make the program, and run the benchmark 5 times, creating 5 CSV files with the benchmark results in the newly created ‘results’ folder in the project directory. The makefiles can also be manually run, with the Windows makefile being the default makefile, OSX makefile being makefile.osx, and the Fedora/Linux makefile being makefile.fedora.
About
A simple OpenGL benchmark for testing OpenGL performance cross-platform
Тестирование видеокарты в Linux
Linux не славится высокой игровой производительностью. Это нормально, так как несмотря на то что количество игр для этой платформы увеличивается, их все равно не так много. Да и инструменты, с помощью которых пользователи могли бы проверить свое оборудование можно сосчитать на пальцах.
Однако есть несколько программ, которые помогут вам точно определить особенности работы вашей видеокарты. Это нужно как для технического сравнения видеокарт, так и просто ради интереса. Вообще говоря, для тестирования видеокарты Linux можно использовать только тест OpenGL рендеринга. Возможно, ваша видеокарта не поддерживает новые версии Direct3D, но в Linux это проверить невозможно, поскольку эта технология поддерживается только в Windows, а нас будет интересовать только OpenGL.
Проверка видеокарты в Linux
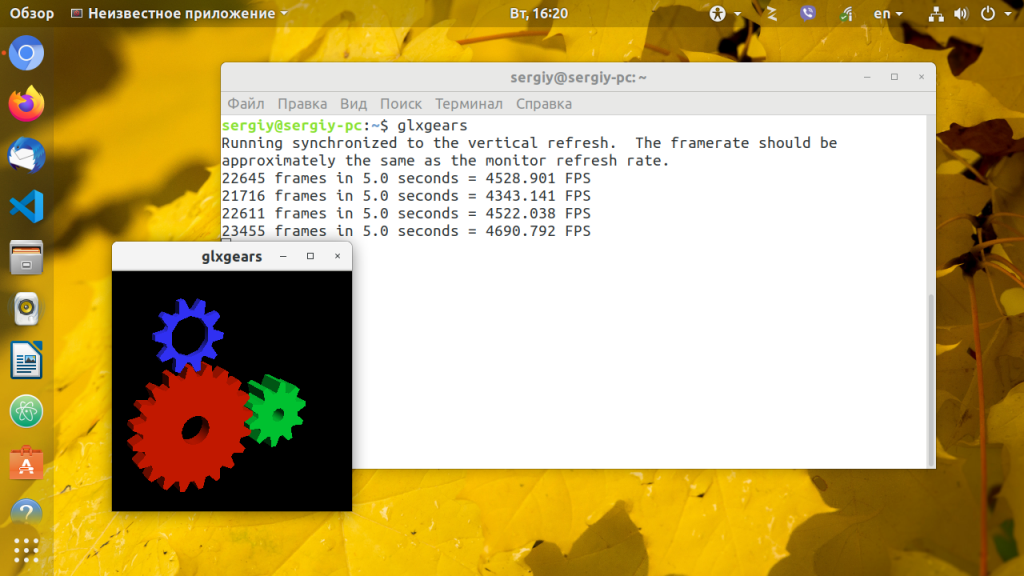
1. Утилита glxgears
Программа glxgears это популярный OpenGL тест, который входит в пакет утилит mesa-utils. Для установки в Ubuntu выполните команду:
sudo apt install mesa-utils
Для тестирования выполните команду glxgears в терминале:
Программа откроет окно, в котором будут рендериться три вращающихся в 3D пространстве шестеренки. Частота кадров (FPS) измеряется и выводится в терминал каждые 5 секунд. Это очень старый инструмент и поэтому позволяет проверить только небольшую часть из возможностей современного OpenGL.
Раньше он использовался для проверки корректности установки и работы проприетарного видеодрайвера. Драйверы с открытым исходным кодом, как правило, работали ужасно, и это было очень заметно во время того, как выполнялся этот тест opengl linux. Сейчас же вы не заметите никакой разницы, по крайней мере, в glxgears.
2. GLMark2
GLMark2 — более мощный инструмент, выпущенный разработчиками дистрибутива Lenaro. В отличие от glxgears, glmark предлагает большое количество тестов для различных аспектов работы видеокарты (буферизация, освещение, текстурирование, построение и т. д.) что позволяет лучше оценить видеокарту.
Каждый тест проводится на протяжении 10-ти секунд, а частота кадров подсчитывается индивидуально. В конце программа выдает оценку производительности на основе всех проведенных тестов. Мне нравится этот инструмент своей простотой и безупречной работой. Вы можете найти его в официальных репозиториях большинства дистрибутивов под названием gmark2. Для установки в Ubuntu выполните:
После установки проверка видеокарты может быть запущена командой:

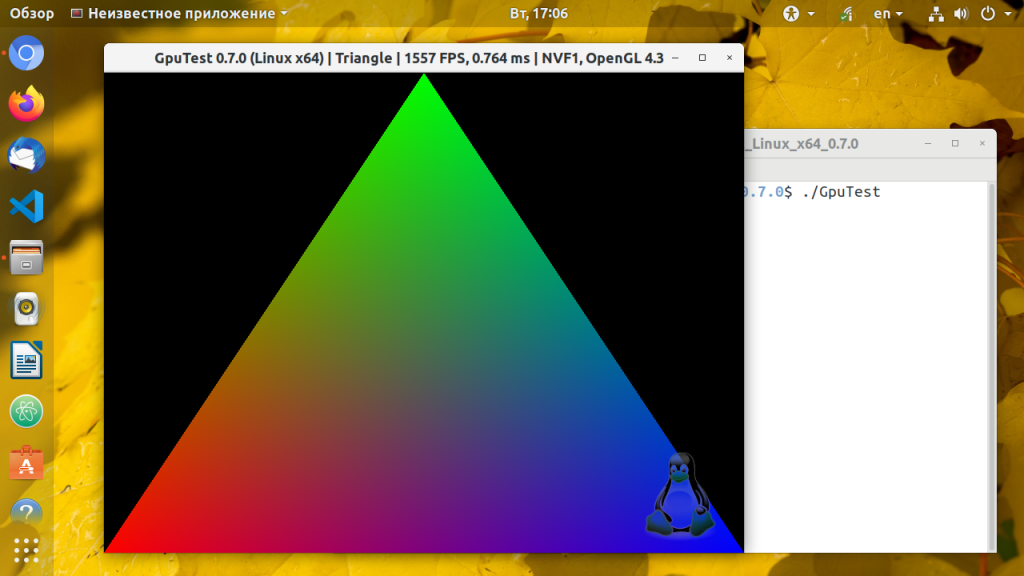
3. GpuTest
Это небольшая современная утилита для тестирования видеокарты в Linux, она поддерживает несколько OpenGL тестов, в том числе и для современных стандартов. Вот поддерживаемые тесты: треугольник (OpenGL 2.1 или OpenGL 3.2), пиксельный тест шейдеров (OpenGL 2.1 или OpenGL 3.2), FurMark (OpenGL 2.1 или 3.2), Plot3D (OpenGL 2.1 или 3.2), GiMark и TessMark (OpenGL 4.0).
Утилиту можно запустить через терминал или с помощью графического интерфейса. Также кроме обычных OpenGL тестов можно выполнить нагрузочное тестирование. Удобно, что утилита сразу выводит результат в терминал, по которому можно сделать приблизительную оценку того как прошла проверка видеокарты linux. Для установки программы необходимо скачать и распаковать архив с портативной версией из официального сайта.
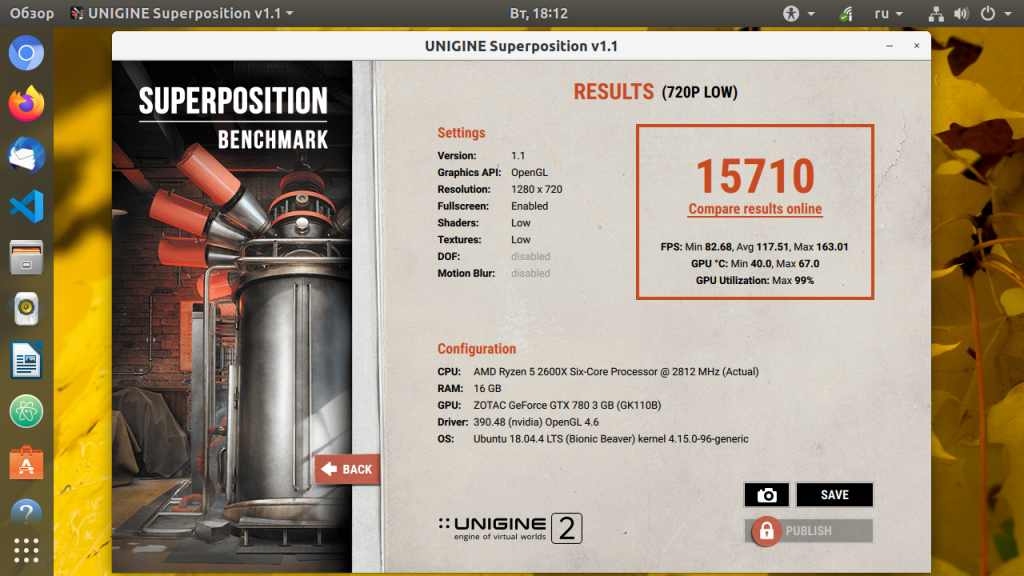
4. Набор программ Unigine
Для тех кому недостаточно первых трёх программ, и тех кто хочет чего-то более современного есть еще три инструмента которые используют 3D движок Unigine. Это Valley, Heaven и Superposition. Бесплатные версии можно скачать на официальном сайте.
Эти инструменты позволяют тестировать в реальном времени взаимодействие света из различных источников, рендеринг, реалистичное небо с рассеянным светом в атмосфере или воду. Можно настроить уровни сглаживания, качество текстур, фильтрацию, анизатропию и качество шейдеров.
Установочный файл занимает около 1,5 гигабайта. После загрузки просто выполните его для установки программы:
После этого вы сможете найти программу в главном меню системы. Запустите её:
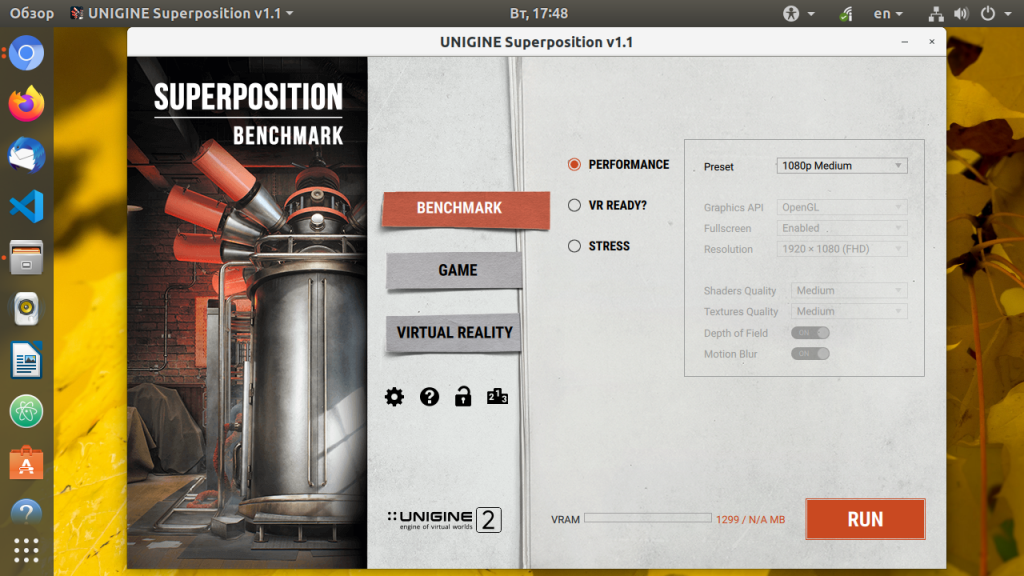
На вкладке Benchmark вы можете выполнить тест производительности видеокарты. Чтобы выбрать параметры тестирования вручную переключите поле Preset в положение Custom или оставьте по умолчанию. Для запуска тестирования нажмите кнопку Run.
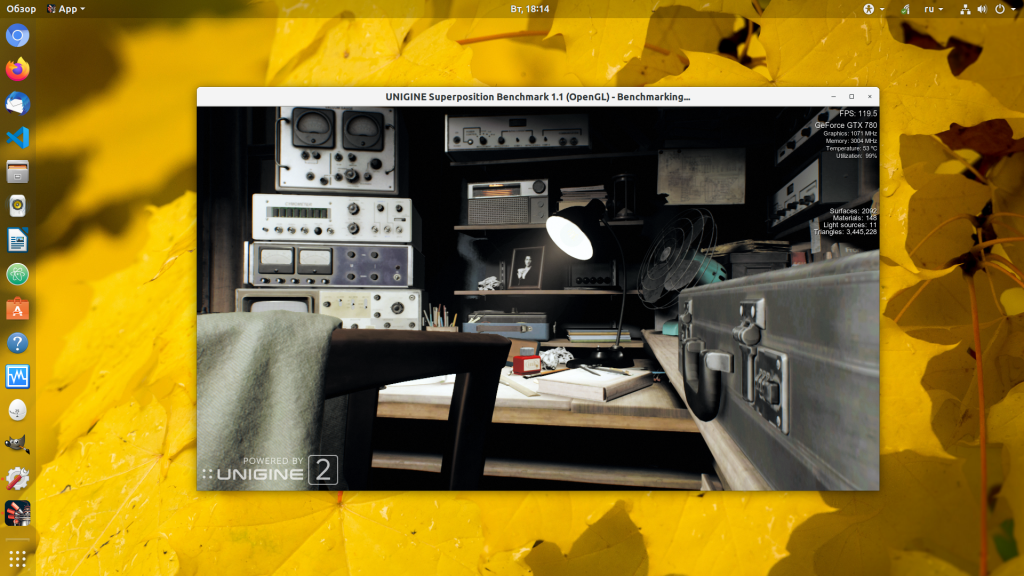
Во время тестирования в правом верхнем углу будет отображаться информация о видеокарте. Это объем памяти, частота, а самое главное температура. По завершении вы увидите оценку и сможете сравнить её с другими оценками в интернете:
Выводы
В этой статье мы рассмотрели с помощью каких программ выполняется проверка видеокарты Linux. Несмотря на то, что здесь есть не так много игр как для Windows, все же есть достаточно инструментов, которые можно использовать для тестирования OpenGL, если вы знаете другие отличные инструменты, напишите в комментариях!
Обнаружили ошибку в тексте? Сообщите мне об этом. Выделите текст с ошибкой и нажмите Ctrl+Enter.