[VPN] How to set up VPN Client in ASUS Router (Web GUI)?
[VPN] How to set up VPN Client in ASUS Router (Web GUI)? What is VPN Client? VPN (Virtual Private Network) clients are often used to connect to a VPN server and allows to access private resources securely over a public network.
Some devices like set-top boxes, smart TVs and Blu-ray players do not support VPN software.
The ASUSWRT VPN feature provides VPN access to all devices in a home network without having to install VPN software on each device. To start a new VPN connection, please follow the steps below: Step 1: How to enter the router’s GUI (ASUSWRT)? Take RT-AX88U as an example. 1-1. Set up your wireless router via wired connection: a. Insert AC adapter of your wireless router to the DC-IN port and plug it to a power outlet. b. Connect your modem to the WAN port of your wireless router with another network cable. c. Insert your modem’s AC adapter to the DC-IN port and plug it to a power outlet. d. Connect your computer to the LAN port of your wireless router with the bundled network cable. 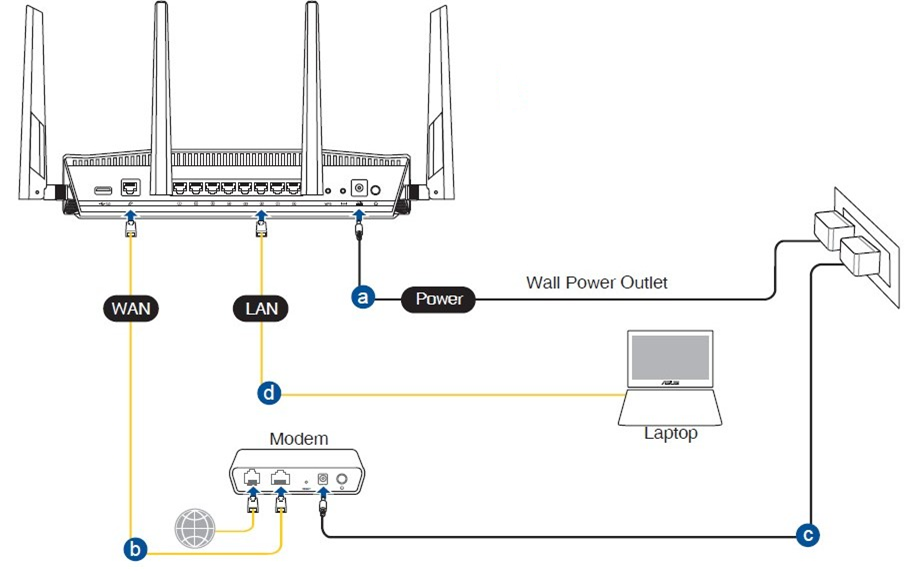 1-2. Connect your computer to the router via wired or WiFi connection and enter your router LAN IP or router URL http://www.asusrouter.com to the WEB GUI.
  Note: Please refer to How to enter the router setting page(Web GUI) (ASUSWRT)? to learn more. 1-3.Key in your router’s username and password to log in.
 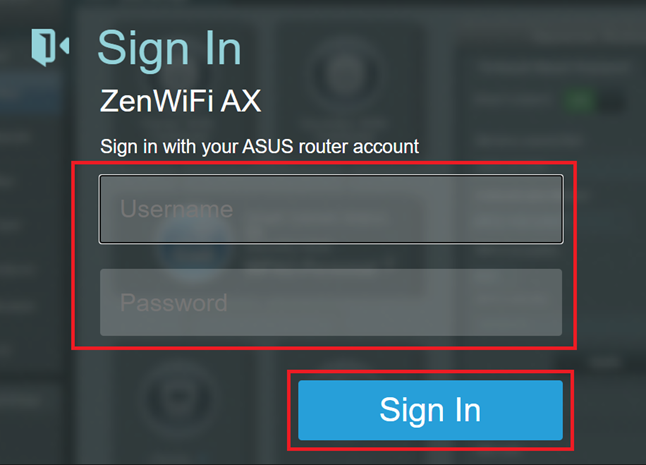 Note: If you forget the user name and/or password, please restore the router to the factory default status and setup.
Please refer to [Wireless Router] How to reset the router to factory default setting? for how to restore the router to default status. Step 2: Click [VPN] from the left Advanced Settings > Find [VPN Client] tab and click [Add profile] 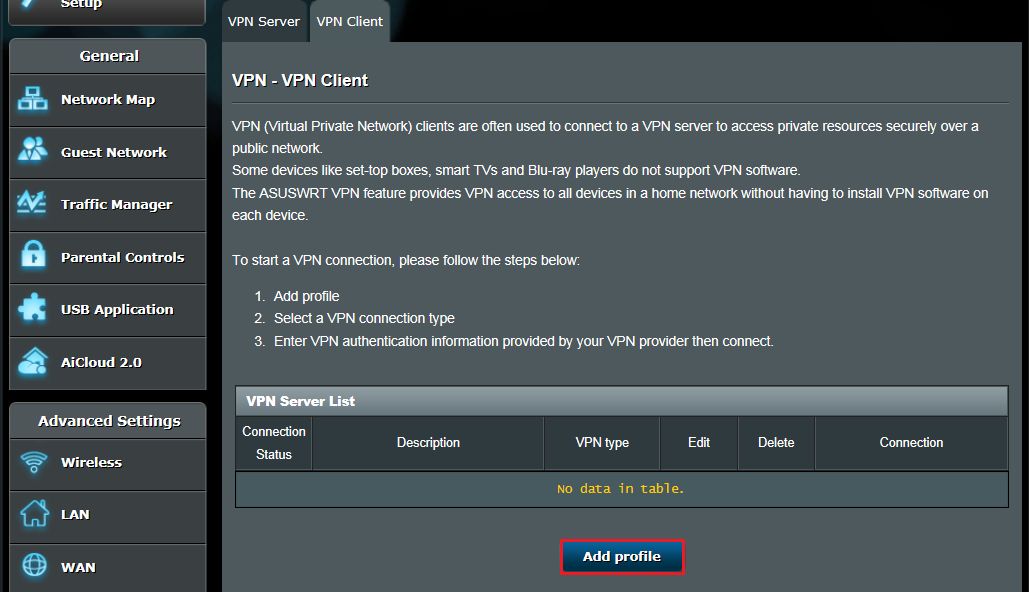
Step 3: Select a VPN connection type: PPTP, L2TP, or OpenVPN. 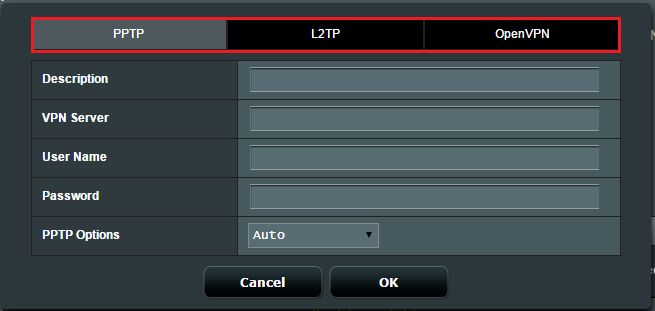 Step 4: Configure VPN information PPTP (1) Click PPTP. Enter the VPN authentication information provided by your VPN provider. (2) Click [OK] to create a VPN Client profile.
 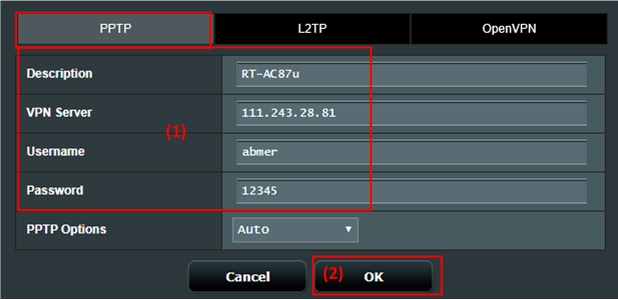 L2TP (1) Click L2TP. Enter the VPN authentication information provided by your VPN provider. (2) Click [OK] to create a VPN Client profile.
 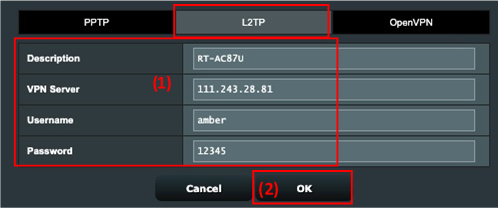 OpenVPN (1) Click OpenVPN. Enter the VPN authentication information provided by your VPN provider.
 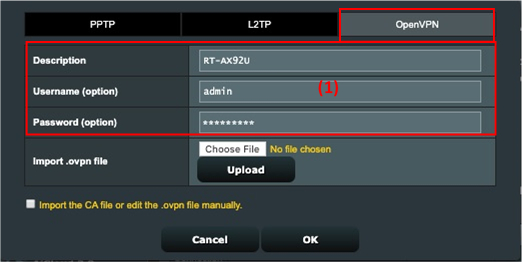 (2) Click “Choose File” and choose the .ovpn file provided by your VPN service provider.
  (3) Check whether the uploaded file name displays. (4) And then click “Upload” button to complete.
 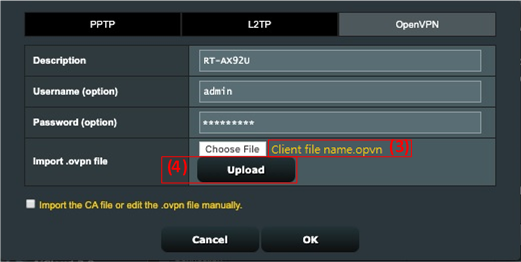 (5) Check whether the “Complete!” hint is displayed. (6) Click [OK] to create a VPN Client profile.
 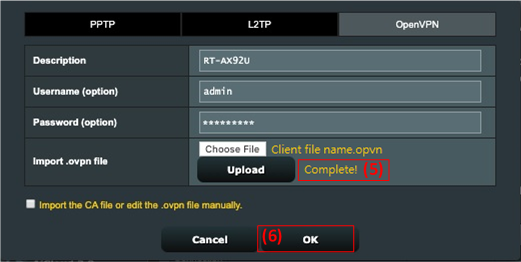 Step 5: Click [Activate] to execute your VPN connection.
 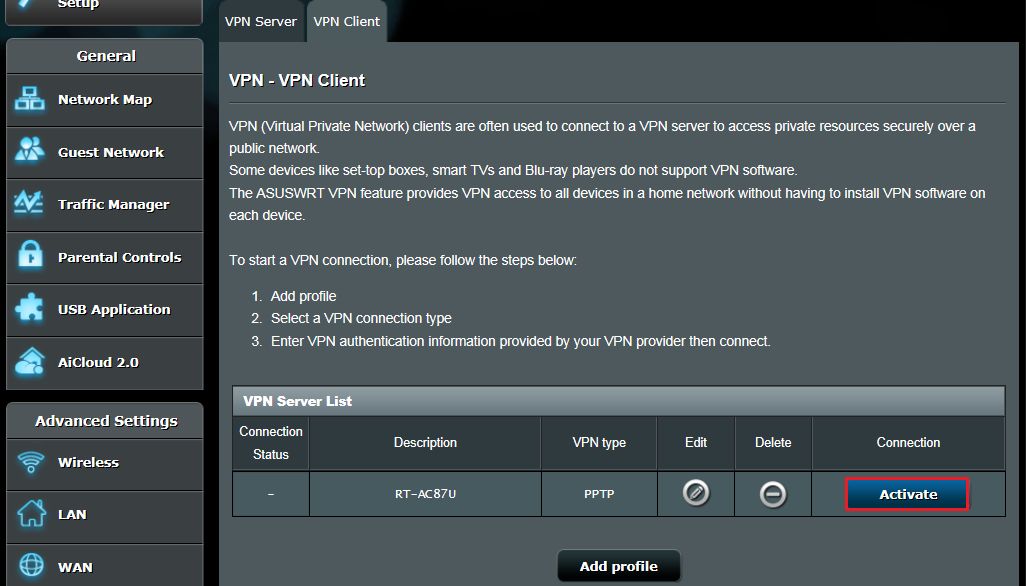 Step 6: The display of » tick icon »
  indicates that the connection is successful.
 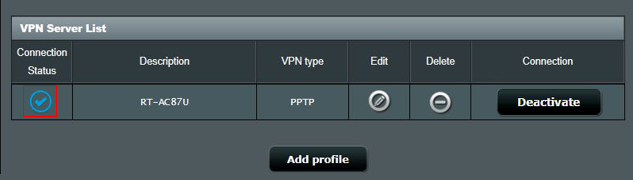 FAQ 1. Why is there no OpenVPN client option available in the latest firmware? The VPN Client is actually called VPN Fusion. For setups on VPN Fusion, please refer to this FAQ article. [Wireless Router] Why you must try Multiple VPN connection (VPN Fusion) — Later than 388.xxxxx 2. Why doesn’t the VPN client automatically reconnect when the server down? When VPN server down, router as VPN client will disconnect to VPN server, and will not auto-reconnect, it’s a normal behavior for all ASUS routers. 3. What should I do if I still cannot successfully connect to the VPN server after following the steps above? A. Please make sure your router can connect to the Internet normally. B. Please make sure that the VPN server information you entered is correct (such as the selected VPN type, server address, VPN account and password, etc.) If you are not sure about the relevant information, please consult your VPN server administrator first. C. It is recommended that you use another device as a VPN client to try to connect to the VPN server to see if you can connect normally. Instructions for connecting to VPN using devices other than ASUS routers: Windows Computer(For Windows11 and Windows10): Connect to a VPN in Windows — Microsoft Support MAC Devices:Set up a VPN connection on Mac — Apple Support Android devices:Connect to a virtual private network (VPN) on Android — Android Help (google.com) Apple devices:VPN settings overview for Apple devices — Apple Support If you cannot successfully establish a connection with the VPN server using a device other than the ASUS router, please consult your VPN server administrator first. D. If you can successfully establish a connection with the VPN server using a device other than the ASUS router, it is recommended that you confirm that the firmware of your ASUS router has been updated to the latest version, restore the router to the original factory default value (RESET), and reset according to QIS instructions then follow the steps in this article again to set up the VPN client to establish a connection. For firmware upgrade, reset router and QIS setup please refer to below FAQs. [Wireless Router] How to update the firmware of your router to the latest version [Wireless Router] How to reset the router to factory default setting? [Wireless Router] How to use the QIS (Quick Internet Setup) to set up Router ? (Web GUI) 4. How to deal with IP conflict if VPN client is not working? When your LAN subnet of ASUS router is the same with VPN Server, your VPN connection may not work and see the warning icon on connection status.
 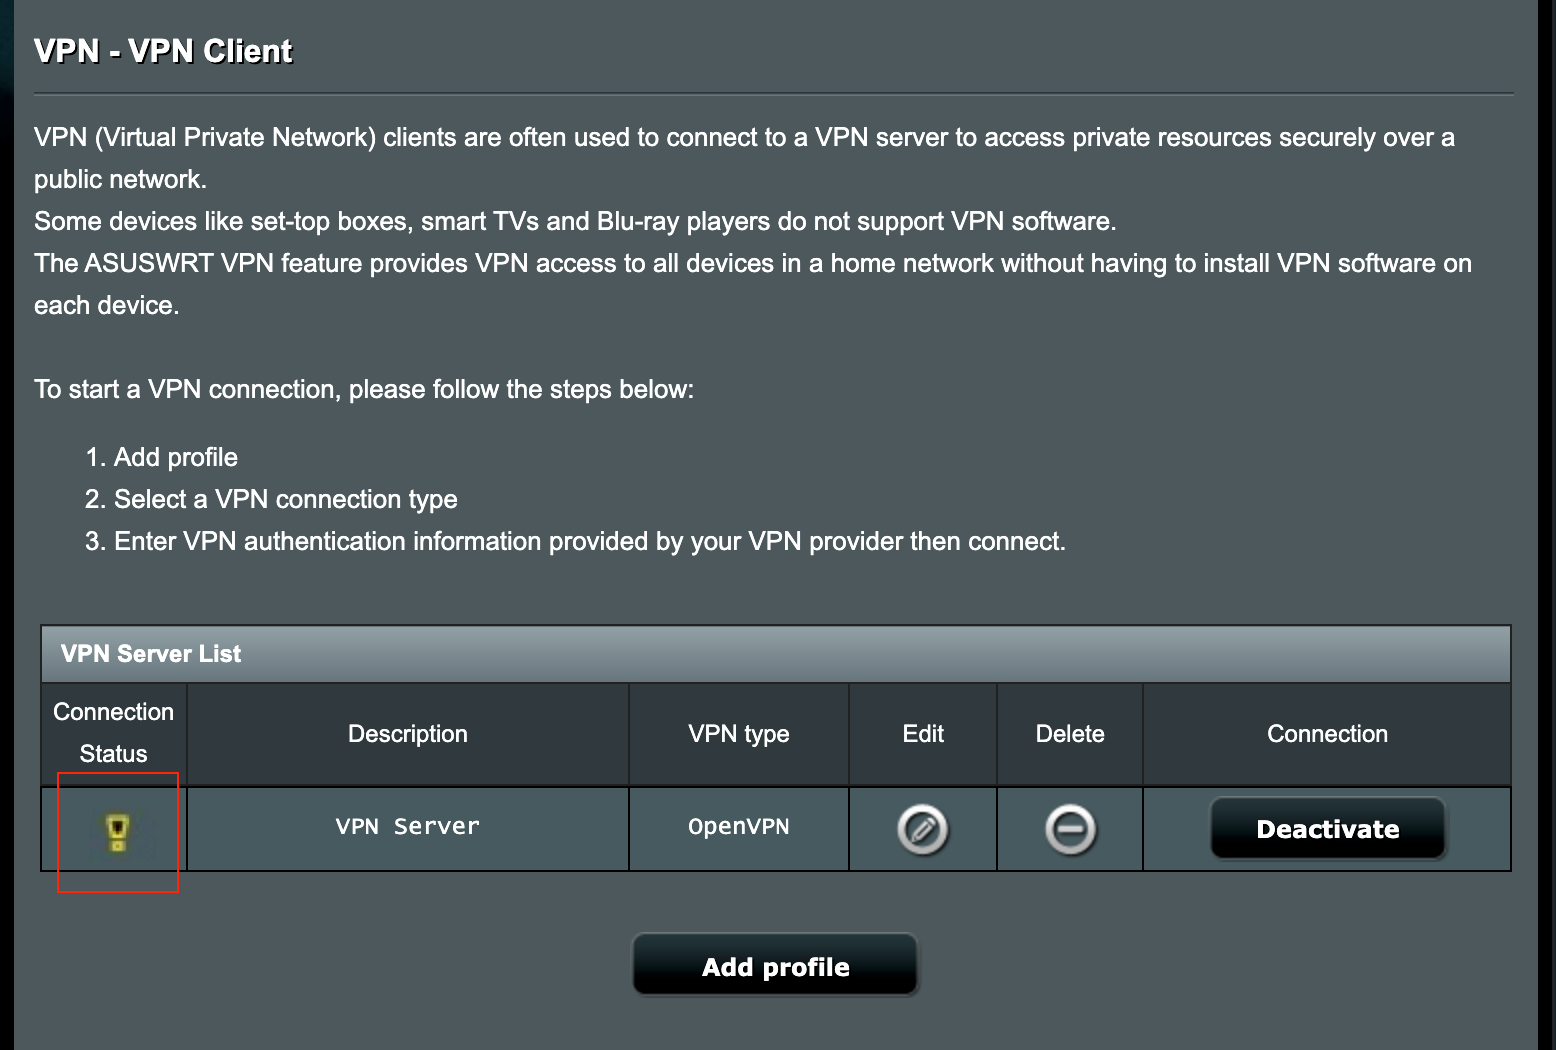 Please try to change your IP address of LAN to another one different with VPN Server.
  5. Can I assign certain devices to use VPN while other devices use WAN? This can be done with a feature we call VPN Fusion, but this feature is only supported on certain router models. For more information regarding VPN Fusion, you may refer to this article: [Multiple VPN] How to configure multiple VPN connections on ASUS Router. For devices that do not support VPN Fusion feature, all devices will be directed to use VPN connection once the VPN Client is set and the connection is established on the router. How to get the (Utility / Firmware)? You can download the latest drivers, software, firmware and user manuals in the ASUS Download Center. If you need more information about the ASUS Download Center, please refer to this link.
Was this information helpful?
- Above information might be partly or entirely quoted from exterior websites or sources. please refer to the information based on the source that we noted. Please directly contact or inquire the sources if there is any further question and note that ASUS is neither relevant nor responsible for its content/service
- This information may not suitable for all the products from the same category/series. Some of the screen shots and operations could be different from the software versions.
- ASUS provides the above information for reference only. If you have any questions about the content, please contact the above product vendor directly. Please note that ASUS is not responsible for the content or service provided by the above product vendor.
- Brand and product names mentioned are trademarks of their respective companies.
- Phones
- Laptops
- Tower PCs
- Graphics Cards
- Networking
- Motherboards
- Show All Products
- Item_other —>
- Tablets
- Gaming handhelds
- Gaming Networking
- AIOT & Industrial Solutions
- Chassis
- Cooling
- Health & Fitness
- All-in-One PCs
- Business Networking
- Chrome Devices
- Headphones & Headsets
- Mini PCs
- Monitors
- DVD & BluRay Optical Drives
- Projectors
- ROG — Republic Of Gamers
- Tinker Board
- Sound Cards
- Stick PCs
- Commercial
- Commercial_list.Item —>
- Tablets
- Networking
- Motherboard
- Mini PCs
- All-in-One PCs
- Desktops
- Laptops
- Monitors
- Projectors
- Servers & Workstations
- Signage
- Gaming Station
- Data Storage
[VPN] Как настроить VPN сервер на роутере Asus — OpenVPN
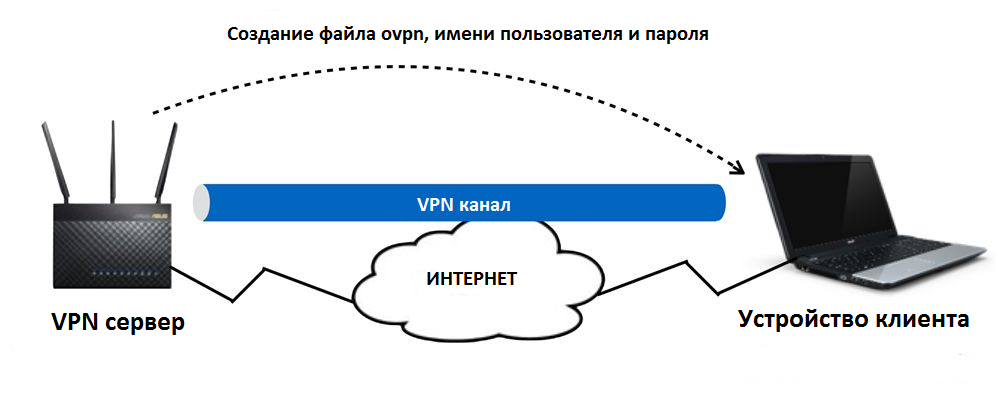
Виртуальная частная сеть: Виртуальные частные сети шифруют Ваше сетевое соединение, обеспечивая безопасную передачу важной информации и предотвращая ее кражу. Позволяет удаленным потребителям (VPN-клиентам) безопасно подключаться к VPN-серверам.
VPN имеет множество способов подключения, в этой статье информация о настройках OpenVPN сервера в маршрутизаторах Asus, для выполнения настроек, связанных с другими типами поддерживаемых серверов (PPTP VPN, IPSec VPN) настройки можно найти в следующих связанных часто задаваемых вопросах. Рекомендации могут быть выбраны в зависимости от типа VPN, поддерживаемого Вашим устройством.
Для настройки PPTP VPN сервера, пожалуйста, oбратитесь к https://www.asus.com/ru/support/FAQ/114892
Для настройки IPSec VPN сервера, пожалуйста, обратитесь к https://www.asus.com/support/FAQ/1044190
VPN-серверы, поддерживаемые беспроводными маршрутизаторами ASUS, различаются в зависимости от модели. Рекомендуется обратиться к руководству пользователя продукта или странице технических характеристик продукта, чтобы подтвердить, что Ваш маршрутизатор поддерживает данный функционал.
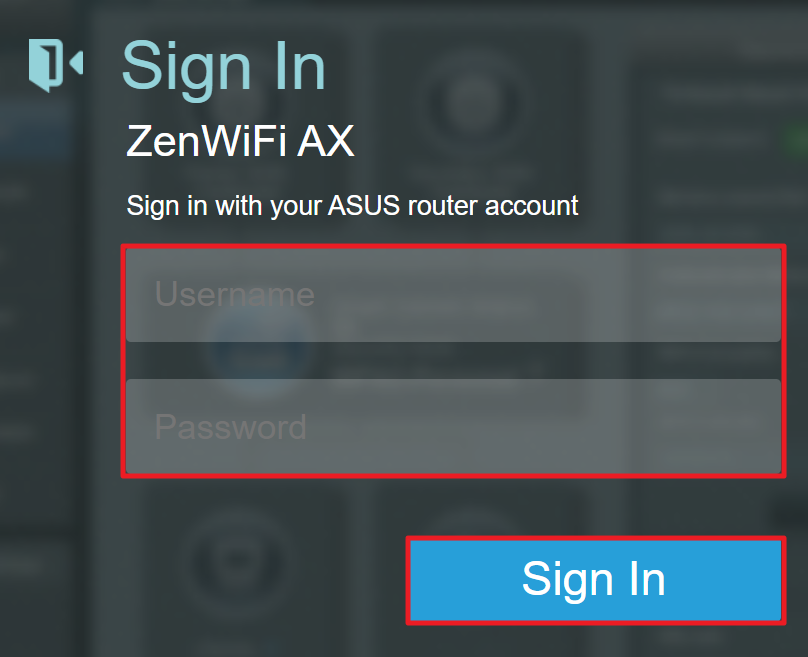
Шаг 1. Пожалуйста, подключите свой компьютер или устройство к маршрутизатору, запустите веб-браузер и введите http://router.asus.com, чтобы войти на страницу входа в маршрутизатор.(Графический веб интерфейс, GUI)

Примечание: воспользуйтесь ссылкой, чтобы узнать больше о том, как войти в интерфейс.
Шаг 2. Введите свое имя пользователя и пароль для входа на страницу входа, а затем нажмите [Войти].
Примечание: Если Вы забыли Имя пользователя и пароль, пожалуйста, сбросьте настройки роутера по умолчанию. Пожалуйста, обратитесь к Как сбросить настройки роутера по умолчанию?
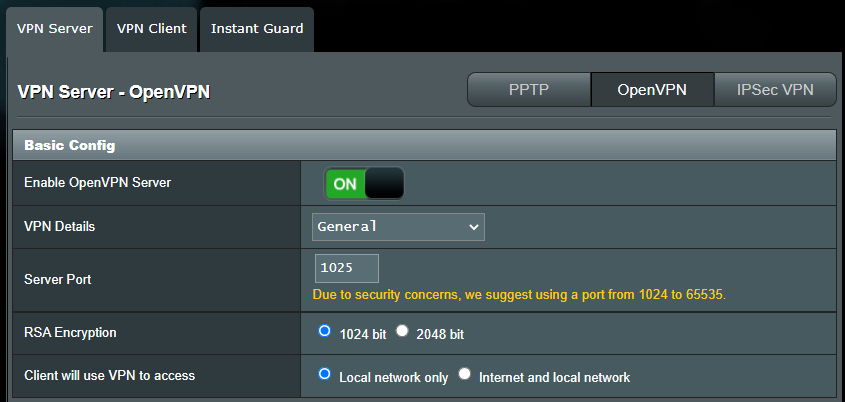
Шаг 3. Откройте настройки [VPN] > [VPN Server] > [OpenVPN], Включите OpenVPN сервер — положение [ON].
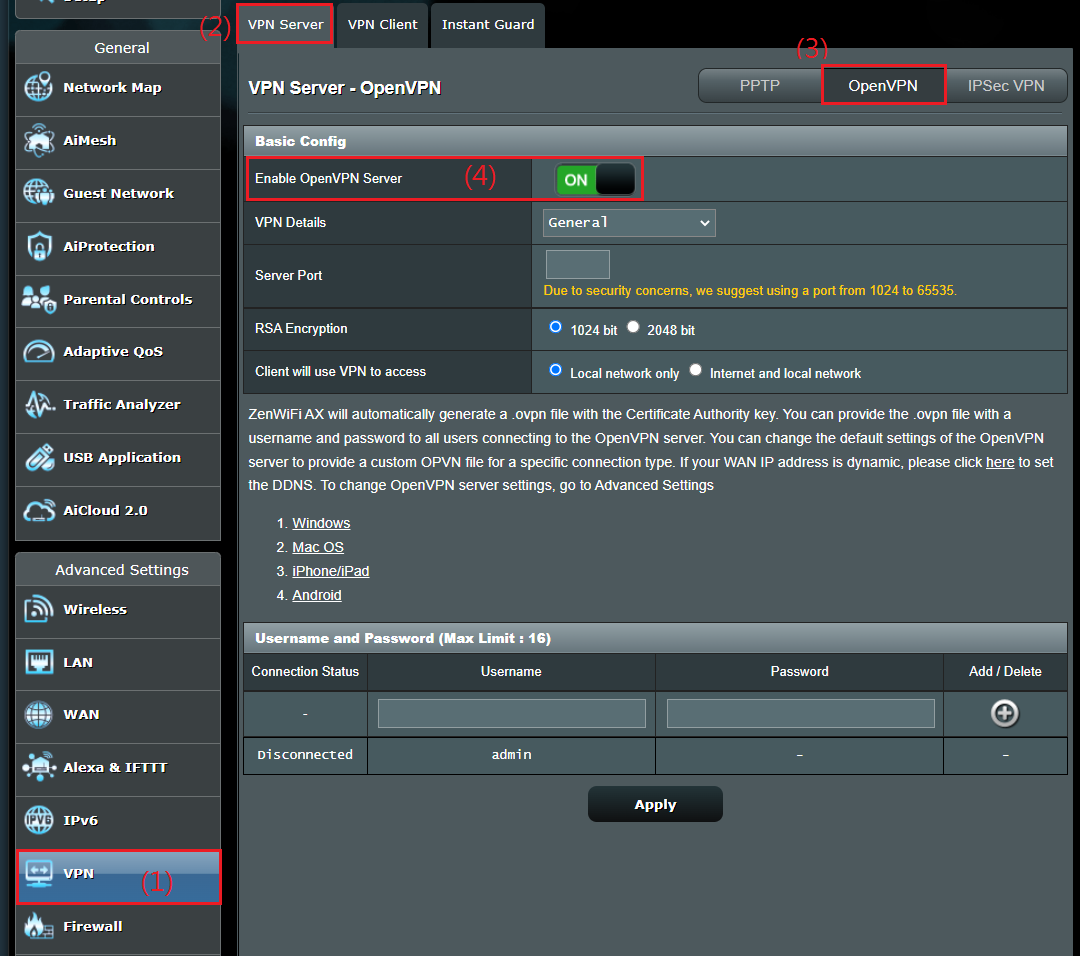
Шаг4. Основные настройки
a. Подробнее о VPN: По умолчанию как [Основные].
b. Порт сервера: Укажите порт соединения. Текущий порт по умолчанию 1194 определяется IANA номерами портов для OpenVPN.
c. RSA Encryption: По умолчанию как [1024 bit].
d. Клиент будет использовать VPN для доступа: По умолчанию [Только локальная сеть]. Когда VPN-клиент подключается к VPN-серверу, он может получить доступ только к локальной сети за VPN-сервером.
[Интернет и локальная сеть]: Когда клиент подключается к VPN-серверу, он может одновременно получить доступ к локальной сети за VPN-сервером, а также может получить доступ к Интернету через VPN-сервер.

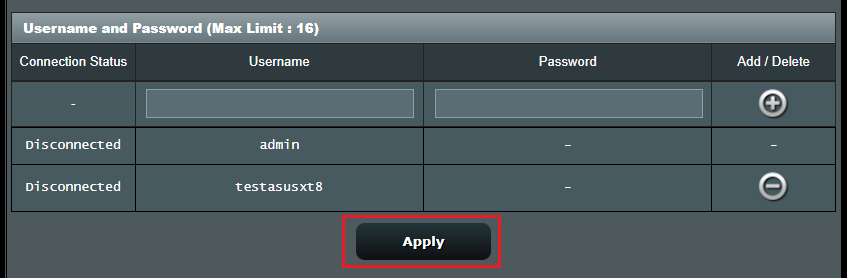
Шаг 5. Введите Ваши имя пользователя и пароль и щелкните по кнопке чтобы создать новую учетную запись для Вашего сервера OpenVPN.
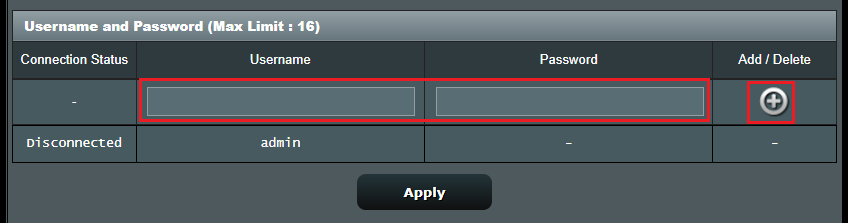
Шаг 6. Пароль будет автоматически скрыт, щелкните [Применить], чтобы сохранить настройки OpenVPN.
Потребуется несколько минут, чтобы инициализировать настройки сервера OpenVPN и сгенерировать файл конфигурации openv. После этого, пожалуйста, нажмите кнопку [Экспорт], чтобы сохранить файл конфигурации ovpn с именем «client.ovpn».
Теперь Вы завершаете настройку OpenVPN на стороне сервера. Пожалуйста, перейдите на сторону клиента, чтобы установить клиентское соединение OpenVPN.
Для получения информации о настройках VPN-клиента ASUS Router, пожалуйста, обратитесь к

Вопросы-Ответы
1: Сколько клиентов может подключиться?
OPEN VPN может поддерживать более 10 клиентских подключений, но стабильность зависит от пропускной способности маршрутизатора.
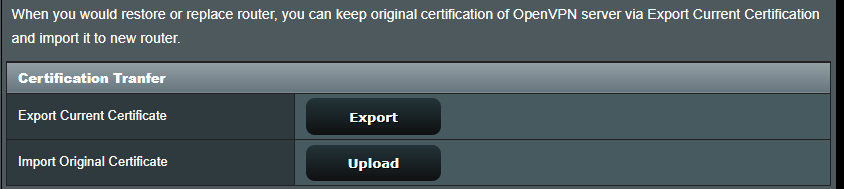
2. Как сохранить файл настроек OpenVPN сервера?
Когда Вы хотите восстановить или заменить маршрутизатор, Вы можете сохранить исходную сертификацию сервера OpenVPN через Экспорт текущей сертификации и импортировать ее на новый маршрутизатор.
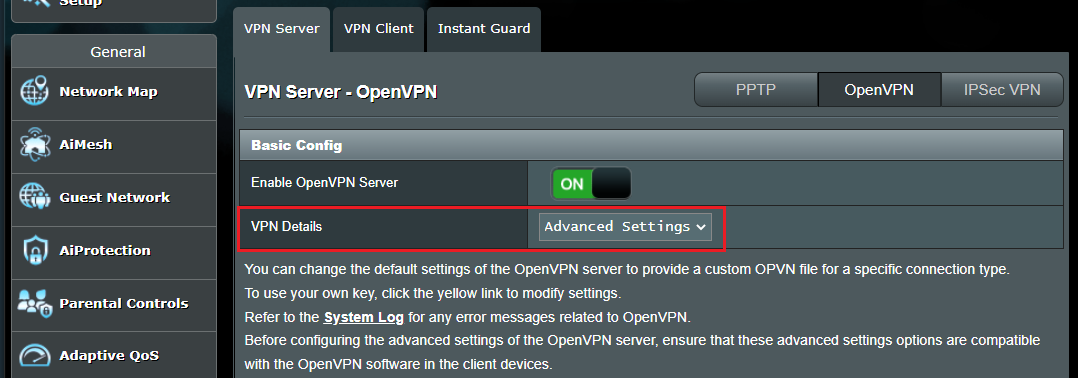
3. Где Дополнительные настройки OpenVPN?
Мы предоставляем более продвинутые настройки для OpenVPN. При необходимости, пожалуйста, перейдите к [VPN Details] >[Advanced Settings] для настройки.
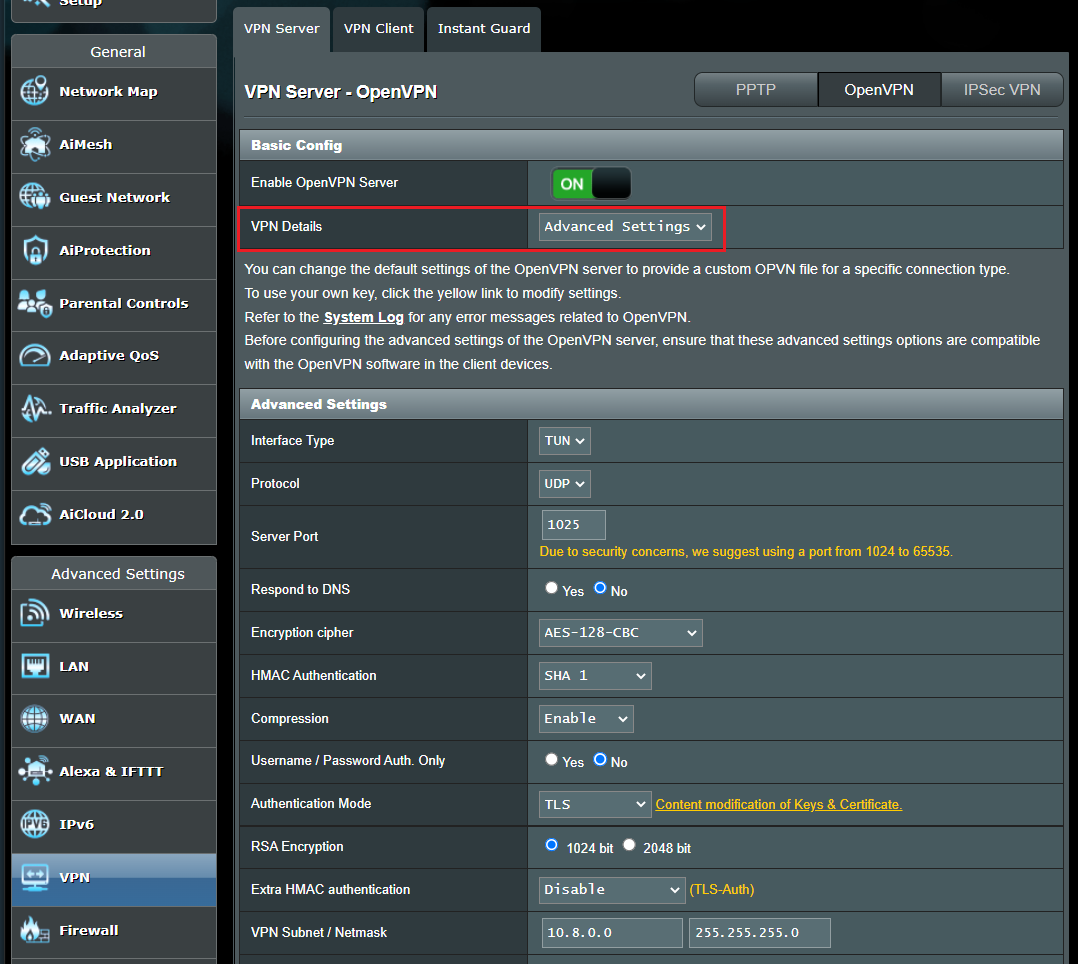
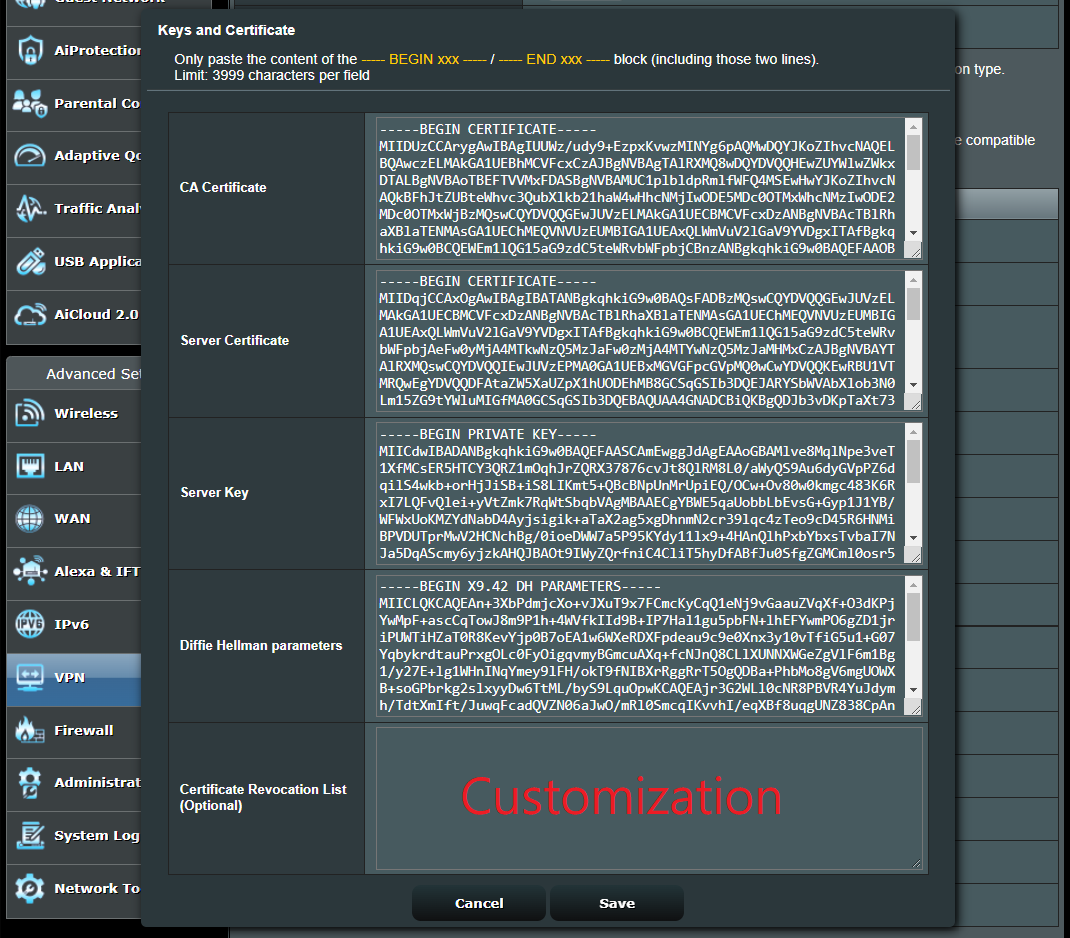
4. Как изменить ключи и сертификат сервера OpenVPN?
Откройте страницу [VPN Details] >[Advanced Settings]
Щелкните по [Content modification of Keys & Certificate].

Измените содержимое и щелкните кнопку [Сохранить] для сохранения настроек.
Нажмите кнопку [Применить] для сохранения настроек OpenVPN.
Как скачать (Утилиты / ПО)?
Вы можете загрузить последние версии драйверов, программного обеспечения, микропрограмм и руководств пользователя в Центре загрузок ASUS.
Узнать больше о Центре загрузок ASUS можно по ссылке.