- OpenVPN 3 Client for Linux
- Installation as Connector for CloudConnexa
- Installation for Debian and Ubuntu
- Important
- Installation for Fedora, Red Hat Enterprise Linux, CentOS, or Scientific Linux
- Note
- Using .ovpn Profile
- Mandatory Commands
- Important
- Note
- Important
- Note
- Guide to install OpenVPN for Ubuntu
- Total infrastructure ownership
- 3. Open a new CLI
- 4. Download the configuration you want
- 5. Configure the VPN-connection
- 6. Enter your username and password and continue configuration
- 7. Connect to OVPN
- 8. Finished
- Есть ли OpenVPN GUI для Linux?
OpenVPN 3 Client for Linux
The OpenVPN 3 Linux project is a new client built on top of the OpenVPN 3 Core Library, which is also used in the various OpenVPN Connect clients and OpenVPN for Android (need to be enabled via the settings page in the app).
This client is built around a completely different architecture in regard to usage. It builds heavily on D-Bus and allows unprivileged Users to start and manage their own WPC tunnels out-of-the-box. System Administrators wanting more control can also control and restrict this access both by hardening the default OpenVPN 3 D-Bus policy or facilitating features in OpenVPN 3 Linux.
Even though the project name carries “Linux”, it doesn’t mean it is restricted to Linux only. Any platform which has D-Bus available should be capable of running this client in theory. But since D-Bus is most commonly used in Linux environments, this will naturally be the primary focus for the project.
The release notes are stored in git tags in the project git repository. They can also be viewed here: https://github.com/OpenVPN/openvpn3-linux/releases (expand the tag to see the full text).
Installation as Connector for CloudConnexa
Installation of CloudConnexa 3 client as a Connector for CloudConnexa Host or Network has been simplified and documented here.
Installation for Debian and Ubuntu
Follow these steps in order to install OpenVPN 3 Client on Linux for Debian and Ubuntu:
- Open the Terminal by pressing ctrl + alt + T .
- Type the following command into the Terminal: sudo wget https://swupdate.openvpn.net/repos/openvpn-repo-pkg-key.pub . This will install the OpenVPN repository key used by the OpenVPN 3 Linux packages.
- Type the following command into the Terminal: curl -fsSL https://swupdate.openvpn.net/repos/openvpn-repo-pkg-key.pub | gpg —dearmor | sudo tee /etc/apt/trusted.gpg.d/openvpn-repo-pkg-keyring.gpg . This will install the OpenVPN repository key used by the OpenVPN 3 Linux packages.
- Type the following command into the Terminal: DISTRO=$(lsb_release -c | awk ») . This will detect the OS distribution and will be automatically used in the next command.
Important
It is recommended to be cautious of the distribution and release you are running. Distribution and version should preferably be retrieved using the hostnamectl command, where the user needs to link the Operating System field with the supported distros table.
Distribution
Release name ($DISTRO)
Installation for Fedora, Red Hat Enterprise Linux, CentOS, or Scientific Linux
Packages for these distributions are provided via a Fedora Copr repository. Supported versions:
Distribution
Release versions
Red Hat Enterprise Linux / CentOS
In order to install the OpenVPN 3 Client for Fedora , Red Hat Enterprise Linux , CentOS , or Scientific Linux , follow the steps below:
- Open Terminal by typing terminal into the search bar.
- If you are running Red Hat Enterprise Linux or its clones, you need to install the Fedora EPEL repository first. Here is the list of commands for each version: (The original article on Fedora EPEL can be found here). RHEL/CentOS 6 : sudo yum install https://dl.fedoraproject.org/pub/epel/epel-release-latest-6.noarch.rpm RHEL/CentOS 7 : sudo yum install https://dl.fedoraproject.org/pub/epel/epel-release-latest-7.noarch.rpm On RHEL 7 it is recommended to also enable the optional, extras , and HA repositories since EPEL packages may depend on packages from these repositories: sudo subscription-manager repos —enable «rhel-*-optional-rpms» —enable «rhel-*-extras-rpms» —enable «rhel-ha-for-rhel-*-server-rpms RHEL/CentOS 8 : sudo yum install https://dl.fedoraproject.org/pub/epel/epel-release-latest-8.noarch.rpm On RHEL 8 it is required to also enable the codeready-builder-for-rhel-8-$-rpms repository since EPEL packages may depend on packages from it: sudo ARCH=$( /bin/arch ) followed by sudo subscription-manager repos —enable «codeready-builder-for-rhel-8-$-rpms On CentOS 8 it is recommended to also enable the PowerTools repository since EPEL packages may depend on packages from it: sudo dnf config-manager —set-enabled PowerTools
- You need to install the yum copr module first by running the following command: sudo yum install yum-plugin-copr .
Note
Using .ovpn Profile
Please note that by this point you should have downloaded a .ovpn Profile to your machine.
Mandatory Commands
- In order to start a one-shot configuration Profile, type the following command into the Terminal: openvpn3 session-start —config $ .
Important
A » one-shot configuration Profile » means that the configuration file is parsed, loaded, and deleted from the configuration manager as soon as the WPC session has been started. No configuration file is available for re-use after this approach. This is achieved by giving the configuration file to the openvpn3 session-start command directly.
Note
Using this approach, an imported configuration file can be used several times, and access to the configuration file itself is not needed to start WPC tunnels. By default, configuration profiles imported are only available to the User who imported the configuration file. But OpenVPN 3 Linux also provides an Access Control List feature via openvpn3 config-acl to grant access to specific or all Users on the system.
Important
This loads the configuration Profile and stores it in memory-only . That means, if the system is rebooted, the configuration Profile is not preserved. If the –persistent argument is added to the command line above, the configuration Profile will be saved to disk in a directory only accessible by the CloudConnexa User. Whenever the Configuration Manager is started, configuration files imported with –persistent will be automatically loaded as well.
Note
When a configuration Profile is available via openvpn3 configs-list , it can easily be started via openvpn3 session-start using the configuration Profile name (typically the filename used during the import)
Guide to install OpenVPN for Ubuntu

The first thing you need to do to connect to our VPN-tunnel is to open system settings.
Once you open System settings, click Programs & updates.

Make sure universe is activated.
If you receive a message about a software update, please approve it.
If you receive a message asking for authentication, please enter you passwords.
Total infrastructure ownership
All the hardware used to operate OVPN is owned by us. All VPN servers operate without hard drives as the operating system only resides in RAM.
3. Open a new CLI
You can open a new CLI by pressing Ctrl + Alt + t at the same time, or by searching after a CLI.
Enter the following command to install needed components:
sudo apt-get -y install network-manager-openvpn
Restart the network-manager by typing:
sudo service network-manager restart 
4. Download the configuration you want
Double-click the file to extract the content.
5. Configure the VPN-connection
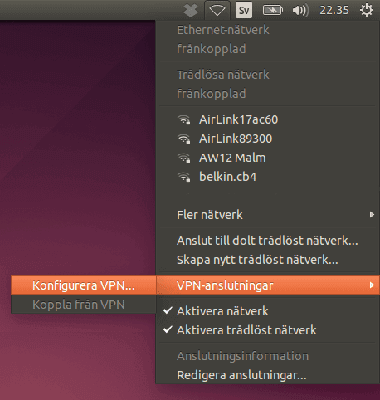
Click the network icon in the upper right corner of the activity field and choose VPN-connections → Configure VPN.

Click Add
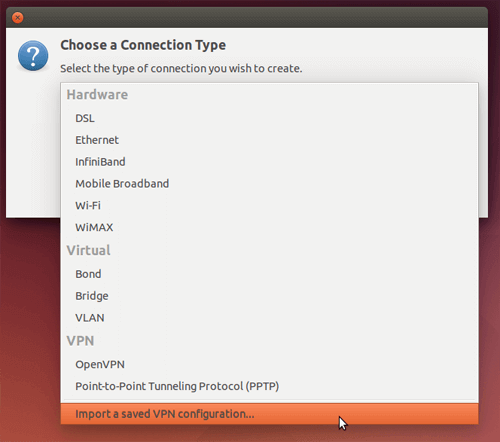
Choose Import a saved VPN configuration.
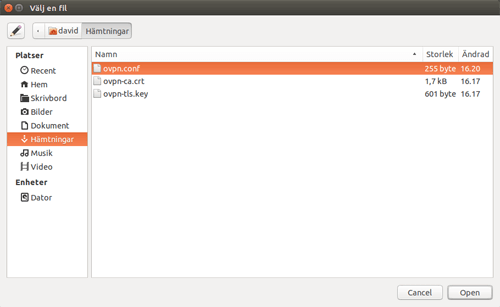
Open the folder where you isntalled the configuration files, and choose ovpn.conf
6. Enter your username and password and continue configuration
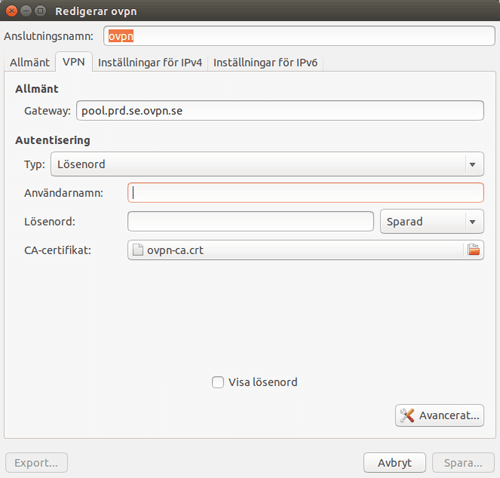
Enter the username and password you used when creating your OVPN account.
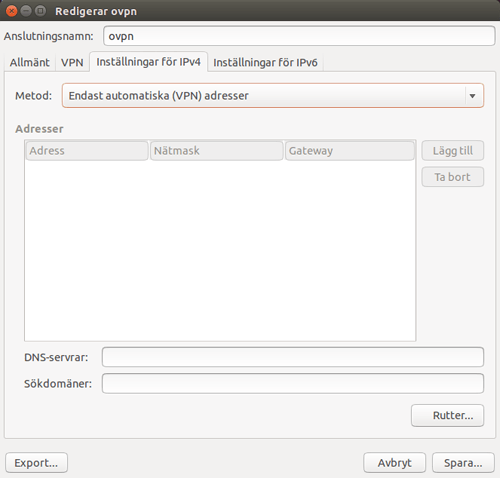
Go to tab Settings for IPv4, and choose Only automatic (VPN) addresses.
You can make the same settings for IPv6 if you are using that.
Go back to VPN-tab and click Advanced. In the new window that opens, go to the tab named TLS-authentification.
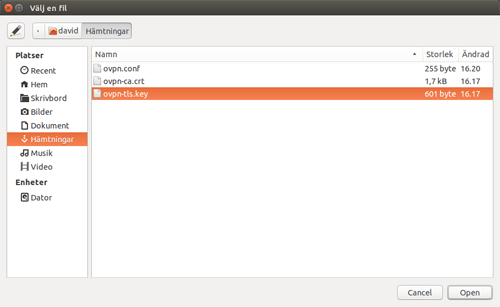
Choose Use another TLS-authentication, and choose the file ovpn-tls.key.
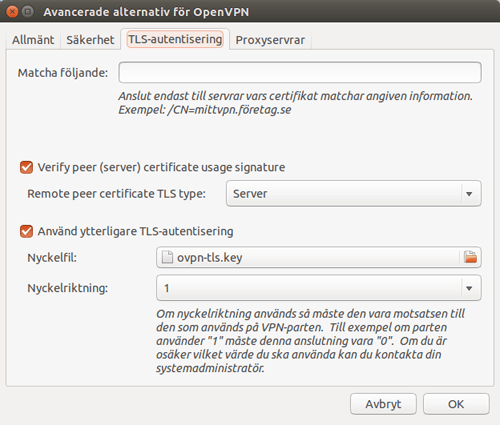
The last step is to enter the Key direction to 1.
Save all the configurations you have made by clicking OK, and then Save.
7. Connect to OVPN
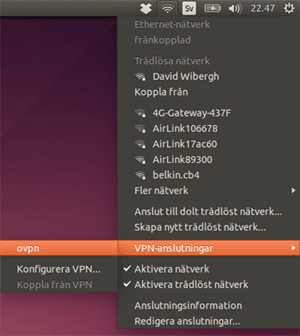
Click the network icon in the upper right corner of the activity field and choose VPN-connections → ovpn.

If the connection is successful you will see:
8. Finished
Save €460 + get an OVPN-tshirt when purchasing the three-year subscription
Есть ли OpenVPN GUI для Linux?
Название статьи подсказала тема на одном из форумов. Несмотря на то, что с момента возникновения вопроса прошло шесть лет, в этом направлении мало что изменилось. А поскольку в последнее время у меня на слуху постоянно был OpenVPN, то было решено исправить данную ситуацию. Так родилась графическая утилита VpnGUI для создания, редактирования, запуска и контроля выполнения утилиты openvpn.
После запуска утилиты VpnGUI в трее появится иконка (квадрат разбитый на четыре сине-красных квадратика) утилиты:

Трей имеет меню, которое появляется при нажатии правой клавиши мышки, когда курсор мышки находится на трее утилиты VPNGui. Меню имеет два пункта – Restore (развернуть окна) и Stop (завершить работу ). После выбора пункта меню «Restore» на экране появится главное окно утилиты VPNGui:

Разработка велась на python с использованием графического пакета Tkinter и дизайнера Page.
Напомним, что для использования «великого, могучего, правдивого и свободного русского языка!» (И.С. Тургенев), необходимо добавить в файл файл gui_pyton_gen.tcl дизайнера Page после 418 строки следующий код:
Аналогичный код необходимо дабавить также в файл support_python_gen.tcl (после 458 строки).
Для программирования трея был установлен пакет Pystray.
Работа утилиты начинается с выбора пользователем выполняемого файла openvpn или его форков. Утилита проверяет наличие выполняемого файла и заполняет списки перечнем поддерживаемых mac (алгоритмя контроля целостности), ciphers (алгоритмы шифрования) и перечнем поддерживаемых шифрсьютов:
# openvpn –show-digests … #openvpn –show-ciphers … #openvpn –show-tls …
Теперь можно приступать к работе с конфигурационным файлом. Пользователь может создать новый файл или отредактировать существующий, предварительно загрузив его (см. скриншот). После того как файл загружен или новый файл сохранен, пользователь может запустить openvpn:

После ввода пароля в окне «Протокол работы» будут отображаться диагностические сообщения OpenVPN:
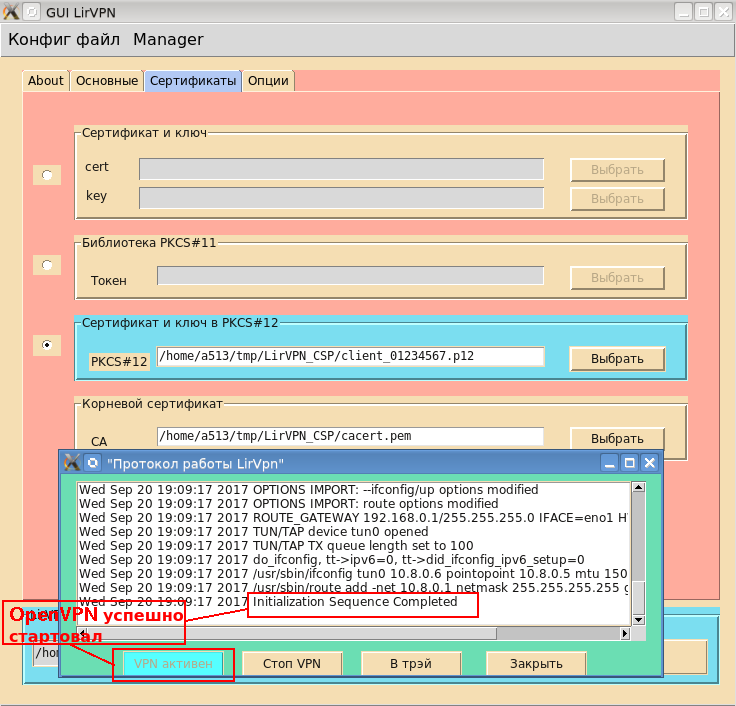
До тех пор пока openvpn нормально работает книопка «VPN активен» будет блокирована. Если openvpn по каким-то причинам завершит свою работу или будет остановлен пользователем (кнопка «Стоп VPN»), то кнопка разблокируется и снова станет кнопкой «Старт VPN».
Отметим, что для выпуска клиентских и серверных сертификатов для OpenVPN удобно использовать центр сертификации XCA:

Теперь, когда openvpn нормально работает, можно его убрать в трей. Для этого можно использовать как кнопку «В трей» на окне «Протокол работы» или меню главного окна (Manager → Убрать в трей):

Утилита плафтормонезависима. Бинарный код утилиты можно получить, используя пакет Nuitka.