User Guide
OpenVPN is one of the most popular protocols for VPN connection. It can be used to create a virtual private network or to interconnect local networks. OpenVPN is open source and distributed free of charge under the GNU GPL license. It provides faster connection speeds than other VPN protocols. In addition, OpenVPN can be called one of the safest protocols. All transmitted data is securely protected by the OpenSSL encryption library and SSLv3/TLSv1 protocols, which provides high security and anonymity.
Keenetic router features TCP and UDP mode for OpenVPN connection, TLS authentication, use of certificates and encryption keys to increase the security of VPN connection.
Important
Keenetic router that will host the OpenVPN server must be connected to the Internet with a public IP address, and when using the KeenDNS domain name, it must be configured in Direct access mode. If any of these conditions are not met, it will not be possible to connect to such a server from the Internet.
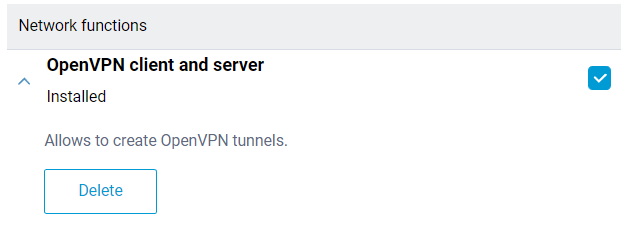
Installing the system component ‘ OpenVPN client ‘ is necessary to configure the OpenVPN connection. With this component, you can use both client and OpenVPN server in your Keenetic. A detailed description of the client mode you may find in the article ‘OpenVPN client’. You can install the system component on the ‘ General system settings ‘ page in the ‘ Updates and components ‘ section by clicking ‘ Component options ‘.
The OpenVPN mode ( client or server ) is mainly defined by its configuration file.
Important
OpenVPN configuration requirements for use in Keenetic:
- The configuration must be in a single file.
- Certificates, keys, etc., should be included in this file.
- In the configuration, you should use only the options listed in the document: https://community.openvpn.net/openvpn/wiki/Openvpn24ManPage.
- Some of the options described above may not be supported. For example, our OpenVPN implementation does not support options related to IPv6.
- The order of the options and the certificates and keys enabled do not matter.
- The OpenVPN configuration file is not saved in the startup-config configuration file. To get a backup of the OpenVPN client interface settings, you must save it separately.
Let’s consider an example of connecting OpenVPN of the ‘ site-to-site ‘ type.
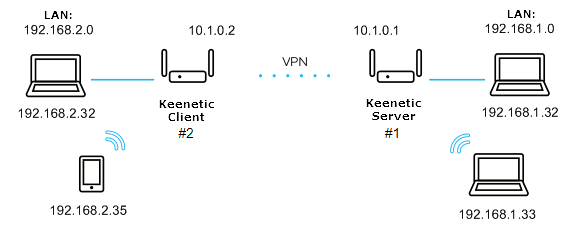
We will connect the Keenetic#2 client (Home-segment 192.168.2.0/24 , tunnel address: 10.1.0.2 ) to the server on Keenetic#1 (Home-segment 192.168.1.0/24 , tunnel address: 10.1.0.1 )
dev tun ifconfig 10.1.0.1 10.1.0.2 cipher AES-128-CBCverb 3 route 192.168.2.0 255.255.255.0
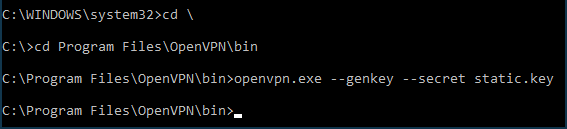
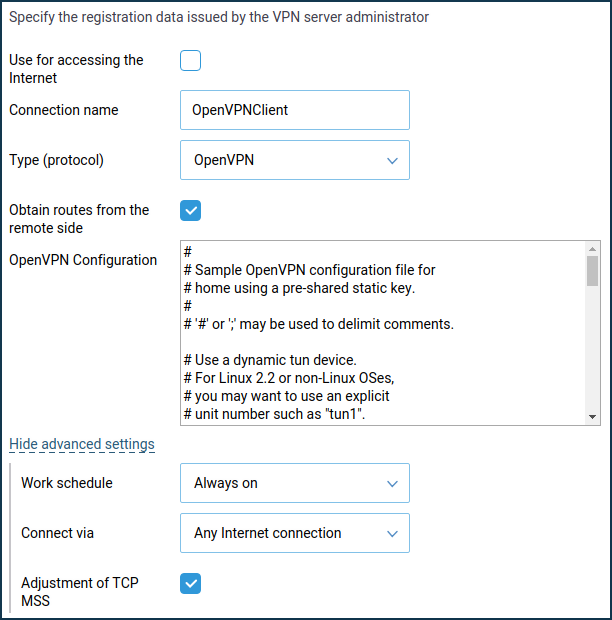
dev tun remote KEENETIC-1.mykeenetic.net verb 3 route 192.168.1.0 255.255.255.0 or redirect-gateway def1 or route 0.0.0.0 0.0.0.0openvpn.exe --genkey --secret static.key
Important
From KeeneticOS 3.4.1 the server only works when ' Connect via ' — ' Any Internet connection ' is specified.
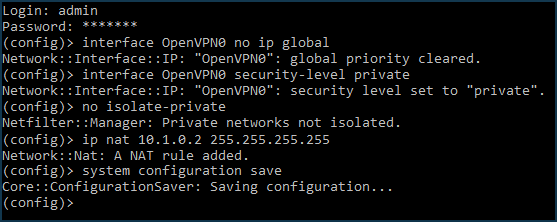
interface OpenVPN0 no ip global interface OpenVPN0 security-level privateTo allow traffic between the Home and OpenVPN0 interfaces, which have a private security level, run the command:
ip nat 10.1.0.2 255.255.255.255system configuration save
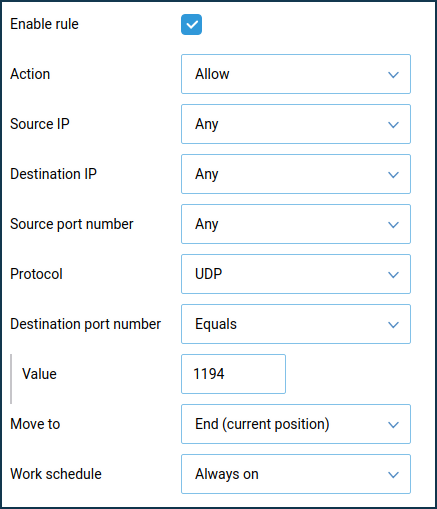
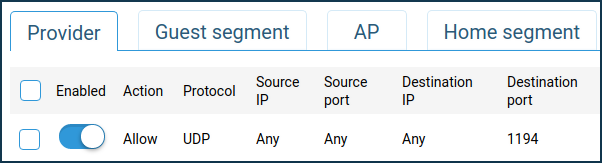
On the ' Firewall rule ' window, select ' Allow ' in the ' Action ' field, ' UDP ' in the ' Protocol ' field, and ' Equals 1194 ' in the ' Destination port number ' field.
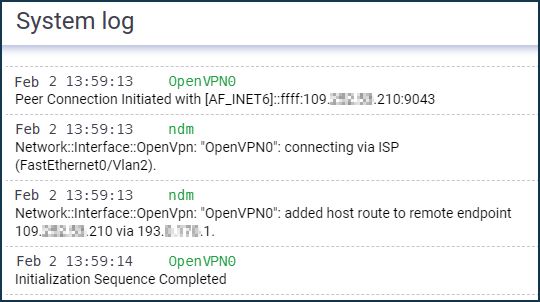
This completes the configuration of the OpenVPN tunnel. Successful installation of the tunnel can be proved by the messages in the System log (on the 'Diagnostics' page): Diagnostics
ping 192.168.1.1 ping 192.168.2.1
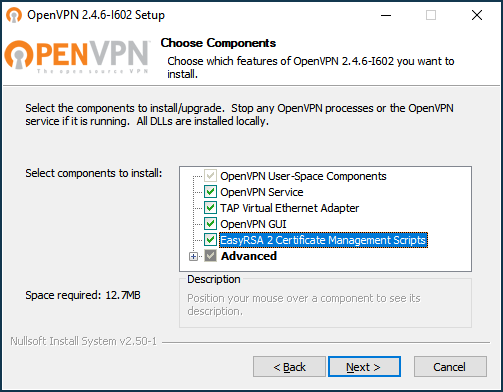
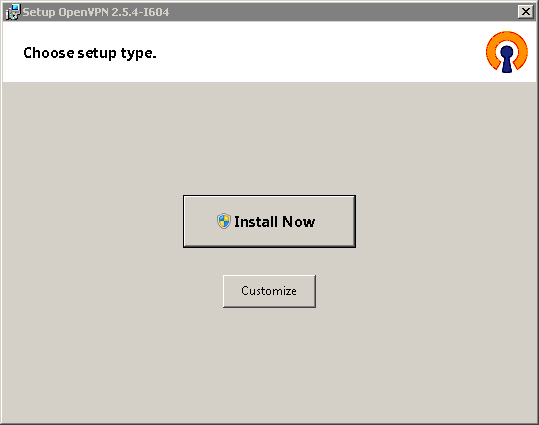
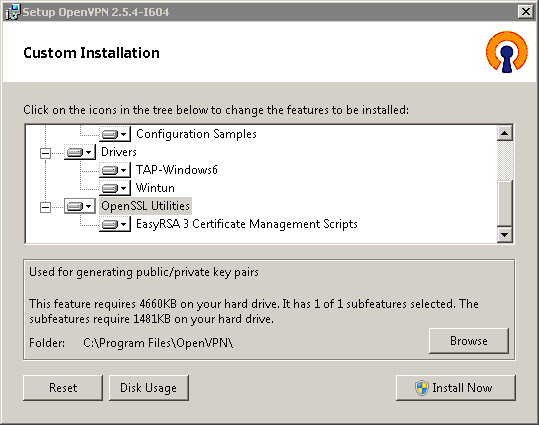
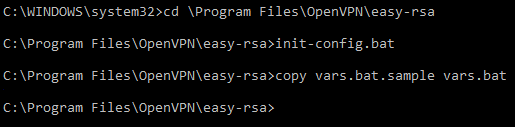
In OpenVPN 2.5.x versions, to install the EasyRSA scripts, press the ' Customize ' button on the first installer screen and scroll to the bottom of the component list.
As a result, we will get a vars.bat file that configures the environment for generating your keys and certificates. Open this file in Windows Notepad and specify a folder to store them; by default, it's ' keys ':
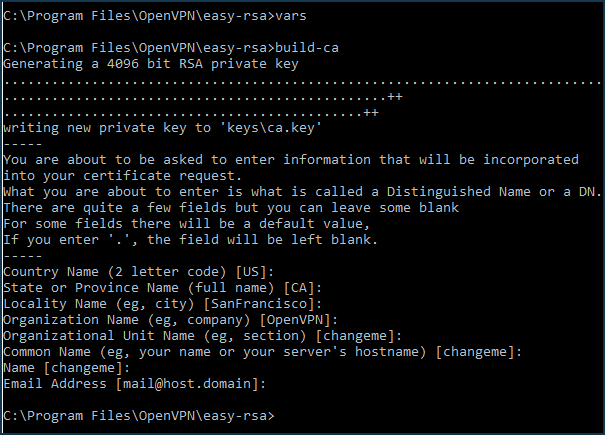
set KEY_COUNTRY=GB set KEY_PROVINCE=YourProvince set KEY_CITY=YourCity set KEY_ORG=YourOrganisation set KEY_EMAIL=mail@example.com set KEY_CN=CommonName set KEY_NAME=KeyName set KEY_OU=OrganisationUnit
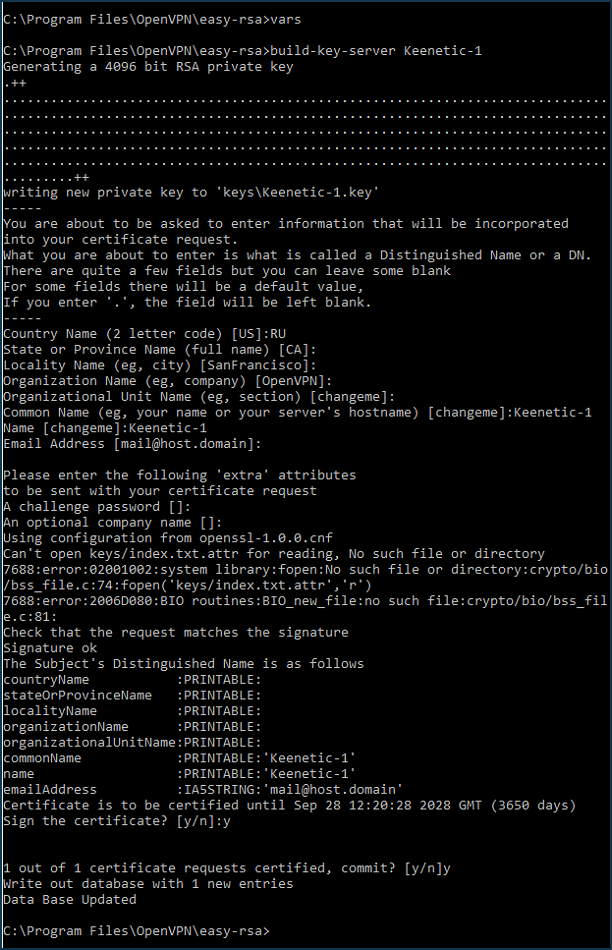
vars build-key-server Keenetic-1When the script asks for Common Name (CN) , enter the server name, such as Keenetic-1 . In the end, double confirm ( y ) that you are signing the certificate.
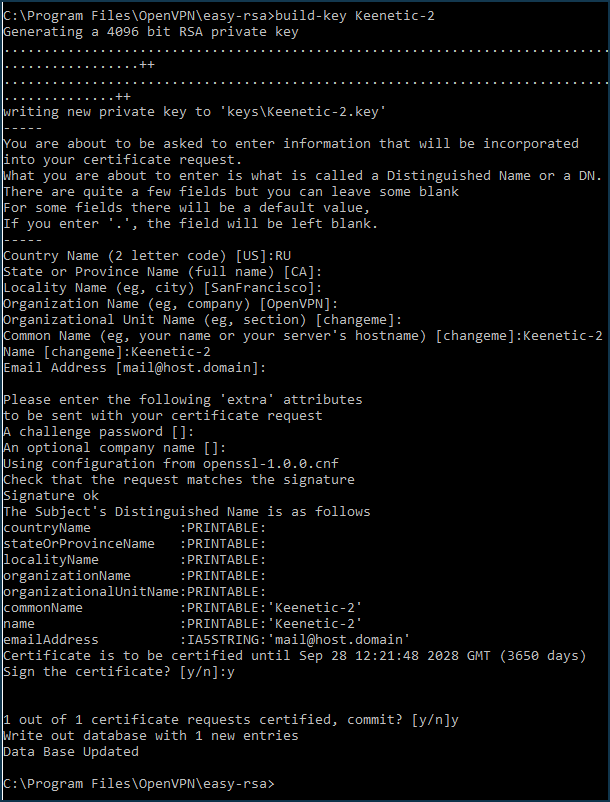
When the script asks for Common Name (CN) , enter the name of the first client — Keenetic-2 . Confirm twice ( y ) that you are signing the certificate.
vars openvpn.exe --genkey --secret keys\ta.key

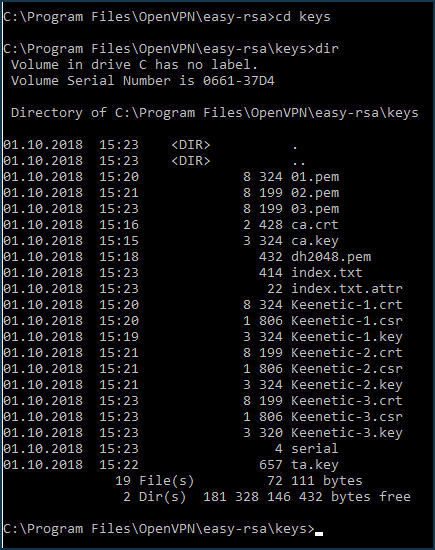
- ca.crt — certificate of the certification centre
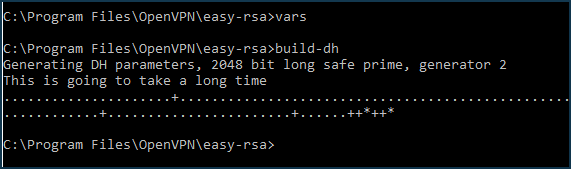
- dh2048.pem (or dh4096.pem) — Diffy-Helman file
- Keenetic-1.crt — OpenVPN server certificate (Keenetic-1)
- Keenetic-1.key — OpenVPN server private key (Keenetic-1)
- Keenetic-2.crt — certificate of the 1st OpenVPN client (Keenetic-2)
- Keenetic-2.key — private key of the 1st OpenVPN client (Keenetic-2)
- Keenetic-3.crt — certificate of the 2nd OpenVPN client (Keenetic-3)
- Keenetic-3.key — private key of the 2nd OpenVPN client (Keenetic-3)
- ta.key — HMAC key for additional protection against DoS-attacks and flooding
The only thing left to do is to add their contents to the server and client configuration text files.
;ifconfig-pool-persist ipp.txt
-----BEGIN OpenVPN Static key V1-----
-----BEGIN OpenVPN Static key V1-----
route 192.168.1.0 255.255.255.0
Tip
In the second part of the example, for simplicity, we performed all the operations in one folder, although for security reasons, it is recommended to place the certification authority on a separate computer, isolated from the Internet, and store the secret key only on it; and carry the certificate on removable media. Similarly, the private keys of the server and OpenVPN clients should only be placed on the respective sides of the tunnel. Only certificates can be exchanged.
Note
- OpenVPN clients connected to the server will be displayed on the ' Device lists ' page in the 'Unregistered devices' list. If you have selected the ' No Internet access ' policy on the 'Home segment' page in the ' Connection policy for unregistered devices ' section, don't forget to register OpenVPN clients if you need to provide them with Internet access as well.
- The configuration of the OpenVPN interface is not saved in the startup-config file. For backup purposes, we recommend backing up the OpenVPN settings in a separate file.
We recommend that you read the following information:
Клиент и сервер OpenVPN
Для настройки OpenVPN обязательно нужно установить компонент системы «Клиент и сервер OpenVPN«.
Откройте веб-интерфейс вашего роутера. По умолчанию для этого в браузере нужно перейти по адресу 192.168.1.1 или my.keenetic.net . Введите логин и пароль от веб-интерфейса роутера (они могут быть написаны на наклейке на нижней части устройства).

Найдите компонент «Клиент и сервер OpenVPN» и установите его. В процессе установки интернет-соединение может временно пропасть.

Настройка файла конфигурации
Скачайте из личного кабинета или бота BlancVPN файл конфигурации .ovpn для любой нужной вам локации.

Откройте файл конфигурации любым текстовым редактором. Например, Блокнотом, Text или Notepad++ (кликните на файле правой кнопкой мыши и выберите «Открыть с помощью»).

Первая строчка – в нашем примере это blancvpn – это логин. Вторая строчка – в нашем примере это 4815162342 – это пароль.
Файл сохранять не обязательно. Но пока не закрывайте.
Настройка VPN на роутере Keenetic
Откройте веб-интерфейс вашего роутера. По умолчанию для этого в браузере нужно перейти по адресу 192.168.1.1 или my.keenetic.net . Введите логин и пароль от веб-интерфейса роутера (они могут быть написаны на наклейке на нижней части устройства).
Перейдите в раздел «Другие подключения», в подразделе «VPN-подключения» нажмите кнопку «Добавить подключение».

Откройте изменённый файл конфигурации подключения, в который вы вписали ваш логин и пароль, выберите весь текст (например, нажав Ctrl+A ) и копируйте его (например, нажав Ctrl+C ).

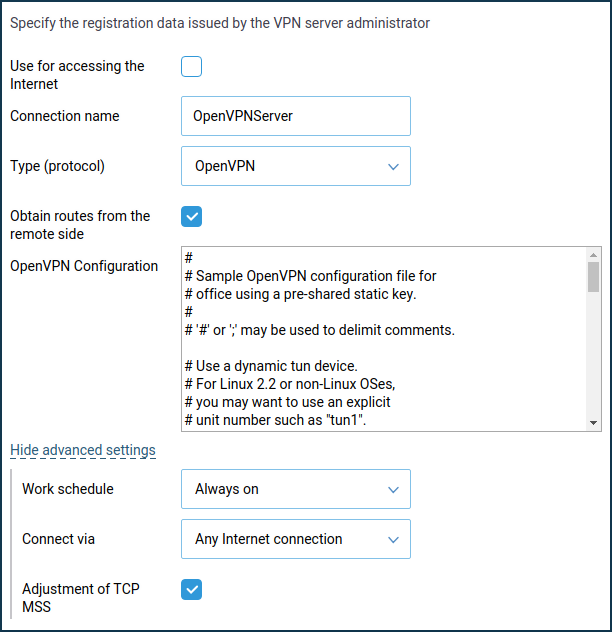
Вернитесь в настройки «Параметры VPN-подключения», перейдите в поле ввода «Конфигурация OpenVPN» и вставьте туда скопированный текст (например, нажав Ctrl+V ).

По желанию вы также можете настроить расписание работы или определение интерфейса. Для этого нажмите «Показать дополнительные настройки».
Установите этому соединению самый высокий приоритет – тогда весь трафик будет защищён VPN-соединением. Перейдите в раздел «Приоритеты подключений», переместите VPN-подключение так, чтобы оно было над подключением провайдера, и сохраните изменения.


Затем в этом же разделе перейдите к подразделу «Применение политик». Перенесите в вашу недавно созданную политику доступа ваши устройства (Домашняя сеть).

В вашей политике доступа должна содержаться как минимум «Домашняя сеть», если вы не настраивали этот пункт отдельно.

Теперь вы можете включать и выключать VPN-подключение на роутере, просто переводя переключатель в разделе «Другие подключения» → «VPN-подключения» в соответствующее положение.

После подключения проверьте, изменился ли ваш IP-адрес. Для этого откройте наш сайт blancvpn.com и посмотрите на панель наверху страницы: там будет указан ваш новый IP-адрес и локация.

Если возникли сложности или что-то пошло не так – напишите нам в Telegram-бот https://t.me/FCK_RKN_bot, поможем!
Совет: можно настроить раздельное туннелирование трафика через политику приоритетов подключений, если требуется направлять через VPN только трафик определённых устройств. Например, игровые приставки и смартфоны – через VPN, а остальные (компьютер или NAS, качающий торренты) — через основной провайдерский Интернет. Кроме того, это открывает возможности балансировки нагрузки при использовании 3G/4G-модемов с лимитированным трафиком. Инструкция по настройке раздельного туннелирования указана в разделе "Приоритеты подключений" на сайте Keenetic.
Совет: если весь ваш трафик перенаправляется через VPN на роутере, не нужно включать VPN на отдельных устройствах, которые подключены к роутеру.
Совет: если после настройки VPN на роутере у вас не загружаются некоторые заблокированные сайта, поменяйте DNS подключений на 8.8.8.8. Для этого перейдите в раздел Другие подключения, Показать дополнительные настройки и нажмите на нужное VPN подключение, отредактируйте поле "DNS 1" и сохраните.

Типовые ошибки и пути решения:
Сильно снижается скорость при использовании VPN на роутере
Протокол OpenVPN очень требователен к ресурсам. MIPS-процессор роутера при активном подключении к VPN «нагружается» постоянным шифрованием и дешифрованием трафика. Кроме того, в силу своей специфики OpenVPN – значительно более «тяжёлый» протокол, чем WireGuard, поэтому даже на флагманских моделях роутеров (включая Keenetic Giga и Ultra) он может ощутимо снижать скорость интернета.
Если замедление критично, рекомендуем подключить протокол WireGuard – его также можно настроить на роутерах Keenetic (инструкция).
Ошибка auth-user-pass without inline credentials data is not supported
Эта ошибка возникает, если в файле конфигурации осталась строка для ввода логина или пароля. В журнале Keenetic она отображается следующим образом:
OpenVPN0 auth-user-pass without inline credentials data is not supported
OpenVPN0 Exiting due to fatal error
Для решения удалите или закомментируйте все строки вида:
auth-user-pass
Ошибка опции block-outside-dns
В журнале Keenetic сообщение об ошибке:
OpenVPN0 Unrecognized option or missing or extra parameter(s) in configuration: (line X): block-outside-dns (2.4.4)
OpenVPN0 Exiting due to fatal error
Другие примеры типовых ошибок собраны на странице Keenetic.