802.11s Based Wireless Mesh Networking
802.11s is an open standard for connecting wireless devices without having to set up infrastructure. It operates on Layer 2 and makes sure that all nodes can see each other on a bridged Layer 2 network (as if they were all plugged into a switch). Any Layer 3 infrastructure will work on top of this.
Packages to enhance the basic layer 2 802.11 mesh with sophisticated layer 3 support have been developed, particularly where multiple Internet gateways and partial cabled backhaul are required (eg Batman, Bird, OLSR etc.). These enhanced packages are targeted more for large infrastructure scenarios eg. city scale, rather than a typical home mesh application. In contrast, a basic 802.11s mesh serves all scenarios from home mesh through to high resilience neighbourhood WISP applications.
Status
802.11s works reliably with OpenWrt 19.07 and later, including authentication and encryption, assuming that there is hardware/driver support, the wpad-mesh-openssl (or equivalent) and the mesh11sd packages have been installed. See also: The Mesh11sd Project
An 802.11s interface requires numerous operational parameters to be set AFTER the interface has come up and established itself as a part of the mesh.
The mesh11sd package monitors and dynamically sets and resets these required mesh parameters.
Historically, the inability to set required mesh parameters in the wireless configuration (due to the interface not yet being established) was interpreted by some as an “ARP relay bug” as the layer 2 (mac routing) network would never become active between all mesh nodes at the same time.
Config
If you want to run an encrypted mesh, you must install a version of wpad that supports mesh encryption.
At the time of writing, one of the following versions of wpad is required:
It may be necessary to remove the non-mesh version of wpad , depending which one is installed by default:
opkg update opkg remove wpad-mini opkg remove wpad-basic opkg remove wpad-basic-wolfssl opkg remove wpad-basic-openssl opkg remove wpad-basic-mbedtls
Install the mesh supporting version:
opkg install wpad-mesh-openssl
opkg install wpad-mesh-wolfssl
opkg install wpad-mesh-mbedtls
From September 2019, wpad-openssl or wpad-wolfssl became capable of 802.11s encyption. wpad-mbedtls was added later.
The wpad-* are the full version of wpad and have 802.11k/v/r/w and 802.11s support.
The Wireless UCI Config File
The /etc/config/wireless file should have a mesh section added along these lines:
config wifi-iface 'mesh' option network 'mesh' option device 'radio0' option disabled '0' option mode 'mesh' option ifname 'mesh0' option network 'lan' option mesh_id 'my-mesh-id' option encryption 'sae' # or 'none' if you do not want encryption option key 'your-secret-password'
Note: option network ‘lan’ bridges the the ‘mesh’ interface to the ‘lan’.
This configuration should be sufficient to bring up the mesh network so you can now reinitialize wifi and see if it worked:
You should see an output similar to:
Interface mesh0 ifindex 10 wdev 0x3 addr 12:34:56:78:9a:bc type mesh point wiphy 0 channel 2 (2417 MHz), width: 20 MHz, center1: 2417 MHz txpower 28.00 dBm multicast TXQ: qsz-byt qsz-pkt flows drops marks overlmt hashcol tx-bytes tx-packets 0 0 129166 0 0 0 0 9107016 129167
Every device you want to participate in the mesh must be configured in the same way ie same mesh_id, same channel, same key.
This wireless UCI configuration may be sufficient for a “mesh” of two or possibly three meshnodes that are fairly close together. But an organic, autonomously self managing mesh network of many meshnodes requires additional configuration.
Mesh11sd — Setting Parameters and Options
There are many mesh parameters available, some of which are essential for a reliable mesh network.
The majority of these however, require the mesh interface to be up and established before setting.
If these parameters were to be set in the wireless UCI config file, they would fail, as of course the wireless UCI config is used to start/restart the wireless system and the mesh interface only becomes established after UCI has completed its tasks.
Parameters can be set manually using the IW utility, but any settings done this way will only persist as long as the mesh interface is up. Rebooting, restarting the network, or reinitialising the wireless interface (“wifi” command) will set parameters back to default.
For permanently setting parameters, the Mesh11sd package should be installed:
opkg update opkg install mesh11sd
The default parameters set and maintained by Mesh11sd (in /etc/config/mesh11sd) are:
option mesh_fwding '1' option mesh_rssi_threshold '-80' option mesh_gate_announcements '1' option mesh_hwmp_rootmode '3' option mesh_max_peer_links '150'
These parameters are a good general set for an autonomously managed mesh network with many mesh peers.
Note: Parameters must be set in the Mesh11sd UCI config file (and not the Wireless UCI config file) to prevent errors being reported in the system log.
For full details of the Mesh11sd package see: mesh11sd
Wireless Hardware Support
Support for 802.11s (type mesh) depends on wireless driver. Most up to date open source drivers work. Note that some drivers may advertise they support mesh but have problems with it.
For example, at the time of writing, the ath10k-ct driver doesn’t support mesh very well, resulting in errors and random dropping of wireless interfaces. It is recommended that you remove both ct module and ct firmware and install non-ct versions to get reliable mesh support.
Use the following to determine if your hardware supports 802.11s mesh.
iw list | grep "Supported interface modes" -A 9 . Supported interface modes: * IBSS * managed * AP * AP/VLAN * WDS * monitor * mesh point * P2P-client * P2P-GO .
iw list . valid interface combinations: * # < managed, WDS > .
Example: ath9k_htc USB Stick
iw list . valid interface combinations: * # < managed, P2P-client >Verify the Mesh Network is Working
Use the iw command to display peer links or a table of reachable nodes in your mesh
iw dev $MESH_IFACE station dump iw dev $MESH_IFACE mpath dumpiw dev $MESH_IFACE station dump Station 00:15:6d:84:14:10 (on mesh) inactive time: 1320 ms rx bytes: 352 rx packets: 4 tx bytes: 174 tx packets: 2 signal: -61 dBm tx bitrate: 1.0 MBit/s mesh llid: 32577 mesh plid: 15969 mesh plink: ESTAB Station 00:15:6d:84:14:09 (on mesh) inactive time: 3370 ms rx bytes: 1064 rx packets: 12 tx bytes: 545 tx packets: 7 signal: -53 dBm tx bitrate: 1.0 MBit/s mesh llid: 41036 mesh plid: 24435 mesh plink: ESTABBlock single peer from meshing
This may require the iw-full package! Block a peer from meshing using its MAC address
iw dev $MESH_IFACE station set $MAC_TO_BLOCK plink_action blockVerify using section above (iw dev $MESH_IFACE station dump)
iw dev $MESH_IFACE station set $MAC_TO_UNBLOCK plink_action openaccording to this source plink_action is not persisted across reconnects of mesh links.
More background
This website uses cookies. By using the website, you agree with storing cookies on your computer. Also you acknowledge that you have read and understand our Privacy Policy. If you do not agree leave the website. OK More information about cookies
Self-registration in the wiki has been disabled.
If you want to contribute to the OpenWrt wiki, please post HERE in the forum or ask on IRC for access.Except where otherwise noted, content on this wiki is licensed under the following license:
CC Attribution-Share Alike 4.0 InternationalБыстрый роуминг (802.11r) в WiFi сети на базе Lede (aka OpenWRT)
Всем привет. Решил я закрепить полученный результат написав статью. А результат этот — это объединение нескольких WiFi точек доступа в сеть в одну неразрывную сеть, ещё её называют бесшовную. Смысл сего действия состоял в том, что моя «локальная» домашняя сеть разрослась до нескольких WiFi точек по причине её (сети) большой площади и невозможности достичь надлежащего качества всего одной точкой.
Первое и лобовое решение было поставить ещё несколько WiFi AP с тем же BSSID и с виду вроде всё работало, но как оказалось не всё. К примеру мой Android based телефон нормально переваривал эту ситуацию перепрыгивая с точки на точку при потере сигнала от одной и обнаружении сигнала от другой, но у пользователей чудного яФона возникла с этим проблема, сие устройства напрочь отказывались отключаться от уже пропавшей из радиуса действия точки и подключаться к новой, хоть и с более жирным сигналом. Ну и как полагается у сего контингента (никакой неприязни — просто сухие факты) началась вонь, что всё вокруг Г. мой чудный телефончик не может работать с этим барахлом. И начал я искать методы борьбы с этим.
Мои поиски привели меня к стандарту 802.11r. В котором нам обещают полную прозрачность для WiFi устройств сети их нескольких AP. И даже Apple подтверждает, что умеет так.
Ну ладно, ради спокойствия души своей и любителей яблок освоим новую дисциплину. Беглое изучение теории и практики показало, что hostapd вроде как умеет сие чудо. Все мои роутеры уже давно на Lede (кто не в курсе, это бывший OpenWRT) ну и как бы в этой связи настройка не должна была бы создать проблем. Но как всегда не всё так просто, либо я туговат 🙂
Для начала в lede по умолчанию устанавливается пакет wpad-mini, в нём собрана основная поддержка WiFi AP с минимумом возможной, дабы работало. Меня такой расклад не устраивает. Поэтому необходимо заменить пакет на wpad.
В простейшем случае для этого нужно выполнить команду:
пакет притянет с собой всё необходимое и заменит собою wpad-mini. В идеальном же варианте не плохо просто пере собрать образ прошивки средствами ImageBuilder.
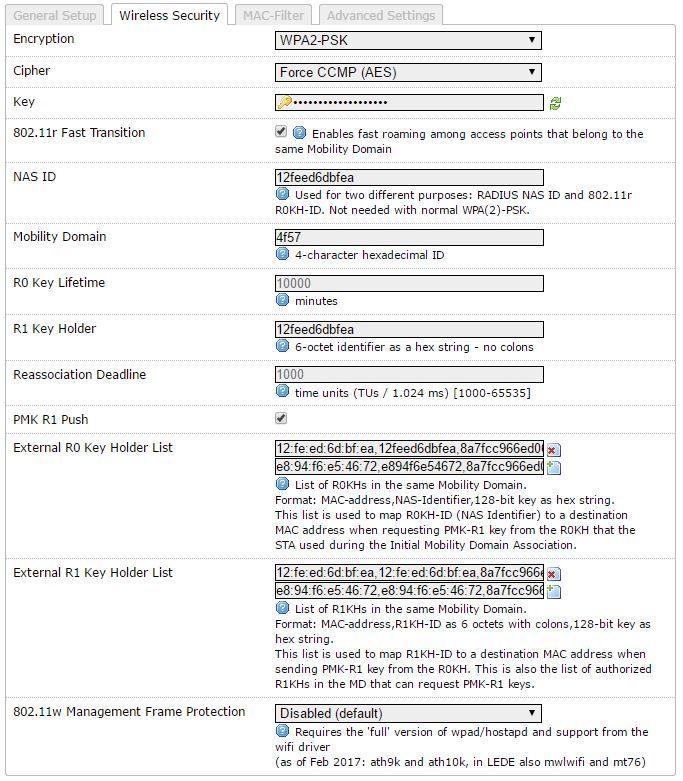
После установки пакета нужно его под настроить. Если вы используете luci интерфейс, то в настройках WiFi сети в разделе Wireless Security появится галочка Enables fast roaming among access points that belong to the same Mobility Domain.
Включив которую нам предоставляют кучу полей для настройки функции роуминга между AP.
Если же у вас нет luci или вы предпочитаете настраивать железку изменяя кофиги, то это же делается строчкой:в секции config wifi-iface файла конфигурации /etc/config/wireless. Я надеюсь не нужно объяснять, что это надо проделать на всех AP участвующих в роуминге.
Это было самое простое. А вот далее началось веселье.
Чтобы объяснить всем точкам, что они в одном роуминге надо это дело как-то настроить. Все мануалы что мне удалось найти упорно сводятся к настройке этого всего дела с использованием RADIUS авторизации. Но у меня нету и RADIUS и не нужен он мне, как я думаю и большинству из нас. Поэтому пришлось эксперементировать.
Пробежимся по полям, которые предлагает нам заполнить luci:
NAS ID — как я понял идентификатор текущей точки доступа в RADIUS сервере. И не нужен при отсутствии последнего, но Luci не даёт сохранить настройки, если это поле не заполнено. Ну чтож — заполним. Обычно все рекомендуют вписывать туда MAC адрес устройства без разделителей.
Mobility Domain — идентификатор конкретно вашей сети. Должен быть один у всех участвующих в роуминге точек. Представляет из себя 16битное число в шестнадцетиричной форме (HEX).
External R0 Key Holder List — вот тут будут участвовать NAS ID, а говорили нужен только для RADIUS. Или же эта функция не участвует без RADIUS? Поясните кто в курсе? Тут я добавил столько строк, сколько у меня точек доступа в сеть. В формате: MAC-адрес, NAS-ID, 128-bit ключ в виде HEX строки
Например: 12:fe:ed:6d:bf:ea, 12feed6dbfea, 8a7fcc966ed0691ff2809e1f38c16996
И так несколько раз с каждой точкой доступа, ключ я использовал один и тот же. Тоже, если кто в курсе как правильно?External R1 Key Holder List — аналог предыдущей секции, только вместо NAS-ID некий R1KH-ID.
Я заполнил так: 12:fe:ed:6d:bf:ea, 12:fe:ed:6d:bf:ea, 8a7fcc966ed0691ff2809e1f38c16996
В итоге получилось примерно вот так:
В виде конфига всё это выглядит так:
option ieee80211r '1' option mobility_domain '4f57' option pmk_r1_push '1' list r0kh '12:fe:ed:6d:bf:ea,12feed6dbfea,8a7fcc966ed0691ff2809e1f38c16996' list r0kh 'e8:94:f6:e5:46:72,e894f6e54672,8a7fcc966ed0691ff2809e1f38c16996' list r1kh '12:fe:ed:6d:bf:ea,12:fe:ed:6d:bf:ea,8a7fcc966ed0691ff2809e1f38c16996' list r1kh 'e8:94:f6:e5:46:72,e8:94:f6:e5:46:72,8a7fcc966ed0691ff2809e1f38c16996' option nasid '12feed6dbfea' option r1_key_holder '12feed6dbfea'Сохранив и перезагрузив все устройства не первый взгляд всё продолжило работать. У меня на Телефоне с Android с виду ничего не изменилось. Владельцы iPhone пока довольны — будем наблюдать. WiFi Анализатор видит мою сеть по прежнему как несколько точек, но помимо WPA-PSK авторизации добавилась FT-PSK.
Я писал статью, чтобы и самому не потерять найденное и чтобы получить критику и помощь в понимании сделанного 🙂 Буду благодарен за любые замечания.