- Guest Wi-Fi using CLI
- Step by step
- Explanation of this config code
- Customization
- Manual rollback
- On demand usage
- Guest Wi-Fi extras
- Providing encryption
- Isolating clients
- ICMP / ICMPv6
- IPv6
- IPv6 only guest network
- Restricting internet access
- Restricting upstream access / Wireless AP
- Resolving race conditions
- Limiting bandwidth
- Multiple network devices
- HotSpot / Captive portal
- Guest Wi-Fi on a dumb wireless AP using LuCI
- 1. Define a new network
- 2. Edit the newly created interface
- 3. Set up the firewall zone
- 4. Set up the firewall traffic rules
Guest Wi-Fi using CLI
This page provides a script that creates an additional separated guest network and a new guest firewall zone for your OpenWrt device. That is, to create a guest WLAN , that only has Internet access but cannot access your existing LAN .
Step by step
Take your time, to read this whole page, before starting any configuration. Get at least a rough idea, of what below’s code is configuring.
Create the guest WLAN as additional config on either your 2,4 or 5 GHz radio which should typically match @wifi-iface[0] or @wifi-iface[1] . The new guest networks will share the channel/frequency with your probably already existing WLANs.
Copy the whole following code block as is into a SSH command prompt of your OpenWrt device and press enter. Alternatively, create and run it as shell script on your OpenWrt device.
# Configuration parameters NET_ID="guest" WIFI_DEV="$(uci -q get wireless.@wifi-iface[0].device)" # Fetch upstream zone . /lib/functions/network.sh network_flush_cache network_find_wan NET_IF FW_WAN="$(fw3 -q network "$")" # Set up guest WLAN uci -q batch _dev set network.$_dev=device set network.$_dev.type=bridge set network.$_dev.name=br-$ delete network.$ set network.$=interface set network.$.proto=static set network.$.device=br-$ set network.$.ipaddr=192.168.3.1 set network.$.netmask=255.255.255.0 commit network delete wireless.$ set wireless.$=wifi-iface set wireless.$.device=$ set wireless.$.mode=ap set wireless.$.network=$ set wireless.$.ssid=$ set wireless.$.encryption=none commit wireless delete dhcp.$ set dhcp.$=dhcp set dhcp.$.interface=$ set dhcp.$.start=100 set dhcp.$.limit=150 set dhcp.$.leasetime=1h set dhcp.$.netmask=255.255.255.0 commit dhcp delete firewall.$ set firewall.$=zone set firewall.$.name=$ set firewall.$.network=$ set firewall.$.input=REJECT set firewall.$.output=ACCEPT set firewall.$.forward=REJECT delete firewall.$_$ set firewall.$_$=forwarding set firewall.$_$.src=$ set firewall.$_$.dest=$ delete firewall.$_dns set firewall.$_dns=rule set firewall.$_dns.name=Allow-DNS-$ set firewall.$_dns.src=$ set firewall.$_dns.dest_port=53 add_list firewall.$_dns.proto=tcp add_list firewall.$_dns.proto=udp set firewall.$_dns.target=ACCEPT delete firewall.$_dhcp set firewall.$_dhcp=rule set firewall.$_dhcp.name=Allow-DHCP-$ set firewall.$_dhcp.src=$ set firewall.$_dhcp.dest_port=67 set firewall.$_dhcp.proto=udp set firewall.$_dhcp.family=ipv4 set firewall.$_dhcp.target=ACCEPT commit firewall EOF /etc/init.d/network reload /etc/init.d/dnsmasq restart /etc/init.d/firewall restart
Explanation of this config code
All the changes will be visible in the web interface afterwards.
a dhcp configuration is created for the “guest” network (assuming that 192.168.3.1/24 is not conflicting with something else on your home network)
Customization
There are endless of personal customization options.
Be aware that there are no special Internet firewall restrictions active for your guests in this default config. If you want to restrict your weird guests to http(s) protocol or block UDP or do whatever fancy restriction, you have to add some additional customized firewall rules yourself.
Also you may have to find individual rules/network setups for your personal situations, e.g. if your guests would like access to your printer or need to stream stuff from their smartphones to your Smart-TV. Unfortunately there is not a single one-fits-all solution for that.
You could go even further and split of a LAN -jack using a custom VLAN configuration and link that split-of LAN jack to that guest net as well, if your guests prefer a wired connection.
Manual rollback
If you ever want to get rid of the customization created by this script, simply open your OpenWrt web interface.
On demand usage
You may not have guests hanging out in your house all week long. You do not have to delete the whole config, when your guests are leaving. You can just enter the OpenWrt web interface and simply enable or disable the guest WLAN at will.
This website uses cookies. By using the website, you agree with storing cookies on your computer. Also you acknowledge that you have read and understand our Privacy Policy. If you do not agree leave the website. OK More information about cookies
Self-registration in the wiki has been disabled.
If you want to contribute to the OpenWrt wiki, please post HERE in the forum or ask on IRC for access.
Except where otherwise noted, content on this wiki is licensed under the following license:
CC Attribution-Share Alike 4.0 International
Guest Wi-Fi extras
If you want to utilize dual-band. Change the interface ID if necessary.
# Configure wireless WIFI_DEV="$(uci get wireless.@wifi-iface[1].device)" uci -q delete wireless.guest2 uci set wireless.guest2="wifi-iface" uci set wireless.guest2.device="$ " uci set wireless.guest2.mode="ap" uci set wireless.guest2.network="guest" uci set wireless.guest2.ssid="guest2" uci set wireless.guest2.encryption="none" uci commit wireless wifi reload
The following settings should be applied separately for each SSID/band.
Providing encryption
Secure your guest network.
# Configure wireless WIFI_PSK="GUEST_WIFI_PASSWORD" uci set wireless.guest.encryption="psk2" uci set wireless.guest.key="$ " uci commit wireless wifi reload
Isolating clients
Isolate guest clients from each other. Some hardware or drivers might not support this option.
# Configure wireless uci set wireless.guest.isolate="1" uci commit wireless wifi reload
ICMP / ICMPv6
Allow incoming ICMP and ICMPv6 traffic. Change the rule IDs if necessary. The goal here is to alter the default OpenWRT firewall rules allowing specific ICMP and ICMPv6 types from WAN to instead allow from all source zones. The rules are originally called “Allow-Ping” and “Allow-ICMPv6-Input”.
# Configure firewall uci rename firewall.@rule[1]="icmp" uci rename firewall.@rule[5]="icmp6" uci set firewall.icmp.src="*" uci set firewall.icmp6.src="*" uci commit firewall /etc/init.d/firewall restart
IPv6
Enable IPv6 on the guest network. Allow ICMPv6, assign an IPv6 prefix, configure a DHCPv6 pool, allow DHCPv6 requests.
# Configure network uci set network.guest.ip6assign="60" uci commit network /etc/init.d/network restart # Configure DHCP uci set dhcp.guest.dhcpv6="server" uci set dhcp.guest.ra="server" uci commit dhcp /etc/init.d/odhcpd restart # Configure firewall uci -q delete firewall.guest_dhcp6 uci set firewall.guest_dhcp6="rule" uci set firewall.guest_dhcp6.name="Allow-DHCPv6-Guest" uci set firewall.guest_dhcp6.src="guest" uci set firewall.guest_dhcp6.dest_port="547" uci set firewall.guest_dhcp6.proto="udp" uci set firewall.guest_dhcp6.family="ipv6" uci set firewall.guest_dhcp6.target="ACCEPT" uci commit firewall /etc/init.d/firewall restart
IPv6 only guest network
While your primary LAN may have legacy devices that only support IPv4 , most modern phones, tablets, and laptops fully support IPv6 and so you may be able to run an IPv6 only guest network, by simply not allocating an IPv4 address to the network or providing and DHCPv4 addresses.
To enable IPv6 guests to access legacy IPv4 only websites you need to set up DNS64 + NAT64.
Configure NAT64 on your OpenWRT router to provide network translation (similar how you would otherwise be providing NAT44 from a private IPv4 range).
Restricting internet access
Allow guest clients to only browse websites.
# Configure firewall uci -q delete firewall.guest_wan uci -q delete firewall.guest_fwd uci set firewall.guest_fwd="rule" uci set firewall.guest_fwd.name="Allow-HTTP/HTTPS-Guest-Forward" uci set firewall.guest_fwd.src="guest" uci set firewall.guest_fwd.dest="wan" uci add_list firewall.guest_fwd.dest_port="80" uci add_list firewall.guest_fwd.dest_port="443" uci set firewall.guest_fwd.proto="tcp" uci set firewall.guest_fwd.target="ACCEPT" uci commit firewall /etc/init.d/firewall restart
Restricting upstream access / Wireless AP
Allow guest clients to access the internet but restrict upstream access.
# Fetch upstream subnet and zone . /lib/functions/network.sh network_flush_cache network_find_wan NET_IF network_get_subnet NET_SUB "$ " FW_WAN="$(fw3 -q network "$")" # Configure firewall uci -q delete firewall.guest_wan uci -q delete firewall.guest_fwd uci set firewall.guest_fwd="rule" uci set firewall.guest_fwd.name="Allow-Guest-Forward" uci set firewall.guest_fwd.src="guest" uci set firewall.guest_fwd.dest="$ " uci set firewall.guest_fwd.dest_ip="!$ " uci set firewall.guest_fwd.proto="all" uci set firewall.guest_fwd.target="ACCEPT" uci commit firewall /etc/init.d/firewall restart
Enable masquerading for the LAN zone when using a wireless AP .
# Configure firewall uci rename firewall.@zone[0]="lan" uci set firewall.lan.masq="1" uci set firewall.lan.masq_src="!$ " uci commit firewall /etc/init.d/firewall restart
Resolving race conditions
Resolve the race condition with netifd service.
# Configure DHCP uci set dhcp.guest.force="1" uci commit dhcp /etc/init.d/dnsmasq restart
Limiting bandwidth
Limit the bandwidth of the guest network using kb/s.
opkg update opkg install qos-scripts uci -q delete qos.guest uci set qos.guest="interface" uci set qos.guest.enabled="1" uci set qos.guest.upload="5000" uci set qos.guest.download="80000" uci commit qos /etc/init.d/qos restart
Multiple network devices
For a network setup that involves two or more network devices (e.g. a router, one or more switches, one or more access points) you need to provide a separate VLAN. On every router, switch or AP we add an interface type bridge which will put the wired and wireless guest interfaces in one network.
HotSpot / Captive portal
If you want to setup a simple Hotspot for your guest network, take a look at Nodogsplash or WiFiDog.
For a captive portal to a commercial ChilliSpot compatible Hotspot service provider, look at CoovaChilli.
This website uses cookies. By using the website, you agree with storing cookies on your computer. Also you acknowledge that you have read and understand our Privacy Policy. If you do not agree leave the website. OK More information about cookies
Self-registration in the wiki has been disabled.
If you want to contribute to the OpenWrt wiki, please post HERE in the forum or ask on IRC for access.
Except where otherwise noted, content on this wiki is licensed under the following license:
CC Attribution-Share Alike 4.0 International
Guest Wi-Fi on a dumb wireless AP using LuCI
Guest Wi-Fi provides internet access to your network members. It also provides firewall security rules to isolate your guest network from the rest. This recipe is based on the Guest Wi-Fi basics and Guest Wi-Fi extras, providing a more user-friendly approach through the LuCI web interface.
The changes below assume an OpenWrt default configuration. We assume that you have a private WLAN set on 192.168.1.xxx and want a guest WLAN on 192.168.2.xxx.
1. Define a new network


Give it an SSID and add it to the guest network.
2. Edit the newly created interface

At the interfaces, edit the `guest` interface that you just created.

Switch the protocol to a static address.
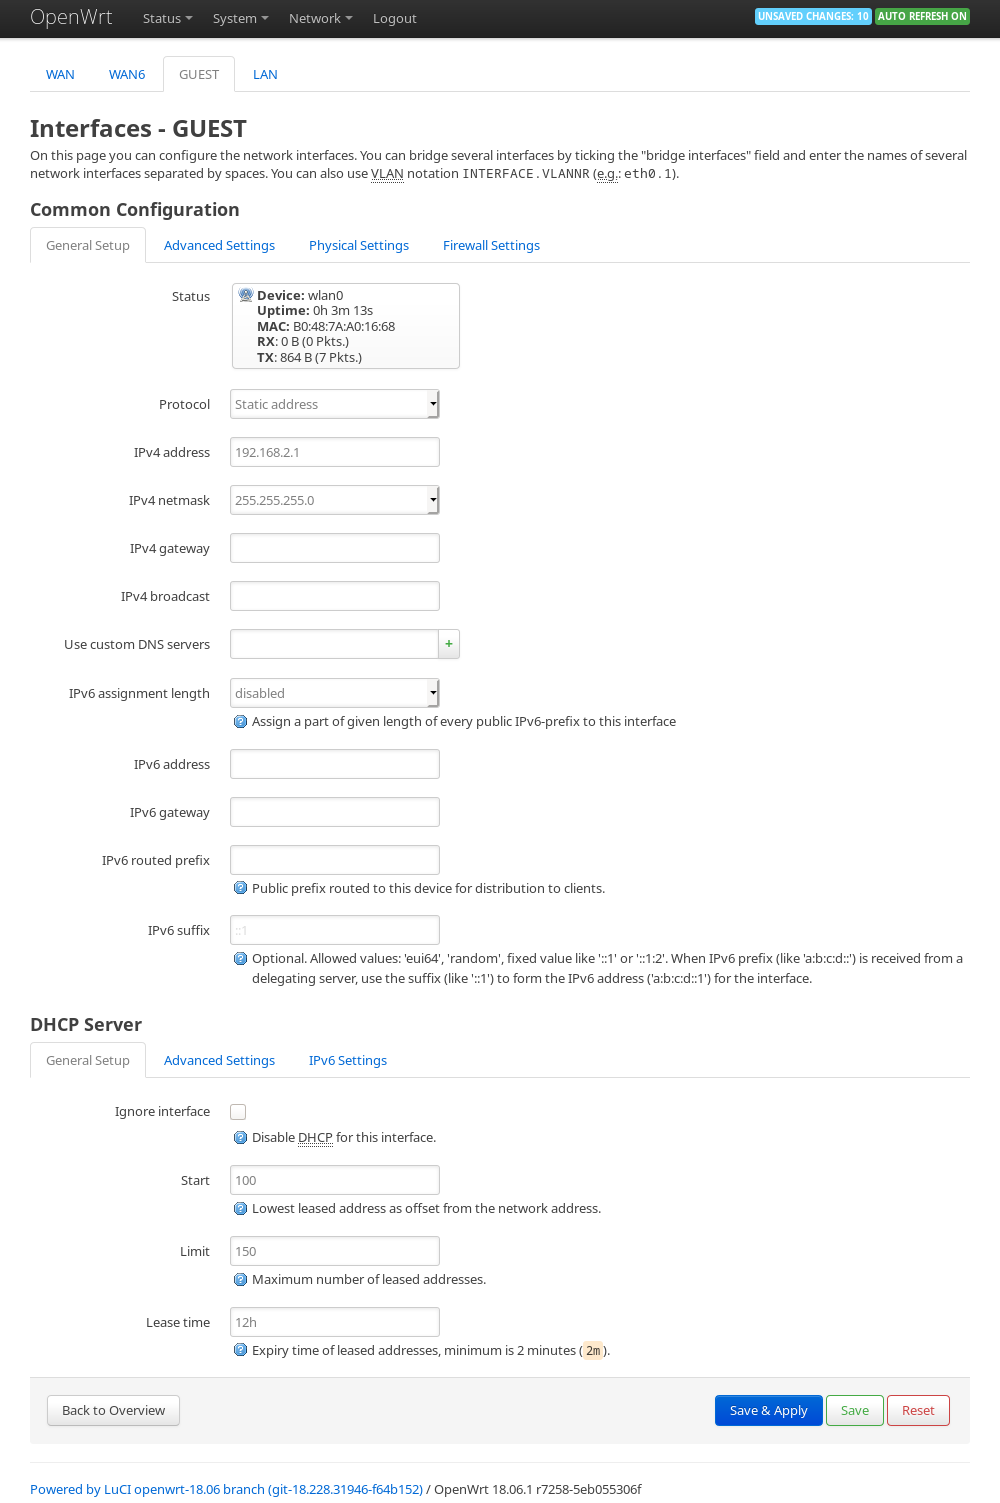
Fill in the static IP , subnet mask and enable DHCP .
Make sure the static IP is on a different subnet.
3. Set up the firewall zone

At firewall settings, create a new guest firewall zone.
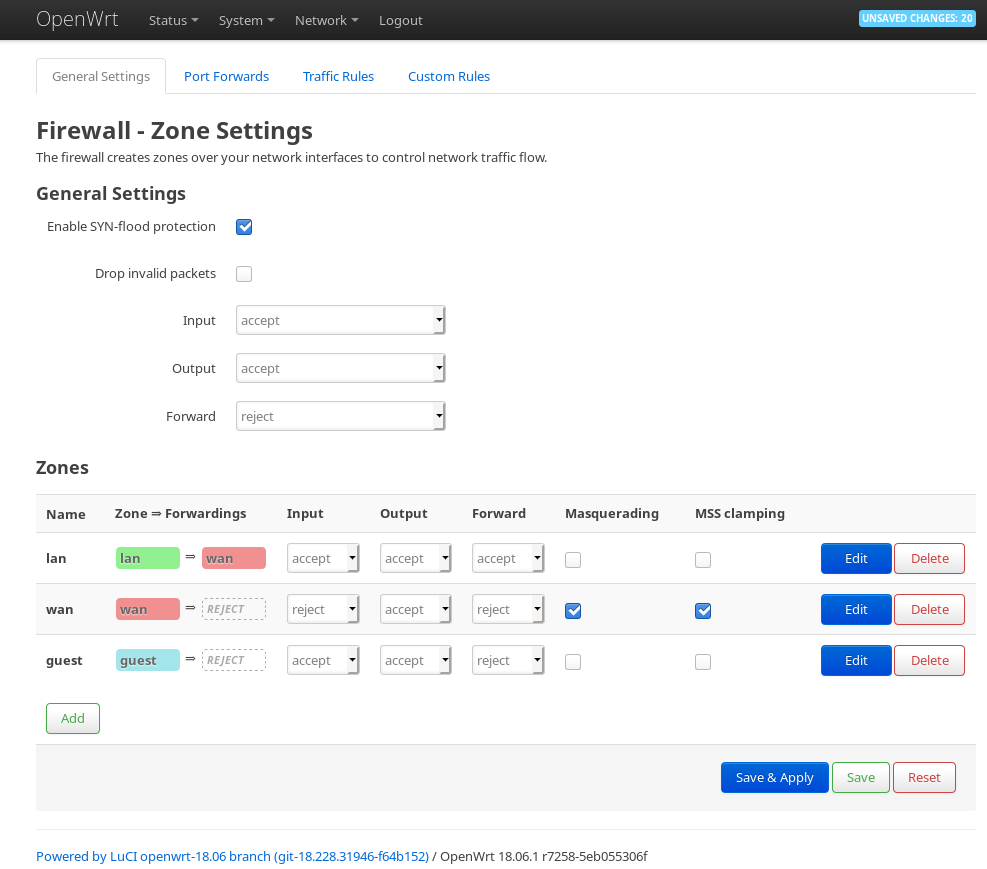
At the firewall settings, edit the newly created guest zone.
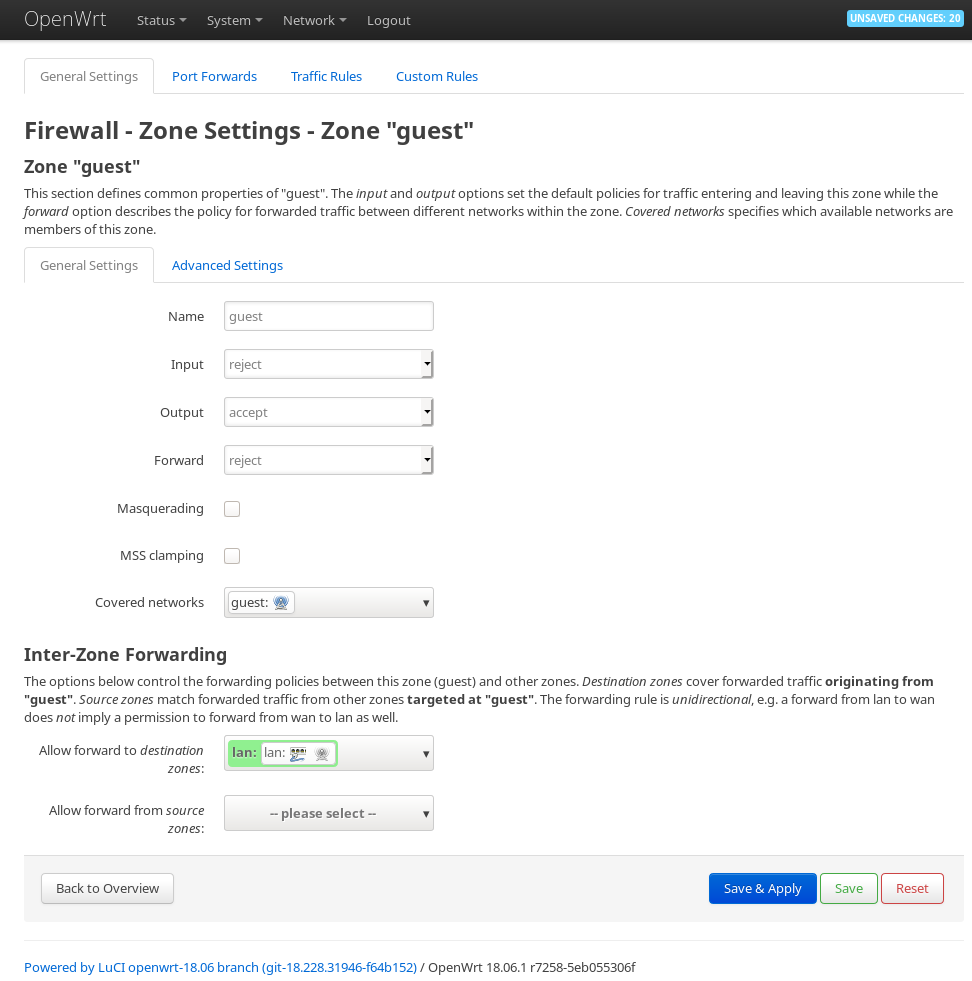
Set Input to REJECT, Output to ACCEPT and Foward to REJECT. Allow forward to destination zone: `lan`.
It should look as follows
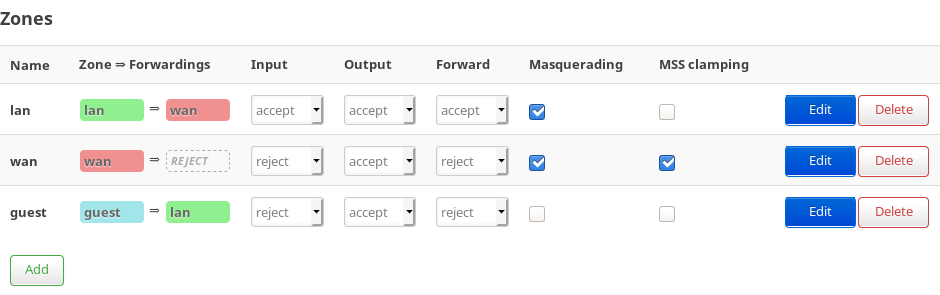
Also enable masquarading for lan
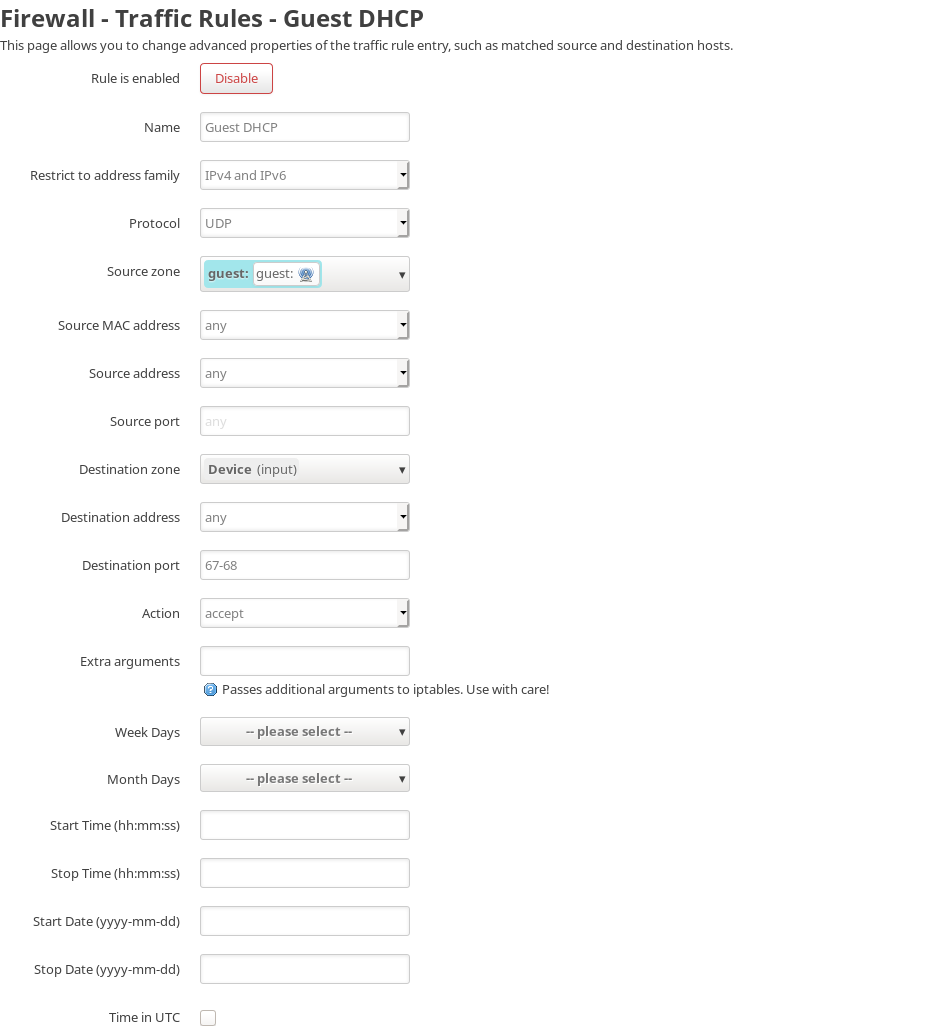
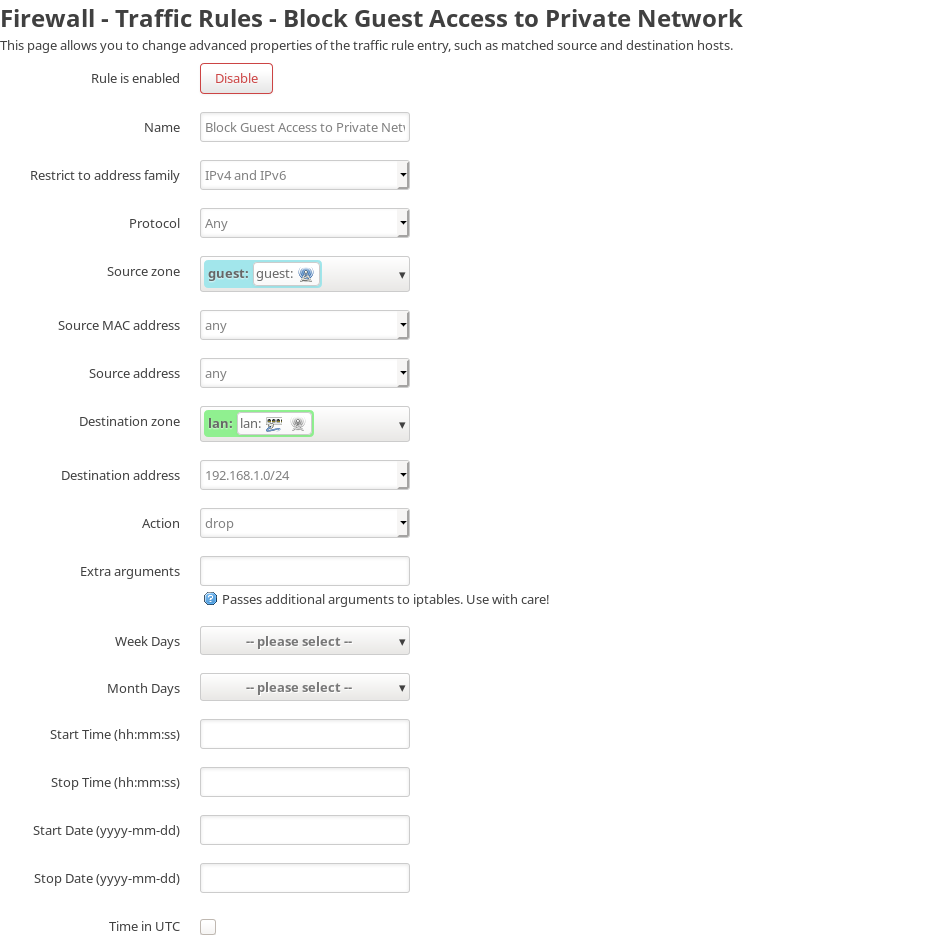
4. Set up the firewall traffic rules
Now go to the traffic rules tab inside firewall and add the following three rules:

This website uses cookies. By using the website, you agree with storing cookies on your computer. Also you acknowledge that you have read and understand our Privacy Policy. If you do not agree leave the website. OK More information about cookies
Self-registration in the wiki has been disabled.
If you want to contribute to the OpenWrt wiki, please post HERE in the forum or ask on IRC for access.
Except where otherwise noted, content on this wiki is licensed under the following license:
CC Attribution-Share Alike 4.0 International