- How to Disable Firewall in Oracle Linux 8?
- Method of Disabling Firewall in Oracle Linux 8
- Step #1: Check the Current Status of the Firewall Daemon in Oracle Linux 8
- Step #2: Stop the Firewall Daemon in Oracle Linux 8
- Step #3: Disable the Firewall Daemon in Oracle Linux 8
- Step #4: Verify if the Firewall has been Disabled in Oracle Linux 8 or not
- Bonus Point
- Conclusion
- About the author
- Aqsa Yasin
- IT Knowledge Base
- How to stop/start and disable/enable firewall on Oracle Linux 7.
- ORACLE DATABASE PROBLEM AND SOLUTIONS
How to Disable Firewall in Oracle Linux 8?
![]()
When it comes to securing any computer system, the very first solution that comes to your mind (especially if you are from a cyber-security background) is a Firewall. Now, maybe you’re thinking why I didn’t take the name of an anti-virus. Actually, to answer this question, we must understand the works and capabilities of a Firewall and anti-virus software. We can simply subsequently distinguish them.
The job of an anti-virus is essential to detect and destroy all the potential viruses and worms that are residing in your computer system. On the other hand, a Firewall acts as a barrier between all the external threats and stops them from entering your computer system in the first place by blocking them right there. That is why, in a way, a Firewall can be considered more powerful and useful than anti-virus software.
If you are extremely concerned about the security of your system, then you must have a Firewall enabled on your system. However, at times, it happens that the rules defined for our Firewall are way too strict, and hence they even tend to block legitimate requests. Therefore, you may consider disabling your Firewall for some time. That is why today, we have decided to show you the method of disabling the Firewall in Oracle Linux 8.
Method of Disabling Firewall in Oracle Linux 8
To disable the Firewall in Oracle Linux 8, you have to perform all the steps that are discussed over here.
Step #1: Check the Current Status of the Firewall Daemon in Oracle Linux 8
First, we need to check if the Firewall is currently enabled in our Oracle Linux 8 system or not. Because if the Firewall is already disabled, then there will be no point in performing this whole procedure. The Firewall Daemon is a process that is responsible for the correct functioning of our Firewall. This process keeps running in the background if the Firewall is enabled on any Linux based system. Therefore, to check if the Firewall is enabled in our Oracle Linux 8 system or not, we will check the status of the Firewall Daemon by running the following command:

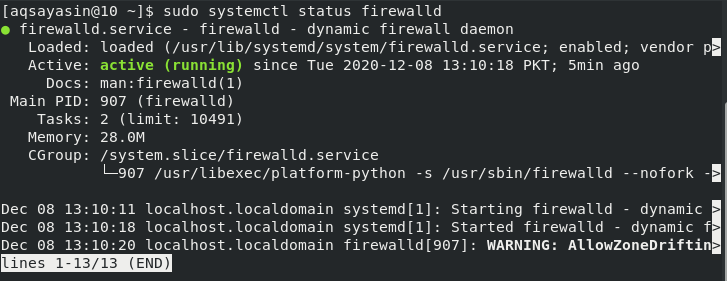
The Firewall was currently enabled in our Oracle Linux 8 system, which is why the status of our Firewall Daemon was “active (running)”, as shown in the image below:

Step #2: Stop the Firewall Daemon in Oracle Linux 8
When we have ensured that our Firewall is enabled or the status of our Firewall Daemon is “active (running)” we can easily attempt to disable our Firewall. But before we try to disable it, we need to stop our Firewall Daemon first with the help of the following command:

If this command successfully manages to stop the Firewall Daemon, then your Oracle Linux 8 system will simply handover the control of your terminal to you without displaying any messages on it, as shown in the image below:

Step #3: Disable the Firewall Daemon in Oracle Linux 8
Once the Firewall Daemon has been stopped successfully, the next step is to disable it. An important point to be noted over here is that you might face some errors if you try to disable your Firewall Daemon without stopping it first. It is strongly recommended that you obey all the steps just as we have described in this article. We can conveniently disable the Firewall Daemon now by running the following command:

Disabling the Firewall Daemon will display the two messages shown in the image below and will also immediately disable your Firewall Daemon.

Step #4: Verify if the Firewall has been Disabled in Oracle Linux 8 or not
By now, your Firewall in the Oracle Linux 8 system has been disabled successfully. However, we still need to verify it. We can simply check this out by looking at the current status of our Firewall Daemon with the following command:

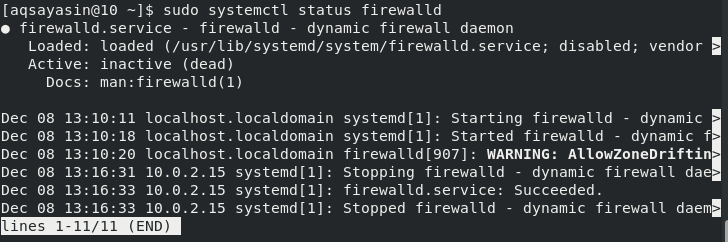
Now that our Firewall has been disabled, the status of our Firewall Daemon will be “inactive (dead)” as shown in the image below:
Bonus Point
Generally, a user chooses to disable the Firewall only when he is trying to perform an important task, and the Firewall is causing a hindrance in that task. However, once that user is done with that task, it is strongly advised to enable the Firewall again. Therefore, if you have previously disabled your Firewall, then you can enable it by first running the following command:
Once you successfully manage to run this command, then the next step is to start the Firewall Daemon again by running the command mentioned below:
After performing the above two steps, you can even verify if your Firewall has been successfully enabled or not. This can be completed by checking its status. If your Firewall has been enabled successfully, then you will see the following status on your terminal:
Conclusion
In this article, we learned the usage of Firewalls in the introduction section. With that introductory explanation, we managed to figure out how important it is to use a Firewall on a computer system. However, we also realized that there are some situations in which we have to disable the system’s Firewall to carry out some important operations smoothly. Therefore, today’s article taught us the method of disabling the Firewall in Oracle Linux 8. As a reminder, we would like to state again that once you have performed that task for which you have disabled your Firewall, you should instantly enable it again. For easing the process of enabling the Firewall in Oracle Linux 8, we have even explained its method as a bonus for you in this article.
About the author
Aqsa Yasin
I am a self-motivated information technology professional with a passion for writing. I am a technical writer and love to write for all Linux flavors and Windows.
IT Knowledge Base
How to stop/start and disable/enable firewall on Oracle Linux 7.
Fedora 18 introduced firewalld as a replacement for the previous iptables service. Since RHEL7 and Oracle Linux 7 are based on Fedora 19, the switch from iptables service to firewalld is now part of the Enterprise Linux distributions.
The firewall on Oracle Linux 7 system is enabled by default. Normally there should not be a need to disable firewall but it may be quite handy for testing purposes etc. The firewall runs as firewalld daemon. Bellow command can be used to check the firewall status:
[root@orclprod ~]# systemctl status firewalld firewalld.service - firewalld - dynamic firewall daemon Loaded: loaded (/usr/lib/systemd/system/firewalld.service; enabled) Active: active (running) since Fri 2015-10-16 14:54:37 CEST; 18s ago Main PID: 2481 (firewalld) CGroup: /system.slice/firewalld.service L¦2481 /usr/bin/python -Es /usr/sbin/firewalld --nofork --nopid Oct 16 14:54:37 orclprod systemd[1]: Started firewalld - dynamic firewall d. n. Hint: Some lines were ellipsized, use -l to show in full.
From the above output we can see that the firewall is enabled, which means it will start automatically after reboot and that is also current active. Furthermore, you can even check all currently applied rules with:
[root@orclprod ~]# iptables-save
You need to distinguish between the iptables service and the iptables command. Although firewalld is a replacement for the firewall management provided by iptables service, it still uses the iptables command for dynamic communication with the kernel packet filter (netfilter). So it is only the iptables service that is replaced, not the iptables command. That can be a confusing distinction at first.
The firewall on Oracle Linux 7 system can be stopped by a following command:
[root@orclprod ~]# service firewalld stop Redirecting to /bin/systemctl stop firewalld.service
Stopped firewall will start again after system’s reboot. To start firewall use the following command:
[root@orclprod ~]# service firewalld start Redirecting to /bin/systemctl start firewalld.service
In order to completely disable OL7 firewall, so it would not start after reboot, run:
[root@orclprod ~]# systemctl disable firewalld rm '/etc/systemd/system/basic.target.wants/firewalld.service' rm '/etc/systemd/system/dbus-org.fedoraproject.FirewallD1.service'
Now the firewall would not start after system’s reboot. To enable the firewall again run:
[root@orclprod ~]# systemctl enable firewalld ln -s '/usr/lib/systemd/system/firewalld.service' '/etc/systemd/system/dbus-org.fedoraproject.FirewallD1.service' ln -s '/usr/lib/systemd/system/firewalld.service' '/etc/systemd/system/basic.target.wants/firewalld.service'
ORACLE DATABASE PROBLEM AND SOLUTIONS
Chain POSTROUTING (policy ACCEPT)
num target prot opt source destination
1 MASQUERADE tcp — 192.168.122.0/24 !192.168.122.0/24 masq ports: 1024-65535
2 MASQUERADE udp — 192.168.122.0/24 !192.168.122.0/24 masq ports: 1024-65535
3 MASQUERADE all — 192.168.122.0/24 !192.168.122.0/24
Table: mangle
Chain PREROUTING (policy ACCEPT)
num target prot opt source destination
Chain INPUT (policy ACCEPT)
num target prot opt source destination
Chain FORWARD (policy ACCEPT)
num target prot opt source destination
Chain OUTPUT (policy ACCEPT)
num target prot opt source destination
Chain POSTROUTING (policy ACCEPT)
num target prot opt source destination
1 CHECKSUM udp — 0.0.0.0/0 0.0.0.0/0 udp dpt:68 CHECKSUM fill
Table: filter
Chain INPUT (policy ACCEPT)
num target prot opt source destination
1 ACCEPT udp — 0.0.0.0/0 0.0.0.0/0 udp dpt:53
2 ACCEPT tcp — 0.0.0.0/0 0.0.0.0/0 tcp dpt:53
3 ACCEPT udp — 0.0.0.0/0 0.0.0.0/0 udp dpt:67
4 ACCEPT tcp — 0.0.0.0/0 0.0.0.0/0 tcp dpt:67
5 ACCEPT all — 0.0.0.0/0 0.0.0.0/0 state RELATED,ESTABLISHED
6 ACCEPT icmp — 0.0.0.0/0 0.0.0.0/0
7 ACCEPT all — 0.0.0.0/0 0.0.0.0/0
8 ACCEPT tcp — 0.0.0.0/0 0.0.0.0/0 state NEW tcp dpt:22
9 REJECT all — 0.0.0.0/0 0.0.0.0/0 reject-with icmp-host-prohibited
Chain FORWARD (policy ACCEPT)
num target prot opt source destination
1 ACCEPT all — 0.0.0.0/0 192.168.122.0/24 state RELATED,ESTABLISHED
2 ACCEPT all — 192.168.122.0/24 0.0.0.0/0
3 ACCEPT all — 0.0.0.0/0 0.0.0.0/0
4 REJECT all — 0.0.0.0/0 0.0.0.0/0 reject-with icmp-port-unreachable
5 REJECT all — 0.0.0.0/0 0.0.0.0/0 reject-with icmp-port-unreachable
6 REJECT all — 0.0.0.0/0 0.0.0.0/0 reject-with icmp-host-prohibited
Chain OUTPUT (policy ACCEPT)
num target prot opt source destination
[root@pri ~]#
[root@pri ~]#
[root@pri ~]# service iptables stop
iptables: Setting chains to policy ACCEPT: nat mangle filte[ OK ]
iptables: Flushing firewall rules: [ OK ]
iptables: Unloading modules: [ OK ]
[root@pri ~]#
[root@pri ~]#
[root@pri ~]#
[root@pri ~]# service iptables status
iptables: Firewall is not running.