Configure Chrony on Oracle Linux
The following tutorial provides step-by-step procedures to configure date and time, and enable Chrony. This tutorial is targeted at Oracle Linux 8 users, but the commands are also available on other Oracle Linux releases.
Objectives
What Do You Need?
Note: When using the free lab environment, see Oracle Linux Lab Basics for connection and other usage instructions.
Configure System Date and Time
In this practice, you use the date , hwclock , and timedatectl utilities to configure and display date and time information.
- Open a terminal and connect to your Oracle Linux instance.
- Become the root user.

The current date and time displays.
Run the date command with the argument to view the weekday name.

Run the date command with the argument to view the month name.

Use the date command to change the date to another date, for example 14 December, 2021. You can substitute any date.

Use the date command to change the date to the correct date, for example 03 February, 2021.

Use the date command to change the time to your current local time. For example, 08:57 AM.

Run the hwclock command with no arguments to display the hardware clock’s current date and time.

Use the hwclock command with the –w option to set the hardware clock to the current system time.

The variation in seconds is due to the delay between running the two commands.
Run the timedatectl command with no arguments to display the system date and time information.

If the above output shows NTP service: active, disable it as follows and re-check it:
timedatectl set-ntp 0 timedatectl 
- Substitute today’s correct date. The example changes the date to 27 January, 2021.
- Run the timedatectl command afterwards with no arguments to verify that the date changed.
timedatectl set-time 2021-01-27 timedatectl 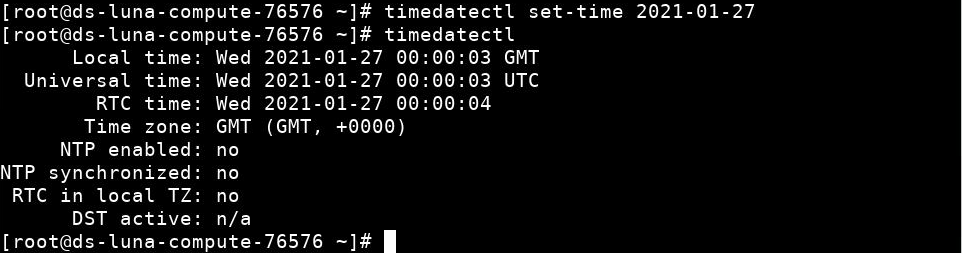
- Substitute the current local time. The example changes the time to 09:11:30 AM.
- Enter the hour using a 24-hour clock.
- Run the timedatectl command afterwards with no arguments to verify that the time changed.
timedatectl set-time 09:11:30 timedatectl 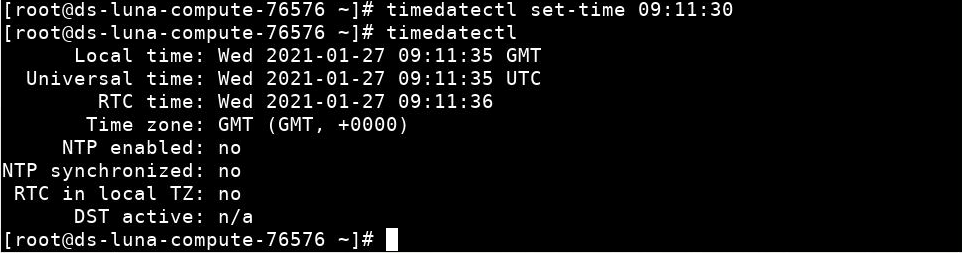
Configure NTP Using Chrony
In this section, you configure NTP using chrony .
- As the root user, use the dnf command to check that chrony is installed.

- If necessary, install chrony using the dnf command.
- Use the systemctl command to start chronyd if necessary.
- Alternatively, you could run chronyc to display a chronyc> prompt, and then run the tracking command from the chronyc> prompt.
- Type quit to exit the chroncyc prompt.
- Sample output is shown.
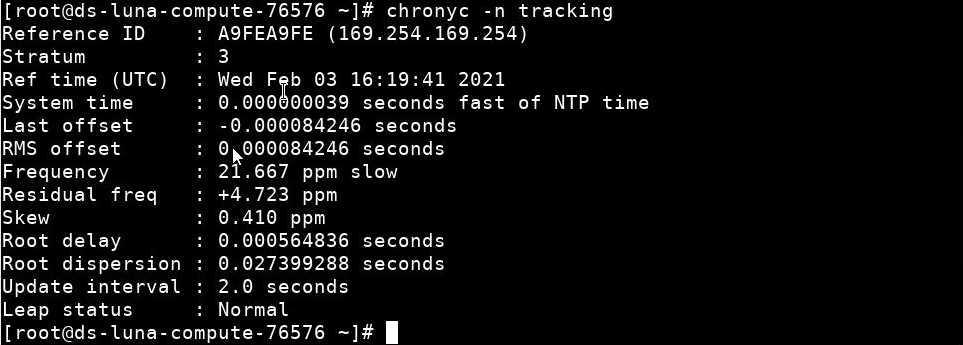
- Reference ID: Refers to the server providing synchronization.
- Stratum: The distance from a computer attached to a highly accurate reference clock.
- Ref time: The most recent time Chrony utilized a time measurement from the server providing synchronization (time is UTC).

- For more information about Chrony, see the chronyc main page.

More Learning Resources
Explore other labs on docs.oracle.com/learn or access more free learning content on the Oracle Learning YouTube channel. Additionally, visit education.oracle.com/learning-explorer to become an Oracle Learning Explorer.
For product documentation, visit Oracle Help Center.
More Learning Resources
Explore other labs on docs.oracle.com/learn or access more free learning content on the Oracle Learning YouTube channel. Additionally, visit education.oracle.com/learning-explorer to become an Oracle Learning Explorer.
For product documentation, visit Oracle Help Center.
Configure Chrony on Oracle Linux
Copyright © 2021, Oracle and/or its affiliates.
Configuring the Oracle Cloud Infrastructure NTP Service for an Instance
Oracle Cloud Infrastructure offers a fully managed, secure, and highly available NTP service that you can use to set the date and time of compute and database instances from within a virtual cloud network (VCN). The Oracle Cloud Infrastructure NTP service uses redundant Stratum 1 devices in every availability domain. The Stratum 2 devices are synchronized to dedicated Stratum 1 devices that every host synchronizes against. The service is available in every region.
This topic describes how to configure compute instances to use this NTP service.
You can also choose to configure instances to use a public NTP service or use FastConnect to leverage an on-premises NTP service.
Platform images for Oracle Autonomous Linux 8.x, Oracle Autonomous Linux 7.x, Oracle Linux 9.x, Oracle Linux 8.x, Oracle Linux 7.x, Oracle Linux Cloud Developer 8.x, CentOS 7.x released after February 2018, and CentOS Stream 8 include the Chrony service by default. You do not need to configure the Oracle Cloud Infrastructure NTP service for these instances.
Use the following steps to configure Oracle Linux 6.x instances to use the Oracle Cloud Infrastructure NTP service.
- Configure IPtables to allow connections to the Oracle Cloud Infrastructure NTP service, using the following commands:
sudo iptables -I BareMetalInstanceServices 8 -d 169.254.169.254/32 -p udp -m udp --dport 123 -m comment --comment "Allow access to OCI local NTP service" -j ACCEPTsudo service iptables savesudo ntpdate 169.254.169.254#server 0.rhel.pool.ntp.org iburst #server 1.rhel.pool.ntp.org iburst #server 2.rhel.pool.ntp.org iburst #server 3.rhel.pool.ntp.org iburstserver 169.254.169.254 iburstThe modified server section now contains the following:
# Please consider joining the pool (http://www.pool.ntp.org/join.html). #server 0.rhel.pool.ntp.org iburst #server 1.rhel.pool.ntp.org iburst #server 2.rhel.pool.ntp.org iburst #server 3.rhel.pool.ntp.org iburst server 169.254.169.254 iburstremote refid st t when poll reach delay offset jitter ============================================================================== 169.254.169.254 192.168.32.3 2 u 2 64 1 0.338 0.278 0.187 Use the following steps to configure Oracle Linux 7.x instances to use the Oracle Cloud Infrastructure NTP service.
- Run commands in this section as root with the following command:
awk -v n=13 -v s=' -A OUTPUT -d 169.254.169.254/32 -p udp -m udp --dport 123 -m comment --comment "Allow access to OCI local NTP service" -j ACCEPT ' 'NR == n ' /etc/firewalld/direct.xml > tmp && mv tmp /etc/firewalld/direct.xmlservice firewalld restart#server 0.rhel.pool.ntp.org iburst #server 1.rhel.pool.ntp.org iburst #server 2.rhel.pool.ntp.org iburst #server 3.rhel.pool.ntp.org iburstserver 169.254.169.254 iburstThe modified server section should now contain the following:
# Please consider joining the pool (http://www.pool.ntp.org/join.html). #server 0.rhel.pool.ntp.org iburst #server 1.rhel.pool.ntp.org iburst #server 2.rhel.pool.ntp.org iburst #server 3.rhel.pool.ntp.org iburst server 169.254.169.254 iburstsystemctl start ntpd systemctl enable ntpdYou also need disable the chrony NTP client to ensure that the NTP service starts automatically after a reboot, using the following commands:
systemctl stop chronyd systemctl disable chronyd remote refid st t when poll reach delay offset jitter ============================================================================== 169.254.169.254 192.168.32.3 2 u 2 64 1 0.338 0.278 0.187 If you encounter a no time data was available error message when setting up the NTP service on Windows Server, review the information in the Microsoft known issue article.
- Configure a Windows Server instance to use the Oracle Cloud Infrastructure NTP service by doing one of the following things:
- To configure the NTP service by using Windows Powershell, run the following commands in Powershell as Administrator:
Set-ItemProperty -Path 'HKLM:\System\CurrentControlSet\Services\W32Time\Parameters' -Name 'Type' -Value NTP -Type String Set-ItemProperty -Path 'HKLM:\System\CurrentControlSet\Services\W32Time\Config' -Name 'AnnounceFlags' -Value 5 -Type DWord Set-ItemProperty -Path 'HKLM:\System\CurrentControlSet\Services\W32Time\TimeProviders\NtpServer' -Name 'Enabled' -Value 1 -Type DWord Set-ItemProperty -Path 'HKLM:\System\CurrentControlSet\Services\W32Time\Parameters' -Name 'NtpServer' -Value '169.254.169.254,0x9' -Type String Set-ItemProperty -Path 'HKLM:\System\CurrentControlSet\Services\W32Time\TimeProviders\NtpClient' -Name 'SpecialPollInterval' -Value 900 -Type DWord Set-ItemProperty -Path 'HKLM:\System\CurrentControlSet\Services\W32Time\Config' -Name 'MaxPosPhaseCorrection' -Value 1800 -Type DWord Set-ItemProperty -Path 'HKLM:\System\CurrentControlSet\Services\W32Time\Config' -Name 'MaxNegPhaseCorrection' -Value 1800 -Type DWordHKEY_LOCAL_MACHINE\SYSTEM\CurrentControlSet\Services\W32Time\Parameters\HKEY_LOCAL_MACHINE\SYSTEM\CurrentControlSet\Services\W32Time\Config\HKEY_LOCAL_MACHINE\SYSTEM\CurrentControlSet\Services\W32Time\TimeProviders\NtpServer\HKEY_LOCAL_MACHINE\SYSTEM\CurrentControlSet\Services\W32Time\Parameters\HKEY_LOCAL_MACHINE\SYSTEM\CurrentControlSet\Services\W32Time\TimeProviders\NtpClient\HKEY_LOCAL_MACHINE\SYSTEM\CurrentControlSet\Services\W32Time\Config\net stop w32time && net start w32time#Peer: 1 Peer: 169.254.169.254,0x9 State: Active Time Remaining: 22.1901786s Mode: 3 (Client) Stratum: 0 (unspecified) PeerPoll Interval: 10 (1024s) HostPoll Interval: 10 (1024s)Oracle linux настройка ntp
When an Oracle VM Server is discovered from Oracle VM Manager, NTP (Network Time Protocol) is automatically configured and enabled to ensure time synchronization. Oracle VM automatically configures Oracle VM Manager as the NTP source for all Oracle VM Servers under its control.
However, to provide time services to the Oracle VM Servers, NTP must first be installed and configured on the Oracle VM Manager host server. Make sure that your Oracle VM Manager host is either registered with the Unbreakable Linux Network (ULN) or configured to use Oracle’s public YUM service.
To configure NTP on the Oracle VM Manager host:
# vi /etc/ntp.conf server 0.rhel.pool.ntp.org server 1.rhel.pool.ntp.org server 2.rhel.pool.ntp.org
#restrict192.168.1.0mask255.255.255.0nomodify notrap
# service ntpd start # chkconfig ntpd on
# ntpq -p remote refid st t when poll reach delay offset jitter ============================================================================== lists2.luv.asn. 203.161.12.165 16 u 25 64 3 3.495 -3043.1 0.678 ns2.novatelbg.n 130.95.179.80 16 u 27 64 3 26.633 -3016.1 0.797 sp1.mycdn.fr 130.234.255.83 16 u 24 64 3 4.314 -3036.3 1.039
# ntpq -c rv assID=0 status=c011 sync_alarm, sync_unspec, 1 event, event_restart, version="ntpd 4.2.4p8@1.1612-o Tue Jul 6 21:50:26 UTC 2010 (1)", processor="x86_64", system="Linux/2.6.32-200.19.1.el6uek.x86_64", leap=11, stratum=16 , precision=-20, rootdelay=0.000, rootdispersion=1.020, peer=0, refid=INIT, reftime=00000000.00000000 Thu, Feb 7 2036 17:28:16.000, poll=6, clock=d21d4a96.a26c5962 Fri, Sep 16 2011 14:09:58.634, state=0, offset=0.000, frequency=0.000, jitter=0.001, noise=0.001, stability=0.000, tai=0 If the server is showing stratum=16 , wait a few minutes and try again. It may take up to 15 minutes for an NTP server to stabilize sufficiently to lower its stratum level. Downstream clients will not synchronize with a server at stratum level 16. Once the stratum level has dropped, log in to any available Linux host in your management network and issue the following command:
# ntpdate -d manager.hostname [. ] 16 Sep 13:58:25 ntpdate[1603]: step time server 192.168.1.1 offset 3.009257 sec Once you have confirmed with these tests that NTP is working properly for your environment, you should not need to check this again.
NTP communicates over UDP port 123. Ensure that no firewall is blocking this traffic.
Copyright © 2011, 2012, Oracle and/or its affiliates. All rights reserved. Legal Notices