- Setting up VirtualBox Guest Additions
- For recent guest OSs
- Ubuntu or similar
- Getting VBoxGuestAdditions.iso
- Making VBoxGuestAdditions.iso visible to the guest
- Executing install script for Guest Additions on older Linux guests
- References
- Installing Virtualbox Guest Additions for Oracle Linux 8.2
- Install VirtualBox Guest Additions on Linux guest
- Install VirtualBox Guest Additions on Debian Based distros
- Install VirtualBox Guest Additions on Red Hat Based distros
- Closing Thoughts
- Related Linux Tutorials:
Setting up VirtualBox Guest Additions
Guest Additions are distributed on their own CD image (.iso file) named VBoxGuestAdditions.iso. How you get that file to the guest can depend on the OS of the guest — see below.
After installing Guest Additions, on some, older guests you might need to restart the guest.
For recent guest OSs
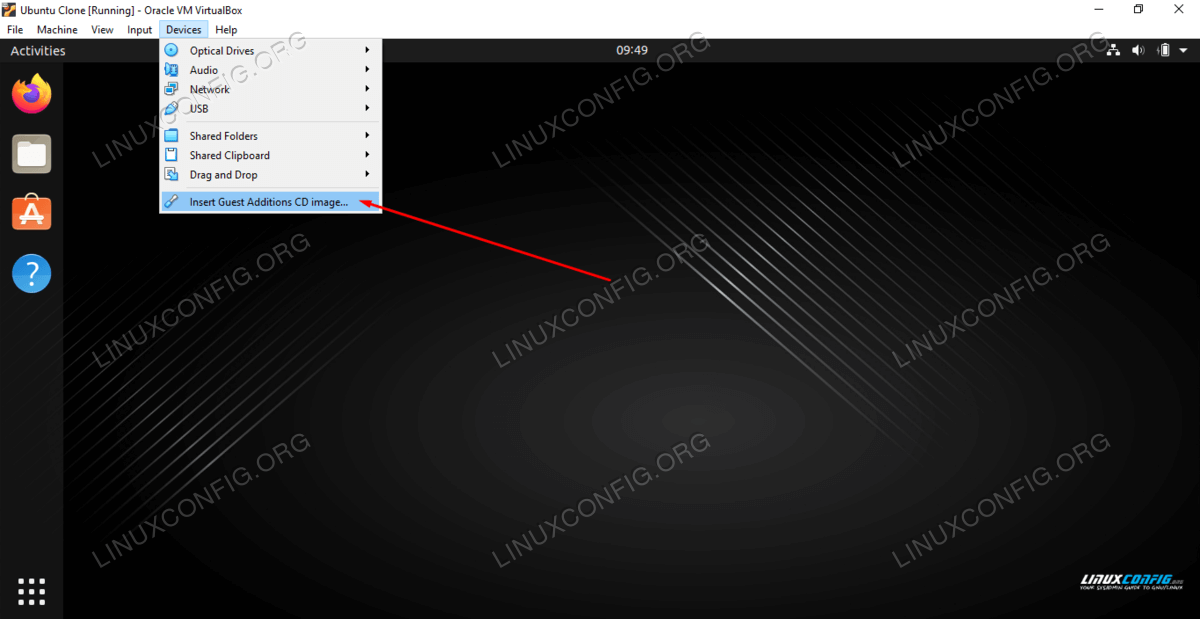
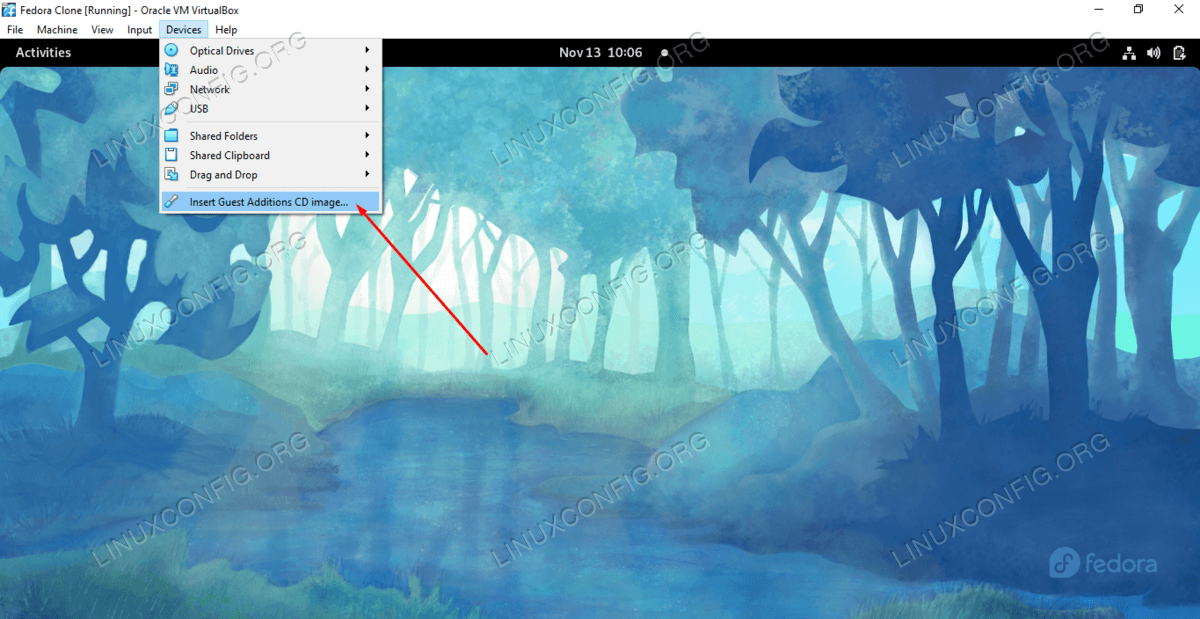
In the guest virtual machine, choose Devices -> Install Guest Additions from the menubar of VirtualBox.
VirtualBox will look for the needed file. Failing to find it, it may give you an opportunity to download the file from the internet.
If all that fails, follow one of the steps below.
Ubuntu or similar
Getting VBoxGuestAdditions.iso
- Download a VirtualBox package from https://www.virtualbox.org/wiki/Downloads (you might have installed this package when you installed VirtualBox). The package should include the VBoxGuestAdditions.iso file.
- Open http://download.virtualbox.org/virtualbox/ and enter the subdirectory for the latest version of VirtualBox. It should contain the corresponding VBoxGuestAdditions_X.Y.Z.iso file.
- Install a package through the usual channels for your distribution. For example, you might use:
sudo apt-get install virtualbox-guest-additions-iso
Some, recent versions of VirtualBox will now be able to find the file on the host when you choose Device -> Install Guest Additions on the VirtualBox running a guest. Continue with instructions for setting up file sharing.
For other, older versions of guest OS’s and VirtualBox, the .iso file is on the host, but the guest needs to see it (and file sharing is not yet enabled.) Follow the next two steps for mounting the .iso file and executing the scripts in the .iso file.
Making VBoxGuestAdditions.iso visible to the guest
Just as you mounted a .iso CD image for your guest OS when installing it on the guest, now mount VBoxGuestAdditions.iso as a CD on the guest. For example, in the VirtualBox window, choose the Storage section under Details, and so forth.
Note that recent versions of VirtualBox have changed the method of mounting .iso files.
Executing install script for Guest Additions on older Linux guests
Make sure you have the image, for example VBoxGuestAdditions.iso or VBOXADDITIONS, mounted as CDROM.
If you are running a Linux guest, open a terminal and type:
in for instance Ubuntu Lucid, the CD image should mount at /media/ so that would be
sudo sh ./VBoxLinuxAdditions.run
If you would like to uninstall the Guest Additions, run:
sudo sh ./VBoxLinuxAdditions.run uninstall
References
VirtualBox/GuestAdditions (последним исправлял пользователь 78-0-208-105 2012-10-20 16:28:08)
The material on this wiki is available under a free license, see Copyright / License for details
You can contribute to this wiki, see Wiki Guide for details
Installing Virtualbox Guest Additions for Oracle Linux 8.2
For this post I used the latest versions at the time of writing:
- Virtualbox 6.1.10 for Linux (my host is running Ubuntu 20.04 LTS)
- Oracle Linux 8.2 (V996906-01.iso)
The VM was installed using the “minimal-environment” group and booted into UEK 6. I believe this change came with Oracle Linux (OL) 8.2 and I seem to remember OL 8.1 used the Red Hat Compatible Kernel (RHCK) by default. There’s nothing wrong with that of course, it’s just an observation. I am going to stick with UEK 6 in my lab, instructions are different from using RHCK.
As usual I run a “dnf update -y” (in a tmux session of course) to upgrade the software release to the latest and greatest software. After this completed, it’s time for a reboot and the installation of the Guest Additions. I hope you forgive me for not sharing screen output from the system upgrade, I thought it would have been boring …
Right after the system comes back online after the reboot, you might notice a new kernel: 5.4.17-2011.3.2.1.el8uek.x86_64 is now the default, previously it was 5.4.17-2011.1.2.el8.
Before you can install the Guest Additions a few additional packages are required.
[root@ol8base ~]# dnf install perl make bzip2 gzip unzip kernel-uek-devel-$(uname -r) tar Last metadata expiration check: 0:22:15 ago on Fri 29 May 2020 14:11:17 BST. Package gzip-1.9-9.el8.x86_64 is already installed. Dependencies resolved. ================================================================================ Package Arch Version Repository Size ================================================================================ Installing: bzip2 x86_64 1.0.6-26.el8 ol8_baseos_latest 60 k kernel-uek-devel x86_64 5.4.17-2011.3.2.1.el8uek ol8_UEKR6 17 M make x86_64 1:4.2.1-10.el8 ol8_baseos_latest 498 k perl x86_64 4:5.26.3-416.el8 ol8_appstream 72 k tar x86_64 2:1.30-4.el8 ol8_baseos_latest 838 k unzip x86_64 6.0-43.el8 ol8_baseos_latest 196 k Installing dependencies: annobin x86_64 8.90-1.el8 ol8_appstream 202 k binutils x86_64 2.30-73.0.1.el8 ol8_baseos_latest 5.8 M binutils-devel x86_64 2.30-73.0.1.el8 ol8_appstream 1.1 M cpp x86_64 8.3.1-5.0.3.el8 ol8_appstream 10 M dtrace x86_64 2.0.0-1.0.el8 ol8_UEKR6 1.3 M [. ] qt5-srpm-macros-5.12.5-3.el8.noarch redhat-rpm-config-122-1.0.1.el8.noarch rust-srpm-macros-5-2.el8.noarch tar-2:1.30-4.el8.x86_64 unzip-6.0-43.el8.x86_64 zip-3.0-23.el8.x86_64 zlib-devel-1.2.11-13.el8.x86_64 Complete!
The next step is to mount the Guest Additions (virtual) CD and run the installer:
[root@ol8base ~]# mount /dev/sr0 /mnt mount: /mnt: WARNING: device write-protected, mounted read-only. [root@ol8base ~]# /mnt/VBoxLinuxAdditions.run Verifying archive integrity. All good. Uncompressing VirtualBox 6.1.10 Guest Additions for Linux. VirtualBox Guest Additions installer Copying additional installer modules . Installing additional modules . VirtualBox Guest Additions: Starting. VirtualBox Guest Additions: Building the VirtualBox Guest Additions kernel modules. This may take a while. VirtualBox Guest Additions: To build modules for other installed kernels, run VirtualBox Guest Additions: /sbin/rcvboxadd quicksetup VirtualBox Guest Additions: or VirtualBox Guest Additions: /sbin/rcvboxadd quicksetup all VirtualBox Guest Additions: Building the modules for kernel 5.4.17-2011.3.2.1.el8uek.x86_64.
This seems to have gone well, let’s check if the necessary kernel modules are present:
[root@ol8base ~]# lsmod | egrep -i 'Module|vbox' Module Size Used by vboxsf 81920 0 vboxguest 339968 2 vboxsf vboxvideo 36864 0 drm_kms_helper 184320 2 vmwgfx,vboxvideo ttm 106496 2 vmwgfx,vboxvideo drm 516096 5 vmwgfx,drm_kms_helper,vboxvideo,ttm [root@ol8base ~]#
This is it! Guest additions ready and working with Oracle Linux 8.2/ UEK 6
Install VirtualBox Guest Additions on Linux guest
If you’re running Linux inside a VirtualBox virtual machine, installing the Guest Additions software will help you get the most out of the system. VirtualBox Guest Additions will give the machine more capabilities, such as a shared clipboard with the host system, drag and drop file transfer, time synchronization, shared folders, automatic window resizing, and more.
This makes copying data to and from a host system much more convenient. It also changes the virutal machine’s resolution automatically when its window is resized, so you do not need to change it manually. Guest Additions will work with just about any Linux distribution, but instrutions can differ because of dependencies and package managers.
In this guide, we’ll be going over the step by step instructions to get VirtualBox Guest Additions installed on Debian based and Red Hat based Linux systems. With these instructions, it doesn’t matter what host system you’re using, as long as the virtual machine is running Linux. This guide assumes that you’ve already installed your Linux operating system in the VM correctly.
In this tutorial you will learn:
- How to install VirtualBox Guest Addition on Debian based systems
- How to install VirtualBox Guest Addition on Red Hat based systems

| Category | Requirements, Conventions or Software Version Used |
|---|---|
| System | Any Debian based or Red Hat based Linux distro |
| Software | Oracle VirtualBox Guest Additions |
| Other | Privileged access to your Linux system as root or via the sudo command. |
| Conventions | # – requires given linux commands to be executed with root privileges either directly as a root user or by use of sudo command $ – requires given linux commands to be executed as a regular non-privileged user |
Install VirtualBox Guest Additions on Debian Based distros
If you’re using a Debian based Linux distro, such as Ubuntu, Linux Mint, Elementary OS, etc. The following steps will work for installing VirtualBox Guest Additions.
- The first thing we need to do is install a few prerequisite packages. Open a terminal and use your system’s package manager to install them with the following commands.
$ sudo apt update $ sudo apt install build-essential dkms linux-headers-$(uname -r)
$ sudo mkdir -p /mnt/cdrom $ sudo mount /dev/cdrom /mnt/cdrom
$ cd /mnt/cdrom $ sudo ./VBoxLinuxAdditions.run
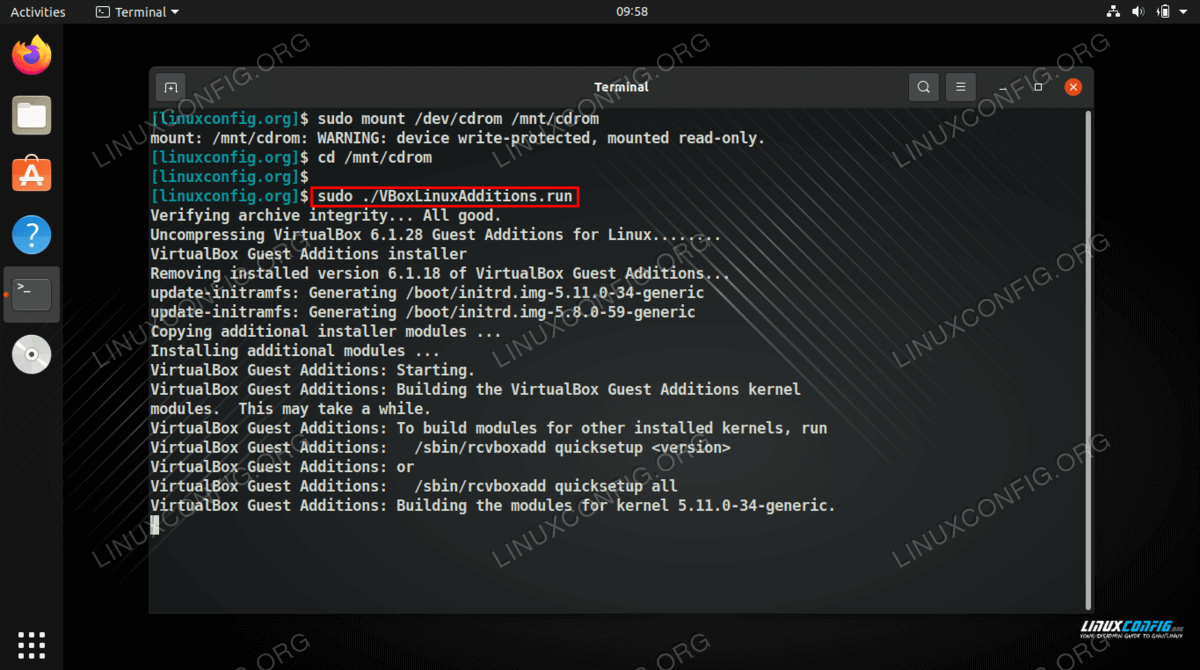
You should now see VirtualBox Guest Additions being installed. This may take a few minutes.
Once the installation is complete, all we need to do now is reboot the system for the new changes to take effect.
Install VirtualBox Guest Additions on Red Hat Based distros
If you’re using a Red Hat based Linux distro, such as Fedora, AlmaLinux, CentOS, Rocky Linux, etc. The following steps will work for installing VirtualBox Guest Additions.
- The first thing we need to do is install a few prerequisite packages. Open a terminal and use your system’s package manager to install them with the following commands.
$ sudo dnf install tar bzip2 kernel-devel kernel-headers perl gcc make elfutils-libelf-devel
$ sudo mkdir -p /mnt/cdrom $ sudo mount /dev/cdrom /mnt/cdrom
$ cd /mnt/cdrom $ sudo ./VBoxLinuxAdditions.run
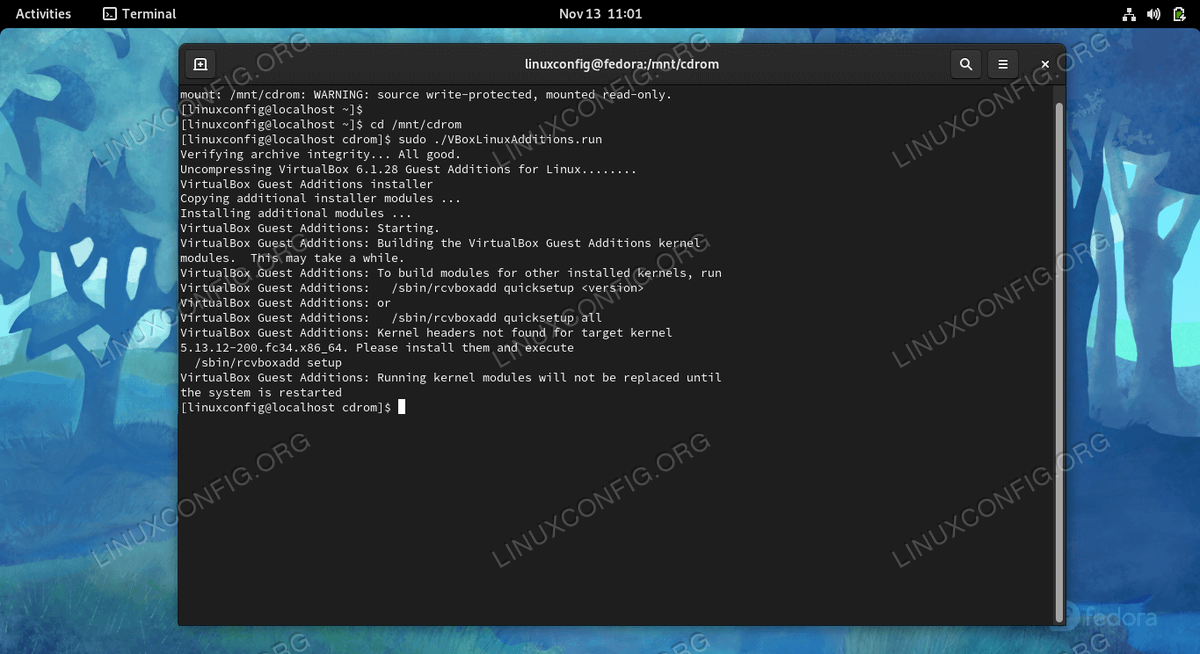
You should now see VirtualBox Guest Additions being installed. This may take a few minutes.
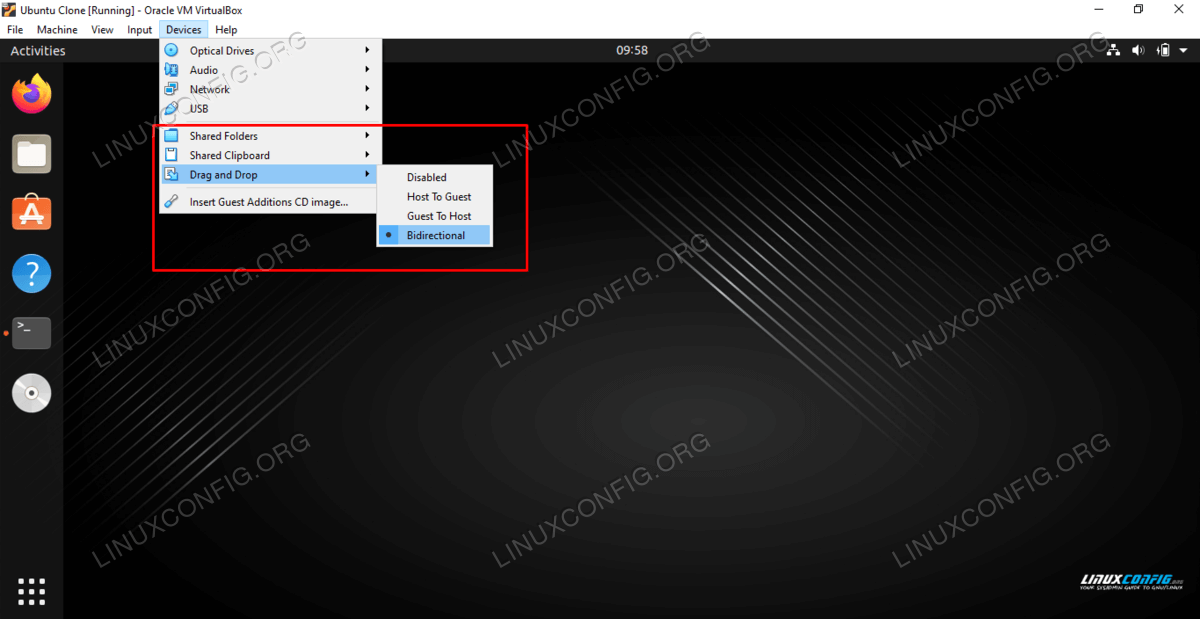
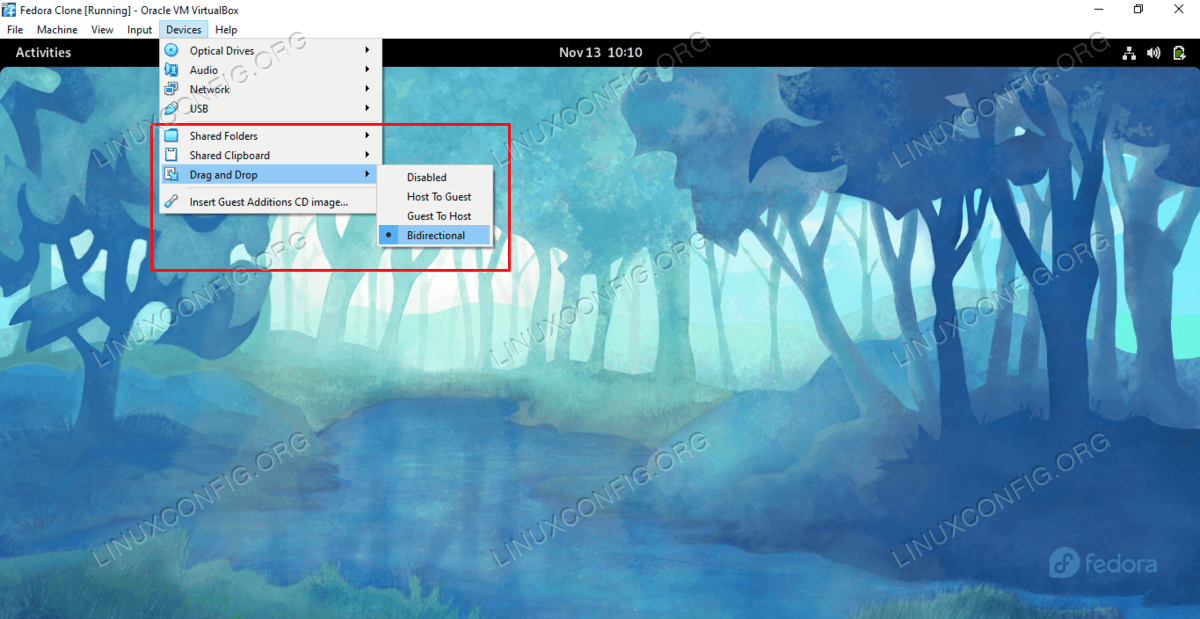
That’s all there is to it. When the virtual machine finishes loading back up, you’ll be able to utilize the shared clipboard, drag and drop function, automatic resolution resizing, and other features mentioned earlier. Make sure you enable the shared clipboard and drag and drop option if you wish to use them, from inside the Devices menu.
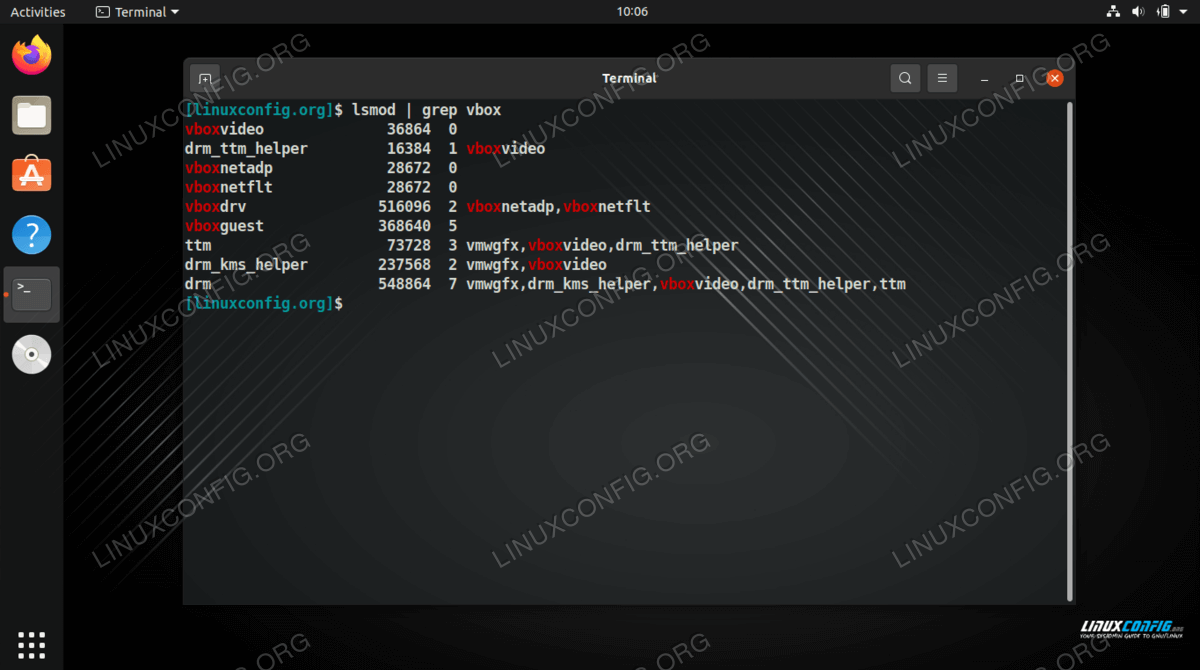
To verify successful installation of VirtualBox Guest Additions, you can run the following lsmod command in terminal. As long as you receive some output similar to that in the screenshot below, then Guest Additions is installed and running.

Closing Thoughts
In this guide, we saw how to install VirtualBox Guest Additions on a Debian based or Red Hat based virtual machine. VirtualBox’s Guest Additions software makes virtual machines much easier to use. You now know how to manually install the Guest Additions software, as well as enable its features from inside the VirtualBox menus.
Related Linux Tutorials:
Comments and Discussions