- Установка LAMP (Linux + Apache + MySQL + PHP) на OrangePi One
- Установка LAMP (Linux + Apache + MySQL + PHP) на OrangePi One
- 0. Предыстория
- 1. Установка прошивки
- 2. Установка LAMP(Linux + Apache + MySQL + PHP)
- Orange pi настройка linux
- How to install Linux on the eMMC of an Orange Pi 3 LTS
- Download Ubuntu and Flash onto an SD Card for installation
- Boot in Linux and Install on the eMMC Flash Memory
- Bonus: Connecting to WiFi and fixing the DNS
- Wrapping Up
Установка LAMP (Linux + Apache + MySQL + PHP) на OrangePi One
Установка LAMP (Linux + Apache + MySQL + PHP) на OrangePi One
0. Предыстория
Недавно столкнулся с такой проблемой: По раз 10-15 приходилось переустанавливать прошивку на Orange Pi One т.к. Mysql и Phpmyadmin не хотели дружить. Долго искал годный мануал на данную тему и так не нашел. Данный мануал собрал с нескольких сайтов и чуток доработан моим корявым русским.
1. Установка прошивки
При помощи утилиты Rufus для Windows устанавливаем прошивку на microSD
При первом старте логин ‘root’ а пароль ‘1234’.
Дальше в принудительном порядке вы поменяете пароль и будет создание нового пользователя
2. Установка LAMP(Linux + Apache + MySQL + PHP)
Подключаемся к нашей OrangePi при помощи SSH/HDMI/UART
Устанавливаем Apache + PHP
$ apt-get install apache2 php libapache2-mod-phpЧтобы включить Htaccess нужно изменить конфиг файл:
$ nano /etc/apache2/sites-enabled/000-defaultAllowOverride None
на
AllowOverride ALL
$ apt-get install mysql-server mysql-client php-mysqlПосле установки пароля для root пользователя жмем Enter и ждем окончания установки.
$ apt-get install phpmyadminThe phpmyadmin package must have a database installed and
configured before it can be used. This can be optionally
handled with dbconfig-common.
If you are an advanced database administrator and know
that you want to perform this configuration manually, or
if your database has already been installed and
configured, you should refuse this option. Details on what needs to be
done should most likely be provided in
/usr/share/doc/phpmyadmin.
Otherwise, you should probably choose this option.
Есть кнопка ОК, но подождите минуты 2 чтобы все было хорошо ( не знаю почему, но у меня с 5того раза получилось)
Оказалось, что «password» в MySQL 5.7 переименовали в «authentication_string». Пришлось модифицировать запрос:
SELECT host, user, authentication_string from mysql.user;UPDATE mysql.user SET authentication_string=PASSWORD('your_new_password') WHERE User='root'; Создать нового пользователя с административными правами, где ‘pmauser’ — имя аккаунта
$ mysql -p -u root CREATE USER 'pmauser'@'%' IDENTIFIED BY 'password_here'; GRANT ALL PRIVILEGES ON *.* TO 'pmauser'@'%' WITH GRANT OPTION;Сделаем помощь Apache, подключив конфигурации для веб-сервера от phpmyadmin.
$ nano /etc/apache2/apache2.confИ в самый конец файла вставим:
Include /etc/phpmyadmin/apache.confЖмем [Ctrl]+[X] затем Y проверяем путь и подтверждаем Enter.
В PHPMYADMIN может выбить ошибка из-за новой версии
(Warning in ./libraries/sql.lib.php#601 count(): Parameter must be an array or an object that implements Countable Backtrace ./libraries/sql.lib.php#2038: PMA_isRememberSortingOrder(array) ./libraries/sql.lib.php#1984: PMA_executeQueryAndGetQueryResponse( array, boolean true, string 'alternativegirls', string 'tgp_photo'. )В строке 613 функция count всегда принимает значение true, поскольку после нее закрывающая скобка отсутствует $analyzed_sql_results[‘select_expr’]. Выполнение приведенных ниже замен решает эту проблему, тогда вам нужно будет удалить последние закрывающие скобки в строке 614, поскольку теперь они являются дополнительными скобками
$ nano /usr/share/phpmyadmin/libraries/sql.lib.php(count($analyzed_sql_results['select_expr'] == 1)На: (Переместить скобку перед == )
(count($analyzed_sql_results['select_expr']) == 1$mysql -u root -p //Команда для входа в БД где 'root' - логин exit; //Выход из БД $service mysql restart //Перезапуск БД Orange pi настройка linux
Пришел ко мне Xunlong Orange Pi Zero с 512Mb памяти. Полностью собранный, помещается на ладони.

Пульт от зомбоящика для сравнения.
Сердцем является 4-х ядерный Allwiner H2+. По слухам — это тот же H3 только без аппаратной поддержки 4K и с 100Mbit-м LAN. На плате расположены: один LAN, один USB, слот под micro SD карточку, гребенка COM порта, GPIO гребенка совместимая с Raspberry Pi, гребенка для платы расширения, выносная антенна WiFi и micro USB порт, он же OTG, для питания устройства. HDMI нет.

Рекомендуемая мощность блока питания — 5v/2A. Рекомендуемый тип карты от 4Gb, как минимум 10-й класс. Дополнительно можно купить плату расширения и отличный корпус. На шилде расположен 3.5мм аудио разъем совмещенный с ТВ выходом и фильтр, убирающий посторонние шумы из аудиотракта. Также присутствуют: микрофон, ИК приемник и два дополнительных USB порта.

Корпус выполнен из темно-синего, полупрозрачного пластика пропускающего ИК излучение. При ярком освещении кажется абсолютно черным. За счет не гуманой доставки, дешевле брать весь набор целиком.

Даже без корпуса температура процессора вызывает тревогу. Встроенный в Linux монитор показывает +50C. В корпусе, с платой расширения и наклеенным радиатором 14х14х8мм — температура заваливает за +56C.
На официальном сайте много полезной информации о плате и готовые сборки Linux и Android. Продвинутые красноглазики советутют обходить их стороной и ставить Ubuntu Xnenial или Debian Jessie от команды Armbian. На их сайте находится зоопарк Linux версий в которых очень трудно разобраться начинающему линуксоиду. Дробление произошло из-за нежелания Allwiner выкладывать исходники, а те что есть давно протухли. За это Allwiner и не любят, но все решает копеечная цена процессоров. Вобщем если нужна поддержка аппаратного декодирования видео, то качаем древнее ядро/legacy kernel — Ubuntu_xenial_default.7z. Если ТВ выход использовать не планируется, накатываем свежак/mainline kernel — Debian_jessie_default.7z.
ока качается образ подготовим SD карту. Идем на сайт ассоциации производителей SD карт и качаем чудо-утилиту для омоложения. Позволяет привести БУ карту к заводским настройкам и вернуть былую резвость. Подробнее об этом, на антимонгольском тут. Если вылетает с ошибкой, поменяйте кардридер. Теперь качаем Rufus — программа для развертывания iso/img/dos образов на флешку. Повторяем все как на картинке, жмем Start.

Все. Вставляем карту, подключаем LAN, подаем питание и даем системе 30-40 секунд на загрузку. Для того, чтоб произвести начальную настройку нам понадобится PuTTY
и IP адрес нашего Апельсина. Идем в вебморду WiFi роутера и ищем там IP — orangepizero. Сразу советую поменять IP на статический, а то при каждом включении Апельсина вам придется искать его заново. Загружаем PuTTY, вписываем IP и устанавливаем SSH соединение на порту 22. Вводим login — root и пароль — 1234. Система тут-же предложит его поменять. Отказаться нельзя.

С того времени как был собран наш Linux многое могло измениться, поэтому опытные красноглазики перед тем как что-то делать всегда обновляют пакеты и ядро:
Теперь когда все свежее можно и WiFi настроить через УДОБНОЕ текстовое меню. Спасибо Armbian за это!
Идем в Network -> wlan0 -> Wifi Manage Wireless networking выбираем точку доступа и вводим пароль.

Отключаем LAN кабель и на всякий случай перегружаем Апельсин:
Скорость WiFi на скачку около 2Mb/s. Все, минимальная настройка завершена.
Можно дальше лазить по меню включать/отключать пакеты и переферию. Например деактивирование HDMI/GPU, экономит 200mW.
Безопасное выключение выполняется командой:
Я просто выдираю из розетки. Пока без проишествий.
Еще одна полезная команда показывающая температутру процессора:
08.04.2018 в 00:34, Просмотров: 12217
How to install Linux on the eMMC of an Orange Pi 3 LTS
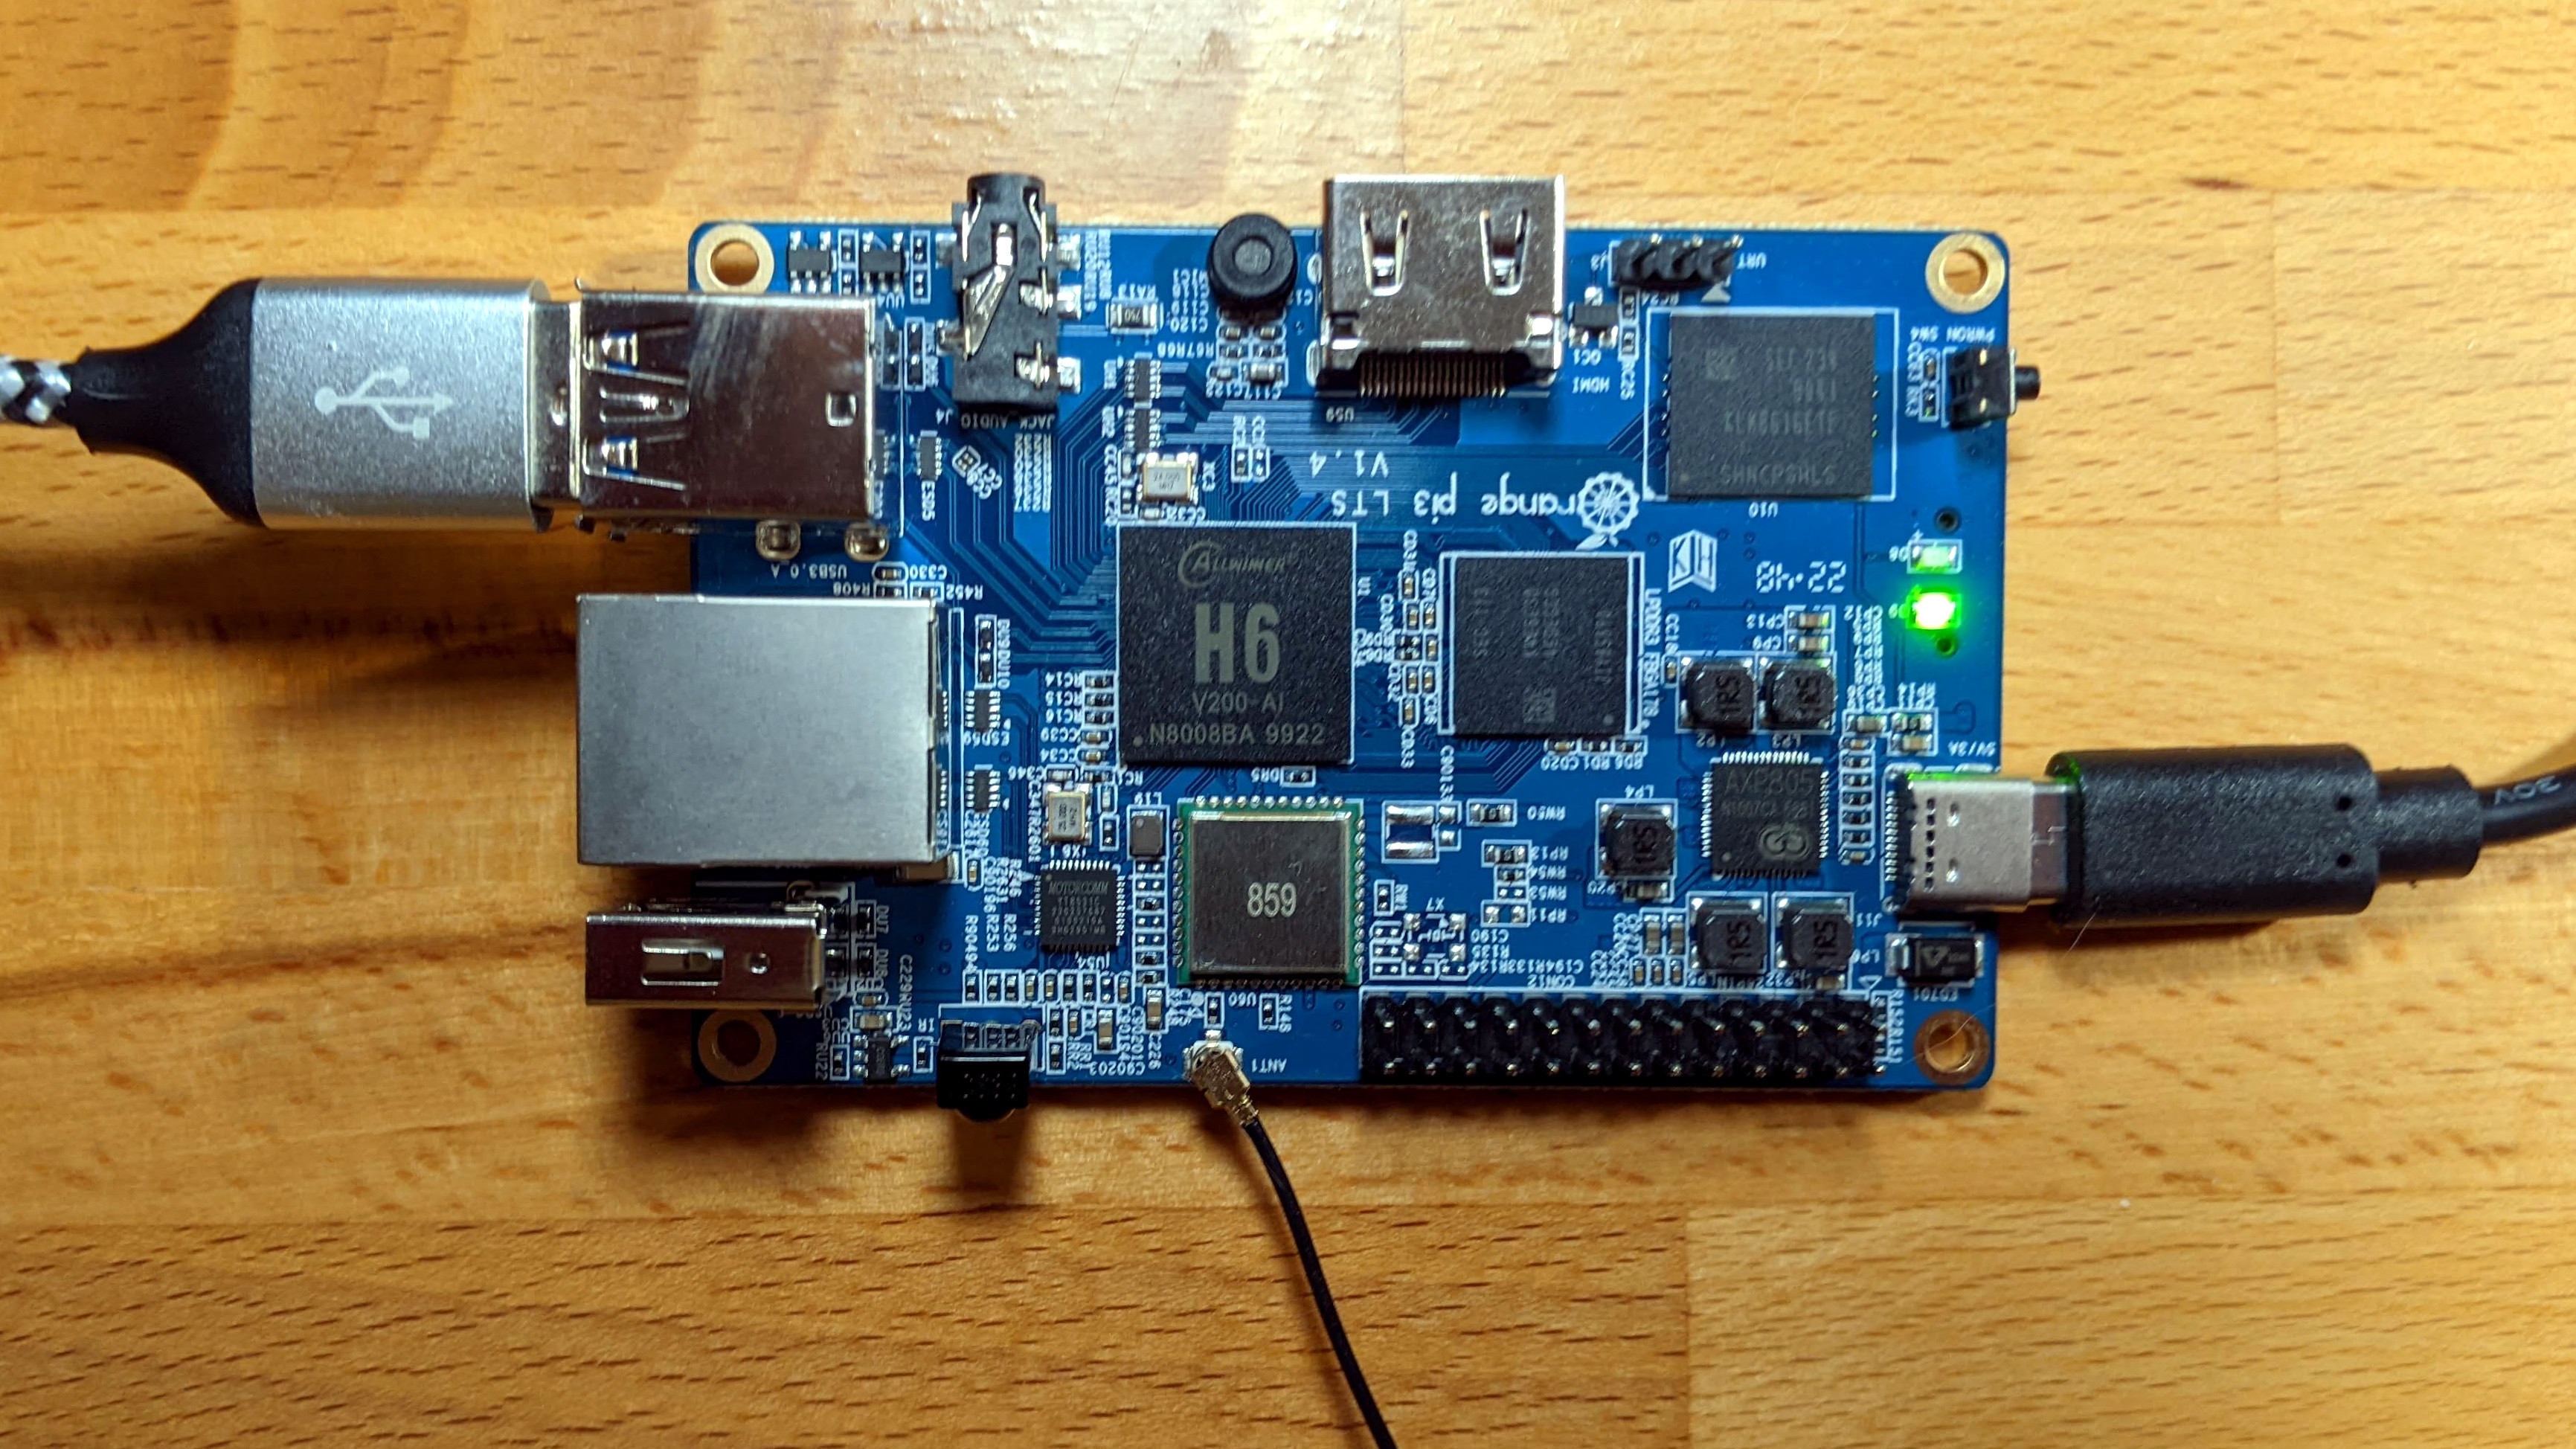
It’s impossible to buy a Raspberry Pi right now so my company is looking to the Orange Pi as an alternative. One perk is that these boards include eMMC memory so that the OS is stored on the board itself. Here’s how to install Linux to the flash memory.

At Golioth, we use Hardware in the Loop (HIL) testing to validate all pull requests to the platform on the actual hardware being targeted. This means that GitHub actions are compiling and running code on the nRF9160, ESP32, and a few other platforms. It’s really slick!
Part of making this all work is a Linux box that connects GitHub actions to the actual dev boards. It’s a perfect job for a Raspberry Pi. The catch, of course, is that because of the chip shortage we haven’t been able to buy a Raspberry Pi for the last year and a half.
This weekend I spent some time validating the Orange Pi 3 LTS as a suitable alternative, and I’m quite happy with it. One of the only drawbacks I have found is that the documentation is not nearly as complete. It took me a while to find the correct command for copying Linux to the onboard eMMC flash memory:
This is command is nowhere to be found on the official wiki, and the documentation available for download includes a deprecated command that no longer works. There is also a bit more that goes into the install so I’m going to walk through the process in this tutorial.
Download Ubuntu and Flash onto an SD Card for installation
The first step is to download an Ubuntu image and flash it onto an SD Card. We will boot the Orange Pi 3 LTS from this SD Card and then install the OS onto the eMMC storage.
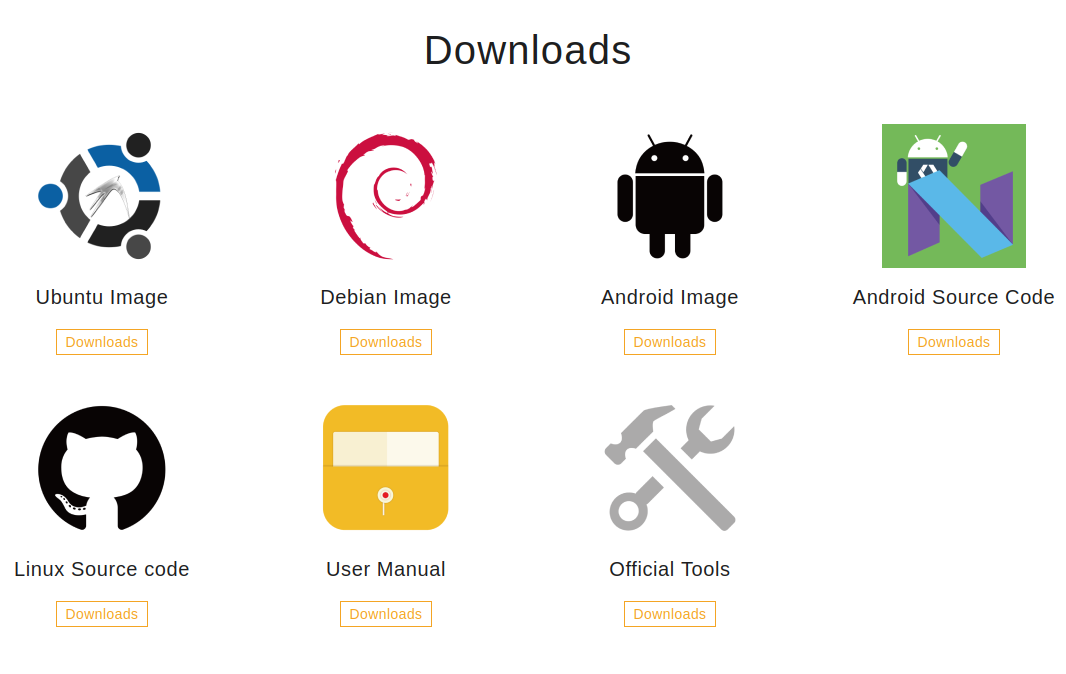
- Go to the Orange Pi downloads page and choose Ubuntu.
 You will be redirected to a Google Drive folder with several files in it. I downloaded the Orangepi3-lts_3.0.8_ubuntu_jammy_server_linux5.16.17.7z archive as I don’t need a desktop for this project. However, installation for any of these images is largely the same.
 - Extract the .img file from the archive you just downloaded
- Download Balena Etcher, which is useful for flashing installation images to an SD Card
- Select your .img file, chose your SD card, and click on flash.
 You will be redirected to a Google Drive folder with several files in it. I downloaded the Orangepi3-lts_3.0.8_ubuntu_jammy_server_linux5.16.17.7z archive as I don’t need a desktop for this project. However, installation for any of these images is largely the same.
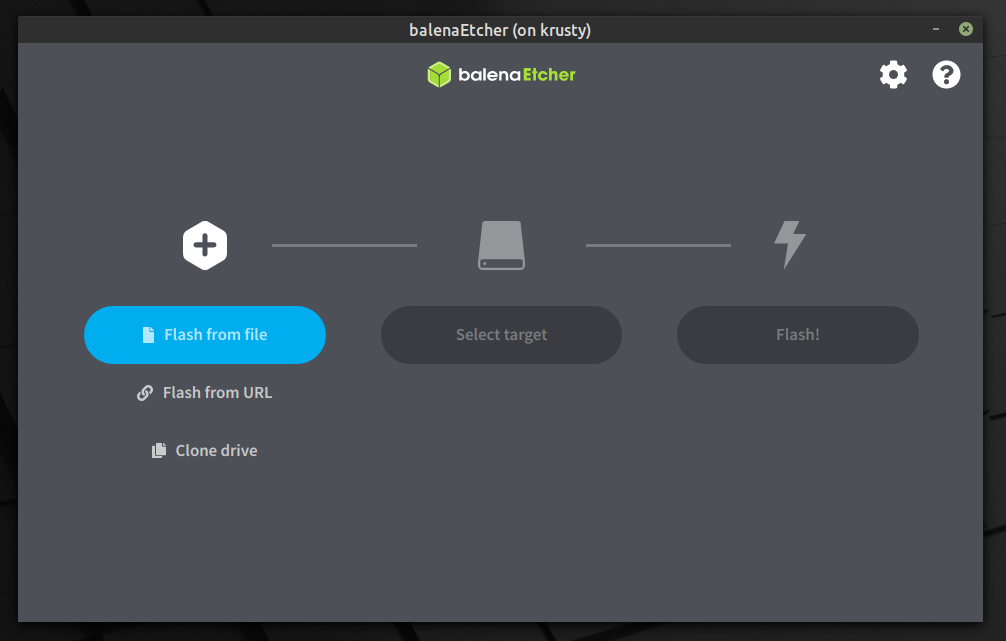
I have seen mention that this SD card should be smaller than the 8GB eMMC on which we will be installing the OS. However, I haven’t verified this requirement. I happened to be using a 2GB card and it works well.
Boot in Linux and Install on the eMMC Flash Memory
Place your SD card in the slot on the bottom of the Oragne Pi 3 LTS board. Connect your monitor via HDMI and your keyboard using the USB ports. Apply power to the USB-C connector on the board.
- After boot, log in with username root and password orangepi
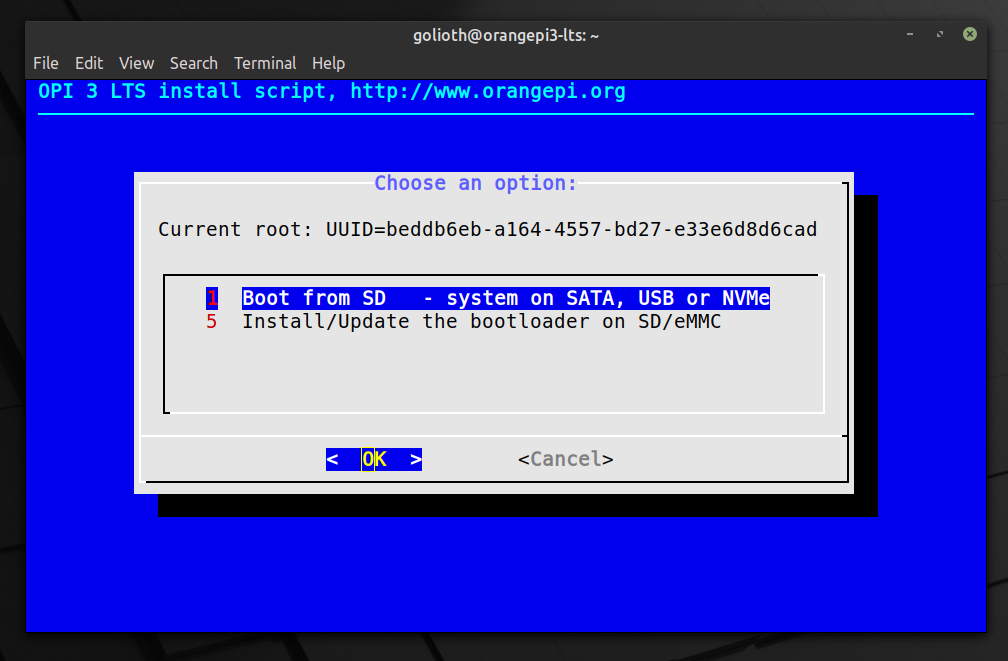
- Type nand-sata-install to begin the installation process
- Choose to boot from eMMC, choose EXT4 , then accept the warning that the process will erase all contents of the eMMC memory
- After a few minutes you will be given the option to power down the board. Do so and remove the SD Card.
Installation of Linux on the eMMC is now complete
Bonus: Connecting to WiFi and fixing the DNS
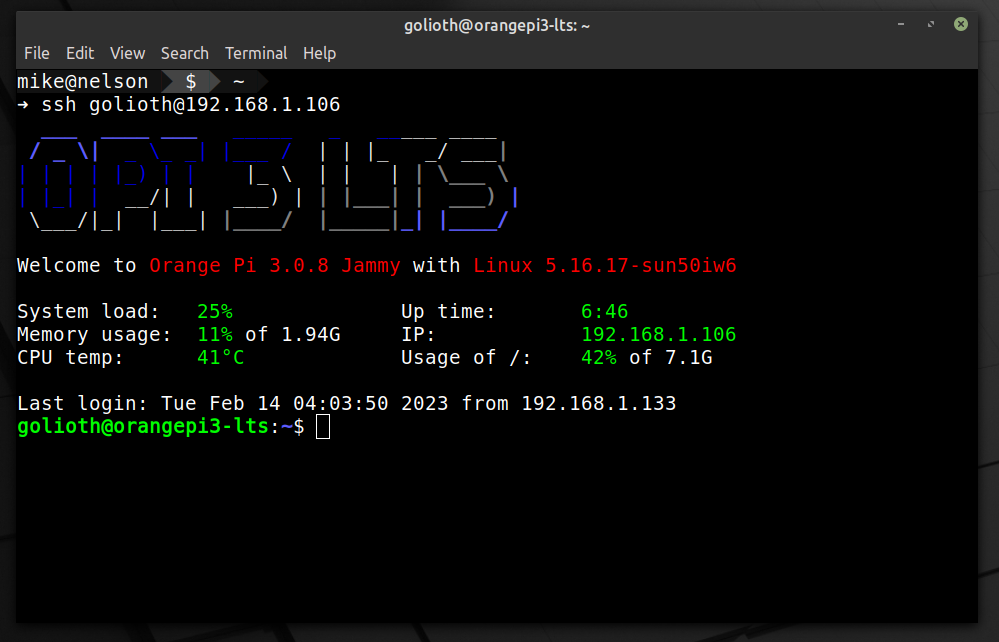
At this point Linux is installed and working on the Orange Pi. You can boot the board and log in with root / orangepi . If you are using an Ethernet connection you likely already have internet working, but I only wanted to use WiFi. Let’s step through the process of setting that up.
- Add WiFi to the network interfaces
$ sudo nano /etc/network/interfaces #Add the following to the bottom of this file: auto wlan0 iface wlan0 inet dhcp wpa-ssid your-wifi-ssid wpa-psk your-wifi-password $ sudo nano /etc/resolv.conf #Add the folling to the bottom of this file: search domain.name nameserver 8.8.8.8 nameserver 1.1.1.1 nameserver 1.0.0.1 Wrapping Up
The Orange Pi is now running from the onboard eMMC, it’s connected to your WiFi network, and it’s able to use a DNS server for domain name lookup. There is still some work to do. I recommend you add a public key for logging in over SSH and disable password-based authentication. But that’s a post for another day.