OrangePi-Lite2 opens WiFi hotspots
OrangePi-Lite2 wants to turn on WiFi hotspot mode, you need 2 tools Hostapd and ISC-DHCP-Server
Hostapd can open the WiFi hotspot, let the surrounding equipment
ISC-DHCP-Server can provide DHCP services to automatically assign an IP address to a device
Because OranGepi only has a wireless network card, it can only be 2 choices as WiFi hotspots and through WiFi Internet access. Therefore, we need to pass other WiFi hotspots, connect to the Internet, and install the required software
The detailed process of specific connections can be seen in this article https://blog.csdn.net/goodboy31985/Article/details/112305628
Here is just to write down commands
After connecting the USB to TTL, enter the following command via SCREEN
nmcli dev wifi connect wifi_name password wifi_passwd WiFi_name replaces the WiFi name
WiFi_passwd replaces the WiFi password
After seeing successful connection, install the software required by the APT
apt install hostapd apt install isc-dhcp-server Configuration can be configured after installation is complete
Configure Hostapd to open WiFi hotspots
Configuration /etc/hostapd.conf
Modify the file content to the following
# # armbian hostapd configuration example # # nl80211 mode # ssid=ARMBIAN interface=wlan0 hw_mode=g channel=5 #bridge=br0 driver=nl80211 logger_syslog=0 logger_syslog_level=0 wmm_enabled=1 wpa=2 preamble=1 wpa_psk=66eb31d2b48d19ba216f2e50c6831ee11be98e2fa3a8075e30b866f4a5ccda27 wpa_passphrase=12345678 wpa_key_mgmt=WPA-PSK wpa_pairwise=TKIP rsn_pairwise=CCMP auth_algs=1 macaddr_acl=0 ### IEEE 802.11n #ieee80211n=1 #ht_capab= #country_code=US #ieee80211d=1 ### IEEE 802.11n ### IEEE 802.11a #hw_mode=a ### IEEE 802.11a ### IEEE 802.11ac #ieee80211ac=1 #vht_capab=[MAX-MPDU-11454][SHORT-GI-80][TX-STBC-2BY1][RX-STBC-1][MAX-A-MPDU-LEN-EXP3] #vht_oper_chwidth=1 #vht_oper_centr_freq_seg0_idx=42 ### IEEE 802.11ac # controlling enabled ctrl_interface=/var/run/hostapd ctrl_interface_group=0 According to the system, the content of the file may vary, but the main one is
SSID = Armbian # WiFi name
Interface = wlan0 # network card device
WPA_PASSPHRASE = 12345678 #WIFI password
Note that this is needed to comment away # bridge = BR0
Save the modified content
Configuration / etc / default / hostapd
Remove the comment of this line in the file
DAEMON_CONF="/etc/hostapd.conf" Because WiFi hotspots and WiFi Internet access can only be 2 selected. If this time Lite2 WiFi is the state of the Internet, you need to close the original WiFi connection, by the following command
nmcli dev disconnect wlan0 Turn off the WiFi connection, check the device status by command
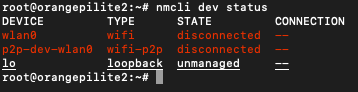
WLAN0 is in the state of disconnection
After confirming that WiFi has been disconnected, use the command
sudo service hostapd stop sudo service hostapd start Start after the Hostapd service, then you can see the WiFi hotspots provided by the mobile phone and computer search, enter the password in normal case, but it is already connected, but after connecting, it will not automatically assign IP.
Configure ISC-DHCP-Server Provide DHCP
Configuration / etc / default / isc-dhcp-server
Set interfaces «wlan0»
Different system versions may see two fields with IPv4 IPv6, all set to wlan0
Configuration /etc/dhcp/dhcpd.conf
Note out below the content
# option definitions common to all supported networks… #option domain-name “example.org”; #option domain-name-servers ns1.example.org, ns2.example.org; And add the following on the end of the file
subnet 192.168.0.0 netmask 255.255.255.0
Set WLAN0 itself IP address
ISC-DHCP-ServerD service, you must have a WLAN0 address and the DHCP server assigning an address in the same network segment, you can run, use the following command to specify an IP address to wlan0
Use the following command to restart the ISC-DHCP-Server service
service isc-dhcp-server restart Restart the hostapd service
sudo service hostapd stop sudo service hostapd start Search for WiFi signals, connect, you can automatically assign an IP address of an intranet.
WiFi hotspots and online two choices
Turn off WiFi connection to open WiFi hotspots
nmcli dev disconnect wlan0 sudo service hostapd stop sudo service hostapd start ifconfig wlan0 192.168.0.1 service isc-dhcp-server restart Turn off WiFi hotspot to open WiFi connection
sudo service hostapd stop nmcli dev connect wlan0 AP6275P PCIe NIC creates WIFI hotspot via create ap
Config dir: /tmp/create_ap.wlan0.conf.fPItFUJ2 PID: 3831
Network Manager found, set ap0 as unmanaged device. DONE
Creating a virtual WiFi interface. ap0 created.
Sharing Internet using method: nat
hostapd command-line interface: hostapd_cli -p
/tmp/create_ap.wlan0.conf.fPItFUJ2/hostapd_ctrl
ap0: interface state UNINITIALIZED->ENABLED
p0: AP-ENABLED
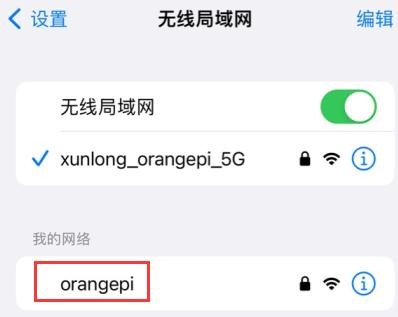
3) Take out the mobile phone at this time, in the searched WIFI list, you can find the WIFI hotspot named orangepi created by the development board, and then click orangepi to connect to the hotspot, the password is the orangepi set above
4) After the connection is successful, the display is as shown in the figure below

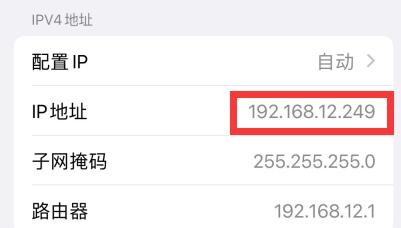
5) In NAT mode, the wireless device connected to the hotspot of the development board requests an IP address from the DHCP service of the development board, so there will be two different network segments, for example, the IP of the development board is 192.168.1.X
By default, the DHCP service of the development board will assign an IP address of 192.168.12.0/24 to the device connected to the hotspot. At this time, click on the connected WIFI hotspot orangepi, and then you can see that the IP address of the mobile phone is 192.168.12.X

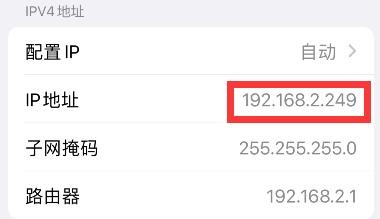
6) If you want to specify a different network segment for the connected device, you can specify it through the -g parameter, such as specifying the network segment of the access point AP through the -g parameter as 192.168.2.1
| orangepi@orangepi5:~$ sudo create_ap -m nat wlan0 eth0 orangepi orangepi -g 192.168.2.1 |
At this time, after connecting to the hotspot through the mobile phone, click the connected WIFI hotspot orangepi, and then you can see that the IP address of the mobile phone is 192.168.2.X
7) If the —freq-band parameter is not specified, the hotspot created by default is in the 2.4G frequency band. If you want to create a hotspot in the 5G frequency band, you can specify it through the —freq-band 5 parameter. The specific command is as follows
| orangepi@orangepi:~$ sudo create_ap -m nat wlan0 eth0 orangepi orangepi —freq-band 5 |
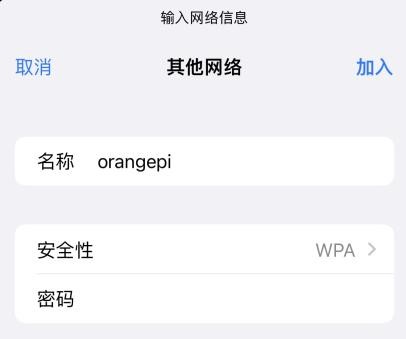
8) If you need to hide the SSID, you can specify the —hidden parameter, the specific command is as follows
| orangepi@orangepi:~$ sudo create_ap -m nat wlan0 eth0 orangepi orangepi —hidden |
At this time, the mobile phone cannot search for the WIFI hotspot. You need to manually specify the name of the WIFI hotspot and enter the password to connect to the WIFI hotspot
2.create_ap method to create WIFI hotspot in bridge mode
1) Enter the following command to create a WIFI hotspot named orangepi and password orangepi in bridge mode
| orangepi@orangepi:~$ sudo create_ap -m bridge wlan0 eth0 orangepi orangepi |
2) If the following information is output, it means that the WIFI hotspot is created successfully
[sudo] password for orangepi:
Config dir: /tmp/create_ap.wlan0.conf.fg9U5Xgt
PID: 3141
Network Manager found, set ap0 as unmanaged device. DONE
Creating a virtual WiFi interface. ap0 created.
Sharing Internet using method: bridge
Create a bridge interface. br0 created.
hostapd command-line interface: hostapd_cli -p
/tmp/create_ap.wlan0.conf.fg9U5Xgt/hostapd_ctrl
ap0: interface state UNINITIALIZED->ENABLED
ap0: AP-ENABLED
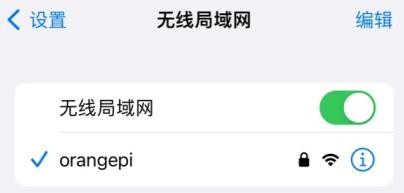
3) Take out the mobile phone at this time, and you can find the WIFI hotspot named orangepi created by the development board in the searched WIFI list, and then you can click orangepi to connect to the hotspot, and the password is the orangepi set above

4) After the connection is successful, the display is as shown in the figure below

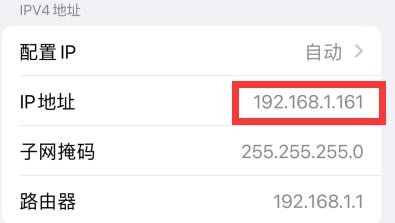
5) In bridge mode, the wireless device connected to the hotspot of the development board also requests an IP address from the DHCP service of the main router (the router connected to the development board), for example, the IP of the development board is 192.168.1.X
The IP of the device connected to the WIFI hotspot is also assigned by the main router, so the mobile phone connected to the WIFI hotspot and the development board are in the same network segment. At this time, click on the connected WIFI hotspot orangepi, and then you can see the IP address of the mobile phone Also 192.168.1.X

6) If the —freq-band parameter is not specified, the hotspot created by default is in the 2.4G frequency band. If you want to create a hotspot in the 5G frequency band, you can specify the —freq-band 5 parameter. The specific command is as follows
| orangepi@orangepi:~$ sudo create_ap -m bridge wlan0 eth0 orangepi orangepi —freq-band 5 |
7) If you need to hide the SSID, you can specify the —hidden parameter, the specific command is as follows
| orangepi@orangepi:~$ sudo create_ap -m bridge wlan0 eth0 orangepi orangepi —hidden |
At this time, the mobile phone cannot search for the WIFI hotspot. You need to manually specify the name of the WIFI hotspot and enter the password to connect to the WIFI hotspot.
Точка доступа на Orange Pi c выходом в интернет через Tor
Рассмотрим как можно собрать беспроводную точку доступа (Wi-Fi) на Orange Pi c выходом в интернет через Tor. Для этого воспользуюсь апельсинкой серии PC, Micro SD картой памяти объем которой в четыре гига будет достаточен, и USB-ишным Wi-Fi адаптером от производителя TP-Link. Сразу хочу заметить, что не каждый может заработать из коробки в качестве точки доступа. Также понадобится источник питания на 5V 2A.
Далее остается запись на SD-ешку операционной системы Armbian с помощью программы Etcher. Затем установив карту памяти в апельсинку и подсоединив все необходимые сопутствующие элементы, подключение по LAN-кабелю к устройству раздающему интернет следует определить IP-адрес одноплатника с помощью сетевого сканера.
Последующие действия заключаются в установке соединения с помощью программы putty, по протоколу SSH к плате, где на первом этапе авторизации нужно ввести логин root, а пароль 1234. Затем пройти стандартные этапы конфигурации. По окончании которых желательно запустить команду — apt-get update, потом apt-get upgrade, что позволит обновить репозитории пакетов и установить их актуальные версии.
Выполнив подготовку одноплатника с помощью утилиты
Прежде, настроим беспроводную точку доступа. В псевдографическом режиме переходим в Network и выбираем hotspot. На следующем шаге указываю беспроводную сетевушку, имя которой можно узнать с помощью команды ifconfig .
Затем идет инсталляция пакетов и настройка. По окончании следует выбрать сетевой интерфейс, по которому приходит интернет.
Далее вновь происходиn установка и перезапуск сетевой службы. По завершении сообщается, что раздача интернета осуществляется по беспроводной сети, где имя точки доступа Armbian.
Узнать ее пароль можно перейдя снова в hotspot. На следующем этапе выбираем Edit и указываем интерфейс, (в целом я не заметил разницы между ними). Из имеющихся вариантов захожу в базовую конфигурацию.
Тут можно видеть имя точки доступа, пароль и канал, которые при необходимости можно изменить. Проверку ее работу выполню на iPhone-е. Установив соединение можно видеть, что доступ к интернету имеется.
Выйдя из псевдографического режима в интерфейсе командной строки ввожу представленную команду
тем самым устанавливаю тор. Далее с помощью текстового редактора nano открываю файл torrc расположенный по указанному пути.
Здесь вставляю несколько строчек с приведенной информацией.
Log notice file /var/log/tor/notices.log
Потом сочетанием клавиш Ctrl+X в появившейся в низу строке ввожу Y и таким образом сохраняю внесенные изменения и выхожу. По мимо этого требуется выполнить настройки в iptables, для этого в каталоге /etc открываю приведенный файл.
# nano /etc/iptables.ipv4.nat
Тут в разделе NAT вставляю еще три заготовленных правила, после чего сохраняю внесенную информацию и закрываю конфигурационный файл.
-A PREROUTING -i wlxd03745eea520 -p tcp —dport 22 -j REDIRECT —to-ports 22
-A PREROUTING -i wlxd03745eea520 -p udp —dport 53 -j REDIRECT —to-ports 53
-A PREROUTING -i wlxd03745eea520 -p tcp —syn -j REDIRECT —to-ports 9040
Наконец запускаю тор прописав данную команду:
А также еще парочку команд, позволяющих сделать его доступным и запускать во время загрузки.
# systemctl unmask tor
# systemctl enable tor
Произведя указанные настройки рекомендую перезапустить апельсинку. По возобновлении ее работы посмотрим как изменился доступ в интернет на смартфоне. В целом доступ к сети имеется и если посмотреть информацию на ресурсе 2ip, то как адрес, так и место положение не те которые у меня в действительности.