- 3 Features of OS X Mavericks Linux Already Offers
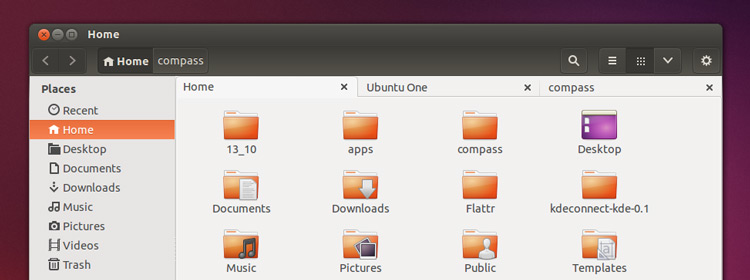
- Tabbed File Manager
- Interactive Notifications
- App Auto Updating
- Os x maverick linux
- Русские Блоги
- Запуск OS X Mavericks на QEMU и KVM [100% переведено]
- Create Mavericks USB from linux
- Create Mavericks USB from linux
- Requirement :-
- Terminal Command to install package:-
- How do you install and use a Linux partition on Mavericks?
- 3 Answers 3
3 Features of OS X Mavericks Linux Already Offers
As upgrades go, Mavericks look like it’ll be bringing some neat new features to the desktop – including new iBooks and Maps applications, an “App Nap” feature that improves performance, and some much-needed work on multi-monitor support.
But not everything set to arrive is unique. Here are three features that may be new to OS X users, but are pretty old-hat to those of us who use Linux…
Tabbed File Manager
Mavericks furnishes Finder, the default file manager on OS X, with a feature Apple fans have been demanding for many, many years: tabs.
Yes. For an operating system that often describes itself as “the world’s most advanced”, it has only just given users the ability to open several different folders in the same window.
Nautilus, the default file manager in Ubuntu, has supported tabbed browsing since 2008. And, just like the implementation in Mavericks, each tab is able to have its view setting configured independently.
Interactive Notifications
While Ubuntu may have added desktop notifications a good few years before Mac OS X (which got them with 2012’s release of Mountain Lion) it’s fair to say that theirs are, arguably, more featured – they can even dismiss them! 😉
For Mavericks Apple are adding even more functionality. Desktop alerts now support “actions” – for example, users can reply to an instant message, ‘answer’ or ‘reject’ a Facetime call, or delete an e-mail right from the notification bubble itself.
While regular Ubuntu doesn’t offer these handy ‘snap decisions’ (though a similar feature is planned for Unity 8), interactive notifications are already offered in GNOME Shell.

App Auto Updating
Apple are adding auto-updating to apps in Mavericks, saving users having to manually check and upgrade themselves. An off switch will be available for those who prefer to take care of updates by hand.
Ubuntu offers something similar: security updates can be set to auto-download and install, hands-free. Just head to the Settings section of the Software Updater tool and set Security Updates to ‘Download & Install Automatically’.
For a more comprehensive auto-update solution a packaged called ‘unattended-upgrades‘ can be configured, though doing this does require some tech know-how.
Home / List / 3 Features of OS X Mavericks Linux Already Offers
Os x maverick linux
Created on October 8, 2014 .
For a while now, I’ve been trying to get OSX running inside a VM on my Debian machine. I myself own a Macbook pro and a Mac Mini, but I still would like access on my Debian desktop to a Mac environment, mainly for browser & Xcode testing. I’ve recently been struggling getting a system going in Virtualbox on Debian Wheezy, and I’ve just managed to get everything working.
I followed this article on the MacBreaker site, which explains the process in very good detail. After obtaining an image and following the installation instructions to the letter, I was still left without internet access or any devices in the network settings. I tried reinstalling the entire system several times to try and combat this issue, but to no avail.
If I’d just spent some time and read the comments section, I would have noticed Rote Adler‘s comment:
I am very glad to announce that I have this issue fixed by changing the network adapter from Intel PRO/1000 T Server (82543GC) to Intel PRO/1000 MT Server (82545EM)
I shut down the machine, changed the network adapter to the Intel PRO/1000 MT Server (82545EM) adapter and booted up. I instantly had working internet. Below is a screenshot of my network settings in Virtualbox:

My recommendation, if you’re attempting to install Mavericks in a VM, is to follow the MacBreaker instructions and then update the network adapter like I’ve mentioned here.
By using this site, you agree that you have read and understand its Privacy Policy.
Русские Блоги
Запуск OS X Mavericks на QEMU и KVM [100% переведено]
Сегодня OS X виртуализация является очень простой задачей, так как хост OS X полностью поддерживает VMware и VirtualBox. Но какова ситуация в области виртуализации на голый металл и QEMU? Под Linux? В конце концов, я полностью получил Mavericks на QEMU (не было никакого дополнительного внутреннего ядра к выставке (!)), Но это не так просто.
штатный сотрудник
Многие из них работают по этому вопросу объясняется Габриэль Л. Somlo, он закончил начальную работу этого вопроса, но я не могу получить любую чистую загрузку установки с его руководства. Так что я могу только отладить сам.
Yun в OS X. Это проект для развлечения, чтобы увидеть, если я могу получить виртуализировать OS X на частном сервере, и я добьюсь успеха. Обратите внимание, что это используется только для учебных целей и не рекомендуется — нет никакой гарантии стабильности, и может привести к нарушению окончательного лицензионного соглашения Apple.
Для того, чтобы приготовить что-нибудь
Для того, чтобы завершить установку, вам необходимо сделать следующее:
- Может работать KVM машину
- Bash Shell Базовые знания
- Маверикс .iso (порожденный этим сценарием оболочки)
- Горный лев .iso (порожденный этим сценарием оболочки)
- git
- Строить-Essential (GCC, Make, заголовки ядра IASL, Linux)
Вышеприведенные два скрипты одинаковы, это относится и к двум версиям OS X.
Установка KVM с поддержкой OS X
Прежде всего, необходимо загрузить последнюю версию кода KVM со склада Git (это необходимо, так как KVM в АТФ или YUM склад не имеет патч OS X). Кроме того, необходимо KVM-KMOD код в хранилище Git, вы можете получить и построить их с помощью следующей команды.
Установите последнюю QEMU с поддержкой OS X
Мы должны загрузить последнюю версию и ХОС X патч со склада Git в QEMU и Seabios.
Хамелеон Bootloader загружается в инсталлятор и OS X
Вы можете установить Хамелеон на диск после установки OS X, но это удобно, мы можем послать двоичный файл QEMU для запуска Хамелеона.
Скачать этот бинарный файл и поместить его в том же каталоге, что и папка только что скачали.
Установить Mountain Lion
Перед тем, как установить индивидуалист, мы должны установить Mountain Lion, а затем обновить (это потому, что непосредственно установленный Маверикс заставит QEMU быть пойманные).
Теперь убедитесь, что ваш горный лев и Mavericks .iso игровая файлы находятся в том же каталоге, начиная с этого момента, я буду называть их Mountainlion.iso и Mavericks.iso.
Теперь нам нужно создать пустой файл , чтобы установить OS X (вы можете использовать DD , чтобы скопировать его в LVM или раздела, но , к сожалению, когда я использовал, я не начал. Установщик).
qemu-img create -f qcow2 osx.img 30G Мы должны использовать следующую команду для запуска этого клиента:
Возможно, вам потребуется ввести ключ, который может быть получен в компьютере яблочного.
Вам нужно заменить ./share/qemu/bios-mac.bin пути к собственному пути (относительно текущего пути, это может быть в одном ./share или ./usr/share).
Это повернет на сессии VNC на локальном хосте: 5901, который может быть подключена к сессии и начать установщик!
-Smp здесь определяет количество ядер, которые могут быть использованы в клиенте. Я поставил его на 4 и работают очень хорошо. Тем не менее, просто использовать ядро, чтобы сделать OS X работает очень хорошо.
Установка OS X нормально, а затем продолжается в следующем разделе.
Обновление до Mavericks
Этот шаг и выше, очень нравится, открыть тот же клиент с помощью следующей команды:
В хамелеона, убедитесь, чтобы начать с «OS X Base System» (ваш файл .iso) вместо жесткого диска. Затем, в том же разделе, в нормальном режиме, вы не должны форматировать раздел.
После этого шага, у вас есть Mavericks, что вы можете работать!
Нет кекстов?
Это полностью собственная система, не требует никаких изменений в Kext, или даже не fakesmc. Я не использовал FakeSMC для тестирования, но она должна работать правильно.
Теперь драйвер QEMU сети по умолчанию карты не является хорошим, то рекомендуется использовать Virtio. Вы можете скачать его следующими способами:
Затем добавьте следующую команду в команду уже упоминалось выше, запустить клиент, а затем установить файл .pkg из смонтированного FAT диск, а затем перезапустить, сетевая карта может работать нормально!
Create Mavericks USB from linux
Hello Guys we are back with new tutorial which is the good news for linux user who wanna install Apple’s Greatest Mac OS X on there respective system,Making a USB Installer is very difficult task to do when we don’t have Mac system or any Hackintosh system but now it is easy Making Maverick Installer in Ubuntu or any other Linux system.
Create Mavericks USB from linux
Requirement :-
Terminal Command to install package:-
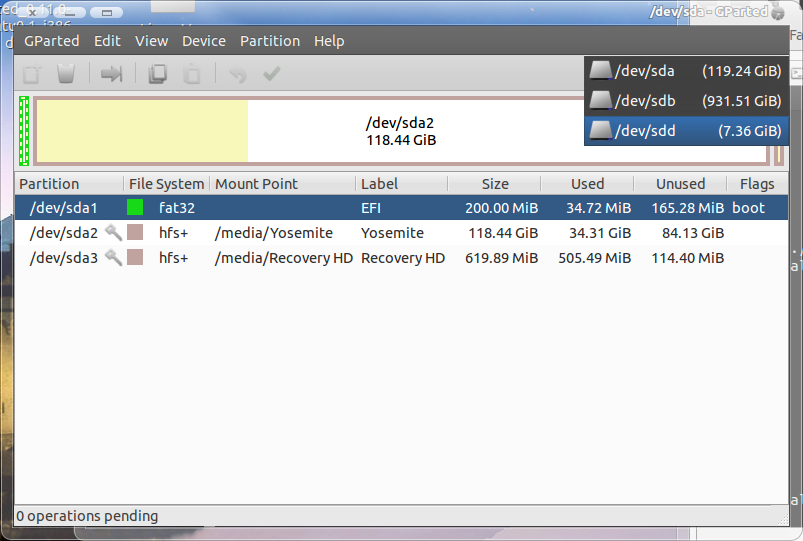
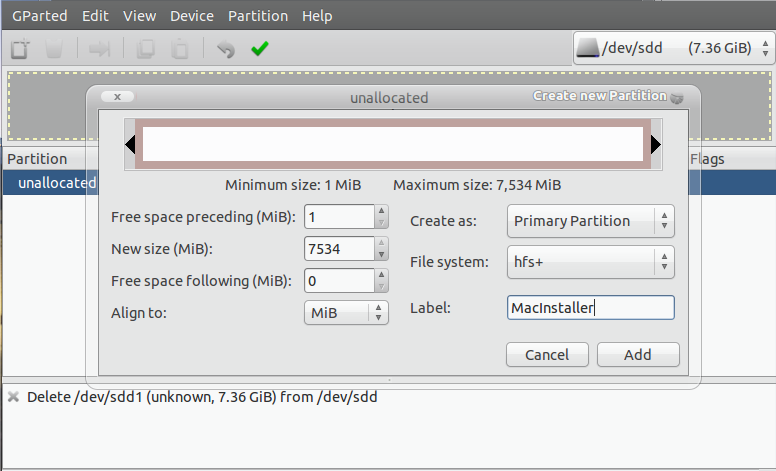
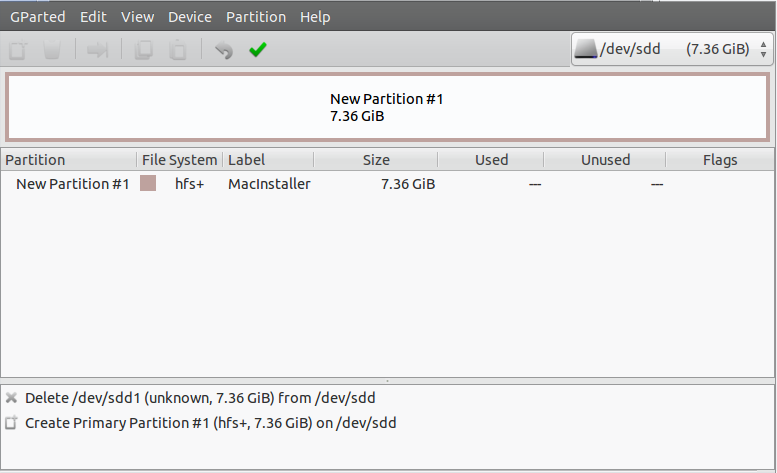
Before we going to Restore Mavericks App on USB we need USB in HFS+ format for that we have to format our USB Flash drive from Gpart

Boot your Linux System and Make a folder named as Linux-Mac on desktop which contain 5 folders named as 0,1,2,3,4,5 and add Mavericks.app which u downloaded from App Store.
# cp ~/Desktop/Linux-Mac/Install OS X Mavericks.app/Contents/SharedSupport/InstallESD.dmg ~/Desktop/Linux-Mac/0
# sudo 7z x -so /media/MacInstaller/System/Installation/Packages/BaseSystemBinaries.pkg Payload | bunzip2 | cpio -i
Step 3=Making USB Flash Drive Bootable
Create a folder called install on desktop and put all boot binary file inside the folder, including Extra folder and important kext for Extra folder
mount | grep MacInstaller # cd ~/Desktop/Install # sudo dd bs=446 count=1 if=boot0 of=/dev/sdb # sudo dd if=boot1h of=/dev/sdb1 # sudo cp boot /media/MacInstaller # sudo cp -r Extra /media/MacInstaller
Step 4=Unmount directory
Step 5= Download Necessary Kext
NullPowerCPUPowerManagement.Kext,
VoodooPS2Controller.Kext
These are the important kext which allow you to reach the installer screen without of this you will never get the Installation screen and this kext you can download it from Tonymacx86 Once you download the kext simply add it to USB( MacInstaller )/Extra/Extensions
Once you copy the kext add Org.Chameleon.Boot.Plist USB( MacInstaller )/Extra/
Quick Note:- (Directory is very important if you type wrong you won’t able to make USB) This guide is tested on Cylon Linux which is basically Distributed from Ubuntu and If you successfully made the USB and still you unable to boot USB or you get error like Boot0 then use following step
How do you install and use a Linux partition on Mavericks?
As a just-for-fun type of experiment, I was wanting to install Linux on an external drive that I own and boot it up on my 2007 iMac desktop. I know there are a plethora of guides out there on how to do this, but I have not encountered one yet about if it remains the same on 10.9. I have read, however, that the software that lets you dual-boot Mac OS X and Linux is broken on Mavericks, which is where my reluctance comes from. The primary reference that I looked at for how to install Linux onto Mac OS X (on a separate partition) was written for Tiger (see here; MacLife magazine), so I assume there are some things to be updated in that respect. Furthermore, the boot menu that I have heard has broken on Mavericks is rEFIt. I noticed that it is no longer maintained, and there is the project known as rEFInd that is maintained. So far, I have tried to use an install DVD to boot up Fedora on my machine, but I can’t get my system to recognize the Fedora DVD in any way. I have tried holding down the ‘C’ key and the ‘option’ key to try to get it to recognize it, but I never see it outside of my desktop when I’m logged in on Mac OS X. All I have put on the disc is the ISO of Fedora.  Additionally, after this, I have tried putting the necessary files for installation on an external drive partition that I want to install Fedora on full-time; however, I am also having issues with that as well. Neither rEFInd nor the system recognizes the hard drive as a bootable partition. I was starting to wonder if it might be because the drive is formatted as an exFAT partition?
 I just need to know if that there is currently a safe way to install Linux on an external hard drive for use on my computer. Thanks!
3 Answers 3
This is getting increasingly harder over time. Instead of creating a bootable Linux partition, I find it much easier to simply install virtualBox and create a Linux virtual machine instead.
@jflory7 Performance is definitely lower than running linux directly, depending on how you set it up, how much memory you have, and if you are also running other apps in OS X at the same time. My feeling is that the performance is at ~70%, which is good enough for most purposes. If you are not doing intensive computations or gaming or image processing. Performance lost is not something to brag about, but you get the added bonus of flexibility through having virtual machines. And as of today, this is the only option that I’ve got to actually work for Mavericks.
I have a 2009 mac mini with 2gb RAM. Supposedly the RAM isn’t upgradeable. With 2gb, there’s simply not enough room for both OSX and a VBox VM.