- TP-LINK CPE510 Outdoor Device Point to Point Configuration [Bridge]
- TP-Link CPE510 Outdoor Device Point to Point Configuration
- TP-LINK CPE510 300Mbps Outdoor Device Specification
- TP-Link CPE510 Hardware Specification
- TP-Link CPE510 Software Feature
- TP-Link CPE510 5GHz Outdoor device Bridge configuration
- TP-Link CPE510 5GHz Outdoor Device connection Diagram
- TP-Link CPE510 5GHz Outdoor device Login first time
- TP-Link CPE510 Outdoor Device Access Point Configuration
- TP-Link CPE510 Operation mode Change to Access Point
- TP-Link CPE510 300Mbps Outdoor Device LAN IP Change
- TP-link outdoor device Wireless configuration
- TP-Link CPE510 Wireless Access Point details
- TP-Link CPE510 5GHz Outdoor Device Client Mode Configuration
- TP-Link CPE510 Access Point to the Client device
- Conclusion
- Related Post
- Pharos Outdoor Access Points
TP-LINK CPE510 Outdoor Device Point to Point Configuration [Bridge]
TP-Link CPE220/CPE210 and CPE510 point to point configuration in the WDS bridge. All the models support the same TP-Link Pharos web interface so follow the post to know TP-Link CPE510 Outdoor Device Point to Point configuration.
TP-Link CPE510 Outdoor Device Point to Point Configuration
TP-Link CPE510 300Mbps outdoor wireless device for point to point bridge to connect two different location wirelessly. TP-Lin CPE510 having a variant with 2.4GHz band model is CPE210 for Wi-Fi and Wireless CPE purpose. The earlier post about CPE210 Access Point configuration and CPE210 Repeater mode Configuration already done. As the TPLink CPE510 and CPE210, both are the same pharos series software so this configuration also works for TP-Link CPE510 Outdoor Device Point to Point and CPE210 configuration. TP-Link CPE510 300Mbps wireless Outdoor device best for a distance 2KM to 3Km point to point connectivity for internet and CCTV purpose. If you are looking to connect your two different locations wirelessly than CPE510 can be a suitable outdoor device for you.
The best thing about CPE510 and CPE210 is it loaded with TP-LINK Pharos MAXtream TDMA (Time-Division-Multiple-Access) technology improves product performance in throughput, capacity and latency performance, ideal for PTMP applications. Before going to start the configuration part go through the basic and important key feature of TP-Link CPE510 300Mbps outdoor wireless device.
TP-LINK CPE510 300Mbps Outdoor Device Specification
TP-Link CPE510 is a cost-effective PTP and PTM solution device suitable for the internet as well as CCTV purpose. Hardware and software both specifications make the device best for performance and stability side.
TP-Link CPE510 Hardware Specification
CPU: Qualcomm Atheros Enterprise 560MHz CPU, MIPS 74Kc
RAM/FLASH: 64MB DDR2 RAM, 8MB Flash
Interface: 1 10/100Mbps Shielded Ethernet Port (Passive PoE in)
1 Grounding Terminal: for lighting safety purposes.
1 Reset Button: used to hard reset device
Antenna: Built-in 13dBi 2×2 Dual-polarized Directional Antenna
Transmit Power: 23dBm/200mw (Adjustable power by 1dBm
PoE Adapter: 24VDC, 1.0A Max
TP-Link CPE510 Software Feature
Wireless Mode: Access Point, Client, WISP, Bridge, AP Router
Security: WPA/WPA2, WPA-PSK/WPA2-PSK (AES/TKIP) Encryption, 64/128/152-bit WEP Encryption
Selectable Channel Width: 5/10/20/40MHz
Automatic Channel Selection
Transmission Power Control
System Tools: Wireless Signal Quality Indicators:
Signal Strength/Noise/Transmit CCQ/CPU/Memory
Monitors: Throughput/Stations/Interfaces/ARP/Routes/WAN/DHCP
Spectrum Analyzer, Speed Test, Ping, Traceroute
TP-Link CPE510 5GHz Outdoor device Bridge configuration
To configure a bridge with CPE510 required pair of devices with the same 5GHz band. To connect two different sites with the bridge (Point to Point) concavity configuration will be Local site and remote site.
- Local site Device configuration as Access Point mode
- The remote Site device will as Client mode.
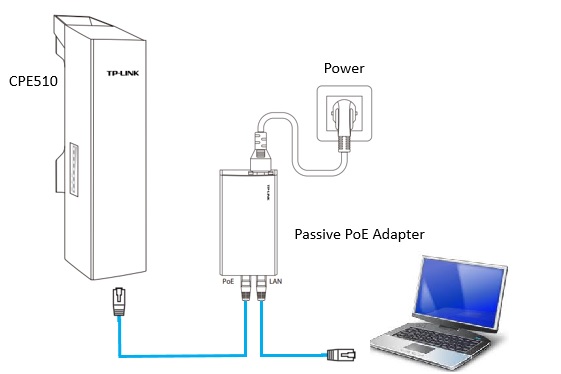
TP-Link CPE510 5GHz Outdoor Device connection Diagram
To configuration, any device required a physical connection of the device to PC/Laptop. Open your CPE510 box and take all accessories out from the box to connect physically.
1: Take your CPe510/CPE210 in hand remove the backside cover take the cat6 patch cord and connect to Device Ethernet port.
2: Now connect the Cat6 Patch cord other ends to PoE adapter PoE ports and take on more Cat6 patch cord and connect PoE adapter LAN port to PC/Laptop LAN port.
Connect PoE adapter power cable to the power socket and switch on the device.
PC/Laptop LAN IP Configuration
After physical connection PC/Laptop LAN IP Address should be in the same series of TP-Link CPE210/CPE510 default IP series.
TP-Link CPE510 Default IP Address – 192.168.0.254
See here how to configure PC/Laptop LAN IP Address
TP-Link CPE510 5GHz Outdoor device Login first time
After the physical connection and configuration part, you can access the CPE510 device to the laptop.
TP-Link default settings- IP- 192.168.0.254
Username-admin, password- admin
Open Internet browsers such as Firefox Mozilla, Google Chrome, Internet Explorer and type TP-Link default IP in the URL bar press enter button.
![]()
First Login requires to accept License Agreement.
Choose your language from the list.
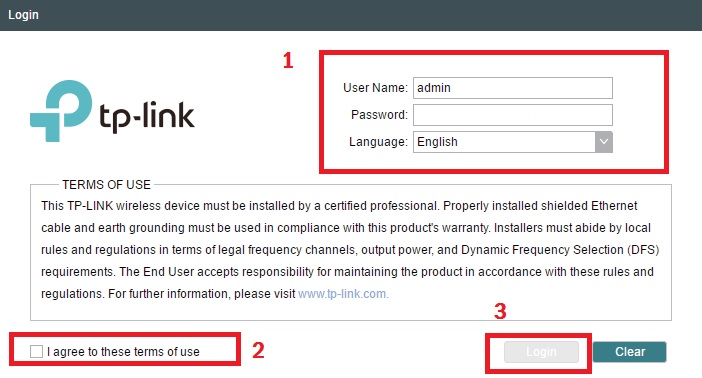
2: CheckBox to accept terms and conditions.
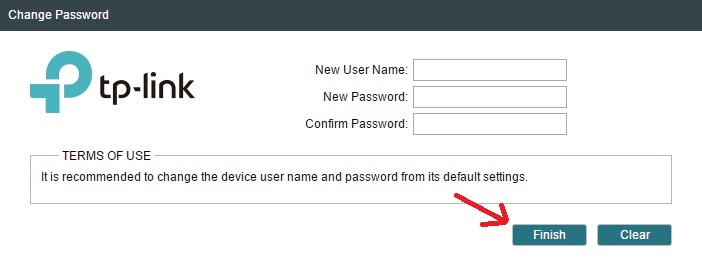
Change the default password and username on the first login.
New User Name: type the new username for your CPE510.
New Password: new password for your TP-Link CPE150
Confirm password: Confirm the new password
Press the Finish button to save settings.
TP-Link CPE510 Outdoor Device Access Point Configuration
To configuration of the point to point the first device will be used as Access Point mode.
In this tutorial, I used the quick setup configuration method to create point-to-point bridge connectivity.
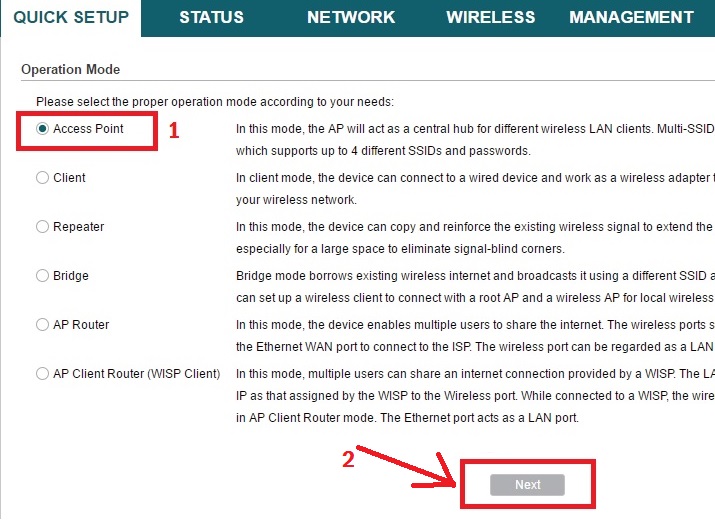
TP-Link CPE510 Operation mode Change to Access Point
The first step is to change the first device mode Access Point and click Next button.
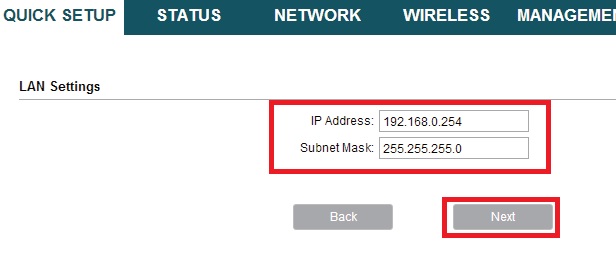
TP-Link CPE510 300Mbps Outdoor Device LAN IP Change
Quick setup next step is LAN settings. A bridge requires two devices and the default IP address is same for al devices. Change the default IP Address to keep protect your device from unauthorized access.
Change the IP Address and click the Next button
Note: after the finish, the wizard device will access with new changed IP Address.
TP-link outdoor device Wireless configuration
Next step to set the SSID and password to protect your wireless bridge.
- SSID- type your bridge name here
- Channel Width- use 20/40 to auto selection as per bandwidth load.
- Channel/Frequency- choose the frequency as per interference and legal as per your country telecom regulatory.
- Security- choose the password type for bridge security. PSK Password- type the password in the box (this password is required to connect remote device)
- Distance settings – set the total air distance of your both site.
- Maxtream- enable the feature to increase performance.
- Press the Next button.

TP-Link CPE510 Wireless Access Point details
Confirm all settings are configured correctly and press the finish button to save settings.
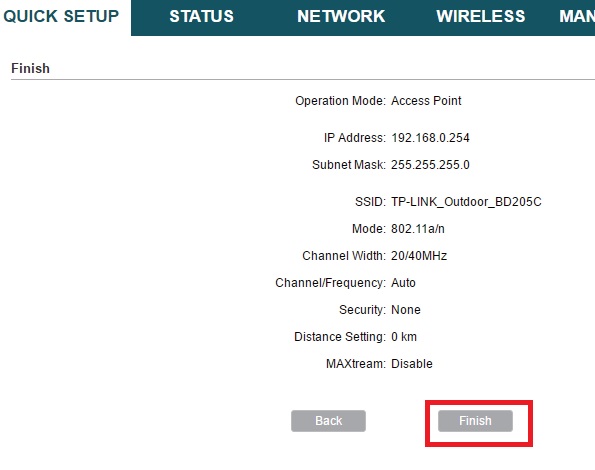
Access Point device configuration finish.
Now take the second device and connect the same as the above connection diagram follows for AP device.
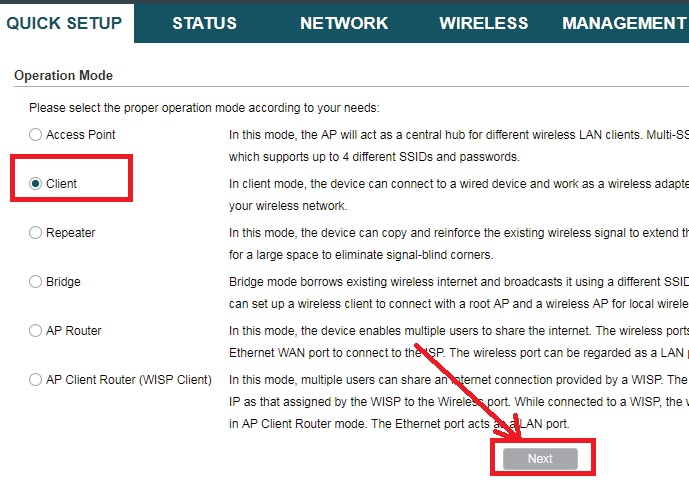
TP-Link CPE510 5GHz Outdoor Device Client Mode Configuration
Now connect the new device and login with the default IP Address as followed above steps.
The first step is to change the Mode to Client mode and press the next button.
Client Device LAN IP Change
Now change the Remote device IP Address to different IP.
Change the IP Address next to AP IP address. EXP- AP device IP 192.168.0.100 use client 192.168.0.101. (Easy to remember)

TP-Link CPE510 Access Point to the Client device
Now do the survey from the client device and find the Access Point device name to join the network.
1: Press Survey button
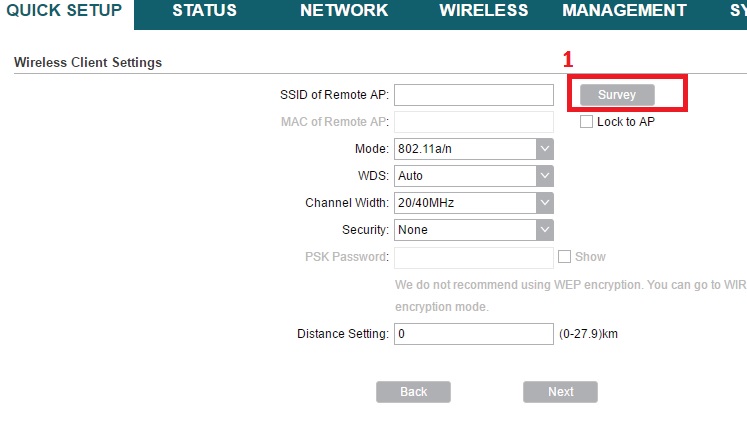
Find your AP device SSID name from the list.
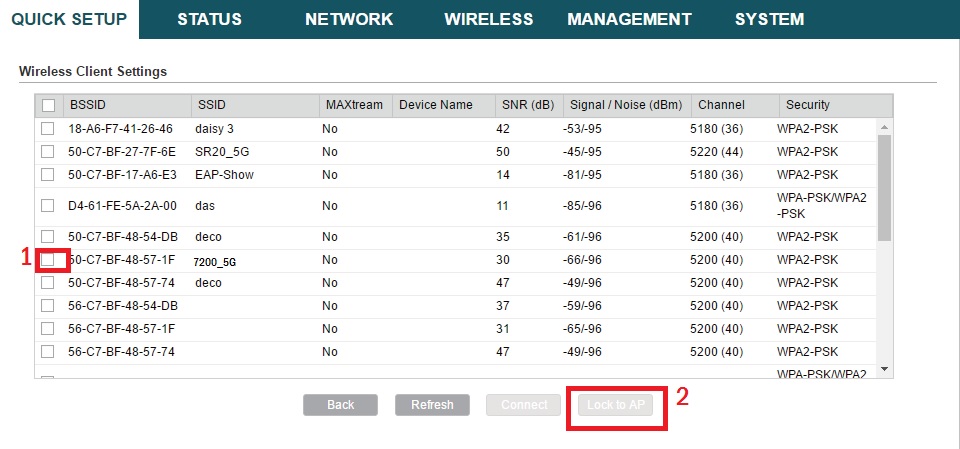
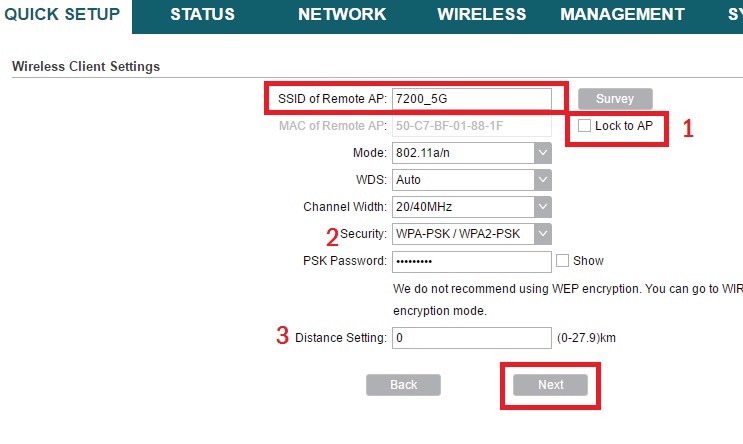
Confirm all the wireless detail of your AP device you have chosen the correct device.
- Lock to AP
- Security- type the Access Point Password in this box ( configured in AP device)
- Distance settings: type the air distance of the point to point link.
- Press the next button to save settings.
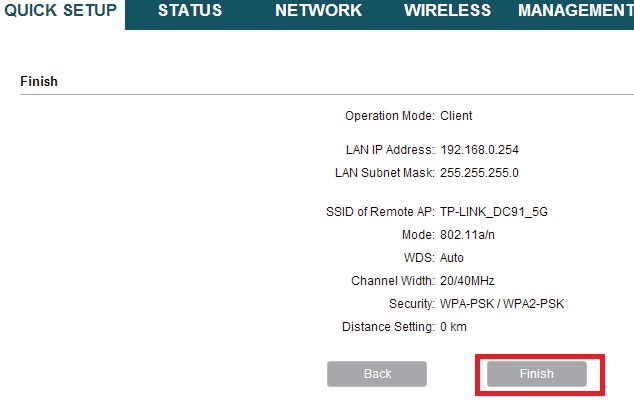
Check all settings and press the Finish button to apply settings.
After a few seconds devices will reboot and you will get the AP device to ping from the client device. Your Access point device all led will glow.
You can check connectivity signal status on the status page after login the device as shown below image.

Conclusion
Point-to-point connectivity is a fast way to connect two different location wirelessly without laying physical cable. TP-Link CPE510 is the best device for connecting two locations for internet or CCTV camera monitoring. In this post, you will get an easy configuration manual to configure your TP-Link CPE510 Outdoor Device Point to Point configuration.
Related Post
Pharos Outdoor Access Points

Subscribe TP-Link takes your privacy seriously. For further details on TP-Link’s privacy practices, see TP-Link’s Privacy Policy.
Be The First To Get Exclusive Deals & News
- Corporate Profile
- Contact Us
- Careers at TP-Link
- Privacy Policy
- Do Not Sell My Info
- News
- Blog
- Security Advisory
- Awards
- Partner Program
- Training & Certifications
- Deal Registration
Get products, events and services for your region.
To provide a better experience, we use cookies and similar tracking technologies to analyze traffic, personalize content and ads. By continuing to browse this website, you agree to our use of cookies and such technologies. Learn more Don’t show again
To provide a better experience, we use cookies and similar tracking technologies to analyze traffic, personalize content and ads. By continuing to browse this website, you agree to our use of cookies and such technologies. Learn more Don’t show again
These cookies are necessary for the website to function and cannot be deactivated in your systems.
accepted_local_switcher, tp_privacy_base, tp_privacy_marketing, tp_smb-select-product_scence, tp_smb-select-product_scenceSimple, tp_smb-select-product_userChoice, tp_smb-select-product_userChoiceSimple, tp_smb-select-product_userInfo, tp_smb-select-product_userInfoSimple, tp_top-banner, tp_popup-bottom, tp_popup-center, tp_popup-right-middle, tp_popup-right-bottom
__livechat, __lc2_cid, __lc2_cst, __lc_cid, __lc_cst, CASID
id, VISITOR_INFO1_LIVE, LOGIN_INFO, SIDCC, SAPISID, APISID, SSID, SID, YSC, __Secure-1PSID, __Secure-1PAPISID, __Secure-1PSIDCC, __Secure-3PSID, __Secure-3PAPISID, __Secure-3PSIDCC, 1P_JAR, AEC, NID, OTZ
Analysis and Marketing Cookies
Analysis cookies enable us to analyze your activities on our website in order to improve and adapt the functionality of our website.
The marketing cookies can be set through our website by our advertising partners in order to create a profile of your interests and to show you relevant advertisements on other websites.
Google Analytics & Google Tag Manager & Google Optimize