- Команда chown Linux
- Команда chown Linux
- 1. Синтаксис и опции
- 2. Использование chown
- Выводы
- How to manage Linux permissions for users, groups, and others
- Linux security
- Setting up a playground
- How do I create directories and files?
- How do I manage ownership and groups?
- How do I manage permissions?
- How do I use absolute mode?
- Great Linux resources
- How do I use symbolic mode?
- Special permissions and Access Control Lists
- Wrap up
Команда chown Linux
Основа философии Linux — все объекты операционной системы — это файлы, для предоставления доступа к тем или иным возможностям системы мы просто даем доступ пользователю к нужным файлам или убираем. Я более подробно рассказывал обо всех правах в статье права доступа к файлам в Linux, здесь же скажу только что у каждого файла есть три группы прав: для владельца, группы и всех остальных.
При создании файла ему тот пользователь, от имени которого он был создан становится его владельцем, а группой устанавливается основная группа владельца. Но владельца файла и группу можно менять, для этого используются команды chown и chgrp. В этой статье будет рассмотрена команда chown linux, а также основные примеры её использования.
Команда chown Linux
1. Синтаксис и опции
Синтаксис chown, как и других подобных команд linux очень прост:
$ chown пользователь опции /путь/к/файлу
В поле пользователь надо указать пользователя, которому мы хотим передать файл. Также можно указать через двоеточие группу, например, пользователь:группа. Тогда изменится не только пользователь, но и группа. Вот основные опции, которые могут вам понадобиться:
- -c, —changes — подробный вывод всех выполняемых изменений;
- -f, —silent, —quiet — минимум информации, скрыть сообщения об ошибках;
- —dereference — изменять права для файла к которому ведет символическая ссылка вместо самой ссылки (поведение по умолчанию);
- -h, —no-dereference — изменять права символических ссылок и не трогать файлы, к которым они ведут;
- —from — изменять пользователя только для тех файлов, владельцем которых является указанный пользователь и группа;
- -R, —recursive — рекурсивная обработка всех подкаталогов;
- -H — если передана символическая ссылка на директорию — перейти по ней;
- -L — переходить по всем символическим ссылкам на директории;
- -P — не переходить по символическим ссылкам на директории (по умолчанию).
Утилита имеет ещё несколько опций, но это самые основные и то большинство из них вам не понадобится. А теперь давайте посмотрим как пользоваться chown.
2. Использование chown
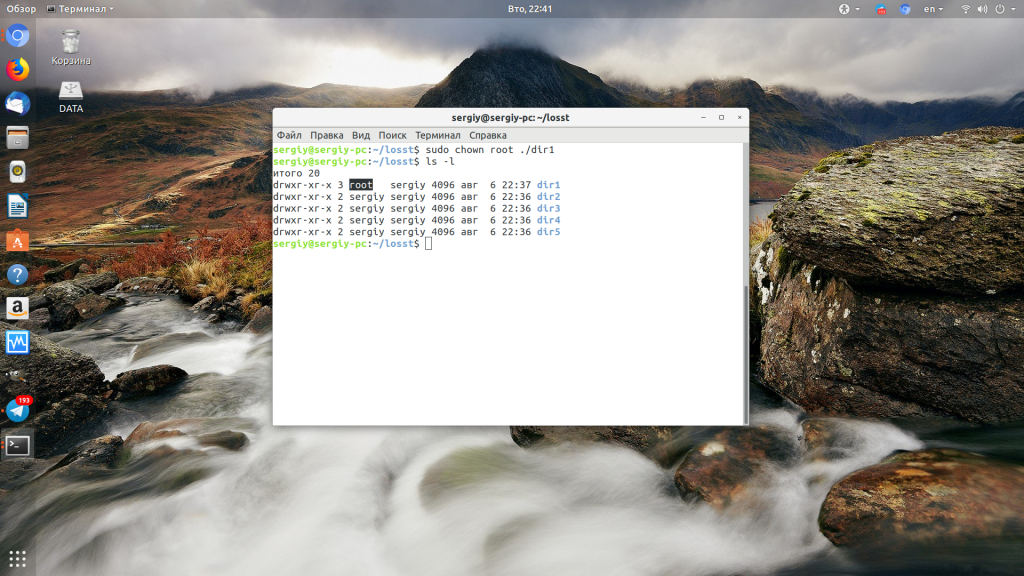
Например, у нас есть несколько папок dir и их владелец пользователь sergiy:

Давайте изменим владельца папки dir1 на root:
Если вы хотите поменять сразу владельца и группу каталога или файла запишите их через двоеточие, например, изменим пользователя и группу для каталога dir2 на root:

Если вы хотите чтобы изменения применялись не только к этому каталогу, но и ко всем его подкаталогам, добавьте опцию -R:
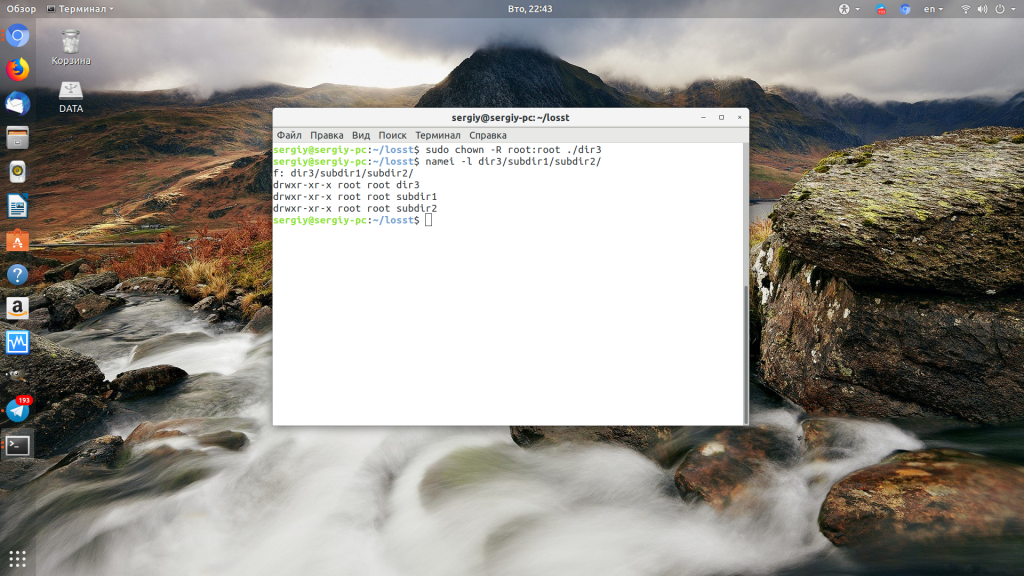
Дальше давайте изменим группу и владельца на www-data только для тех каталогов и файлов, у которых владелец и группа root в каталоге /dir3:
chown —from=root:root www-data:www-data -cR ./
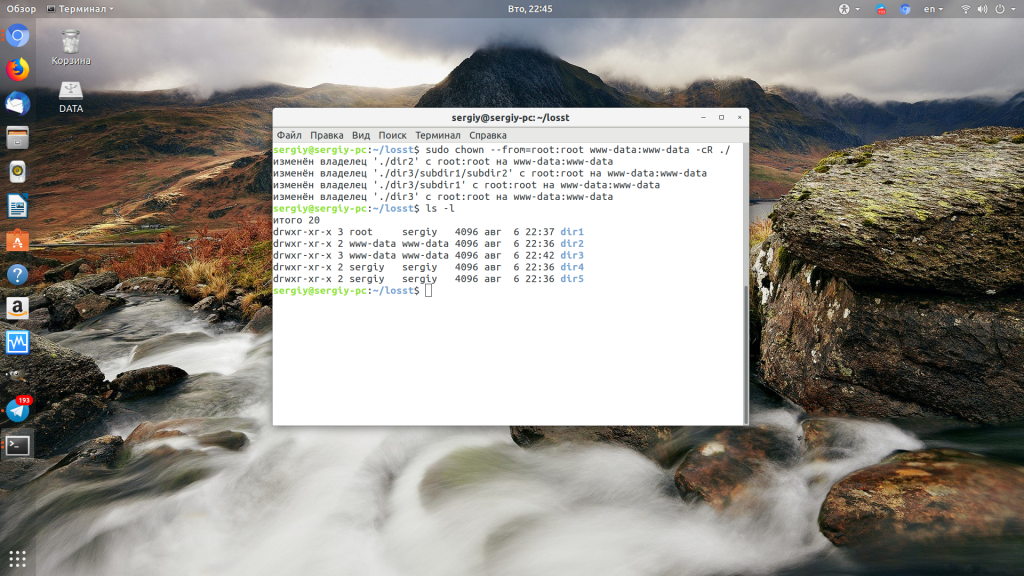
Для обращения к текущему каталогу используйте путь ./. Мы его использовали и выше. Далее указываем нужную группу с помощью опции —from и просим утилиту выводить изменения, которые она делает в файловой системе с помощью опции -c.
Выводы
Команда chown очень простая и позволяет только менять владельца и группу. Если вы хотите более подробно настроить права для владельца, группы и всех остальных, вам понадобится команда chmod. Права — довольно частая проблема при настройке работы различных программ, знание двух этих команд плюс ls и namei может помочь исправить много ошибок.
Обнаружили ошибку в тексте? Сообщите мне об этом. Выделите текст с ошибкой и нажмите Ctrl+Enter.
How to manage Linux permissions for users, groups, and others
How to manage permissions and ownership for users, groups, and all others to resources such as directories and files.

Managing access to resources is a fundamental task for sysadmins. This responsibility consists of three components: identities, resources, and permissions. This article covers several user, group, and file management commands to control access to resources. The article uses a «How do I…?» format, and it assumes you have a few resources to work with. Specifically, I cover the following topics:
- Creating directories and files
- Managing ownership and associated groups
- Setting permissions with absolute and symbolic modes
Linux security
Setting up a playground
I’ve been in IT for about 25 years, and most of that time was spent as a technical trainer. That means that the things that I write are usually structured as some sort of lab or other hands-on opportunity. It’s just how I cover material. With that in mind, I’ll assume you have a couple of identities and resources to experiment with as you read the rest of the article. You can use the following commands to set up a playground. It’s best to do this on a virtual machine rather than your personal Linux box, but these tasks are relatively harmless.
Create two new users and two new groups to work with. Note that you do not need to configure passwords for the users in this exercise, as you won’t log on with those accounts.
# useradd user01 # useradd user02 # groupadd groupA # groupadd groupBNote: You would use the passwd user01 command to set the user’s password.
[ Want to test your sysadmin skills? Take a skills assessment today. ]
In your home directory, create a new directory named playground :
Change into the ~/playground directory by using the cd command. You are ready to work with the commands and concepts below.
When you’ve completed the article and learned the techniques I’ve covered, delete the two user accounts, the groups, and the playground directory. Use rm -fR /playground , userdel user01 , and groupdel groupA to remove the resources.
How do I create directories and files?
Use the mkdir command to create directories. The touch command is one of many ways to create files.
How do I create a directory named Resources ?
How do I create a directory path (a series of directories that don’t yet exist)?
# mkdir -p Resources/data/2020dataNote: The goal here is to create the 2020data directory, but the given path’s data directory does not yet exist. The -p option creates parent directories as needed to complete the path.
How do I create a file named file1 ?
How do I create several files at once?
How do I manage ownership and groups?
In the playground directory, display the current owner and group associated with the Resources directory and the files.
How do I display permission, owners, and groups?
The ls -l command displays directory contents in long format. The long format contains both permissions and ownership. You can see that the user account that created the resources also owns those resources. The group association is also that user’s primary group.
How do I change the user/owner associated with file1 ?
How do I change the group associated with file1 ?
How do I change the owner and group at the same time for file2 ?
There is a specific chgrp command, but I prefer only to memorize one command ( chown ) and apply it to both functions (user and group associations) rather than chown for the user and then have to recall chgrp for the group.
How do I change the user/group for a directory and all of its contents?
# chown -R user01:groupA ResourcesThe above task provides a recursive configuration. Technically, recursive commands are repeated on each specified object. Effectively, recursive means «this and everything in it.» In the above example, you are configuring the related user/group for the Resources directory and everything in it. Without the -R option, you would only affect the Resources directory itself, but not its contents.
How do I manage permissions?
The change mode or chmod command sets permissions. The syntax is straight-forward:
chmod permissions resource-nameHere are two examples of manipulating permissions for file2 :
# chmod 740 file2 # chmod u=rwx,g=r,o-rwx file2But wait! Those appear to be radically different examples (they’re not, actually). What are all those letters and numbers?
We need to discuss absolute mode and symbolic mode.
How do I use absolute mode?
Absolute mode is one of two ways of specifying permissions. I’ve seen this mode referred to as octal or numeric mode, but the term I learned was absolute. That term also makes the most sense to me because it’s an absolute statement of the desired permissions. I always told my students that this seemed like the most complex of the two modes but is actually the simplest. Usually, they agreed.
Each access level (read, write, execute) has an octal value:
| Access level | Octal value |
| Read | 4 |
| Write | 2 |
| Execute | 1 |
Each identity (user, group, others) has a position:
| Identity | Position |
| User | First or left-most |
| Group | Middle |
| Others | Last or right-most |
Great Linux resources
The absolute mode syntax states the desired permissions from left to right.
How do I grant the user (owner) read, write, and execute, the group read-only, and all others no access to file2 by using absolute mode?
The three permissions values are associated with identities:
ugo
740
- The 7 is assigned to the user and is the sum of 4+2+1 or read+write+execute (full access)
- The 4 is assigned to the group and is the sum of 4+0+0 (read-only)
- The 0 is assigned to others and is the sum of 0+0+0 (no access)
In this example, the user has rwx, the group has r only, and all others have no access to file2 .
Let’s look at one more example.
How do I grant the user (owner) read and write, the group read-only, and all others read-only to file2 ?
- The user has 6 (read and write)
- The group has 4 (read-only)
- All others have 4 (read-only)
I find this easier because there are no calculations involved. I’m not concerned with adding or subtracting specific permissions based on the current settings. Instead, I say, «set the permissions to be this,» and that’s the end result I get. It’s an absolute statement.
How do I set permissions for the Resources directory and all of its contents by using absolute mode?
How do I use symbolic mode?
Symbolic mode uses more symbols, but the symbols are simpler to understand. That’s attractive to sysadmins that are new to standard Linux permissions.
Each access level has a symbol:
| Access level | Symbol |
| Read | r |
| Write | w |
| Execute | x |
Each identity has a symbol:
| Identity | Symbol |
| User | u |
| Group | g |
| Others | o |
There are also operators to manipulate the permissions:
| Task | Operator |
| Grant a level of access | + |
| Remove a level of access | — |
| Set a level of access | = |
The general chmod command syntax is the same:
command permissions directory/fileHow do I remove the read permissions from others for file2 by using symbolic mode?
This example removes ( — ) the read ( r ) permission from others ( o ) for file2 .
Here’s another simple example:
How do I grant the read and write permissions to the group for file2 ?
This one gives ( + ) read and write ( rw ) to the group ( g ) for file2 .
How do I set permissions for a directory and all of its contents by using symbolic mode?
# chmod -R o=rwx,g+rw,o-rwx ResourcesSpecial permissions and Access Control Lists

The above discussion covers standard Linux permissions—applying rwx to the user, group, and all others. Linux has far more flexibility, however. Special permissions permit users to run applications with other credentials, control the inheritance of group associations, and keep files from being changed accidentally. Check out this great article on special permissions.
Linux also has a way of enforcing different permissions for different users and groups. Access Control Lists (ACLs) permit sysadmins to define permissions for more than just one user and one group, which adds a great deal more flexibility to standard permissions. For example, user01 can be granted rw- to file1 , while user02 can be granted r— to file1 . Here is a great article on ACLs.
Wrap up
Creating resources, managing users, and setting permissions are fundamental tasks for Linux users. My goal was to provide a quick and easy guide based on common questions or tasks that we must all accomplish regularly. If you’re new to Linux, having a solid grasp of the eight commands discussed above will make your sysadmin life much easier.