Packages and Binaries:
GNU Parted is a program that allows you to create, destroy, resize, move, and copy disk partitions. This is useful for creating space for new operating systems, reorganizing disk usage, and copying data to new hard disks.
This package contains the static library and header files for libparted, which are really only of interest to parted developers.
Installed size: 950 KB
How to install: sudo apt install libparted-dev
- libblkid-dev
- libc6-dev
- libdevmapper-dev
- libparted-fs-resize0
- libparted2
- uuid-dev
libparted-fs-resize0
GNU Parted is a program that allows you to create, destroy, resize, move, and copy disk partitions. This is useful for creating space for new operating systems, reorganizing disk usage, and copying data to new hard disks.
This package contains the libparted-fs-resize shared library for resizing HFS+ and FAT file systems.
Installed size: 106 KB
How to install: sudo apt install libparted-fs-resize0
libparted-i18n
GNU Parted is a program that allows you to create, destroy, resize, move, and copy disk partitions. This is useful for creating space for new operating systems, reorganizing disk usage, and copying data to new hard disks.
This package contains localization data.
Installed size: 2.04 MB
How to install: sudo apt install libparted-i18n
libparted2
GNU Parted is a program that allows you to create, destroy, resize, move, and copy disk partitions. This is useful for creating space for new operating systems, reorganizing disk usage, and copying data to new hard disks.
This package contains the shared library.
Installed size: 524 KB
How to install: sudo apt install libparted2
parted
GNU Parted is a program that allows you to create, destroy, resize, move, and copy disk partitions. This is useful for creating space for new operating systems, reorganizing disk usage, and copying data to new hard disks.
This package contains the binary and manual page. Further documentation is available in parted-doc.
Parted currently supports DOS, Mac, Sun, BSD, GPT, MIPS, and PC98 partitioning formats, as well as a “loop” (raw disk) type which allows use on RAID/LVM. It can detect and remove ASFS/AFFS/APFS, Btrfs, ext2/3/4, FAT16/32, HFS, JFS, linux-swap, UFS, XFS, and ZFS file systems. Parted also has the ability to create and modify file systems of some of these types, but using it to perform file system operations is now deprecated.
The nature of this software means that any bugs could cause massive data loss. While there are no such bugs known at the moment, they could exist, so please back up all important files before running it, and do so at your own risk.
Installed size: 122 KB
How to install: sudo apt install parted
parted
A partition manipulation program
[email protected]:~# parted -h Usage: parted [OPTION]. [DEVICE [COMMAND [PARAMETERS]. ]. ] Apply COMMANDs with PARAMETERS to DEVICE. If no COMMAND(s) are given, run in interactive mode. OPTIONs: -h, --help displays this help message -l, --list lists partition layout on all block devices -m, --machine displays machine parseable output -j, --json displays JSON output -s, --script never prompts for user intervention -f, --fix in script mode, fix instead of abort when asked -v, --version displays the version -a, --align=[none|cyl|min|opt] alignment for new partitions COMMANDs: align-check TYPE N check partition N for TYPE(min|opt) alignment help [COMMAND] print general help, or help on COMMAND mklabel,mktable LABEL-TYPE create a new disklabel (partition table) mkpart PART-TYPE [FS-TYPE] START END make a partition name NUMBER NAME name partition NUMBER as NAME print [devices|free|list,all] display the partition table, or available devices, or free space, or all found partitions quit exit program rescue START END rescue a lost partition near START and END resizepart NUMBER END resize partition NUMBER rm NUMBER delete partition NUMBER select DEVICE choose the device to edit disk_set FLAG STATE change the FLAG on selected device disk_toggle [FLAG] toggle the state of FLAG on selected device set NUMBER FLAG STATE change the FLAG on partition NUMBER toggle [NUMBER [FLAG]] toggle the state of FLAG on partition NUMBER unit UNIT set the default unit to UNIT version display the version number and copyright information of GNU Parted Report bugs to [email protected] partprobe
Inform the OS of partition table changes
[email protected]:~# partprobe -h Usage: partprobe [OPTION] [DEVICE]. Inform the operating system about partition table changes. -d, --dry-run do not actually inform the operating system -s, --summary print a summary of contents -h, --help display this help and exit -v, --version output version information and exit When no DEVICE is given, probe all partitions. Report bugs to [email protected]>. parted-doc
GNU Parted is a program that allows you to create, destroy, resize, move, and copy disk partitions. This is useful for creating space for new operating systems, reorganizing disk usage, and copying data to new hard disks.
This package contains user documentation for parted and API documentation for the library packages.
Installed size: 249 KB
How to install: sudo apt install parted-doc
Partitioning in kali linux
Have you ever wished you could travel back in time after deleting that all important customer report or installing a broken driver just before heading into the board meeting?
Well, you better read on, because now you can!
All it takes is to install Kali Linux version 2022.1 or newer with btrfs as file system and to enable snapshotting after installation.
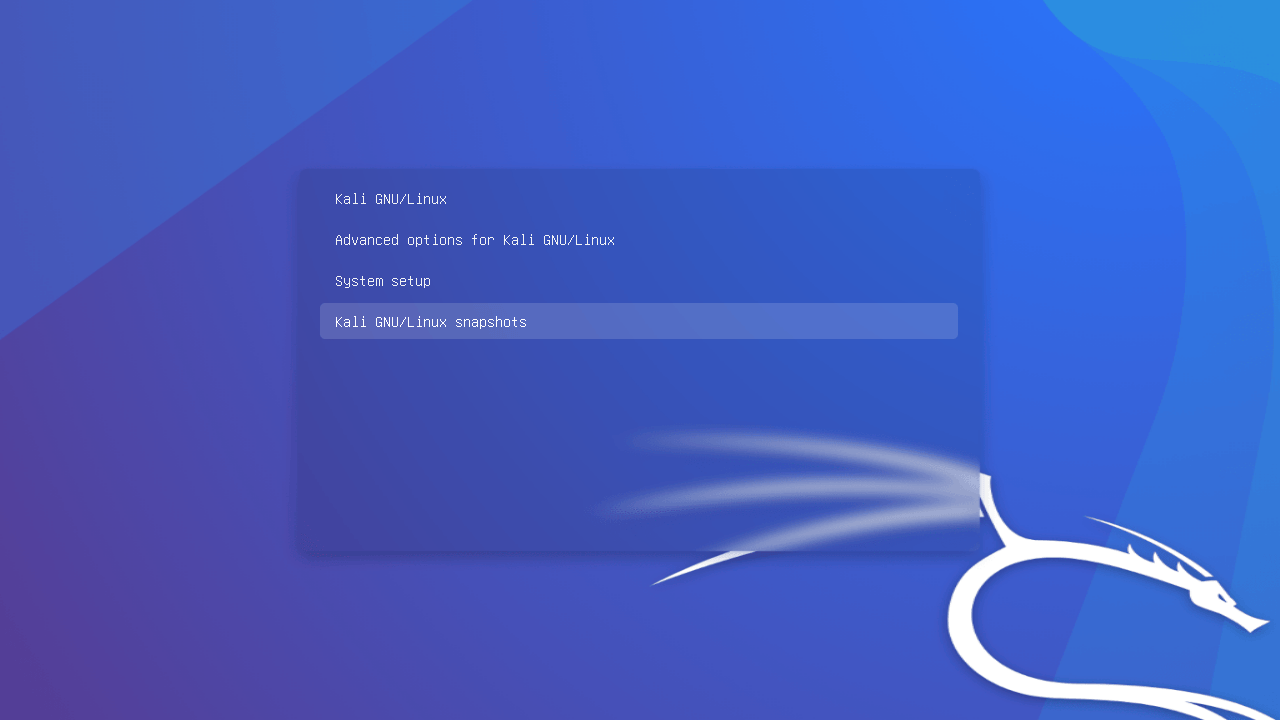
You can even boot into any of your saved snapshots via the boot menu and easily rollback to a previous system state:
Content
- Content
- Overview
- Installation Overview
- Partitioning Scheme
- Kali Linux Installation Procedure
- Modify configurations
- Create additional configurations
- Create a snapshot
- List snapshots
- Delete snapshots
- Rollback
- Diff
- Browse snapshots
- Boot into a last known good snapshot
- Rollback
Overview
btrfs is a modern Copy on Write (CoW) filesystem for Linux aimed at implementing advanced features such as pooling, snapshots, checksums, and integrated multi-device spanning. In particular, the snapshot support is what makes btrfs attractive for Kali installations on bare metal. Virtualization solutions such as VMware and VirtualBox provide their own snapshotting functionality and using btrfs in those environments is not really required.
The snapshotting strategy of this walk-through centres around a tool called “snapper” from our friends over at SUSE. Snapper transparently hooks into the apt workflow and automatically creates snapshots before and after any apt operation. This neat little feature allows to easily rollback a system after a botched upgrade.
To top things off, we added grub-btrfs by Antynea to automatically add a list of snapshots to the grub boot menu.
Snapper-gui by Ricardo Vieira is another great tool we use to make our lifes easier.
Installation Overview
Installing Kali Linux with snapshotting functionality is very similar to a standard installation except that we install it with btrfs as file system.
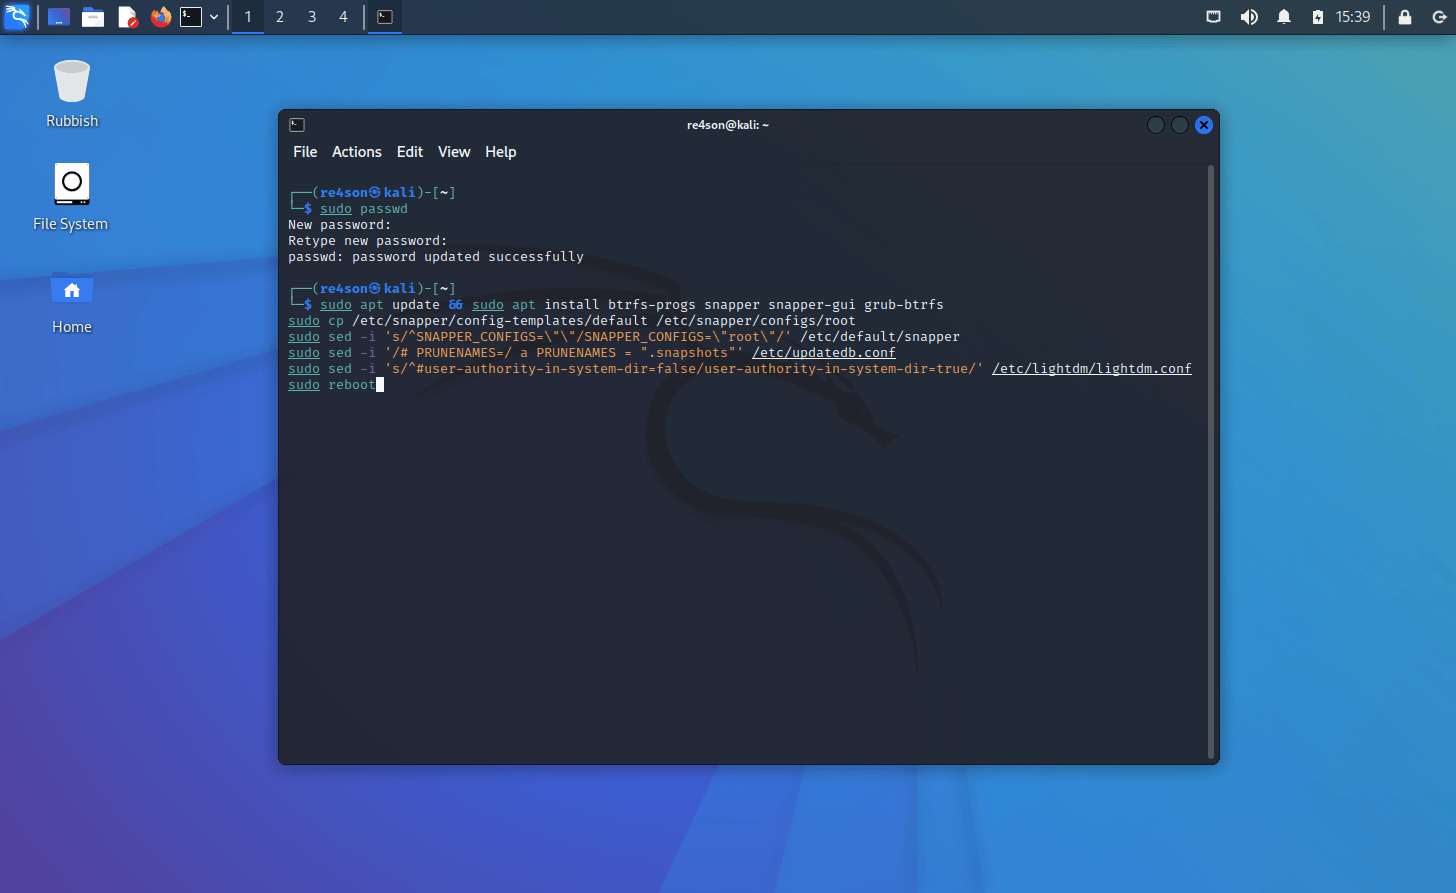
After the installation, we will install some tools and create a default configuration for snapper.
Partitioning Scheme
When selecting “btrfs” as file system, the installer will automatically create the following subvolume layout:
[email protected] | Log files /srv | @srv | Site-specific data served by this system /tmp | @tmp | Temporary files /usr/local | @[email protected] | Tertiary hierarchy for local dataKali Linux BTRFS Installation Steps
Kali Linux Installation Procedure
- To start your installation, boot with your chosen installation medium. You should be greeted with the Kali Boot screen. Choose Graphical Install.
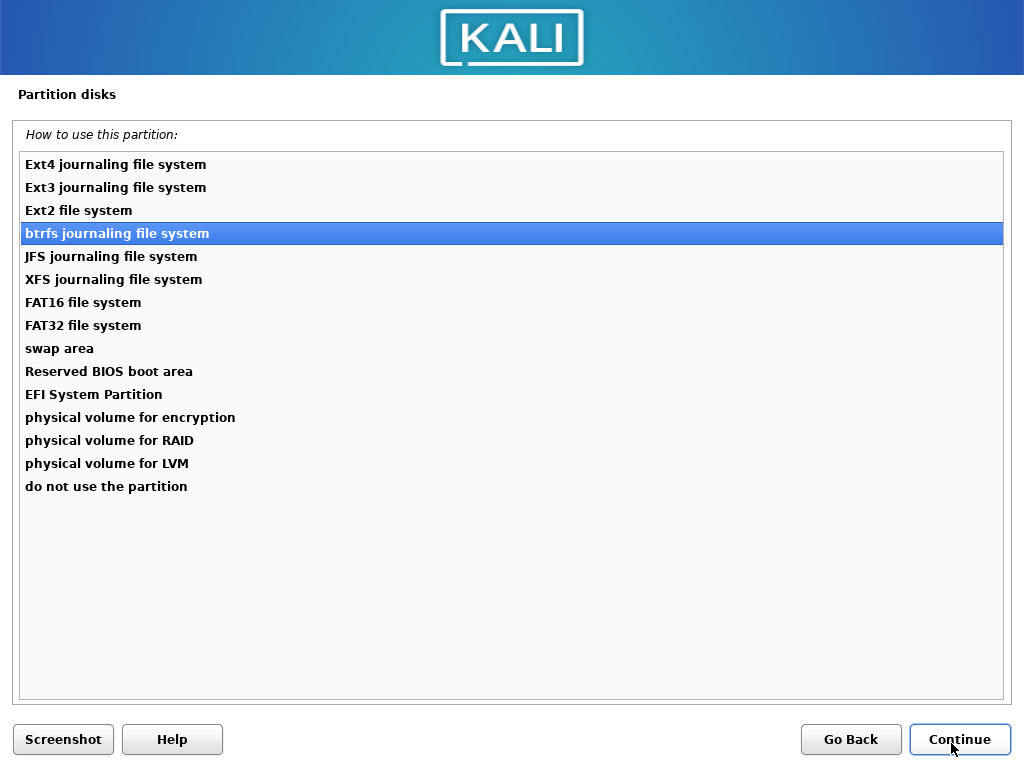
- The installation steps are identical to a default Kali installation except changing “ext4” to “btrfs” as file system:
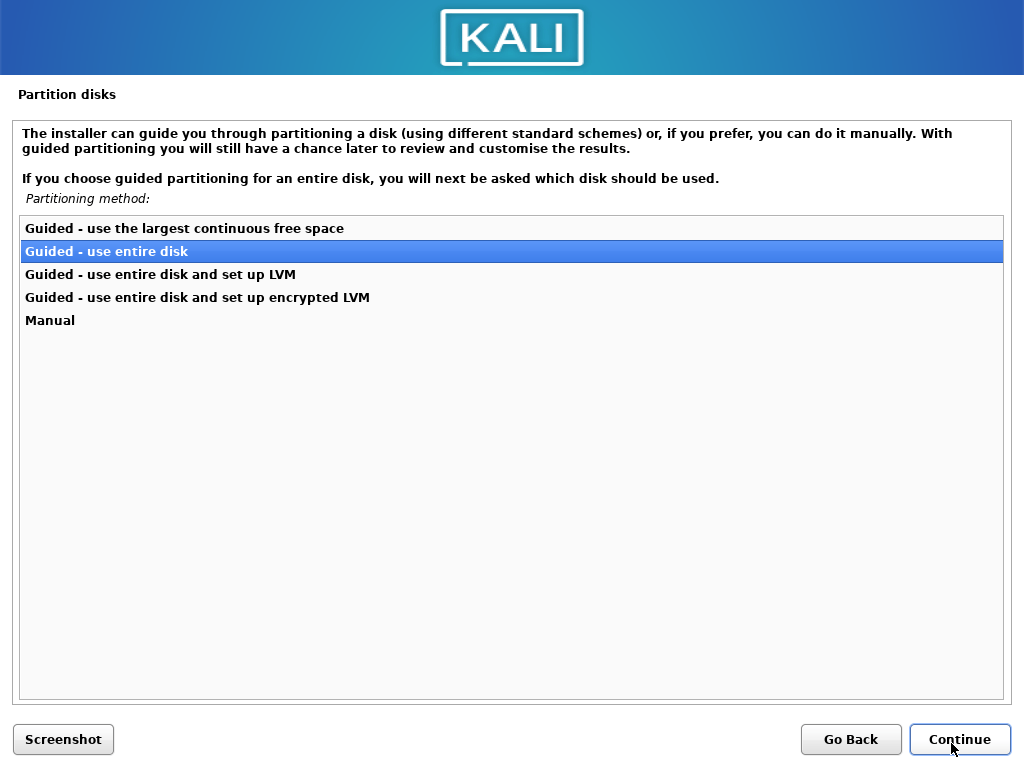
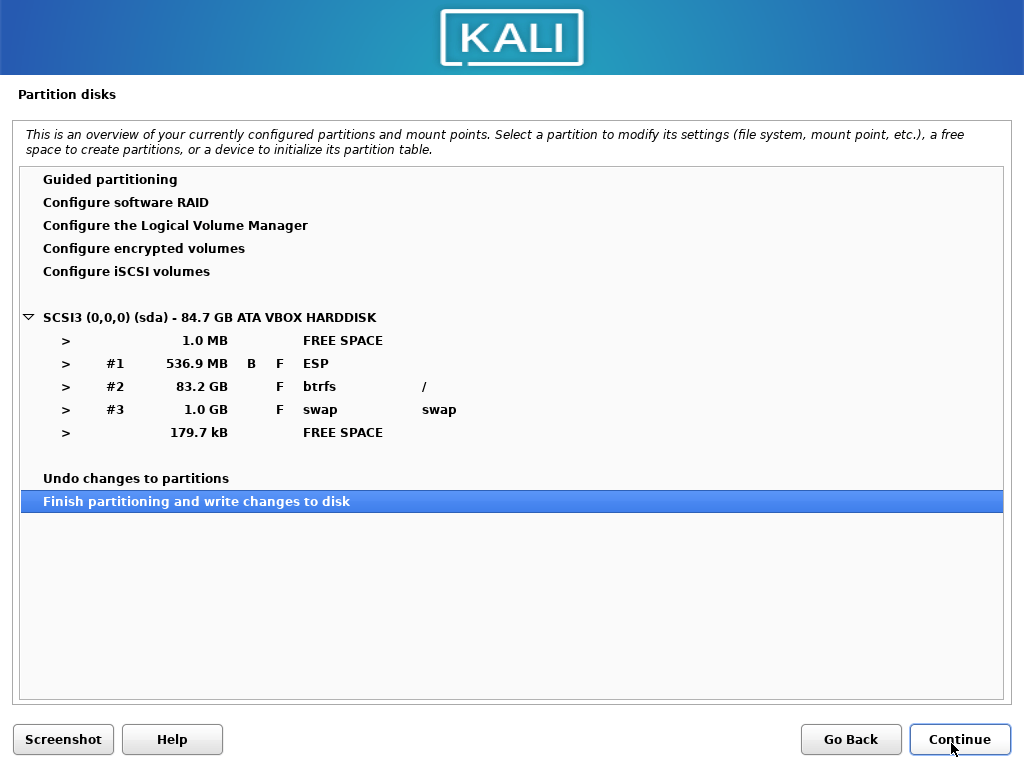
At the “Partition Disk” screen, choose “Guided — use entire disk”:

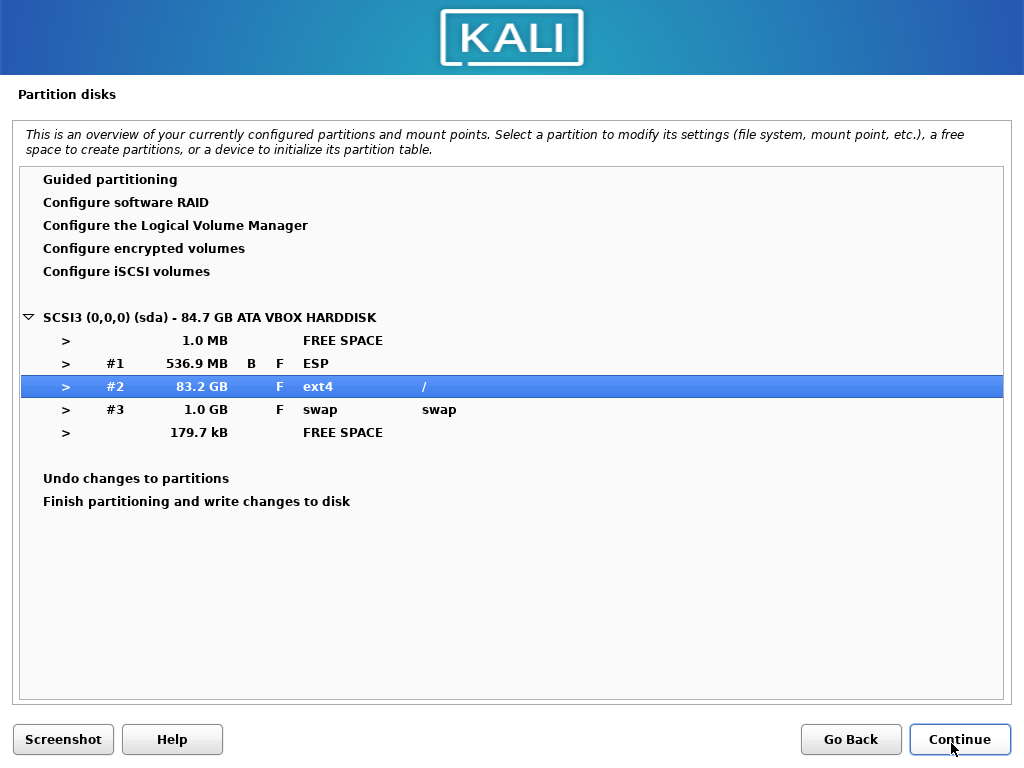
Double-click on the / partition:
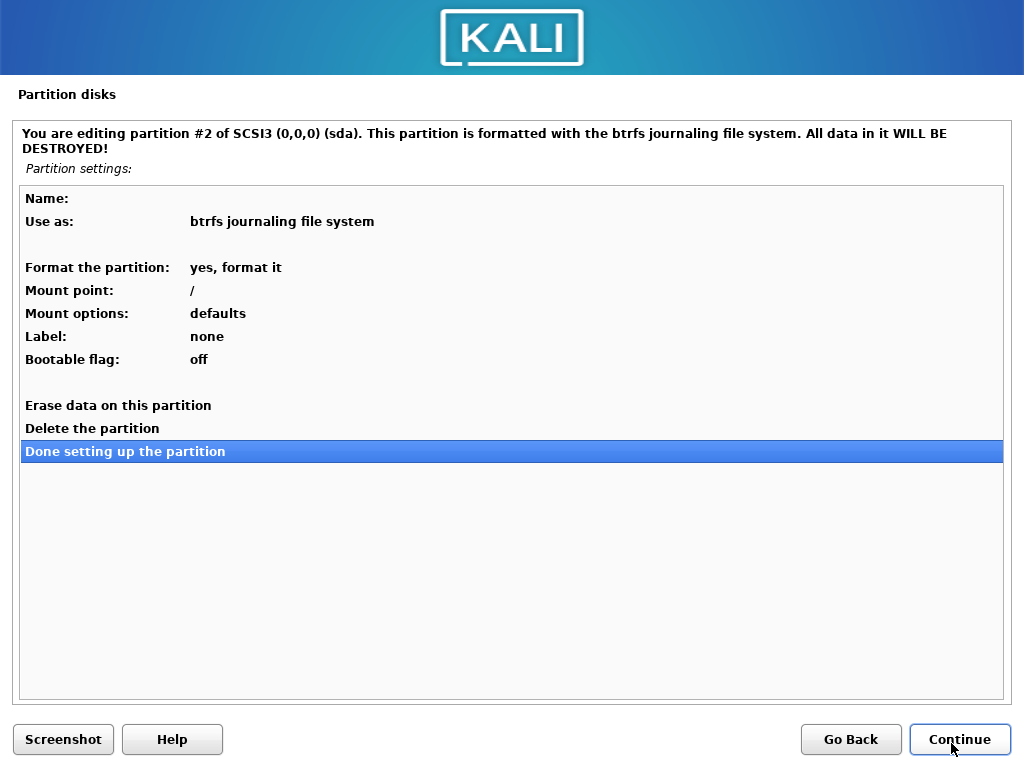
Select “Done setting up the partition” and continue:
Select “Finish partitioning and write changes to disk” and continue with the installation.
- We need to tweak the desktop managers to work in read only snapshots. Pick your DE from the following:
in our example, replace it with yours $ sudo mount /mnt $ sudo btrfs subvolume create /mnt/@[email protected]@gdm3 $ sudo btrfs subvolume create /mnt/@[email protected]@AccountsService $ sudo mv /var/lib/gdm3/* /var/lib/gdm3/.*/mnt/@[email protected]@gdm3 $ sudo mv /var/lib/AccountsService/* /var/lib/AccountsService/.* /mnt/@[email protected]@AccountsService/ $ sudo vi /etc/fstab # Add the following (substitute the with yours) # /var/lib/gdm3 was on /dev/sda1 during installation UUID= /var/lib/gdm3 btrfs defaults,[email protected]@[email protected] 0 0 # /var/lib/AccountsService was on /dev/sda1 during installation UUID= /var/lib/AccountsService btrfs defaults,[email protected]@[email protected] 0 0 # Reboot for the changes to take effect $ sudo reboot- The first reboot will create the first automatic snapshot. Reboot again to find the new boot menu entry for this snapshot:
Congratulations, you have just installed a Kali system with automatic snapshotting functionality! Next, we will cover some basic usage examples.
Usage
Modify configurations
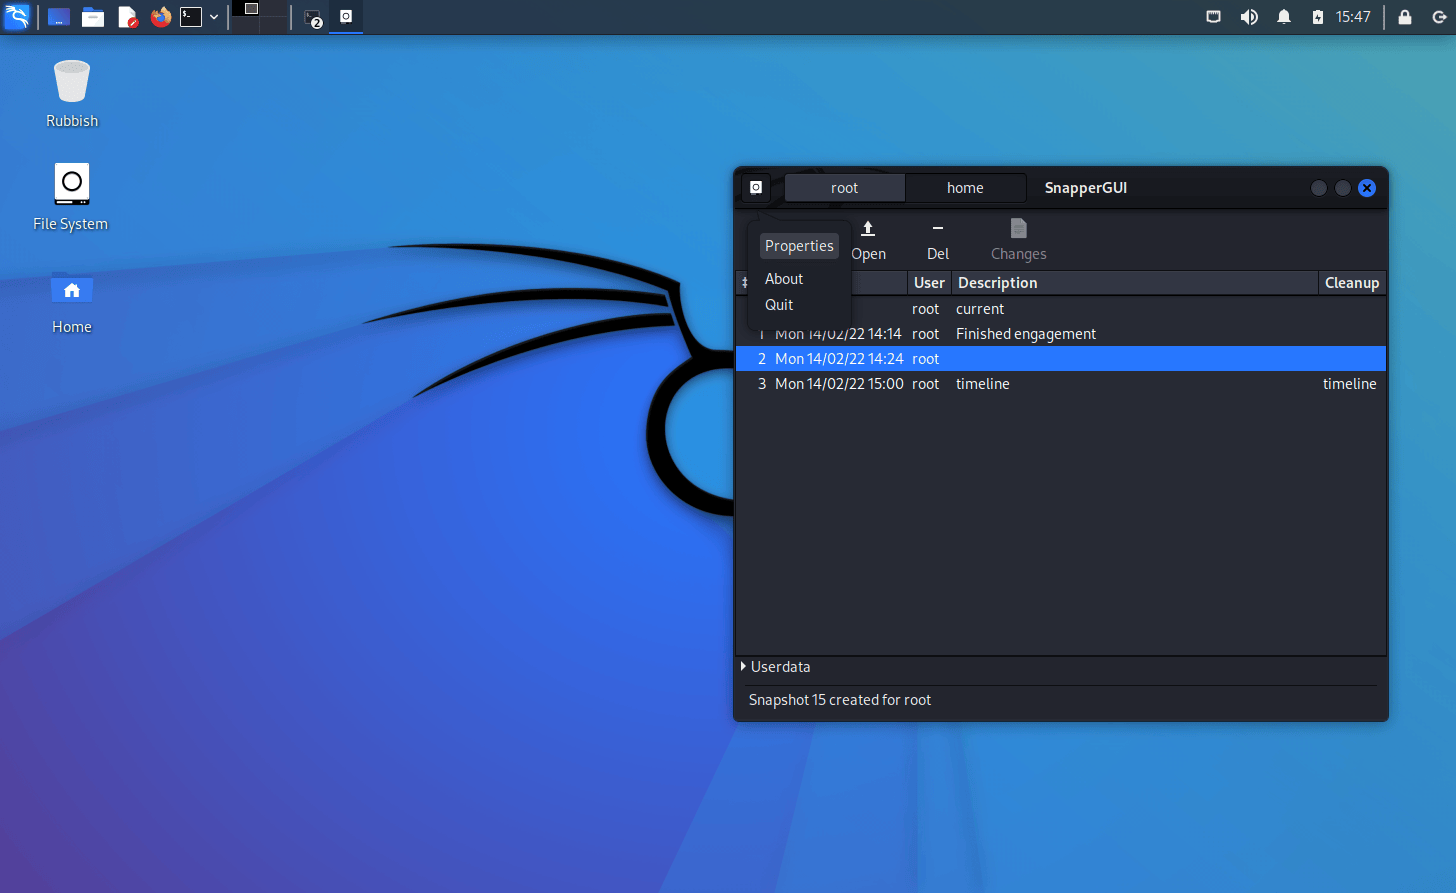
Out of the box Kali creates snapshots of the root directory to allow system rollbacks. Snapshots are automatically created during apt operations, at specified time intervals, and on every boot. The configuration can be changed via the “snapper-gui” tool. Just click on the little icon in the top left hand corner and select “Properties”:
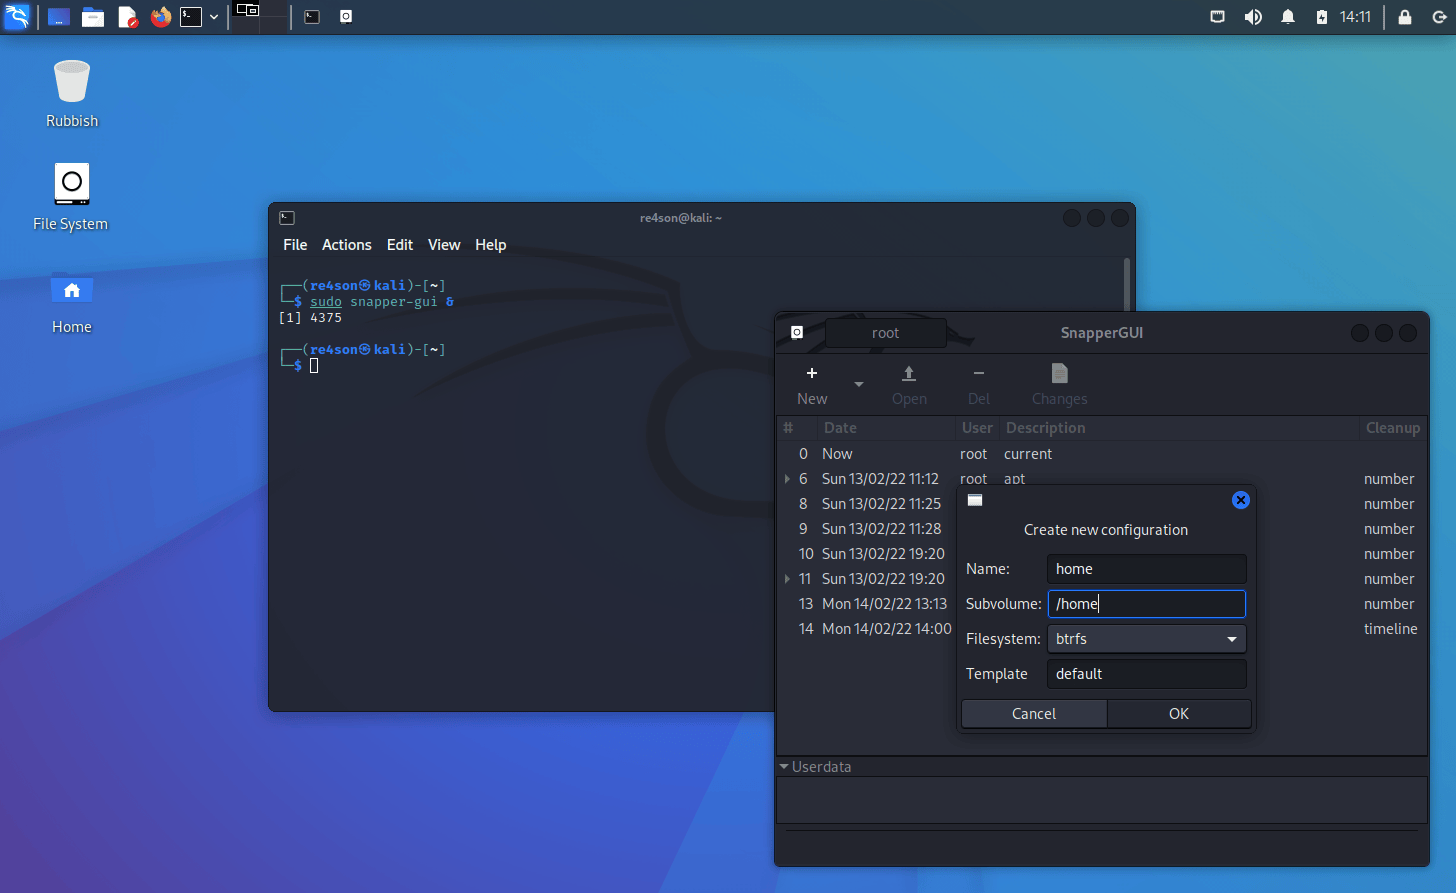
Create additional configurations
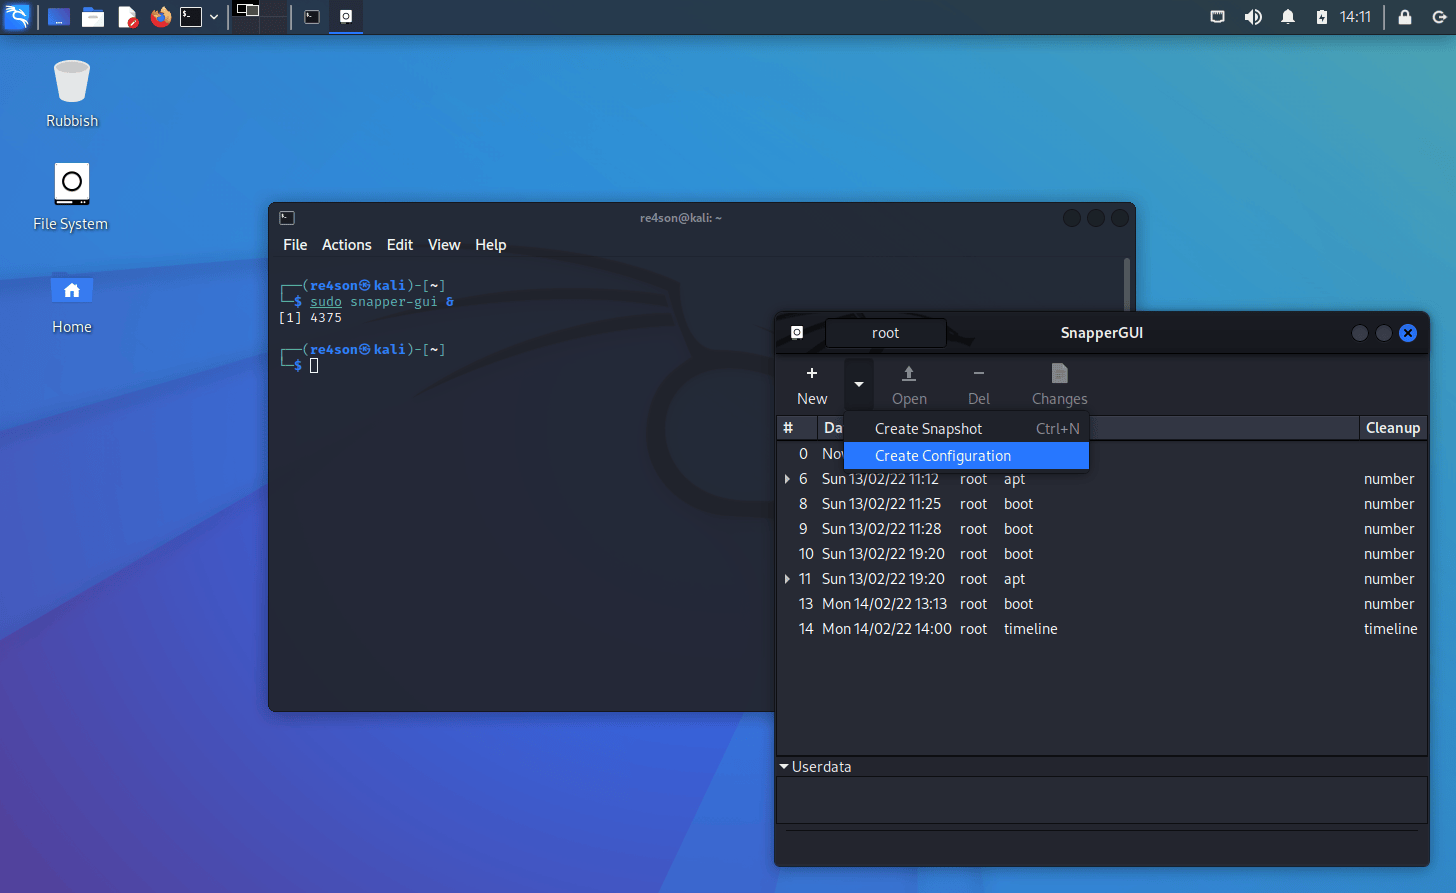
To create snapshots of your home directory, you can create a new configuration using snapper-gui.
Click on “New” -> “Create Configuration”
Create a snapshot
To manually create a snapshot using snapper-gui, select the appropriate configuration tab (home in this case) and click “New” -> “Create Snapshot”
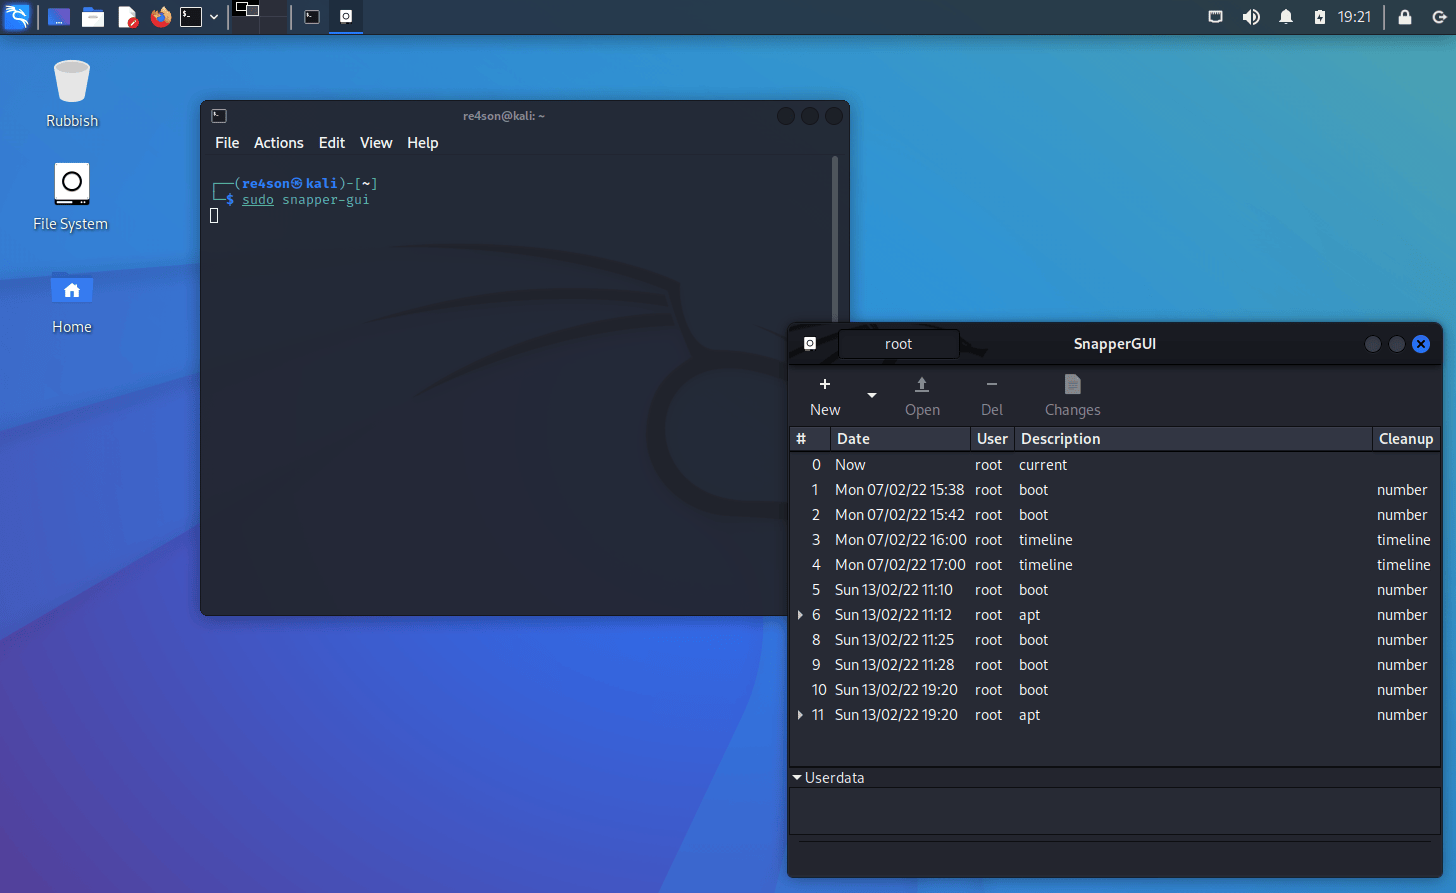
List snapshots
Snapshots are listed in the snapper-gui:
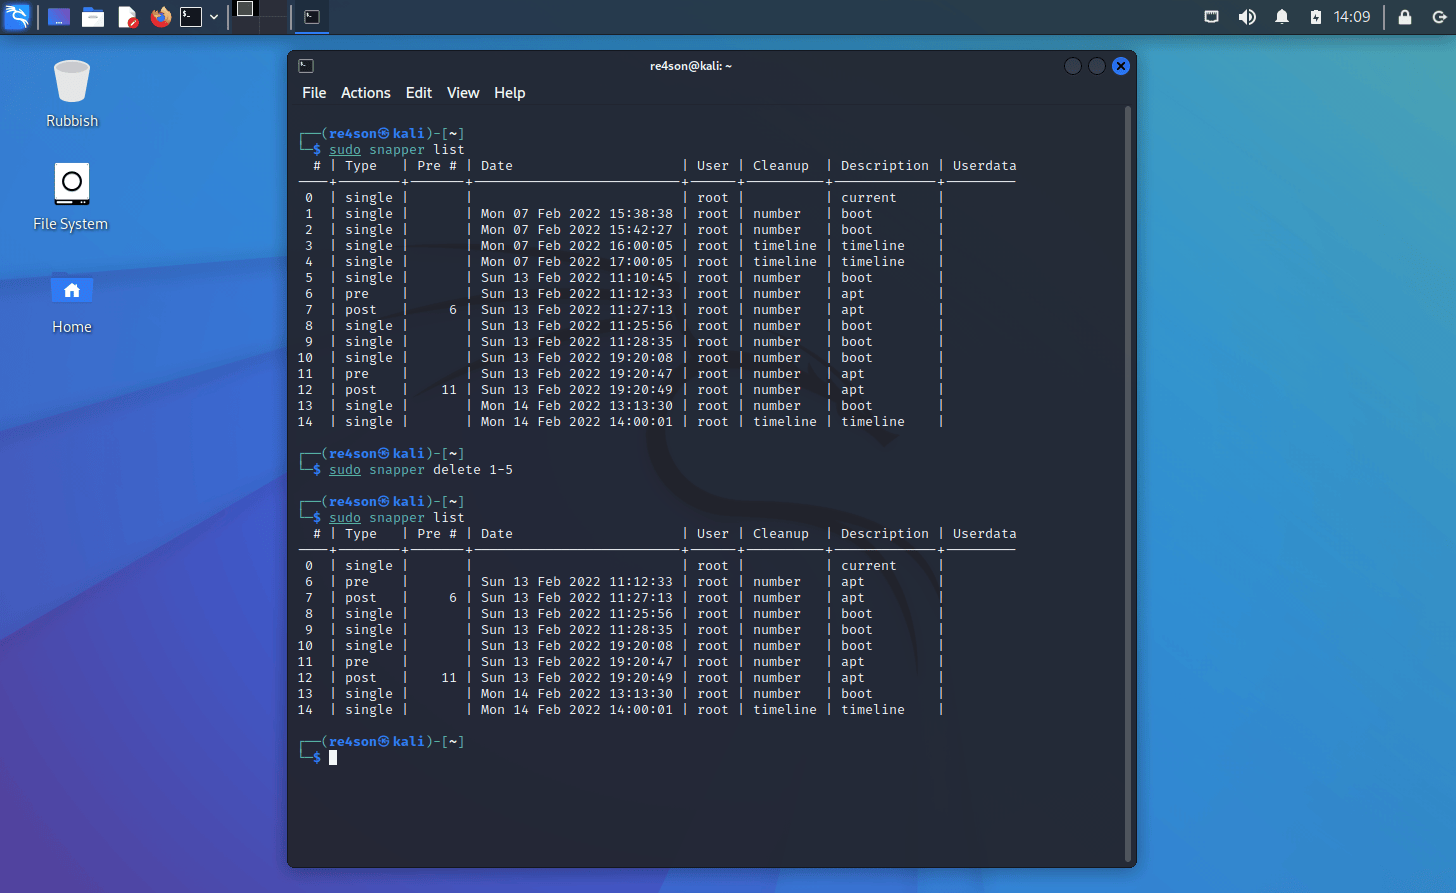
Alternatively, snapshots on all configurations can be viewed using the snapper command line tool:
Delete snapshots
The easiest way to delete a snapshot is by using the snapper command line tool:
Now is probably the right time to flick through the snapper command line options via:
Rollback
To roll back to a previous snapshot we have to remember two things:
- The root / of the file system has been installed in a subvolume /@» and not the root of the btrfs partition /
- A snapshot is treated like just another subvolume except that they are read-only
- You can easily boot into your read-only snapshots to find the one you want to roll-back to.
Thus all we have to do is mount the btrfs partition and replace the current root subvolume @ with the last snapshot. To be safe we’ll backup the current root ( @ ) subvolume.
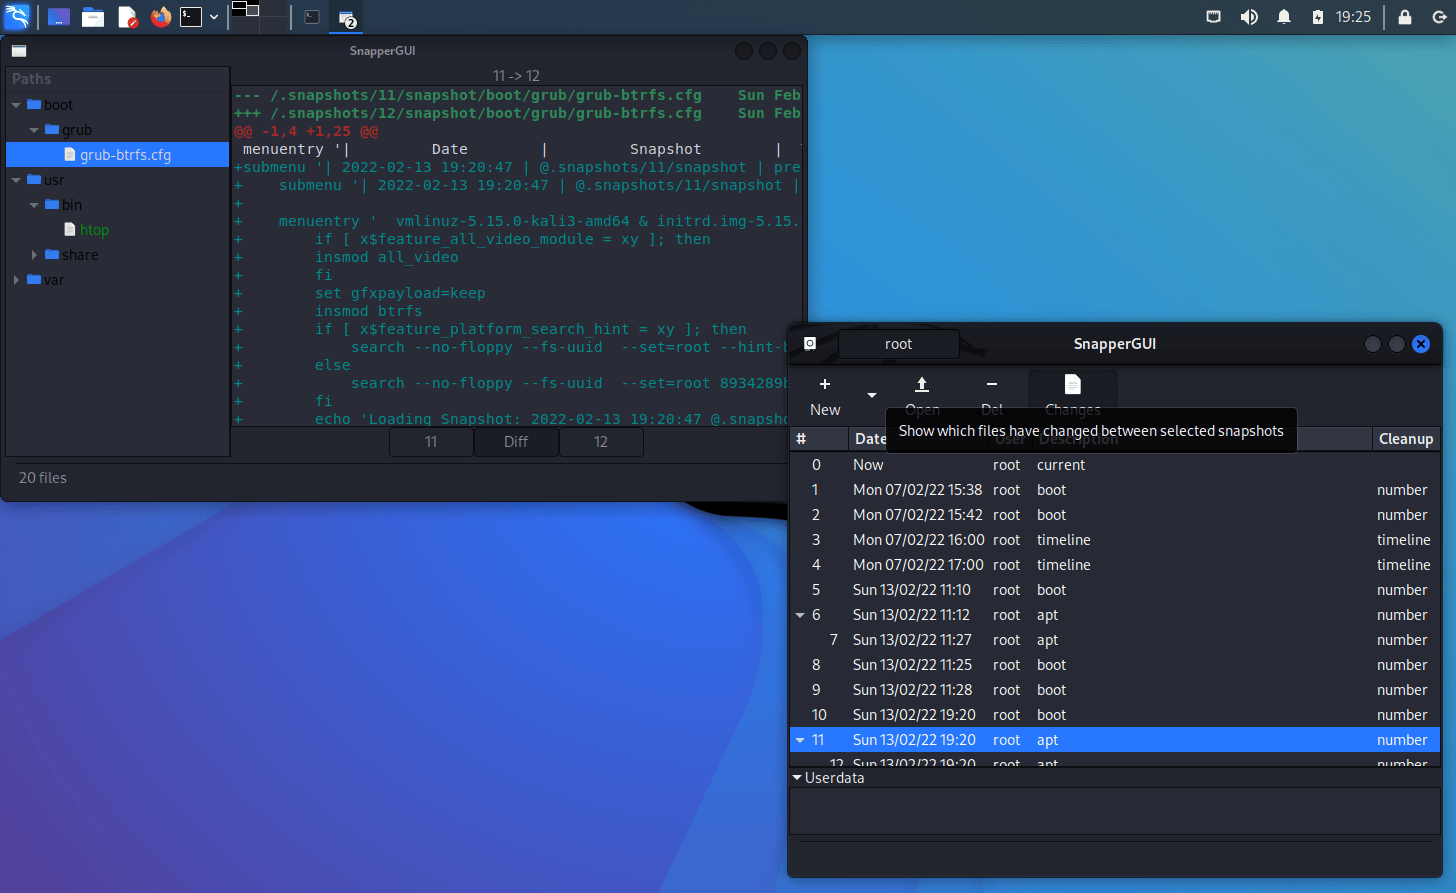
Diff
Snapper is chock-a-block with powerful features like diffs between snapshots:
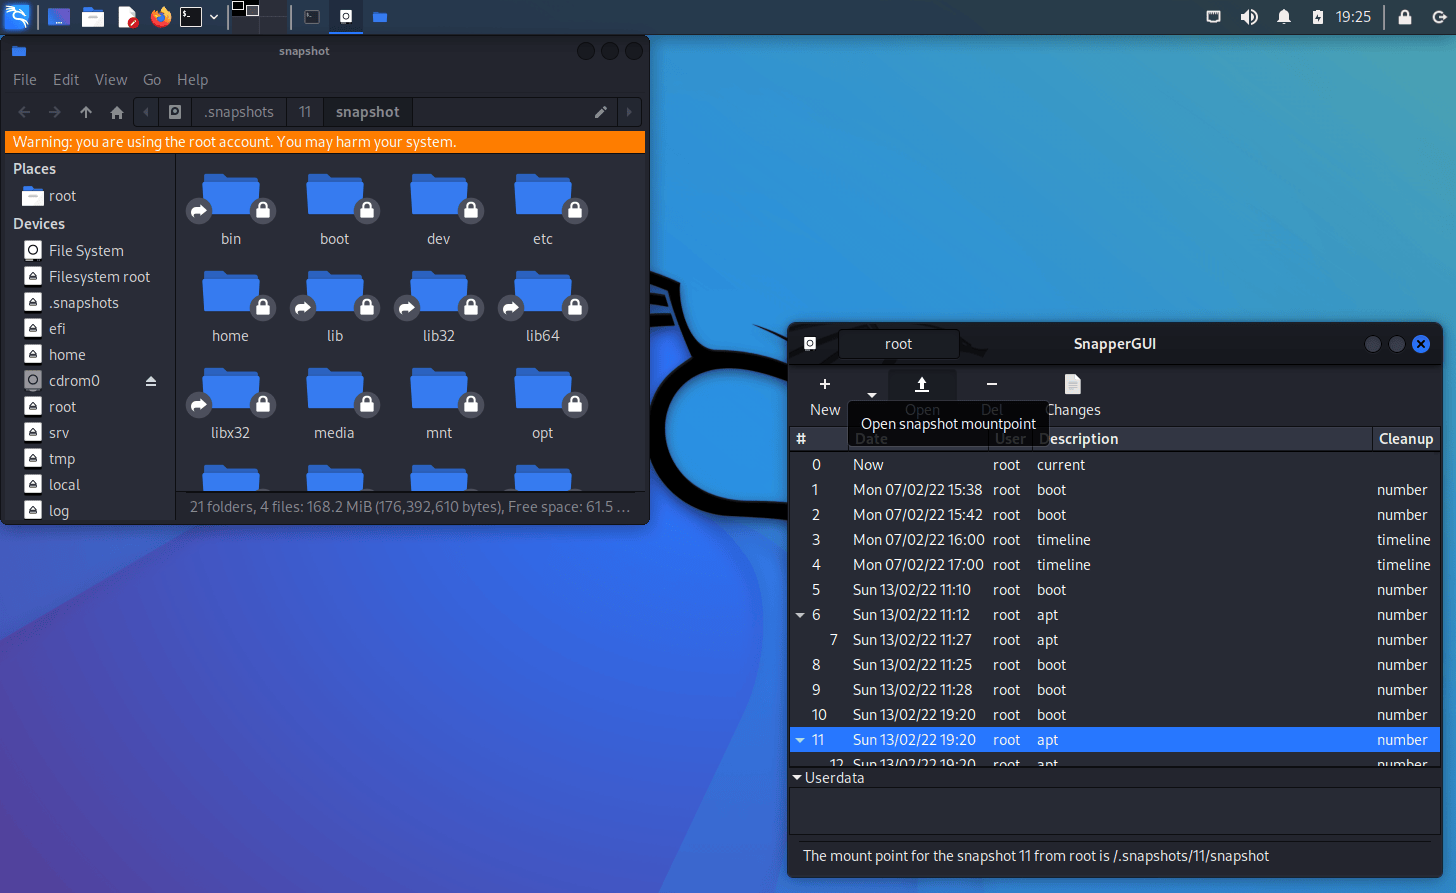
Browse snapshots
You can even browse the content of snapshots:
Full recovery from an unbootable system
Boot into a last known good snapshot
Let’s assume that the last upgrade broke our machine. Every run of “apt install” creates to snapshots, one “pre” snapshot is created before the installation and one “post” snapshot is created after the installation.
To undo the last “apt upgrade”, we would boot into the last “pre” snapshot and check if everything is working again:
Now you can login to the snapshot.
Please note that the snapshot is read only and you might receive an error message from an applet or two after logging in. Just ignore that.
Have a look around ensure that this is what you would like to roll-back to.
Rollback
Remember that “/” itself is the subvolume “@”. To rollback to a snapshot, all we have to do is replace “@” with the snapshot we want.
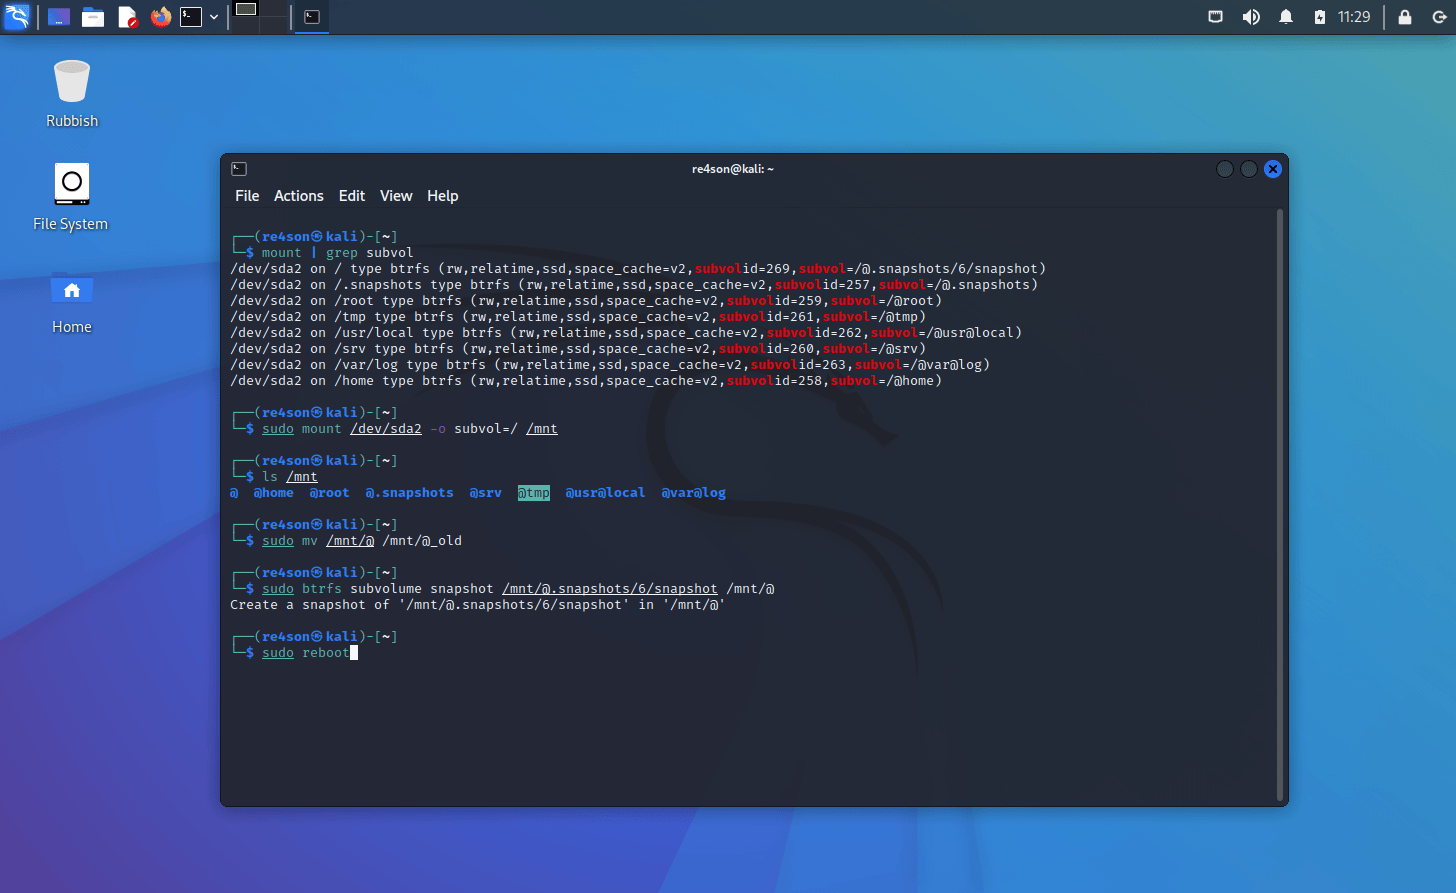
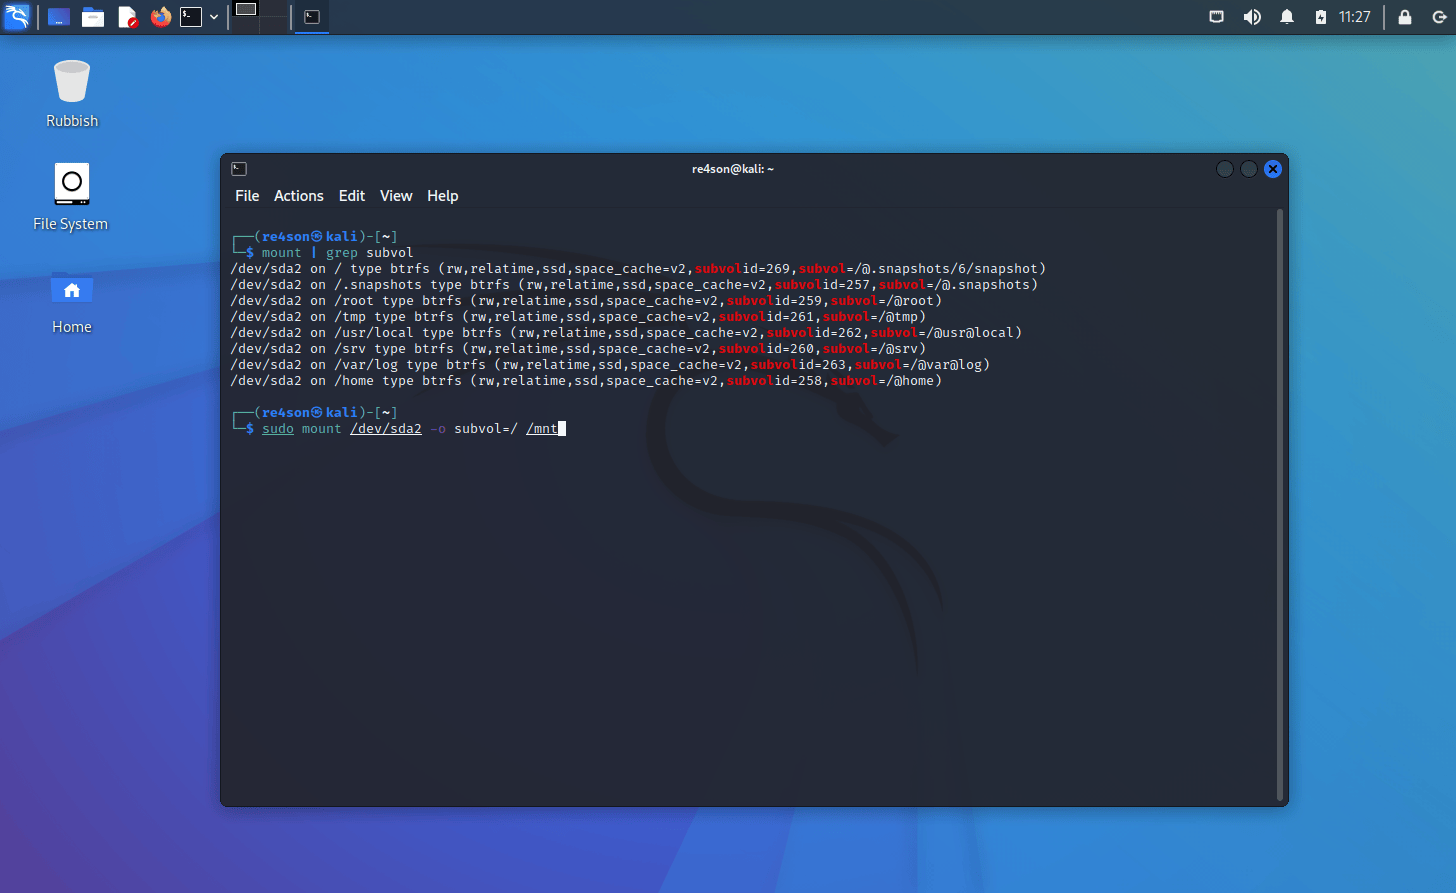
- First we have to mount the physical partition that holds all our subvolumes. Let’s find it first
and then mount it (/dev/sda2 in this example:
sudo mount /dev/sda2 -o subvol=/ /mnt
If we list the content of that partition we can see all the subvolumes, including the one containing our snapshots:
- Now we can create a read-write snapshot of the current read-only snapshot (in this example we booted into the read-only snapshot “6” according to the query above):
sudo btrfs subvolume snapshot /mnt/@.snapshots/6/snapshot /mnt/@
And that’s all there is to it, now we can reboot as if nothing ever happened to our beautiful machine:
References
Updated on: 2023-Mar-06
Author: re4son