- Troubleshooting PCIe Bus Error severity Corrected on Ubuntu and Linux Mint
- What causes PCIe errors?
- What is PCI Noaer?
- What is PCI parity error?
- What is PCI Express x16?
- What is malformed TLP in PCIe?
- How does PCIe Aer work?
- How do I install PCI Nomsi?
- What is Grub_cmdline_linux_default?
- What is quiet splash?
- How do I fix parity error?
- How do I fix PCI error?
- Troubleshooting PCIe Bus Error severity Corrected on Ubuntu and Linux Mint
- Observations about PCIe Bus Error severity Corrected
- Handling PCIe Bus Error messages if you can boot in to your Linux system
- Further troubleshooting: Disable MSI
- Even further troubleshooting: Disable mmconf
- Can’t boot! How to edit grub config now?
- Ошибки PCIe Bus Error: severity=Corrected при выключении в Linux
Troubleshooting PCIe Bus Error severity Corrected on Ubuntu and Linux Mint
To do that, you need to edit the grub configuration. Basically, you just have to use a text editor for editing the file. Restart Ubuntu and you shouldn’t see the ‘PCIe Bus Error severity Corrected messages’ anymore. If this doesn’t fix the issue for you, you can try to change other kernel parameters.
What causes PCIe errors?
It may be a hardware bug in the device, in the PCIe root controller on the motherboard, in the specific interaction of those two, or something else. By using pci=nommconf , the configuration space of all devices will be accessed in the original way, and changing the access methods works around this problem.
What is PCI Noaer?
pci=noaer = no pci advanced error reporting .
What is PCI parity error?
If your PCI ports are incorrectly or loosely connected due to dust or if your PCI ports are completely corrupted unexpectedly, your computer will not be able to reach and read the connected hardware and finally give you such error message.
What is PCI Express x16?
PCIe (peripheral component interconnect express) is an interface standard for connecting high-speed components. . Most GPUs require a PCIe x16 slot to operate at their full potential.
What is malformed TLP in PCIe?
PCIe defines the transaction rules at each layer. Any transaction/packet violating these rules considered as malformed TLP. Examples: Data payload exceeds max payload size, the actual data length does not match data length specified in the header, TC to VC Mapping violation/errors.
How does PCIe Aer work?
When AER is enabled, a PCI Express device will automatically send an error message to the PCIe root port above it when the device captures an error. The Root Port, upon receiving an error reporting message, internally processes and logs the error message in its PCI Express capability structure.
How do I install PCI Nomsi?
- Start your system as your traditional way 🙂 Then open terminal( Ctrl + Alt + T ) and execute these commands: sudo cp /etc/default/grub /etc/default/grub.bak sudo gedit /etc/default/grub. .
- Update grub and restart your system: sudo update-grub sudo reboot.
What is Grub_cmdline_linux_default?
GRUB_CMDLINE_LINUX_DEFAULT=»quiet splash» This line imports any entries to the end of the ‘linux’ line (GRUB legacy’s «kernel» line). The entries are appended to the end of the normal mode only. To view a black screen with boot processes displayed in text, remove «quiet splash».
What is quiet splash?
From Unix & Linux, on quiet splash : The splash (which eventually ends up in your /boot/grub/grub. cfg ) causes the splash screen to be shown. At the same time you want the boot process to be quiet, as otherwise all kinds of messages would disrupt that splash screen.
How do I fix parity error?
- Correct Electrical Source Problems.
- Remove ESD and EMI Sources.
- Adjust RAM Timing.
- Remove or Replace RAM Modules.
How do I fix PCI error?
- Update your drivers.
- Update Windows 10.
- Run the Hardware Troubleshooter.
- Run the SFC scan.
- Run DISM.
- Remove overclock settings.
- Remove problematic software.
- Reset Windows 10.

Centos
When was RHEL 8.1 release?What is the latest kernel version for CentOS 8?Is CentOS based on Redhat?Is CentOS same as RHEL?Why Red Hat Linux is not fre.

Default
Changing Default Application for Opening a Certain File Type The Properties window will open. Click on the “Open With” tab and select Shotwell Viewer .

Node
How to Install and Manage Node. js via NVMStep 1 – Install NVM. NVM is an command line utility to install and manage Node. . Step 2 – Find Available.
Latest news, practical advice, detailed reviews and guides. We have everything about the Linux operating system
Troubleshooting PCIe Bus Error severity Corrected on Ubuntu and Linux Mint
Seeing lots of PCIe Bus Error severity Corrected errors on your Linux system at boot time? Here’s how you can handle these annoying errors.
Recently I was trying to install Mint on several nodes in my institute. At times, I could not install and got lots of ‘PCIe Bus’ errors on the screen. I have also observed a similar issue with Ubuntu 18.04. I got stuck into it for more than a month after using many solutions and observations (solution is the same, but observation and treatment may be different), I found something which was helpful for me. I think it could be beneficial for other Ubuntu and Linux Mint users. This is why I am sharing it here.
Observations about PCIe Bus Error severity Corrected

It happened with my HP system and it seems that there is some compatibility issues with the HP hardware. The PCIe Bus Error is basically the Linux kernel reporting the hardware issue. This error reporting turns into a nightmare because of the frequency of error messages generated by the system. I have noticed in various Linux forums that many HP user have encountered this error; probably, HP needs to improve Linux support for their hardware. Note that this doesn’t necessarily mean you cannot use Linux on your HP system. You might be able to use Linux like everyone else. It’s just that seeing this message flashing on the screen on every boot is annoying and sometimes, it could lead to bigger troubles. If the system keeps on reporting, it will increase the log size. If you have limited space for root, it could mean that your system will get stuck at the black screen displaying the PCIe error message and your system won’t be able to boot. Now that you know a few things let’s see how to tackle this error.
Handling PCIe Bus Error messages if you can boot in to your Linux system
If you see the PCIe Bus Error message on the screen while booting but can still log in, you could do a workaround for this annoyance. You can do little on the hardware compatibility front. I mean you (most probably) cannot go ahead and start coding drivers for your hardware or fix the existing drivers code. If your system works fine, your main concern should be that too much of error reporting doesn’t eat up the disk space. In that regard, you can change the Linux kernel parameter and ask it to stop reporting the PCIe errors. To do that, you need to edit the grub configuration. Basically, you just have to use a text editor to edit the file. First thing first, make a backup of your grub config file so that you can revert in case you are not sure of things you changed. Open a terminal and use the following command:
cp /etc/default/grub ~/grub.backsudo gedit /etc/default/grubLook for the line that has GRUB_CMDLINE_LINUX_DEFAULT=”quiet splash” Add pci=noaer in this line. AER stands for Advanced Error Reporting and ‘noaer’ asks the kernel not to use/log Advanced Error Reporting. The changed line should look like this:
GRUB_CMDLINE_LINUX_DEFAULT="quiet splash pci=noaer" Restart Ubuntu and you shouldn’t see the ‘PCIe Bus Error severity Corrected messages’ anymore. If this doesn’t fix the issue, you can try changing other kernel parameters.
Further troubleshooting: Disable MSI
Now you are resorting to hit and trial. You may try disabling MSI. Though Linux kernel supports MSI for several years now, a wrong implementation of MSI from some hardware manufacturer may lead to the PCIe errors. The drill is practically the same as you saw in the previous section. You edit the grub configuration and make the GRUB_CMDLINE_LINUX_DEFAULT line look like this:
GRUB_CMDLINE_LINUX_DEFAULT="quiet splash pci=nomsi" Even further troubleshooting: Disable mmconf
I know it’s getting repetitive but if you are still facing the issue, it could be worth to give this a last try. This time, disable the mmconf parameter in Linux kernel. mmconf means ‘memory mapped config’ and if you have an old computer, a buggy BIOS may lead to this issue. The steps remain the same. Just change the line GRUB_CMDLINE_LINUX_DEFAULT in your grub config to make it look like:
GRUB_CMDLINE_LINUX_DEFAULT="quiet splash pci=nommconf" Can’t boot! How to edit grub config now?
In some cases, if you are not even able to boot at all, perhaps your root is out of space. An idea here would be to delete old log files and see if you could boot now and if yes, change the grub config. On reboot, if you are stuck with logs on the screen and do a hard boot (use power button to turn it off and on again). When you power on, choose to go into recovery mode from the grub screen. It should be under Advanced options. 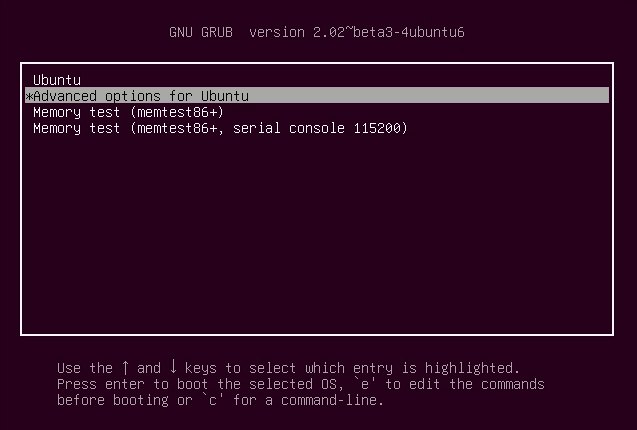 If your system doesn’t show the grub screen, press and hold shift key at boot. In some systems, pressing the Esc key brings the grub screen. In the advanced option->recovery mode:
 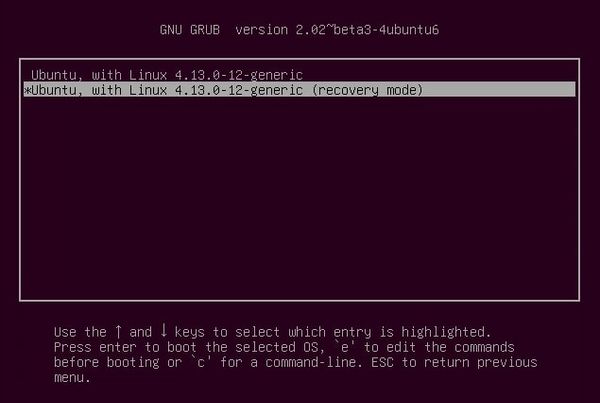 Drop into root shell:
 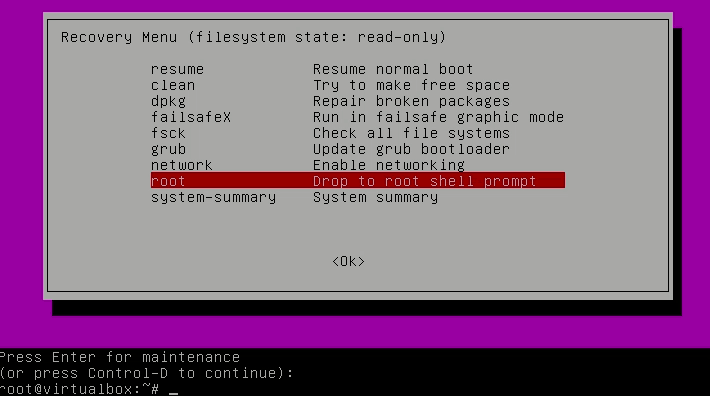 If you use the ls command to find large files, you’ll see that sys.log and kern.log take huge space:
Once that is done, reboot your system. You should be able to log in. You should quickly change the grub parameters as discussed above. Adding pci=noaer should help you in this case. I know it’s more of a workaround than a solution. But this is something that troubled me for long and helped me get around the error. Otherwise, I had to reinstall the system. I just wanted to share what worked for me with the community here. I hope it helps you as well.
This article is written by Arun Shrimali. Arun is IT Head at Resonance Institute in India and he tries to implement Open Source Software across his organization. The article has been edited by Abhishek Prakash.
Ошибки PCIe Bus Error: severity=Corrected при выключении в Linux

После обновления Linux, при следующем выключении компьютера на экран повалилась куча одинаковых сообщений об ошибке: «pcieport 0000:00:1c.3: PCIe Bus Error: severity=Corrected, type=Physical Layer«. Причём длится это безобразие довольно долго, так что рука тянется принудительно выключить компьютер с кнопки, что я пару раз и проделал, пока не нашёл решения проблемы.
Как я уже сказал выше, выключение или перезагрузка компьютера стала адовой процедурой — лог повторяющихся ошибок бежал по экрану в течении (!) двух минут. Оказалось, что данная проблема постигла практически всех владельцев интеловских процессоров и, по всей видимости, связана с попытками понизить питание на порту PCIe. На тематических Linux-форумах предлагается добавить следующие два параметра при загрузке ядра:
pci = nomsi — отключает использование прерываний MSI;
pci = noaer — отключает расширенный отчёт об ошибках ядра.
Однако, возвращаться к использованию устаревших методов доставки прерываний мне совсем не хотелось — костыли, так себе. Решил пойти другим путём и просто отключить технологию ASPM (Active-State Power Management).
ASPM позволяет управлять энергопотреблением шин PCI Express (PCIe) посредством их перевода в энергосберегающий режим, если устройство не используются. В то же время, активация ASPM приводит к задержке ответа от устройств, так как требуется некоторое время на переключение режимов работы шины.
Поведением ASPM можно управлять, добавив параметр pcie_aspm в загрузчик или внеся изменения в файле /sys/module/pcie_aspm/parameters/policy (pcie_aspm=off отключает ASPM, а pcie_aspm=force принудительно задействует, даже на поддерживающих технологию устройствах). Я подправил загрузчик GRUB:
# открываем файл настроек grub в текстовом редакторе sudo editor /etc/default/grub # добавляем параметр pcie_aspm=off GRUB_CMDLINE_LINUX_DEFAULT="quiet pcie_aspm=off" # сохраняем и обновляем загрузчик sudo update-grub
В моём случае, ошибку выдавал встроенный Wi-Fi адаптер, который в принципе не отличался стабильностью в работе и постоянно отваливался. Отдельно отключить энергосбережение для WiFi поможет продвинутая консольная утилита для управления питанием TLP (/etc/default/tlp):
WIFI_PWR_ON_AC=off WIFI_PWR_ON_BAT=off
Если считаете статью полезной,
не ленитесь ставить лайки и делиться с друзьями.