- Adobe Acrobat Reader
- Установка
- Замечания для x86_64
- Замечания для ПК (x86_64), введенных в домен
- How To Install Adobe Acrobat Reader on Ubuntu 20.04
- How to install Adobe Acrobat Reader on Ubuntu 22.04
- Conclusion
- About the author
- Awais Khan
- Как установить Adobe Acrobat Reader в Ubuntu 20.04?
- Как установить Adobe Acrobat Reader в Ubuntu?
- Шаг 1. Обновление ранее установленных пакетов
- Шаг 2. Получение архитектуры i386
- Шаг 3. Установка программных зависимостей
- Шаг 4. Получение последней версии двоичного пакета Adobe Acrobat Reader
- Шаг 5. Установка Adobe Acrobat Reader
- Шаг 6. Подтверждение установки
- Заключение
- How to Install Adobe Acrobat Reader on Ubuntu 22.04
- How To Install Adobe Acrobat Reader on Ubuntu 22.04
- Step 1: Update System Cache
- Step 2: Download the Acrobat Reader Package (deb) using Link
- Step 3: Add Architecture i386 (32-bit)
- Step 4: Install Required Dependencies/Libraries
- Step 5: Check the Availability of Package File
- Step 6: Install the Adobe Acrobat with Package Manager (dpkg)
- Step 7: Open Adobe Acrobat Reader
- How to remove Adobe Acrobat Reader from Ubuntu 22.04
- Conclusion
Adobe Acrobat Reader
Внимание! Компания Adobe прекратила поддержку Acrobat Reader for Linux. rpm-пакет, описываемый здесь, датирован 8 мая 2013 года. В Adobe Acrobat Reader, при этом, регулярно находят уязвимости. Возможно, что современные уязвимости не актуальны для такой старой версии, но и старые никто не закрывал. Используйте это ПО на свой страх и риск.
Установка
Хотя компания Adobe прекратила поддержку Acrobat Reader for Linux, однако, ссылку для скачивания всё ещё можно найти у них на сайте.
apt-get install http://ardownload.adobe.com/pub/adobe/reader/unix/9.x/9.5.5/enu/AdbeRdr9.5.5-1_i486linux_enu.rpm
Замечания для x86_64
- Так как приложение Acrobat Reader 32-разрядное, перед установкой следут убедиться, что подключен репозитарий x86_64-i586. Для этого удобно воспользоваться утилитой apt-repo:
# apt-repo rpm [updates] http://ftp.altlinux.org/pub/distributions/ALTLinux/p7/branch x86_64 classic rpm [updates] http://ftp.altlinux.org/pub/distributions/ALTLinux/p7/branch noarch classic rpm [updates] http://ftp.altlinux.org/pub/distributions/ALTLinux/p7/branch x86_64-i586 classic
- Если не установлен i586-glibc-gconv-modules, его потребуется доустановить (apt его по зависимостям не вытягивает почему-то):
# apt-get install i586-glibc-gconv-modules
- Тем обладателям карт NVidia, которые используют проприетарный драйвер, протребуется i586-nvidia_glx_. Его можно поставить утилитой nvidia-install-driver из пакета nvidia_glx_common:
Операцию по доустановке соответствующего i586-nvidia_glx потребуется выполнять после каждого обновления драйвера NVidia.
Замечания для ПК (x86_64), введенных в домен
Для работы AdobeReader под доменной учетной записью необходимо доустановить следующие пакеты:
- i586-libwbclient.32bit
- i586-samba-winbind-clients — для машин введенных в домен через winbind ActiveDirectory/Login
- i586-sssd-client — через SSSD SSSD/AD
How To Install Adobe Acrobat Reader on Ubuntu 20.04
![]()
Adobe Acrobat Reader is a cross platform application by Adobe and used to read and print the PDF files. Adobe Acrobat Reader is an excellent utility and widely being used because of its many features.
In this tutorial, we will guide you how you can install Adobe Acrobat Reader on Ubuntu 22.04 and use this tool to view PDF documents with ease.
How to install Adobe Acrobat Reader on Ubuntu 22.04
Here, you will find the required steps necessary to perform successful installation of Adobe Acrobat Reader on Ubuntu 22.04. The detail of each step is given as under.
Step 1: First, open the Ubuntu 22.04 terminal using Ctrl+Alt+T keys.
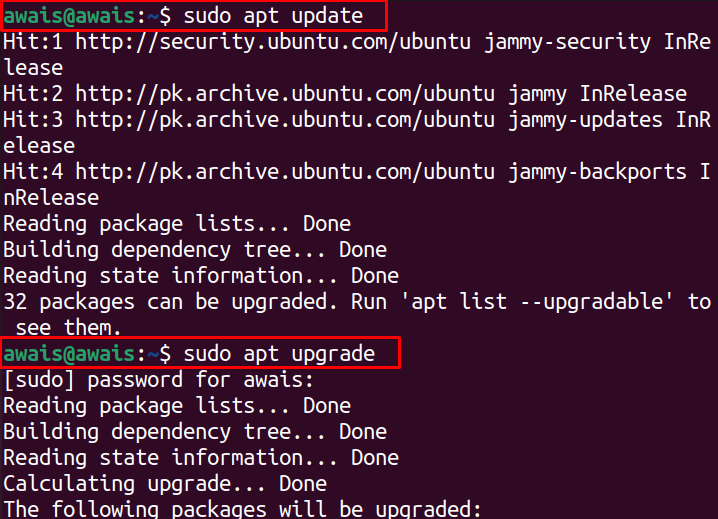
Step 2: Run the update and upgrade commands to ensure that all packages on your desktop are up to date:
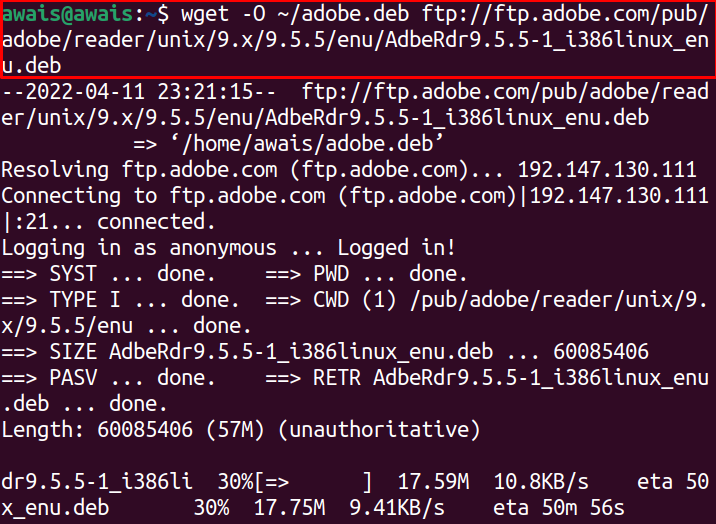
Step 3: Now, use the following command-line to download the Adobe Acrobat Reader deb package on Ubuntu 22.04:
$ wget -O ~ / adobe.deb ftp: // ftp.adobe.com / pub / adobe / reader / unix / 9 .x / 9.5.5 / enu / AdbeRdr9.5.5- 1 _i386linux_enu.deb
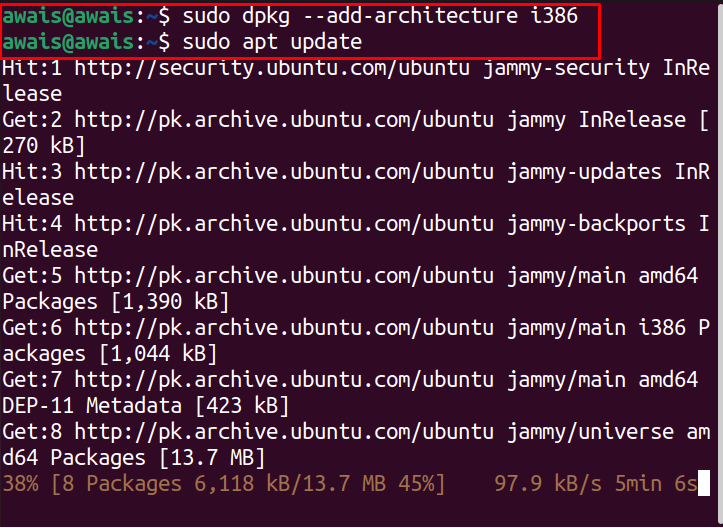
Step 4: As the installer includes i386 architecture, you have to add this architecture using the following command:
Once you execute the above command, you can then run the following command to update the changes:
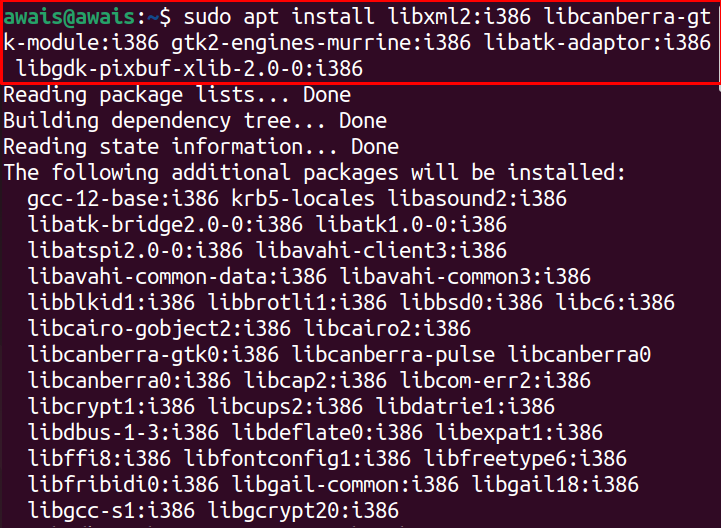
Step 5: Next, install all the required perquisites using the following command:
$ sudo apt install libxml2:i386 libcanberra-gtk-module:i386 gtk2-engines-murrine:i386 libatk-adaptor:i386 libgdk-pixbuf-xlib- 2.0 — 0 :i386
Step 6: Now, execute the following command to install the downloaded Adobe Acrobat Reader deb package:

Once it completes the installation, enter the name “acroread” in the command line to run the Adobe Acrobat Reader:
Click on the “Accept” button to continue running the reader.
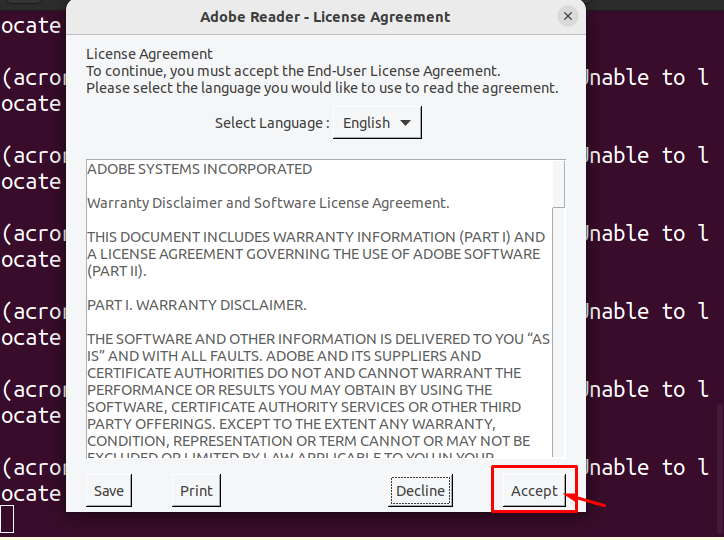
Once you accept the agreement, Adobe Acrobat Reader will appear on your desktop.

Now, you can easily open any PDF document on your Adobe Acrobat Reader.
Conclusion
Adobe Acrobat Reader is an excellent application that will let you read and print the PDF documents with ease. With the unavailability of a robust native application for reading the PDF documents on Ubuntu Linux, you will need to install the Adobe Acrobat Reader. The above installation guide will help you in installing it successfully on your Ubuntu desktop. Make sure that you perform each step carefully otherwise you may encounter errors.
About the author
Awais Khan
I’m an Engineer and an academic researcher by profession. My interest for Raspberry Pi, embedded systems and blogging has brought me here to share my knowledge with others.
Как установить Adobe Acrobat Reader в Ubuntu 20.04?

Советы и хитрости
Когда мы загружаем какой-то файл из Интернета, в большинстве случаев есть вероятность, что он находится в формате pdf, поэтому у нас должна быть программа для чтения pdf, чтобы прочитать этот файл. Самая эффективная и часто используемая программа для чтения PDF-файлов — это Adobe Acrobat Reader. Это удобное многоплатформенное программное обеспечение PDF, которое используется для чтения, комментирования и выполнения различных задач с файлами PDF. Премиум-версия поставляется с дополнительными возможностями, такими как редактирование текста, аннотирование, преобразование, совместное использование и подписание PDF-файлов. Здесь мы обсудим простую процедуру установки Adobe Acrobat Reader в Ubuntu 20.04.
Как установить Adobe Acrobat Reader в Ubuntu?
Ниже показана процедура загрузки и установки Adobe Acrobat Reader в Ubuntu 20.04 (LTS):
Шаг 1. Обновление ранее установленных пакетов
Сначала вы должны убедиться, что все системные пакеты, установленные на вашем Ubuntu, обновлены до последней версии. Для обновления списка пакетов используйте:

Шаг 2. Получение архитектуры i386
Adobe Acrobat Reader требует некоторых пакетов i386, которых нет в текущих версиях Ubuntu. Поэтому вам необходимо включить 32-битную архитектуру в Ubuntu, а для активации 32-битной архитектуры выполните следующую команду:

На изображении выше видно, что 32-битная архитектура была включена.
Шаг 3. Установка программных зависимостей
Для запуска Adobe Acrobat Reader вам потребуется несколько дополнительных пакетов. Чтобы установить необходимые зависимости, выполните в терминале Ubuntu указанную ниже команду:
$ sudo apt install gtk2-engines-murrine:i386 libatk-adaptor:i386 install libxml2:i386 libcanberra-gtk-module:i386

После выполнения вышеупомянутой команды будут доступны зависимости, необходимые для Adobe Acrobat.
Шаг 4. Получение последней версии двоичного пакета Adobe Acrobat Reader
Теперь вам нужно установить последний двоичный пакет Debian по ссылке для Adobe Acrobat Reader. Для его установки запустите в своем терминале следующую команду:
$ wget -c http: // ardownload.adobe.com / pub / adobe / reader / unix / 9 .x / 9.5.5 / enu / AdbeRdr9.5.5- 1 i386linux enu.deb

Приведенная выше команда загрузит пакет в домашнюю папку, который будет установлен на следующем шаге.
Шаг 5. Установка Adobe Acrobat Reader
Теперь, наконец, после успешной загрузки Adobe Acrobat Reader, вам необходимо установить ридер, чтобы легко работать с вашими PDF-файлами. Теперь выполните указанную ниже команду:

Шаг 6. Подтверждение установки
Вы можете подтвердить установку, набрав «Adobe» в строке поиска в разделе «Обзор действий»:


Заключение
Adobe Acrobat Reader является бесплатным, а также имеет версию Premium Edition, обычно используемую для чтения, редактирования и подписания PDF-файлов. В этой статье мы обсудили пошаговую установку Adobe Acrobat Reader на Ubuntu (ОС Linux). Этому PDF-ридеру требуется архитектура i368 для правильной установки и правильной работы в новых версиях Ubuntu.
How to Install Adobe Acrobat Reader on Ubuntu 22.04
Adobe Acrobat Reader is an application which is popular for reading, manipulating and printing the documents in PDF. Adobe Acrobat Reader allows editing and crop PDF pages.
Digital signs can also be added on PDF documents using Acrobat utility. Additionally, It has the feature to Read Out Loud through which you can hear your text from the page. Acrobat Reader is compatible with Windows, macOS, Linux and Android devices.
In this article, the complete installation process of Adobe Acrobat Reader will be explained step by step.
How To Install Adobe Acrobat Reader on Ubuntu 22.04
In the world of technology, everything is shifted to digital form and the same is happening with books. Adobe Acrobat Reader software is one of the key advancements in digitalization of documents.
The following steps refers to installing Adobe Acrobat Reader on Ubuntu 22.04.
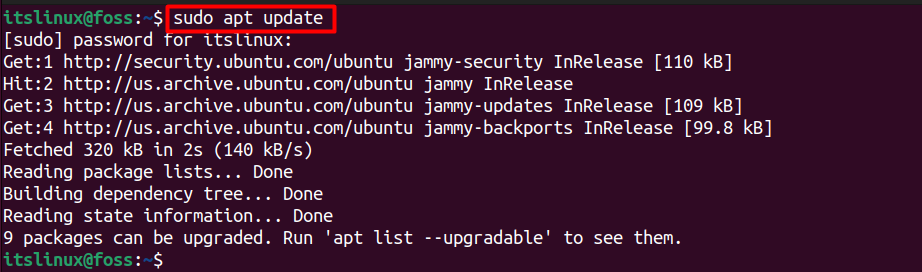
Step 1: Update System Cache
Updating your system cache is very essential before doing any installation. Update your Ubuntu’s 22.04 cache via the following command:
Step 2: Download the Acrobat Reader Package (deb) using Link
First of all, you need to download the package file (.deb) from the adobe link. The (.deb) files can be used on Ubuntu as well as on other Debian based distributions.
$ wget ftp://ftp.adobe.com/pub/adobe/reader/unix/9.x/9.5.5/enu/AdbeRdr9.5.5-1_i386linux_enu.deb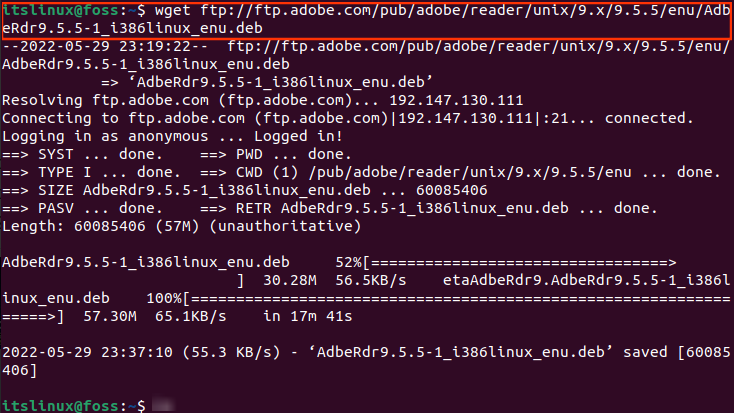
At the end of the above output, It can be observed that the Adobe Reader package is downloaded 100%.
Step 3: Add Architecture i386 (32-bit)
Now it’s time to add architecture i386. This architecture basically refers to a 32-bit version of the package. The below command will add i386 architecture in your system.
$ sudo dpkg --add-architecture i386
Run the apt update command in Ubuntu terminal to update your system cache.
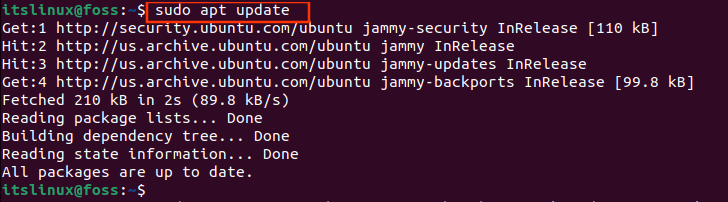
Now, your system is up to date with all packages and dependencies.
Step 4: Install Required Dependencies/Libraries
There are some required dependencies you need to install. Copy the command below, paste in your terminal and hit enter.
$ sudo apt install libatk-adaptor:i386 libxml2:i386 gtk2-engines-murrine:i386 libcanberr-gtk-module:i386 libgdk-pixbuf-xlib-2.0-0:i386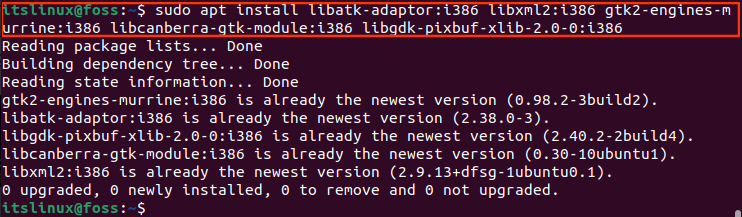
Step 5: Check the Availability of Package File
Run the following command to see the “.deb” file in your directory.

Step 6: Install the Adobe Acrobat with Package Manager (dpkg)
Finally, it’s time to install the Adobe Acrobat Software. To do so, make use of the following command:
$ sudo dpkg -i AdbeRdr9.5.5-1_i386linux_enu.deb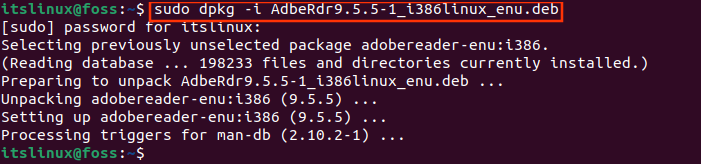
Great! All done successfully.
Step 7: Open Adobe Acrobat Reader
Run acroread commandfrom your terminal to open Adobe Acrobat Reader.
Upon successful execution of the command, the Adobe Acrobat will be initiated as shown below.


Click on Open from the File menu, add your ePub (electronic publications) files and enjoy reading.
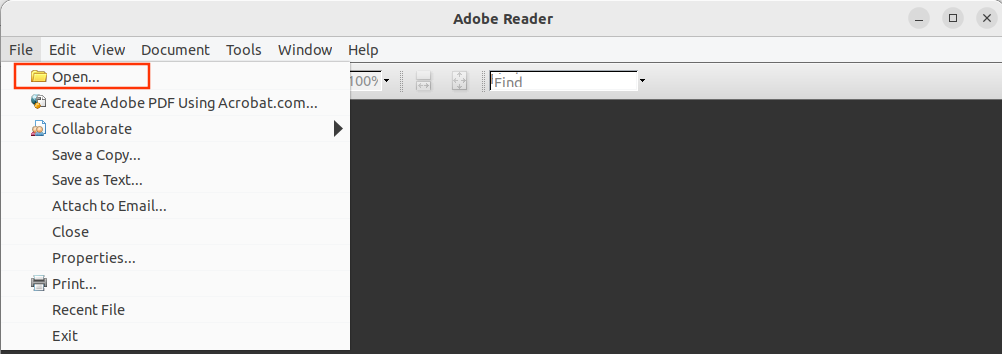
Here you go! The Adobe Acrobat Reader is now ready to use.
How to remove Adobe Acrobat Reader from Ubuntu 22.04
Adobe acrobat is a useful utility for reading purposes. However, you can delete it from your Ubuntu 22.04 with the below command.
$ sudo apt purge adobereader-enu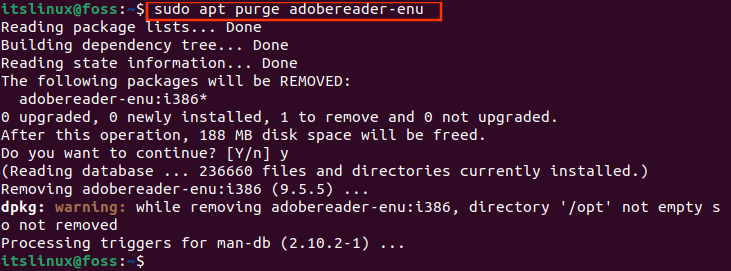
Conclusion
The Debian package file of Adobe Acrobat Reader can be used to install it on Ubuntu 22.04. Adobe Acrobat Reader requires some dependencies that are also provided here. This learning article practically demonstrated the complete process of installing Adobe Acrobat Reader in Ubuntu 22.04. Adobe Acrobat Reader is a third-party application not only used to read PDFs but also useful for converting and manipulating documents.
TUTORIALS ON LINUX, PROGRAMMING & TECHNOLOGY