- 4 Easy Ways to Manually Reset the Wi-Fi Adapter in Windows
- Disabling & Reenabling the Adapter
- Resetting TCP/IP and DNS
- Uninstalling & Reinstalling the Driver
- Resetting All Network Adapters
- Community Q&A
- Tips
- You Might Also Like
- How to Enable, Disable or Restart Network Adapter Remotely
- 1. Disable or Enable the Network Adapter in Network Connections
- 2. Disable or Enable the Network Adapter in Device Manager
- 3. Disable or Enable the Network Adapter Using the WMIC Command
- 4. Restart Network Adapter with Bat-file
- Consider Using Action1 to Restart the Network Adapter if:
4 Easy Ways to Manually Reset the Wi-Fi Adapter in Windows
This article was co-authored by wikiHow staff writer, Nicole Levine, MFA. Nicole Levine is a Technology Writer and Editor for wikiHow. She has more than 20 years of experience creating technical documentation and leading support teams at major web hosting and software companies. Nicole also holds an MFA in Creative Writing from Portland State University and teaches composition, fiction-writing, and zine-making at various institutions.
The wikiHow Tech Team also followed the article’s instructions and verified that they work.
This article has been viewed 395,568 times.
Are you having trouble connecting to Wi-Fi on Windows 10 or 11? Resetting your Wi-Fi network adapter can help resolve wireless issues, including not being able to connect to a Wi-Fi access point or not being able to browse the web once connected. If disabling and re-enabling your wireless adapter doesn’t help, you can uninstall and reinstall your Wi-Fi drivers, reset your TCP/IP stack, or even perform a full network reset. This wikiHow article will teach you simple ways to manually reset your wireless adapter and network settings on a Windows PC.
- If your computer can’t connect (or won’t stay connected) to your Wi-Fi router, disabling and re-enabling the Wi-Fi adapter can help.
- If your Wi-Fi problems are persistent no matter which access point you connect to, you might need to uninstall and reinstall your Wi-Fi drivers.
- For tougher internet connection issues, you can manually reset all of your network settings from the command prompt or in Network Connections.
Disabling & Reenabling the Adapter


- If you’re using Windows 8, 7, or Vista, follow these steps instead:
- Click the Start menu and select Control panel.
- Click Network and Sharing Center. If you don’t see it, click Network and Internet. You should find the Network and Sharing Center there.
- Click Change adapter settings in the left panel.
- Skip to Step 4.

Click Change adapter options or More network adapter options . You’ll see Change adapter options in Windows 10, and More network adapter options in Windows 11. A list of your connections will appear.
- If you’re still having trouble with your connection, try connecting to a different wireless access point. If that works, the issue may be with your internet provider or Wi-Fi router.
Resetting TCP/IP and DNS
- This method will delete all of your computer’s network connections and settings, including the wireless adapter, and then reinstall them. If you’ve already tried disabling and re-enabling the wireless adapter and it didn’t solve your problem, use this method on any version of Windows.
Right-click «Command prompt» and select Run as administrator . This gives you an elevated command prompt that allows you to perform administrative tasks.

Type netsh winsock reset and press ↵ Enter . This command resets your TCP/IP settings, which can help resolve internet issues. [1] X Trustworthy Source Microsoft Support Technical support and product information from Microsoft. Go to source
Type netsh int ip reset and press ↵ Enter . This essentially removes and re-adds TCP/IP by overwriting registry keys. [2] X Trustworthy Source Microsoft Support Technical support and product information from Microsoft. Go to source
Type ipconfig /release and press ↵ Enter . This command releases the IP address that was assigned to you by the router.
Type ipconfig /renew and press ↵ Enter . This command attempts to reconnect to the router to acquire a new IP address.
Type ipconfig /flushdns and press ↵ Enter . This final command purges any cached IP addresses and domain names.
- If you’re still having trouble with your connection, try connecting to a different wireless access point. If that works, the issue may be with your internet provider.
Uninstalling & Reinstalling the Driver
- To make sure you’re downloading the correct driver, visit your PC manufacturer’s support website and choose your exact PC model. If you’re not sure of the model, press Windows key + Pause at the same time, or go to Settings >System >About.
- If you don’t have internet access, you can download the drivers on another computer, save them to a USB flash drive, and then copy them to PC that’s having problems.
- In some cases, your Wi-Fi adapter can use a generic driver that comes preinstalled with Windows. If you don’t download a driver, you may be able to use the generic driver to get back online after uninstalling.
- Sometimes using the default driver can even resolve internet issues! But to be on the safe side, download your manufacturer’s drivers—there’s always a chance your card isn’t compatible with the generic drivers.
Right-click the Start menu and select Device Manager . This opens the Device Manager, which allows you to add and remove hardware drivers.
Click the arrow next to «Network adapters.» This displays all of the network adapters connected to your PC, including your Wi-Fi adapter.
Right-click your Wi-Fi adapter and select Uninstall device . A confirmation message will appear.
Click the checkbox next to «Attempt to remove the driver software for this device.» This ensures that the driver is actually removed.
- After the drivers are installed, try connecting to Wi-Fi. If you’re connected, great! If not, continue with this method to manually reinstall the drivers.
- If the file ends with .zip, you’ll need to unzip the file first. Right-click the file, select Extract all, select a folder you’ll remember, and then click Extract.
- If there’s no file ending in .exe or you weren’t able to download drivers, continue to the next step.

- Right-click the Start button and select Device manager.
- Click the arrow next to «Network Adapters.»
- Right-click the Wi-Fi adapter and select Update driver.
- Click Browse my computer for drivers.
- Click Browse and select the location of your drivers.
- Click Next and follow the on-screen instructions.
Resetting All Network Adapters

- If you’re having connection issues after upgrading to Windows 11 or can’t connect to shared network drives, this method may resolve those issues. [4] X Trustworthy Source Microsoft Support Technical support and product information from Microsoft. Go to source
Click Advanced network settings (Windows 11 only). If you have Windows 10, you can skip this step. For Windows 11, click this option at the bottom of the right panel.
- You may have to reinstall any VPN software you’re currently running after the reset is complete.
Community Q&A
From Device Manager click on your adapter and go to the Advanced tab. Under the WiFi setting change 802.11b/g/n to 802.11b/g (So there is no «n» at the end). Also go to the Power Management tab and uncheck power saving.
Thanks! We’re glad this was helpful.
Thank you for your feedback.
As a small thank you, we’d like to offer you a $30 gift card (valid at GoNift.com). Use it to try out great new products and services nationwide without paying full price—wine, food delivery, clothing and more. Enjoy! Claim Your Gift If wikiHow has helped you, please consider a small contribution to support us in helping more readers like you. We’re committed to providing the world with free how-to resources, and even $1 helps us in our mission. Support wikiHowTips
You Might Also Like

How to Take a Screenshot on a Windows PC: 8 Simple Tricks
2 Ways to Turn Off S Mode on a Windows 11 PC
How to Open Windows Task Manager: Menus, Shortcuts, & More
4 Easy Ways to Access the Boot Options Menu in Windows
2 Ways to Install Windows Apps if You’re Not an Administrator
How to Stop Windows from Freezing: Easy Troubleshooting Guide
How to Enable, Disable or Restart Network Adapter Remotely
Very often, when working on a remote site, you must distort the network cable or disconnect and enable the network adapter. But since we cannot do this physically, we have to ask someone to do it or to excel in such ways. In Linux, this happens easily, via ssh we drive in ifdown eth0 & ifup eth0 and all the rules. In Windows, you have to do the following to restart the network adapter.
1. Disable or Enable the Network Adapter in Network Connections
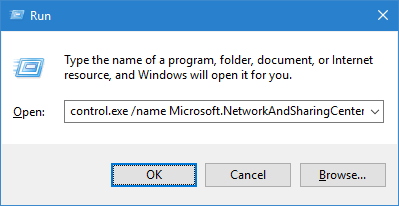
In the search bar or in the execute menu, type control.exe / name Microsoft.NetworkAndSharingCenter and press the Enter key (or go to the Start menu ⇨ Settings ⇨ Network and Internet ⇨ Status ⇨ Adapter settings”).

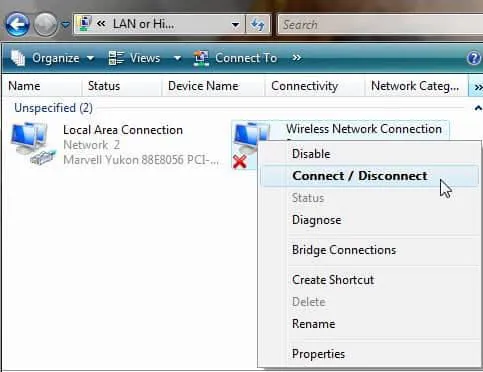
On the left side, click on “Change adapter settings.”

To disable the network connection: select the network adapter that you want to disable and click on “Disable this network device” (or right-click on the network connection and select Disable).

To enable the network connection: select the network adapter you want to enable, and click on “Enable this network device” (or right-click on the network connection and select “Enable”).
2. Disable or Enable the Network Adapter in Device Manager
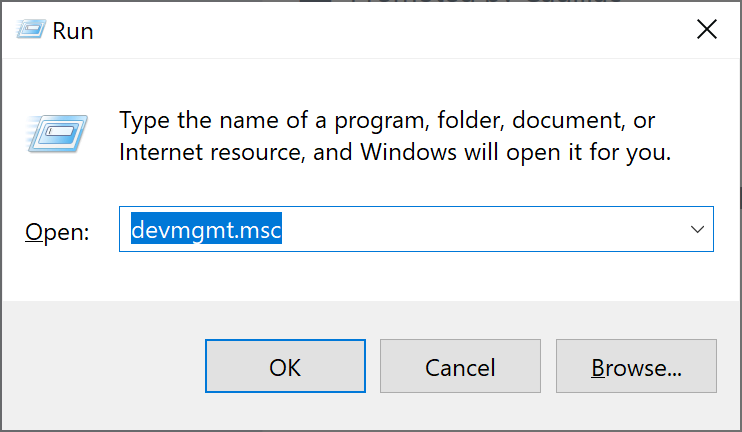
Open the “Device Manager”: one of the ways is to execute in the search bar or in the menu (Run is called with the Win + R keys) enter the command devmgmt.msc and press the Enter key.

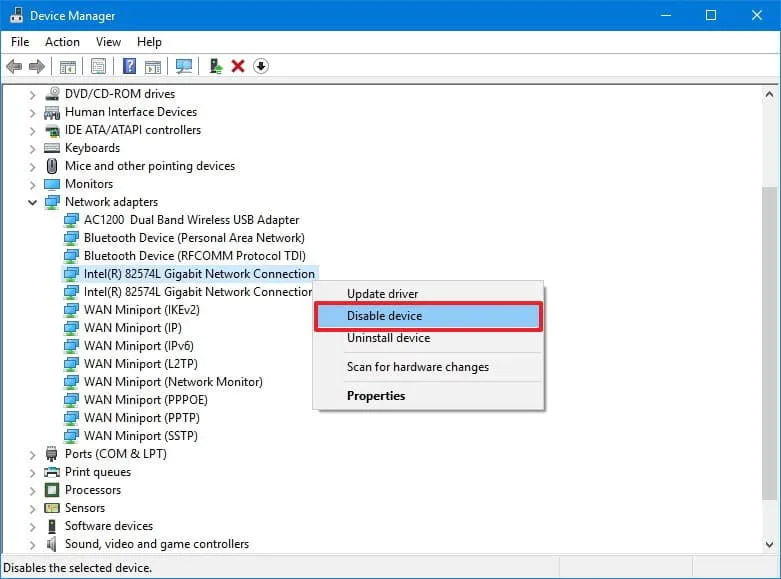
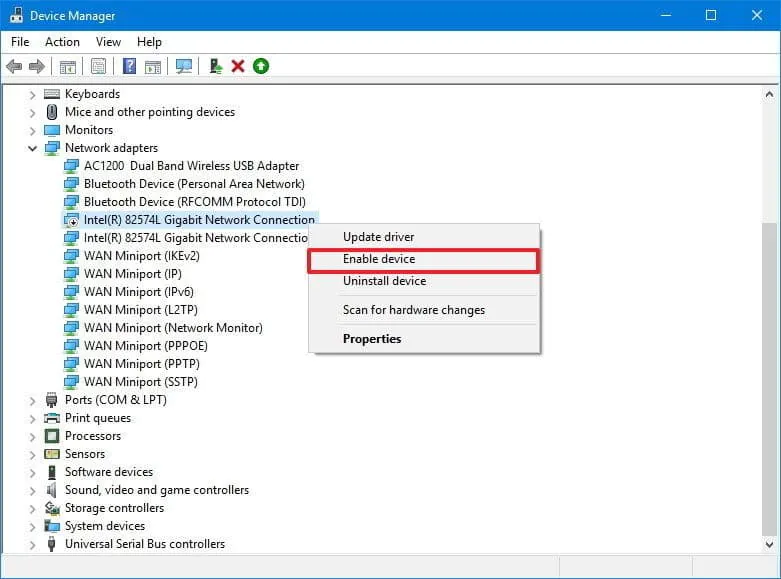
To disable the network connection: open “Network adapters”, right-click on the one you want to disable, and click on “Disable device”. In the window that appears, click on “Yes.”

To enable a network connection: open “Network adapters”, right-click on the one you want to enable, and click on “Enable device”.
3. Disable or Enable the Network Adapter Using the WMIC Command
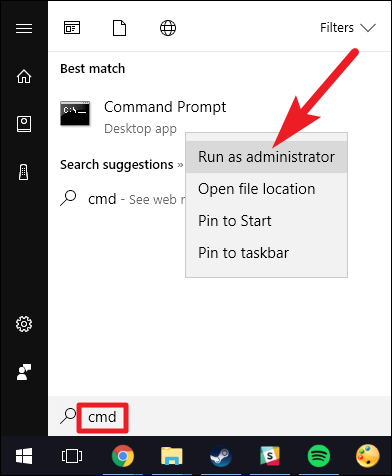
Open a command prompt as administrator: one way is to enter cmd in the search bar and right-click on the result found, select “Run as administrator”.

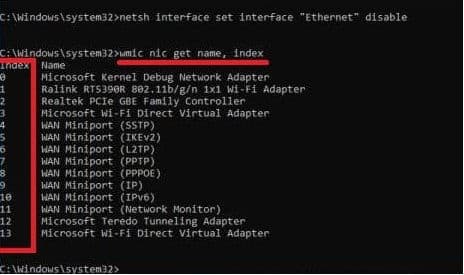
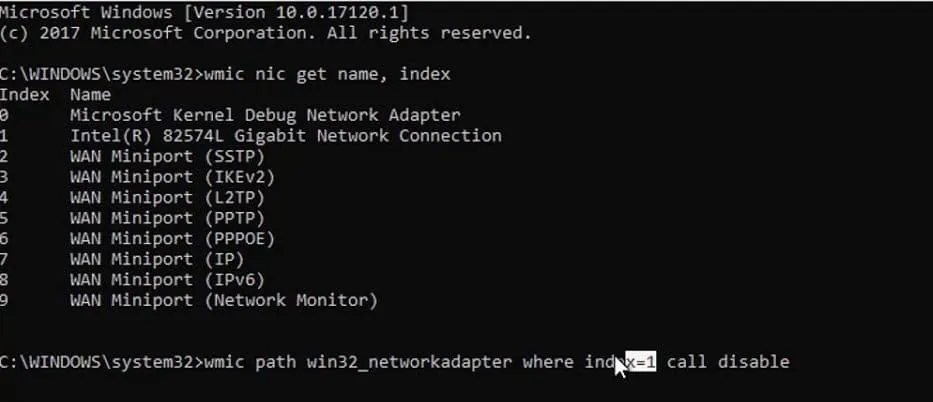
Type wmic nic get name, index and press Enter. Opposite the name of the network adapter that you need to enable or disable is the index that you need to remember.

To disable a network adapter, use command wmic path win32_networkadapter where index = 1 call disable

To enable the network adapter, use command wmic path win32_networkadapter where index = 1 call enable
4. Restart Network Adapter with Bat-file
Create a bat-file, enter the following script there necessarily in ANSI encoding:
netsh interface set interface name = “Local Area Connection” admin = DISABLEDnetsh interface set interface name = “Local Area Connection” admin = ENABLED
Run this bat-file as administrator.
Where “Local Area Connection” is the name of the network adapter in your Windows. It may be called “Local Area Connection 2” or “Local Area Connection 3”. For convenience, I renamed the connections to LAN, Wi-Fi, Internet, Router or Bluetooth.
Remarks: works not only in Windows 7, but also in Windows 8 and Windows 10.Consider Using Action1 to Restart the Network Adapter if:
- You need to perform an action on multiple computers simultaneously.
- You have remote employees with computers not connected to your corporate network.
Action1 is a cloud-based IT management platform for patch management, software deployment, remote desktop, software/hardware inventory, endpoint management and endpoint configuration reporting.