- Установка и настройка Zabbix агента в Ubuntu
- #Автоматизация #Технологии #Процессы #ИТ #Записки #Журнал #Блог #Форум
- Перезапуск zabbix agent linux
- Creating the script in Zabbix
- Creating a trigger that will use the script
- Configuring Zabbix server and agent
- Test restarting the service
- Установка агента Zabbix на Ubuntu
- Заключение
Установка и настройка Zabbix агента в Ubuntu
В Ubuntu/Debian Zabbix агент устанавливается довольно легко.
Изначально достаточно ввести команду установки:
sudo apt install zabbix-agent
И немного изменить конфигурационный файл /etc/zabbix/zabbix_agentd.conf
А именно указать:
LogFileSize=1 (размер файла логов в мегабайтах)
EnableRemoteCommands=1 (разрешить выполнение команд в системе Zabbix сервером)
Server=192.168.1.11 и ServerActive=192.168.1.11 (ip адрес удаленного Zabbix сервера)
Hostname=имя (такое же как hostname текущей системы)
ListenIP=192.168.1.1 (если в системе несколько сетевых интерфейсов с разными IP адресами и необходимо чтобы zabbix агент работал на конкретном из них, а не на всех, то укажем его)
Редактировать конфигурационный файл можно например стандартным текстовым редактором nano (в котором Ctrl+O и Enter служит для сохранения изменений, а Ctrl+X для выхода).
Пример открытия файла в текстовом редакторе nano:
sudo nano /etc/zabbix/zabbix_agentd.conf
Если на сервере много IP адресов, а zabbix-agent должен работать на одном, а не на всех, то укажем его:
Если необходимо чтобы zabbix агент запускался от имени пользователя root, то укажем root в файле /etc/default/zabbix-agent.
Перезапустим Zabbix агент чтобы изменения в конфигурационном файле вступили в силу:
sudo /etc/init.d/zabbix-agent restart
Посмотреть на каких сетевых интерфейсах запущен zabbix-agent можно так:
sudo netstat -tulpn | grep :10050
Проверим запустится ли zabbix-agent после перезапуска системы и при при необходимости активируем автозапуск:
sudo systemctl is-enabled zabbix-agent.service sudo systemctl enable zabbix-agent.service
Если используется iptables, то добавим два правила (можно также добавить к правилам, например -s 192.168.0.20, если нужно разрешить подключение к агенту только с конкретных IP-адресов):
sudo iptables -A INPUT -s 192.168.0.20 -p tcp --dport 10050 -j ACCEPT sudo iptables -A INPUT -s 192.168.0.20 -p tcp --dport 10051 -j ACCEPT
#Автоматизация #Технологии #Процессы #ИТ #Записки #Журнал #Блог #Форум
service zabbix-server start -Запустить службу Заббикс Сервера
/etc/init.d/zabbix-server start — или Запустить службу Заббикс Сервера
service zabbix-server restart -Перезапустить службу Заббикс Сервера
service zabbix-agent restart -Перезапустить службу Заббикс Агента
nano /usr/local/etc/zabbix_server.conf — редактируем Конфигурацию Сервера
nano /usr/local/etc/zabbix_agentd.conf — редактируем Конфигурацию Агента
service zabbix-server status — Просмотр статуса службы Заббикс Сервера
cp -f /etc/mysql/my.cnf /etc/mysql/my051018.cnf — делаем копию конфига MySQL
nano /etc/mysql/my.cnf — редактируем конфиг MySql
service mysql restart — перезапуск перезапуск sql
shutdown -r now — перезагрузка
su -c ‘/sbin/shutdown now’ — алт
shutdown -h now — выключение
перезагрузки кэша конфигурации сервера
zabbix_server -c /usr/local/etc/zabbix_server.conf -R config_cache_reload
использования административных функций для вызова выполнения очистки базы данных:
zabbix_server -c /usr/local/etc/zabbix_server.conf -R housekeeper_execute
htop — диспетчер задач
iftop — позволяющей смотреть сетевую загрузку в режиме реального времени
screenrc http://itman.in/ssh-screen/ удаленые ssh в одном окне
удаленная перезагрузка через агента
zabbix_get -s 192.168.326.7 -p 10050 -k system.run[«shutdown -r -f»]
zabbix_get -s IP -k agent.version — Узнать версию агента на удаленном хосте через Заббикс Сервер
zabbix_get -s 192.168.175.6 -p 10050 -k agent.ping проверка агента со стороны сервера
zabbix_get -s 192.168.175.160 -k ‘proc.num[cron]’ проверка служб
zabbix_get -s 192.168.321.3 -k ZScript[hard,discovery,temperature] пример скрипта через агента
web.test.fail [шаг]- доступность веб интерфейса
web.test.in[шаг,,bps] — Медленно отвечает Веб
web.test.error[шаг] — ошибка Вею сценария
web.test.rspcode[шаг] — Код ответа указаного шага
web.test.time[шаг,resp] — Медленная Авторизация
Перезапуск zabbix agent linux
In this tutorial, I will show you, how to restart a service (systemctl) on Ubuntu/Debian monitor with Zabbix. When we supervise a server and in particular the services, it happens that we want to restart a service which will be “fallen” automatically in order to guarantee a level of service.
Restarting a service to fix an “unknown” problem is not always the solution. Here I will take the example of a service that stops regularly, especially when applying updates.
In this tutorial, I will configure Zabbix to restart the crowdsec-firewall-bouncer service which is used to inject blocking rules into Iptables.
The configuration is done in several steps:
- Creating the script in Zabbix
- Creating trigger in Zabbix
- Configure monitored server to give rights to Zabbix user to restart service and configure agent to execute commands.
Creating the script in Zabbix
The first step will be to create our script in Zabbix which will allow us to restart the service when it stops. From the menu, expand Administration 1 and click on Scripts 2 . 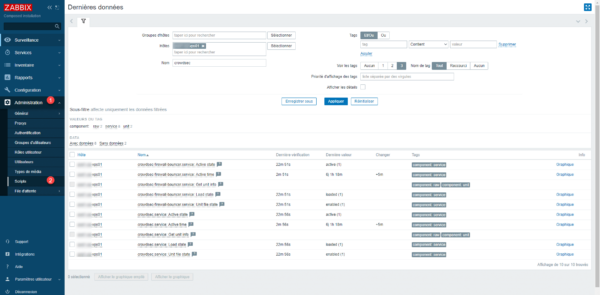 By default, 3 scripts are already configured, Click on the Create a script 1 button at the top left.
 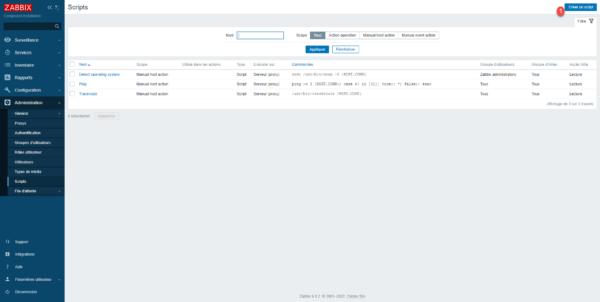 Name the script 1 , choose type Script 2 and select Zabbix agent 3 .
Selecting Zabbix agent indicates that the script will be executed by the agent that is installed on the monitored server.
In the Commands field, enter the script executed 1 and then click the Add 2 button. 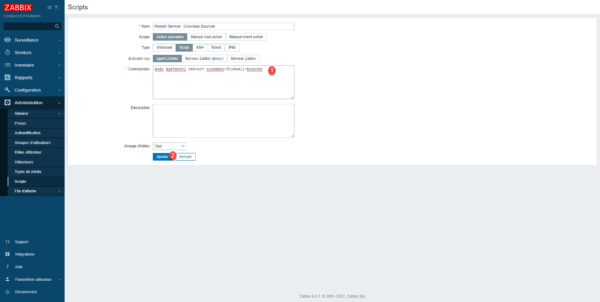 The script is added and available in Zabbix.
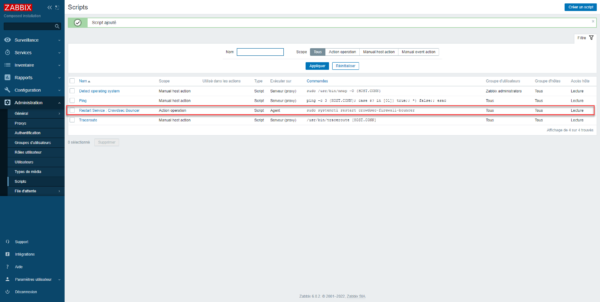
Creating a trigger that will use the script
We will now configure an action trigger, which will use our script to restart the service. In the navigation menu, unfold Configuration 1 , go to Actions 2 and click on Trigger actions 3 . 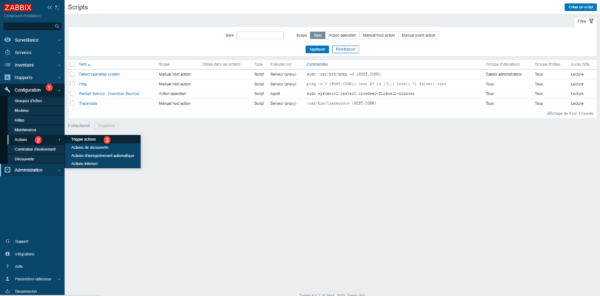 Here, we find all the actions to configure linked to the triggers, click on the Create an action 1 button.
 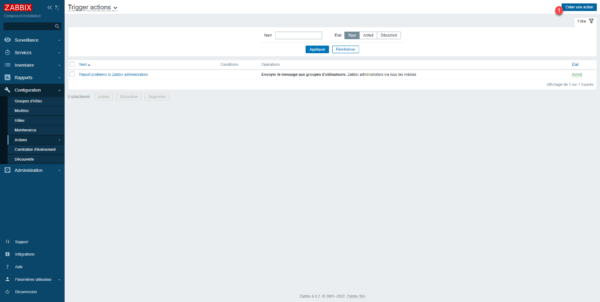 Name the action 1 then click on Add 2 in the Conditions part.
 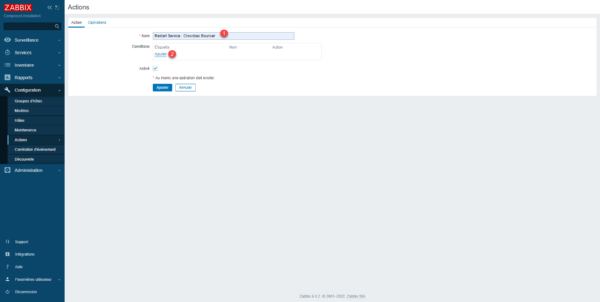 A modal window opens where we will configure the triggering of our action, in type, choose Trigger 1 then click on the Select button 2 .
 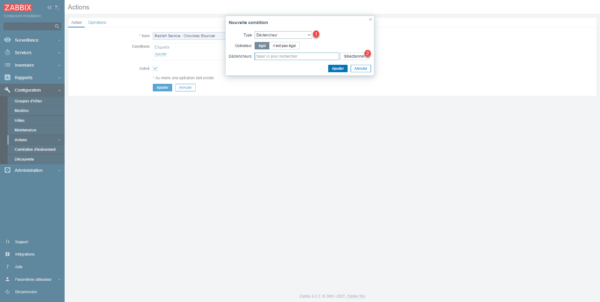 In the host part, choose the server 1 where the trigger is configured, then select the service trigger 2 which indicates that the service is not functional, finish by clicking on the Select button 3> >.
 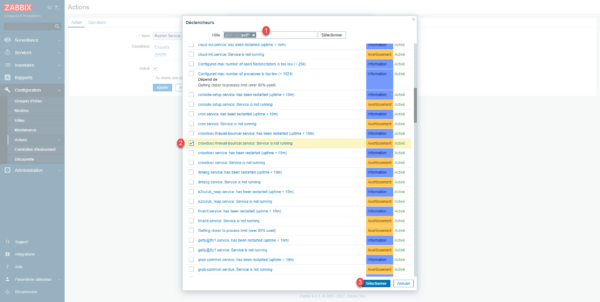 Click on the Add 1 button to create the condition.
 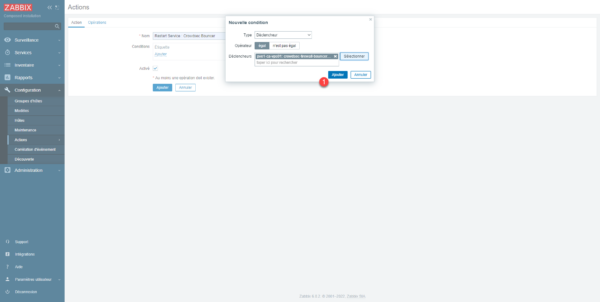 The first part of the action is configured, we will now proceed to the execution of the script. Click on Operations 1 .
 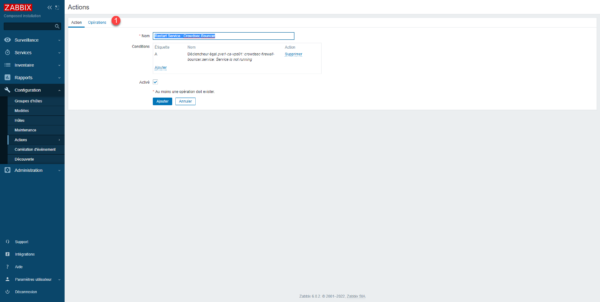 At the level of Operations, click on Add 1 .
 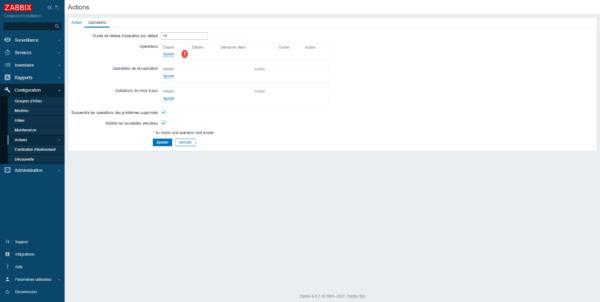 By default, the operation is send Send message, use the scrollbar to select the script 1 created previously.
 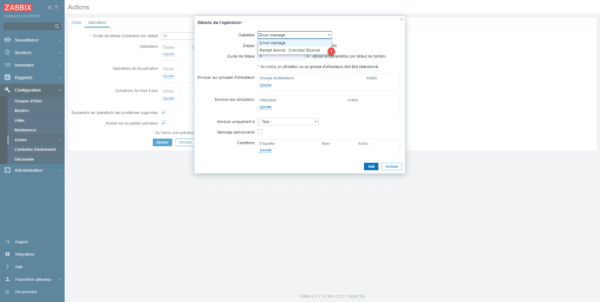 In the Target List, check the Current Host 1 box and click Add 2 .
 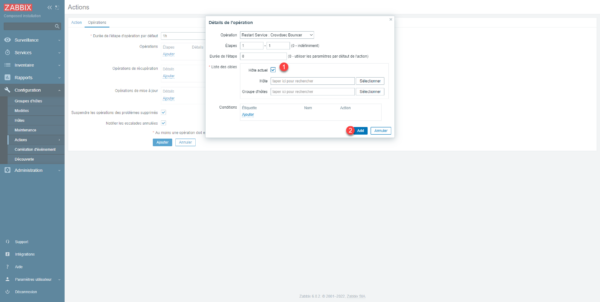 The operation is added, click on Add 1 .
 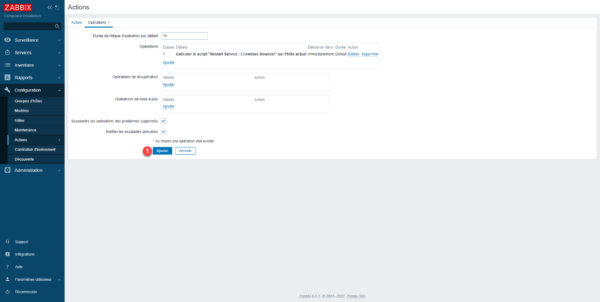 The action trigger is added.
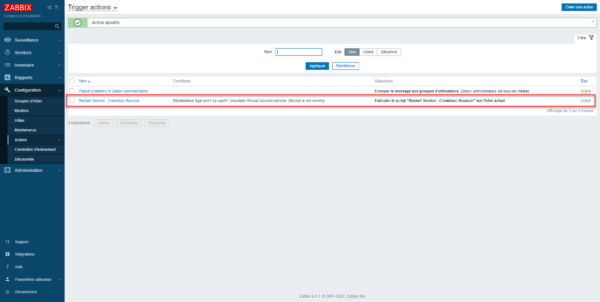
Configuring Zabbix server and agent
Last game before we can have our services restarting. On the server where the agent is, enter the command below to edit the /etc/sudoers file:
zabbix ALL=(ALL) NOPASSWD:/bin/systemctl restart crowdsec-firewall-bouncer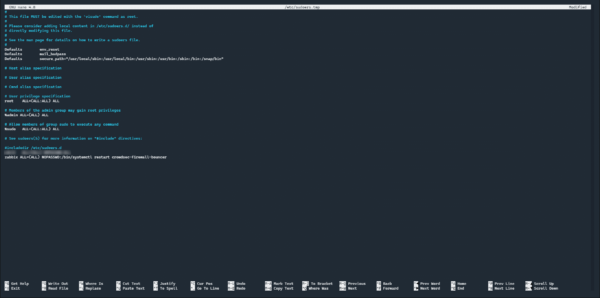
Close the editor while saving.
Do not modify the /etc/sudoers file directly with nano or another editor, the visudo editor checks the file before saving. Misconfiguration in the file will block all sudo commands.
sudo nano /etc/zabbix/zabbix_agent2.conf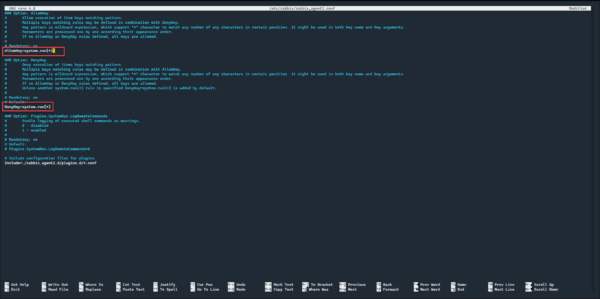
Save and close the configuration file. Restart Zabbix agent service:
sudo systemctl restart zabbix-agent2.serviceTest restarting the service
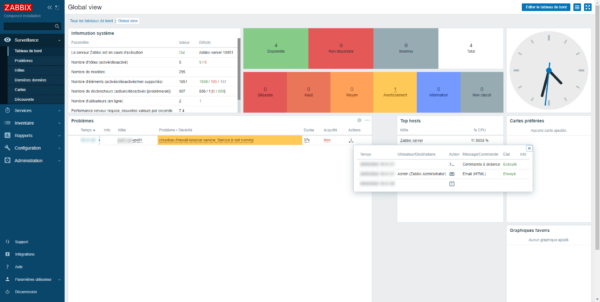
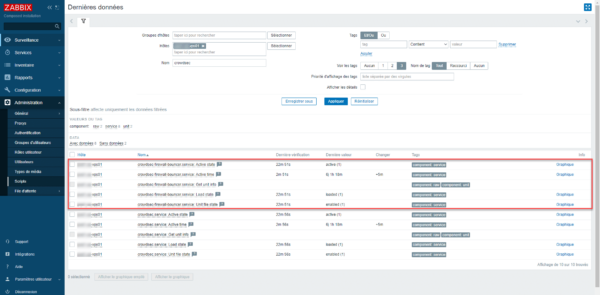
To test, the easiest way is to stop the service on the monitored machine and check if Zabbix restarts it. Once the service is stopped, one can see the alert in Zabbix and that the action has been performed. After checking on the server, we can see that the service is started. Now you know how to restart a service automatically with Zabbix. If you plan maintenance on a service, consider disabling the trigger.
Установка агента Zabbix на Ubuntu
Агент Zabbix – приложение, используемое в онлайн-мониторинге состояния и ресурсов станций, например статистики жесткого диска, состояния памяти, загруженности процессора, доступности портов и т. д. Давайте рассмотрим установку его на Ubuntu.
VPS сервер с Ubuntu от ₽430 / мес Создайте виртуальный сервер на Linux за 1 минуту Заказать VPS
Скачаем программу используя:

Установив программу мы захотим её настроить. Мы сможем сделать это, открыв /etc/zabbix/zabbix_agentd.conf. и изменив некоторые параметры. Те, которые нам нужны, это: Server= ServerActive= Hostname=. Почитайте описания переменных, в Server и ServerActiv подставляем адрес нашего Zabbix, Hostname – имя узла(регистрозависимое), если оставить переменную неопределенной агент подставит название локальной машины. 


Перезагрузим службу.
Посмотрим, запустился ли он.

Заключение
Мы разобрались, как скачать агент и настроить его работу с вашим сервером Zabbix.