- Permission denied when running .sh scripts
- 5 Answers 5
- Ошибка «Permission denied» в Linux
- Изменение прав в терминале
- Изменение прав в файловом менеджере
- В заключение
- How to fix permission denied error in Linux? [Solutions]
- What is Linux Permission Denied Error?
- How To Fix Permission Denied Error in Linux?
- Representation of permissions
- Symbolic representation
- How to Solve Bash Permission Denied?
- Conclusion
- Permission denied, are you root?
- sudo: Executing Commands with Elevated Privileges
Permission denied when running .sh scripts
program exited with code: 126 . This problem always occur when I try to execute my code. What might be the solution?
When I do that it tells me this chmod: cannot access `geany_run_script.sh’: No such file or directory. Should I run it from the terminal or what?
5 Answers 5
If you want to skip these (for now of course), you can create a directory/folder in your user-home directory and work on your C programmes (or others) there.
You can open the terminal (press Ctrl + Alt + T ) and cd to the target directory:
To give the file «the_file_name» execute permission (if the file-system allows you with the RW rights):
..what’s your working directory ie. what’s the location of your source code file? ..do you have some experience with windows CLI?
@wkhwilo-012, please copy your executable file Area_circumference and paste it (the file path will be pasted) to update your question’s body.
You need to give execute and read permissions. Follow this:
chmod u+r+x filename.sh ./filename.sh When we make a new script file then by default it has read and write permission. But if we want to execute them, then we should give execute permission as shown above.
Execution bit alone is not enough for shell scripts, one must be able to read the file as well to execute it (contrary to binaries which only need the execute permission bit)
Open your terminal application by pressing CTRL + ALT + T or with the apposite shortcut on the graphical enviroment (like Terminal or xTerm ).
In the uniform window which appears on the screen you’ll see a blinking character, it’s the terminal cursor : simply click on the window and write to enter text (typically commands) and press ENTER to confirm the input.
Before the cursor there is always listed your current position on the file system from the root directory («/») and your home (where your personal files are) is called «~».
To change directory/folder use cd EXISTENTFOLDER (replace EXISTENTFOLDER with the folder name); if you feel lost, simply type cd to return to your home directory in a blink!
Now let’s solve your problem:
- Use the cd command to find the directory with your source code. Use TAB to help you. If you execute ls -lh , you’ll see a list of possible paths to follow and files to execute.
- When you’ve find the blocked file execute chmod +x FILENAME (replace FILENAME with the name of your source code file).
- If you have multiple blocked files execute chmod +x * to unlock all files in the current directory. Never chmod +x dangerous or insecure files.
- Execute ./FILENAME YOUREVENTUALARGUMENTS to execute your executable file.
- Remember that if your compiled program tries to read/write outside your home directory you’ll need to execute it as root by using sudo ./FILENAME YOUREVENTUALARGUMENTS .
If you want to have a manual for a command execute man COMMAND (replace COMMAND with the exact command name, Linux is case sensitive).
Some shells have an Open terminal here command to simplify your life, search for it in the future and remember that the command shell can be your best friend, if you use it well. 😀
It’s all. If you need more help comment under here.
If I’m helping you press the UP arrow on the left; if you solve mark this answer as best answer.
Have a nice experience on Linux & Ubuntu.
Ошибка «Permission denied» в Linux
Все операционные системы семейства Linux имеют четко разграниченные права доступа. В своей домашней директории пользователь может делать все, что ему угодно, до тех пор, пока укладывается в отведенные рамки. Попытка выйти за них приводит к появлению ошибки «Permission Denied».
Изменение прав в терминале
Рассмотрим вариант, в котором необходимо прочесть текстовый документ, созданный другим пользователем. Файлы TXT в Linux можно просматривать непосредственно в терминале с помощью команды «cat».
- Заходим в каталог с интересующим нас документом. Набираем команду «cat filename», подставляя вместо «filename» имя нужного файла. На скриншоте показана ошибка «Permission Denied», выглядящая в русской локализации как «Отказано в доступе».

Получаем ошибку «Permission Denied» при попытке просмотреть содержимое файла
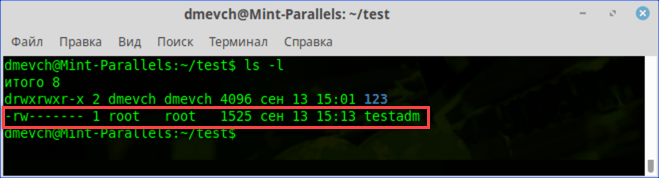
Проверяем права доступа к документу используя команду «ls -l»
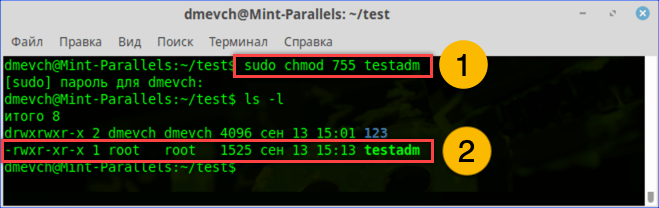
Используем команду «chmod» и административные права для получения доступа
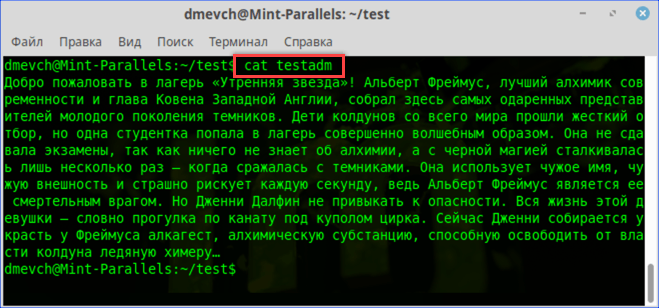
Просматриваем содержимое текстового документа командой «cat»
Изменение прав в файловом менеджере
Разберемся, как выполнить рассмотренную выше операцию в графическом интерфейсе, используя файловый менеджер из дистрибутива.
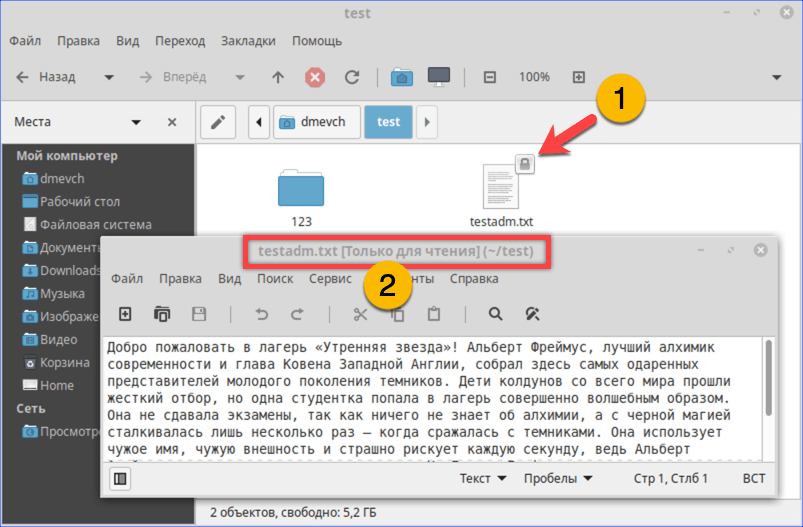
- Как видно на скриншоте, значок файла изначально имеет дополнительные символы, указывающие на то, что доступ у нему ограничен. При попытке посмотреть содержимое получаем графический вариант ошибки «Permission Denied».
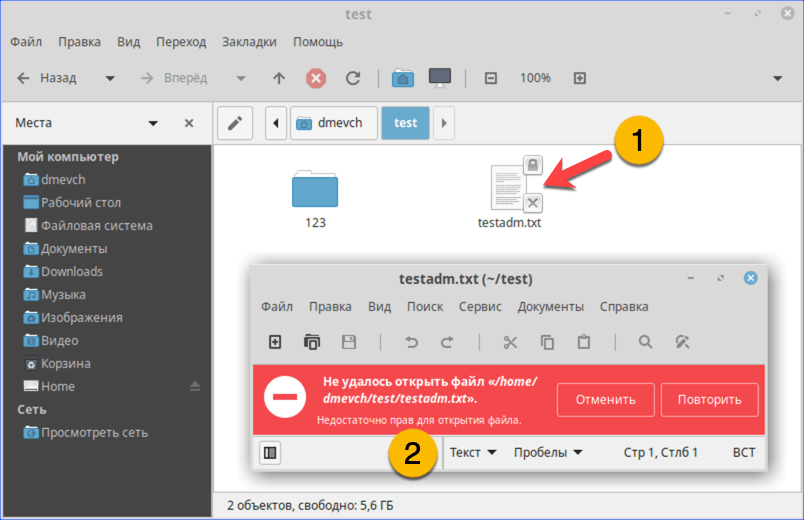
При попытке открыть текстовый документ получаем ошибку «Permission Denied»
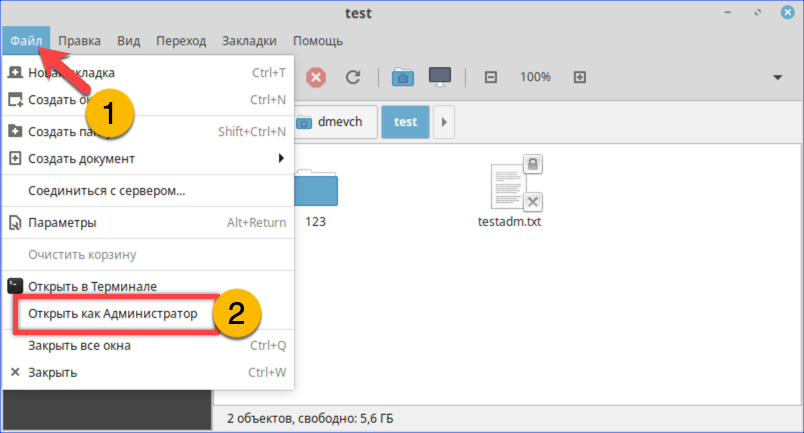
Открываем меню «Файл» и перезапускаем файловый менеджер от имени root
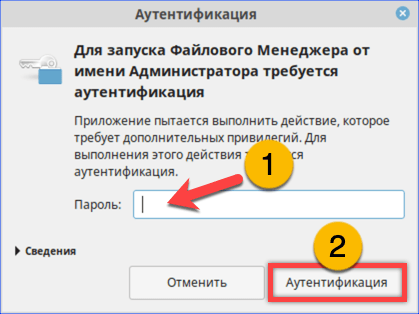
Набираем пароль root в окне аутентификации
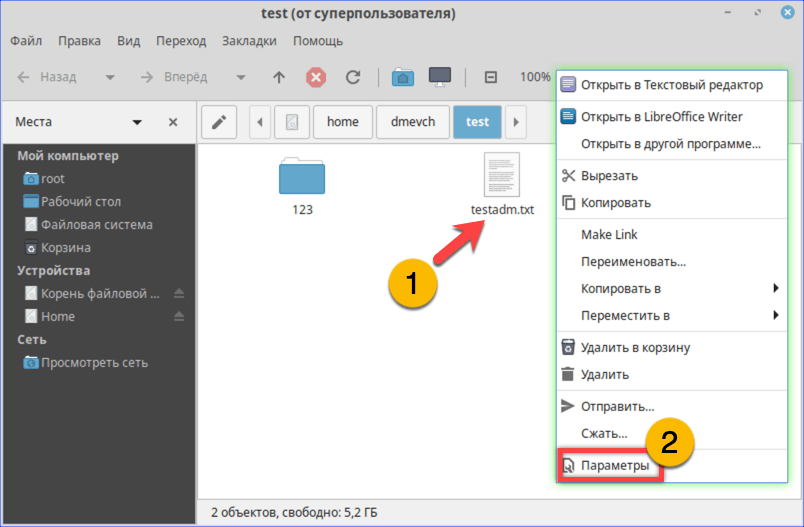
Открываем параметры файла с помощью контекстного меню
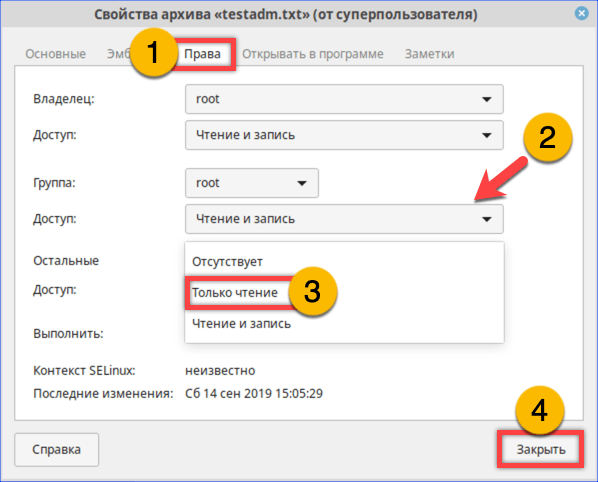
На вкладке «Права» разрешаем доступ для группы root и остальных пользователей
Открываем ранее недоступный файл в режиме чтения и изучаем содержимое
В заключение
Как видим, избавиться от ошибки Permission Denied достаточно просто. Решив изменить правда доступа к системным файлам, лишний раз убедитесь, что полностью уверены в своих действиях и понимаете последствия вносимых изменений.
How to fix permission denied error in Linux? [Solutions]
When you are working with the Linux Operating system then a common error occurs i.e. permission denied, In this article, you will get to know about how to ‘permission denied’ error in Linux?[linux permissions denied]
![How to fix permission denied error in Linux? [Solutions]](https://monovm.com/wp-content/uploads/2022/02/permission-denied-linux327-main.webp)
List of content you will read in this article:
In the Linux operating system, you cannot execute any command without proper permission. Every file and directory has some permission or privilege (read, write, or execute) associated with them. If you are not authorized to access the file or directory, executing any command on that will result as a “permission denied” error in Linux. This prevalent common can only be resolved by getting the proper access to that file and directory. In this article, we will help you with how to fix the permission denied errors in Linux and what type of error this is with the help of various Linux commands.
What is Linux Permission Denied Error?
This type of error will occur whenever you run a command for which you do not have the execute permission. Similarly, you cannot perform read or write actions if you do not have read or write permission for any file or directory. These Linux permissions are the primary reason behind the security of Linux, as they will help in protecting the data from unauthorized access.
Linux system has three types of permissions
So, if you want to solve a Linux permission denied error, you can check your privileges for the specific file or folder using the following command.
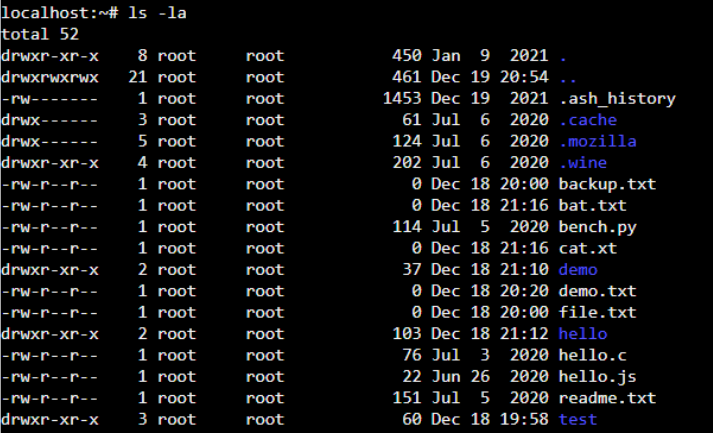
This command will display the long listing of all files and folders along with the permission, as shown below.
As shown below, we have created a shell script “hello.sh” without the execute permission. On executing “hello.sh”, you will get a “permission denied” error.

How To Fix Permission Denied Error in Linux?
For solving this error, you need to add the correct permissions to the file to execute. However, you need to be a “root” user or have sudo access for changing the permission. For changing the permission, Linux offers a chmod command. The chmod stands for change mod. This command has a simple syntax, as shown below.
chmod flags permissions filename
- Flags are the additional options that users can set.
- Permissions can either be read, write or execute in the file. You can represent them in symbolic form (r, w, and x) or octal numbers.
- The Filename specifies the file’s name for changing the permissions.
Representation of permissions
Below is the symbolic and octal representation of the user’s permissions while executing the “chmod” command. First, we will understand the representation before using it.
Symbolic representation
- r specifies the read permissions
- w specifies the write permissions
- x specifies the execute permissions
- Octal representation-
- 4 specifies the read permissions
- 2 specifies the write permissions
- 1 specifies the execute permissions
- 0 means no permissions issued.
How to Solve Bash Permission Denied?
Now, we are aware of the error, as shown below.

Giving the appropriate permission to the user will solve the problem. Thus, we are giving the execute permission to the user to run the “hello.sh” shell script. Execute the below command to provide execute permission.

Now, we can see the change in the permission of the “hello.sh” script file. The above command provides the execute permission to the file. As you can see, the root user can make the required changes. If we execute the shell script, we should not get the error. Let’s try by running the below command.

After executing the “hello.sh”, we get the output that displays the “hello.” Changing permission has solved the problem of bash permission denied.
Conclusion
If you are a regular Linux user, you might have faced the “permission denied” error while executing various commands. This might be due to the incorrect privileges to run that command. Only a root user or user with sudo access can change the permissions for the file or directory you want to access or execute. If you are the correct user to make the required permission changes, you can run the “chmod” command and add the desired permission.
This is all about how you can solve/fix permission denied errors in Linux with the help of the above-listed commands/methods. If you think there are other alternatives to achieve the goal, you can put them down via the comment box. Also, you can buy a Linux VPS server to run and test the above-listed commands.
Permission denied, are you root?
Use sudo to run a command with root privileges, like this:
@Suisse you’re not using bash which is pretty uncommon so the first question is why, secondly you might want to try simply typing /bin/bash to get into bash
I am using the terminal of a docker image. from the docker dashboard. by doing /bin/bash I got into bash (different colors and highlighting) but I still get the error: E: Could not open lock file /var/lib/dpkg/lock-frontend — open (13: Permission denied) E: Unable to acquire the dpkg frontend lock (/var/lib/dpkg/lock-frontend), are you root?
@Suisse if you’re using Docker it’s a Docker question more than an Ubuntu question. It may depend on your container but likely you can specify that you want to be root when you enter the container, like docker exec -u root -it
sudo: Executing Commands with Elevated Privileges
- Most of the following commands will need to be prefaced with the sudo command. This elevates privileges to the root-user administrative level temporarily, which is necessary when working with directories or files not owned by your user account. When using sudo you will be prompted for your password. Only users with sudo (administrative) privileges will be able to use this command. You should never use normal sudo to start graphical applications as Root (Please see RootSudo for more information on using sudo correctly.)
So, because apt-get installs software and thus affects the system, you need to use the sudo command to give yourself administrator privilages.
Thus, you command should be sudo apt-get install myunity
If you want to update your system, run
sudo apt-get update sudo apt-get dist-upgrade This will update your system’s package database and then install any upgrades.
This does’t help in getting rid of the error: unable to lock the administration directory (/var/lib/dpkg/), are you root?
This one worked for me. You shouldn’t run both commands in one line as it was giving me same above error. I ran it separately and it’s doing something. Let’s see how it goes.
Before running any administrative task: installing, removing, changing system wide preferences, etc. you need to be root . This is specially true for apt-get . The message itself tells you where the problem is:
If you are not root , the install command will not work at all.
The way to fix this is using sudo before the command:
➜ ~ apt-get update E: Could not open lock file /var/lib/apt/lists/lock - open (13: Permission denied) E: Unable to lock directory /var/lib/apt/lists/ E: Could not open lock file /var/lib/dpkg/lock - open (13: Permission denied) E: Unable to lock the administration directory (/var/lib/dpkg/), are you root? ➜ ~ sudo apt-get update Fetched 616 kB in 25s (23.9 kB/s) As you can notice, it completed without problems when I used sudo . If you have any open (13: Permission denied) it is almost sure that you are not root and need to use sudo .