- Change folder permissions and ownership
- 9 Answers 9
- File Permissions in Linux – How to Use the chown and chgrp Commands
- What are Group and Users in Linux?
- What are Primary and Secondary Groups in Linux?
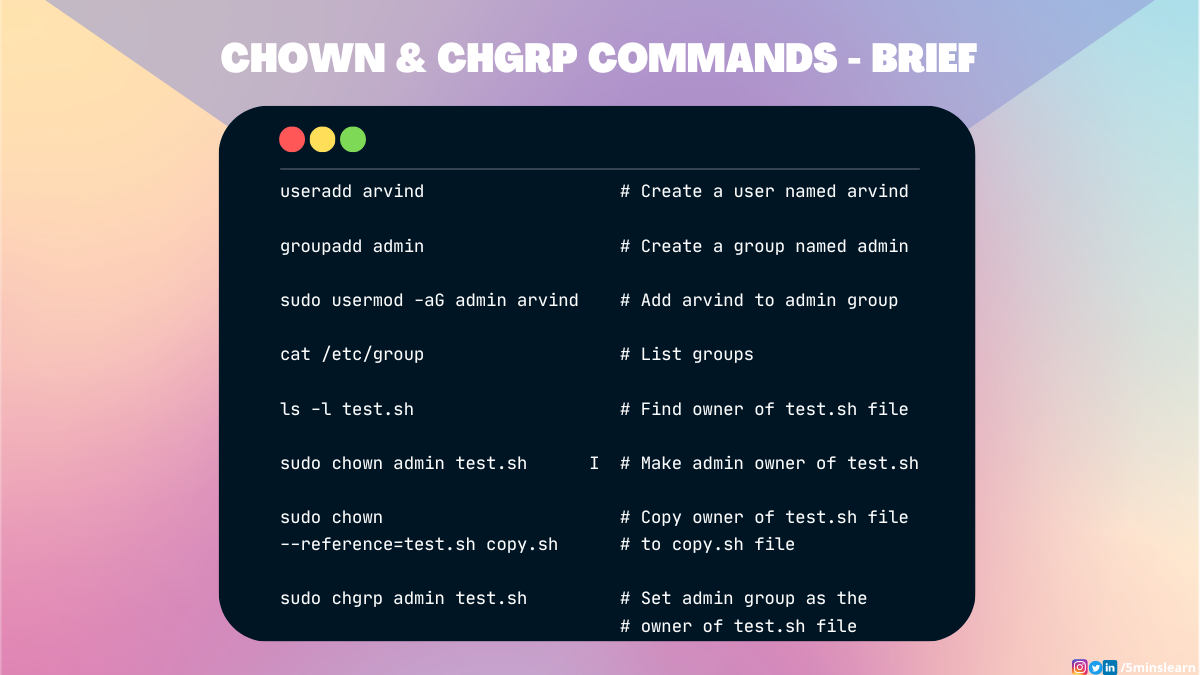
- How to Create a User
- How to Find the Current Owner and Group Ownership of a File
- How to Change the Owner of a File or Directory
- How to Copy Ownership from One File to Another
- How to Change Ownership of Multiple Files with a Single Command
- How to Change the Group Ownership of a File
- How to Change the Group Ownership of a Directory
- Conclusion
Change folder permissions and ownership
I would like the user to have full rights on this folder (as well as all sub-directories and files in it):
currently owned by root. I have found numerous posts (in this forum and elsewhere) on how to do this for files but I can’t find a way to do it for whole folders.
9 Answers 9
Use chown to change ownership and chmod to change rights.
As Paweł Karpiński said, use the -R option to apply the rights for all files inside of a directory too.
Note that both these commands just work for directories too. The -R option makes them also change the permissions for all files and directories inside of the directory.
sudo chown -R username:group directory will change ownership (both user and group) of all files and directories inside of directory and directory itself.
sudo chown username:group directory will only change the permission of the folder directory but will leave the files and folders inside the directory alone.
As enzotib mentioned, you need to use sudo to change the ownership from root to yourself.
Note that if you use chown : (Note the left-out group), it will use the default group for that user.
If you want to change only the group, you can use:
BEWARE of recursively taking ownership of ANY directory. Think before you leap. Don’t be chown copypastin’ from the internet, kids. Just because you want to install a node package and it won’t let you, don’t sudo chown -R just because the fist hit from googling the error message says to. Reckless sudo chown -R -ing can kill your OS.
It needs to be said that using the -R option only applies to files and folders that exist in the directory already. It does NOT apply to future creations. For example, if you create another folder or file as root within the folder you’ve already changed permissions on, you will have the same experiences you’re having now until you chmod\chown them again.
Make the current user own everything inside the folder (and the folder itself):
very helpful for newbies (like me) when don’t know what to type in ‘usergroup’ for sudo chown
If you prefer, this can be done with a GUI as well. You will need to open Nautilus as root to do so. Press Alt + F2 to access the «Run Applications» dialog and enter gksu nautilus
Next, browse to and right click on the folder you would like to modify. Then, select «Properties» from the context menu. You can now select the user or group that you would like to be the «Owner» of the folder as well as the permissions you would like to grant them. Finally, press «Apply Permissions to Enclosed Files» to apply the changes recursively.
Though it seems this does not always work for some operations in a deep folder tree. If it does not work use the appropriate terminal command.
File Permissions in Linux – How to Use the chown and chgrp Commands

Arunachalam B
When it comes to large organizations, Users and Groups in Linux play an important role in helping keep systems secure and properly functioning.
There can be different levels of users in an organization with different roles and permissions. And you’ll need a good understanding Linux permissions to manage and/or understand them.
To protect files and directories in Linux from access by certain types of users, we can use the chown and chgrp commands. These commands let you manage which type of user can read, write, and execute a file.
Before discussing the specifics of these commands, though, you need to understand the basics of how groups and users work in Linux. You’ll also need to know how you can manipulate permissions for them.
Let’s get into the topic without any further ado.
What are Group and Users in Linux?
A user is a regular entity that can manipulate files, directories, and perform various types of actions in a system. We can create any number of users in Linux.
A group contains zero or more users in it. Users in a group share the same permissions. The group allows you to set permissions on the group level instead of having to set permissions for individual users.
Let’s consider a scenario in software development where a machine gets used by various types of people like Administrators, Developers, and Testers.
Each person should have an individual level of access to the files in the system. Accordingly, there will be a common set of permissions for developers, testers and admins, in their respective groups.
Let’s say there are 10 developers and 8 testers on your team and you’re using 1 shared computer (each of you has a laptop too).
You want to create a file that should be accessible only to the developers. Can you achieve this without using the concept of groups? Yes – it’s doable. But, that means you’ll have to assign permissions individually to each developer.
The next day, say you get news that your team is expanding to 150 developers and 20 testers due to an immediate client requirement.
Again, you could assign all those additional permissions individually. But, it’s not scalable. It’s so tedious to manage permissions for each and every developer – so why not do it all together if they share common permissions?
Here comes the usefulness of groups. If we have all 10 (or 150) developers in a group called dev_group , we can simply give permission to the group dev_group .
There are other use cases aside from permissions for groups, but we won’t get into that here.
What are Primary and Secondary Groups in Linux?
As the name implies, a primary group is a group that a user belongs to by default.
For example, let’s assume your username is arun , and you create a group called admin . Then you will belong to the group admin by default.
A secondary group is a group to which you can add any number of users.
How to Create a User
You can create a user by using the useradd command. Each user in a Linux system has a unique user id.

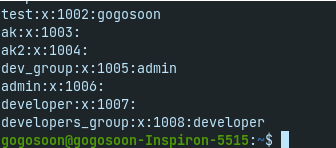
This will be huge file. By default it has 70 to 100 lines. So, I’ve cropped the top and bottom part of the command’s output in the above screenshots.
The last 2 lines of the above screenshot describe that there’s a new user called developer , a new group called developers_group , and the user developer has been added to the developers_group group.
How to Find the Current Owner and Group Ownership of a File
There’s a powerful – and likely familiar – command in Linux which shows the permissions involved in a file/directory. This is the ls -l command:
![]()
Let’s go over the output separated by spaces and understand each part of it:
- -rw-rw-r— 1 – Permission for file test.sh
- 1st occurrence of gogosoon – Owner of the file
- 2nd occurrence of gogosoon – Group ownership of the file
How to Change the Owner of a File or Directory
You can use the chown command to change the ownership of a file. The chown command is abbreviated from «change owner».
From our previous example, we have seen the file test.sh owned by the user named gogosoon .

From the above screenshot, you can clearly see that the owner of the file test.sh has been changed from gogosoon to admin .
How to Copy Ownership from One File to Another
I have faced this scenario once in my career. We use a common system in some rare use cases. Here’s what was going on:
One day I was working on that system to complete a POC which required me to create hundreds of files with a different user ownership. A file was created with default permissions (owned by me) whenever it was created.
But I want the file to be owned by another user. I was too lazy to change the ownership for each file manually. If I changed the ownership for one file, I wanted to be able to copy the same ownership for other files. I was sure that there must be some command that allowed me to do this.
So I did a quick Google search about how to copy ownership from one file to another. After few seconds, I found the solution and it was so simple. You can do this by adding a —reference flag.

From the above screenshot, you can see that the first command describes the ownership of the test.sh file, which is owned by the admin user.
The second command describes the ownership of the copy.sh file which is owned by the gogosoon user.
The third command copies the ownership of the test.sh to the copy.sh file.
The last command again describes the ownership of the copy.sh file which is now owned by admin user.
You may wonder that at the beginning I told that I created hundreds of files – but how did I change the ownership of all the files at once?
That’s a different story. But here’s a quick answer: I wrote a script that looped over all the files and changed the ownership by referencing a single master file.
How to Change Ownership of Multiple Files with a Single Command
You can do this by passing multiple file names to the chown command with one user name. This sets the ownership of all the given files to that particular user.

How to Change the Group Ownership of a File
Almost all the operations related to groups can be achieved with chgrp command (an abbreviation of «change group»). It’s pretty similar to the chown command.
Syntax of the chgrp command:

From the above screenshot, you can see that I changed group ownership of the test.sh file from gogosoon to admin . Since I do not belong to this group, I will not have write access to the file.
Let’s verify the same by opening the file in write mode using nano test.sh :

How to Change the Group Ownership of a Directory
The same syntax for files is applicable to directories also. Here’s a quick example:

But remember that the above command changes the group ownership of only the files in that directory. To recursively change the group permissions of all the directories inside that directory, we have to add the -R flag to it like this:
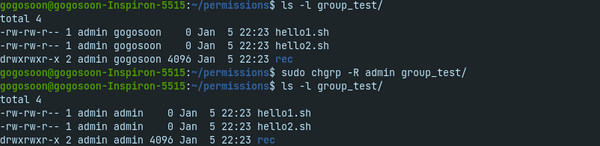
Now the group ownership for all the files and directories inside group_test have been changed from gogosoon to admin .
Let’s verify the output by trying to write a file from the directory group_test as the gogosoon user:


Hurray! The ownership has been applied appropriately.
Conclusion
In this article, you have learned about handling user and group ownership of files and folders. I hope you enjoyed reading it.
Subscribe to my newsletter by visiting my site and also have a look at the consolidated list of all my blogs.