- pfSense bridging Wi-Fi and LAN: allow access between Wi-Fi and LAN
- 2 Answers 2
- pfSense 2.4 WIFI configuration: a helpful illustrated guide
- Add wireless interface
- Assign wireless interface
- Wireless interface configuration
- Which Standard and channel to use?
- Bridge Wireless and LAN
- WiFi firewall rules
- DHCP pool for WIFI network
- Wi-Fi troubleshooting
- wifi connected, but there’s no internet
- wifi network is up, but you can’t get an IP address
- Any other problem?
- Pfsense wifi as lan
- Pfsense wifi as lan
pfSense bridging Wi-Fi and LAN: allow access between Wi-Fi and LAN
I have read the docs on the pfSense page and from what I can tell, the bridge between interfaces should allow for communications.
I have tried following this article and either I did it wrong, or it no longer applies.
This page https ://forum.pfsense.org/index.php?topic=20917.0 was written a long time ago, and I don’t know enough about pfSense to really follow his written directions. The part about the extra adapter is what’s throwing me for the loop.
Why do you want to bridge these networks? Most of the time in this situation, LAN and WiFi would each be their own subnet, and could route traffic back and forth. Firewall rules for traffic between these subnets can be as open or as restrictive as you desire.
This is a test, and there is 1 machine behind pfSense that I wish to manage, and Wi-Fi makes that easy.
You’re missing the point. Bridging networks like this is nearly always not what you want to do. Instead, create two separate Layer 3 networks and then configure routing between them. Routing is much different than bridging. With a routed solution, you’ll still be able to communicate between networks without issue, including performing whatever management tasks required.
I may be missing your point, but the doc page says that a bridge bridges layer 2 and that’s not working. I appreciate your attempt at another better solution, and I’ll explore that when I can get back to the hardware. I don’t understand why anyone and everyone seems to hate or ignore bridging though. Is it broken in pfSense? Is it like the white elephant of pfSense?
It’s the white elephant of networking in general, not just pfSense. There are few to no benefits of bridged networks, and it introduces the possibility of a lot of different types of issues. Routed networks are much more simple, predictable, easier to control, easier to troubleshoot, etc., and unless you require L2 broadcast connectivity between hosts, there is no technical reason to not use two separate routed networks.
2 Answers 2
The devices on the LAN and on the Wifi have the same network address ? Or they’re different networks if we talk about IP networks ?
Try to look if the Firewall it’s your problem:
Create on Firewall / Rules one Rule allowing the access to the LAN network if the source it’s the Wifi network
Action = pass
Interface = Select on the combo Lan address name
protocol = any
Source = Select on the combo » Name of the wan network net»
Destination = Select on the combo » Name of the LAN network net»
Log = Check it to see on the System Logs info about the packet it controls. When it runs ok you can remove it.
To see the log of the Firewall go to: Status / System Logs / Firewall tab
pfSense 2.4 WIFI configuration: a helpful illustrated guide
There are many tutorials all over the internet for pfSense wireless configuration, but most of them don’t seem to work work and the rest is for the previous pfSense versions.
At TekLager we configure wireless for clients almost every day, and this is how we do it.
- Have wireless card that is supported by pfSense (for example WLE200NX)
- Make sure your card is properly mounted in the mPCIe slot and the pigtail cables are plugged in tightly
- Your card is detected by pfSense
First, overview of all steps:
- Add wireless interface
- Assign newly created interface
- Configure the interface
- Configure the DHCP for the interface
- Bridge the LAN and WIFI interfaces
- Allow the Wifi interface traffic through the firewall
- Verify
Now, thep by step instructions.
Add wireless interface
Click Interfaces -> Assign -> Wireless
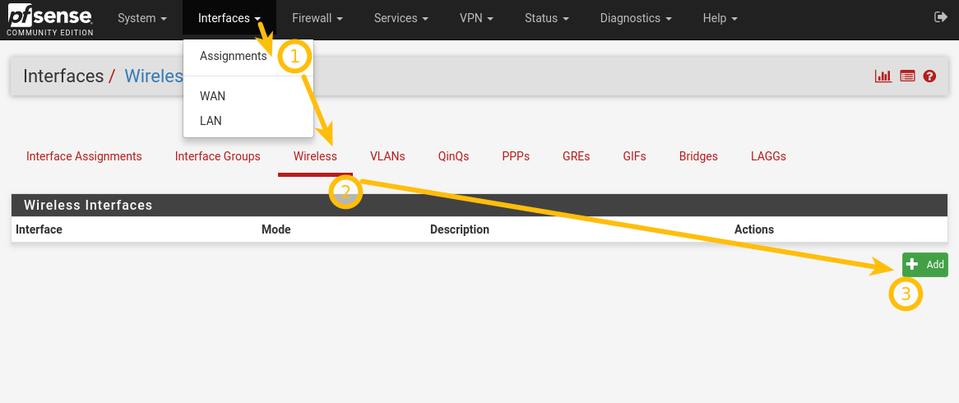
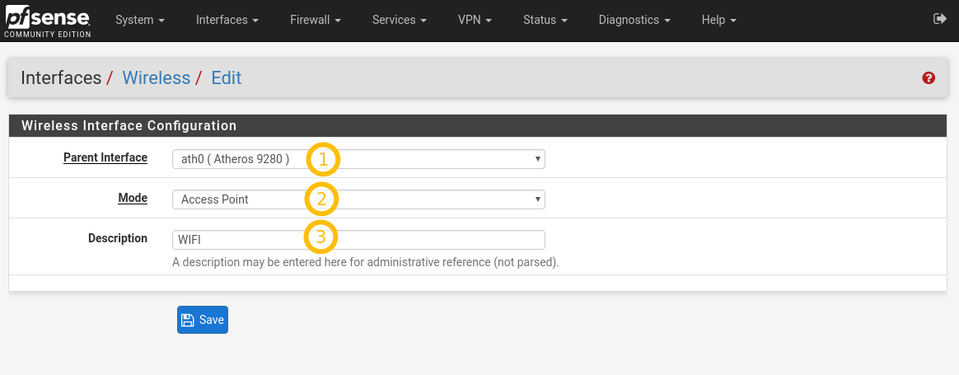
In the «Parent interface» drop-down you should see your wireless card. If this field is empty, your card is either not supported by pfSense or improperly installed.
In «mode» select «Access point».
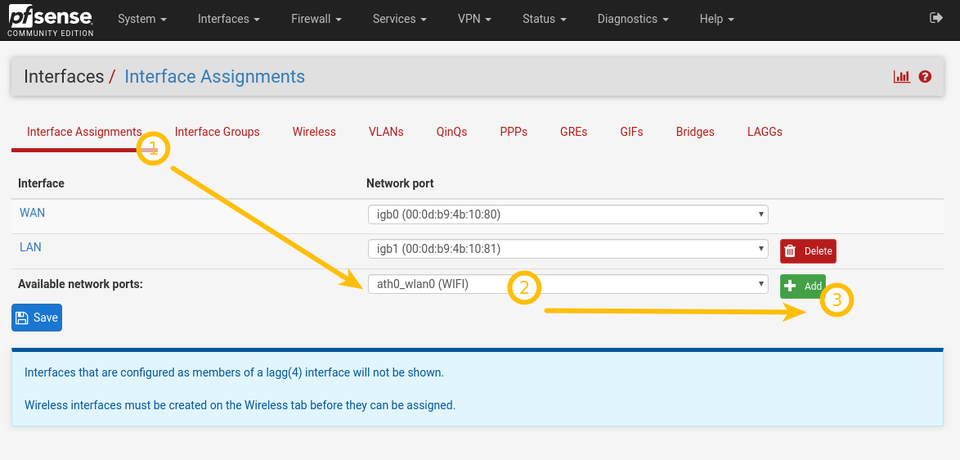
Assign wireless interface
This is somewhat confusing since you already «added» the card. Now you need to assign the interface.
Go to «Interface Assignment», select your newly created interface and click Add.
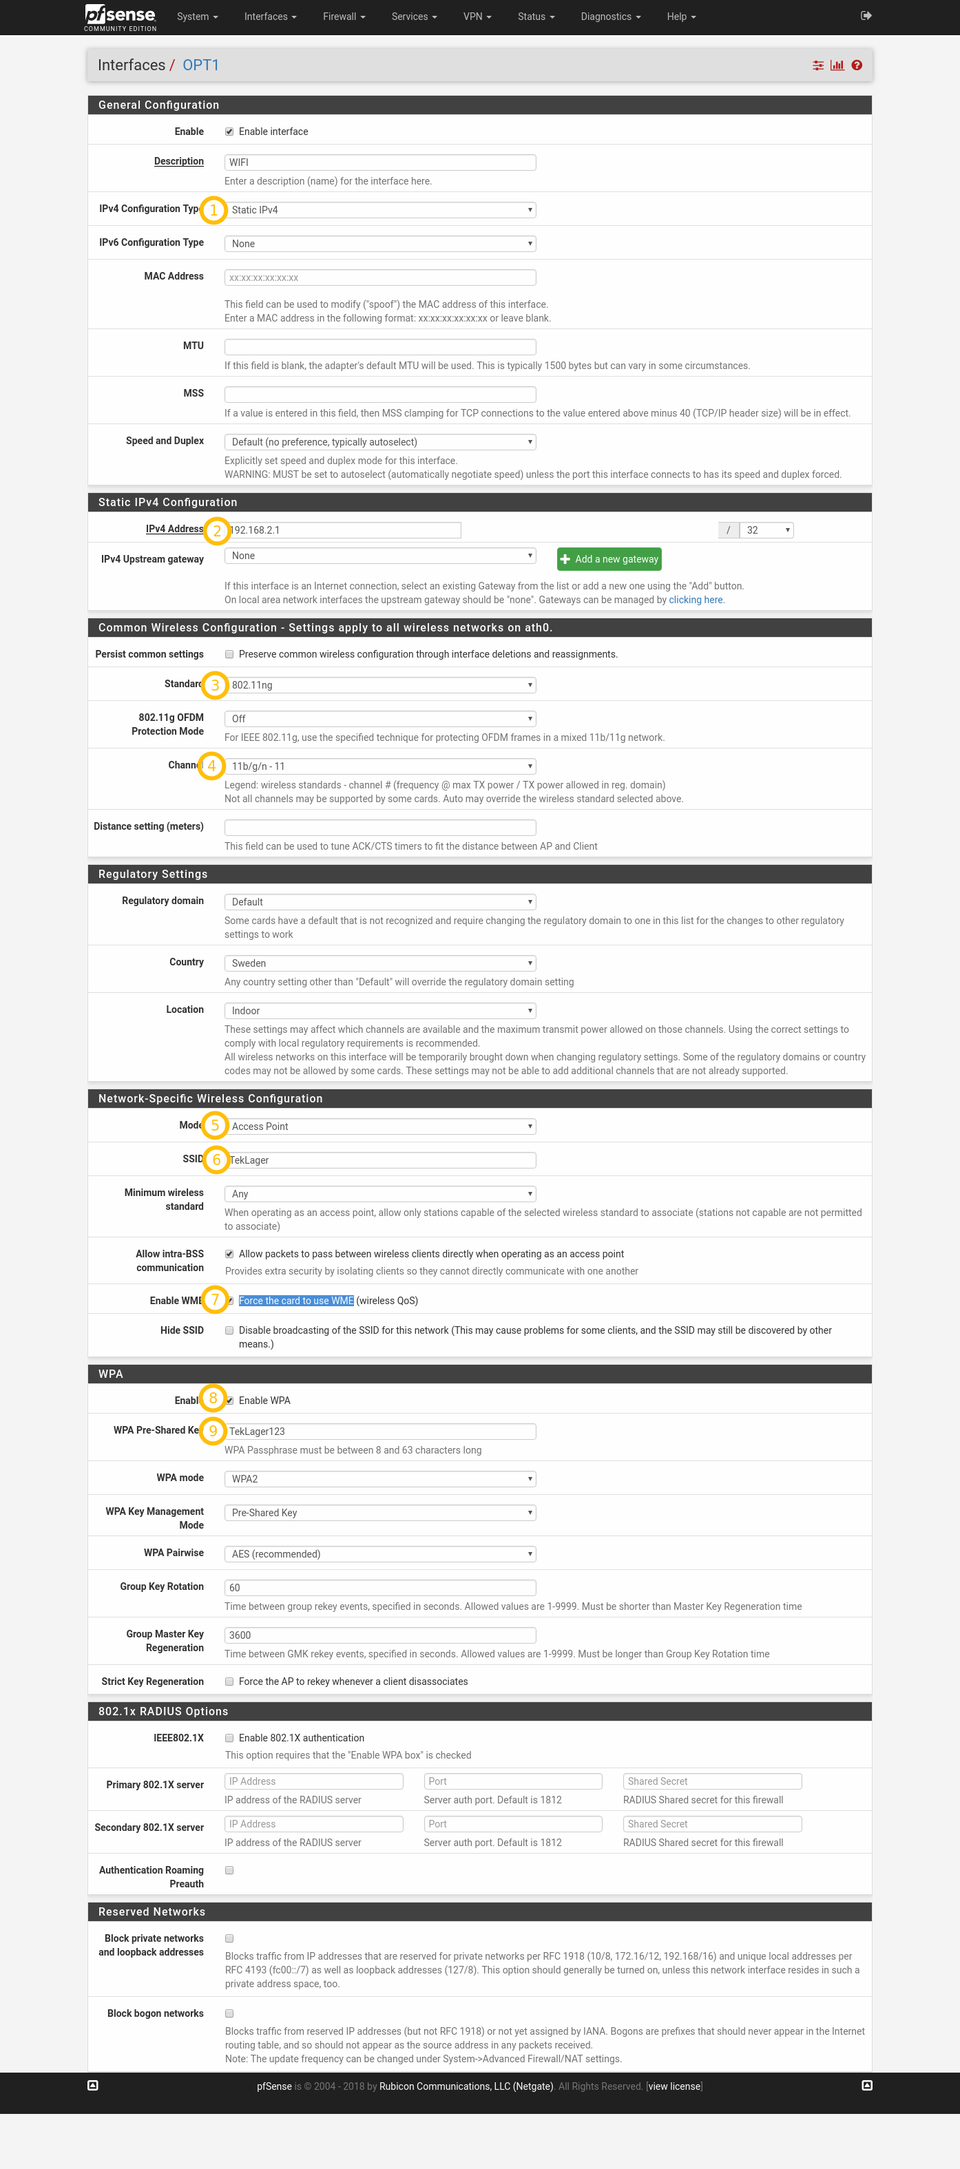
Wireless interface configuration
This is where the bulk of the configuration happens. See the detailed screenshot for how we configure the interface by default.
Enable: checked
Description: WIFI
IPv4 Configuration Type: Static IPv4
IPv4 Address: 192.168.2.1/24 (WARNING: screenshot shows incorrectly /32 — don’t make this mistake!)
Standard: 802.11ng or 802.11na — (see explanation below in «Which Standard and channel to use?»)
Channel: «11b/g/n — 11″ or » a/n — 100 » — (see explanation below in «Which Standard and channel to use?»)
Mode: AccessPoint — important(!!)
Enable WME: checked (Force the card to use WME) — important(!!)
Enable WPA: checked
WPA Pre-shared Key: TekLager123
Which Standard and channel to use?
If you must connect with old 802.11g devices, you have to choose the 802.11ng mode otherwise your old hardware won’t see the new access point.. If you don’t have any old hardware that needs to use this access point, then we highly recommend using 802.11na mode because throughput and performance will be much better.
See out throughput test for the different modes in the Wireless throughput test article.
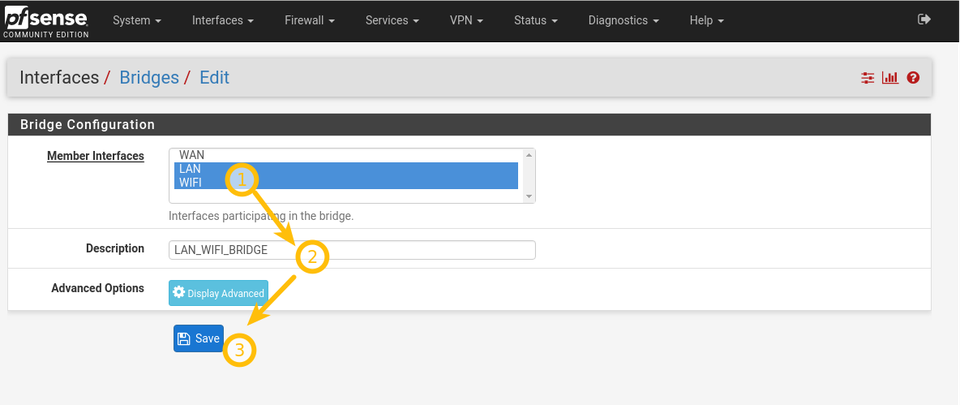
Bridge Wireless and LAN
This step is not stricly necessary, but it’s convenient to be able to connect to the LAN hosts when you are on WIFI.
LAN is on 192.168.1.0/24 and Wireless is on 192.168.2.0/24 — if you don’t bridge these two networks, you won’t be able to connect between LAN and wireless hosts.
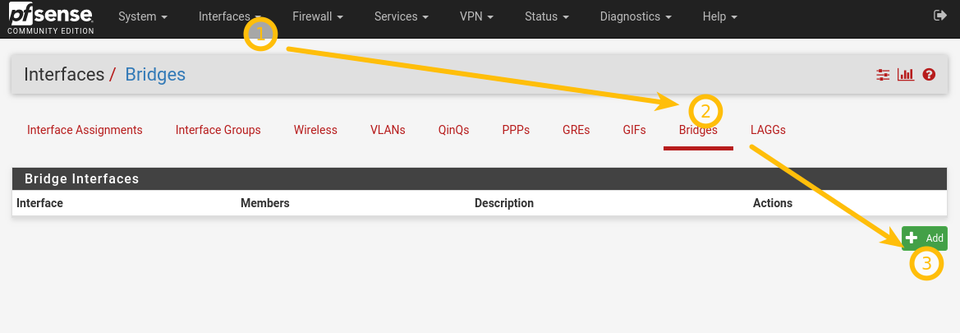
Go to Interfaces -> Bridges -> Add
Select WIFI and LAN and Save.
This may take between 10-30 seconds. You may temporarily lose the connection and may need to refresh the browser window.
WiFi firewall rules
It’s important to add «pass» rules to the WiFI interface, otherwise all your connections and packets will be dropped.
Go to Firewall -> Rules -> WIFI and add pass ruless.
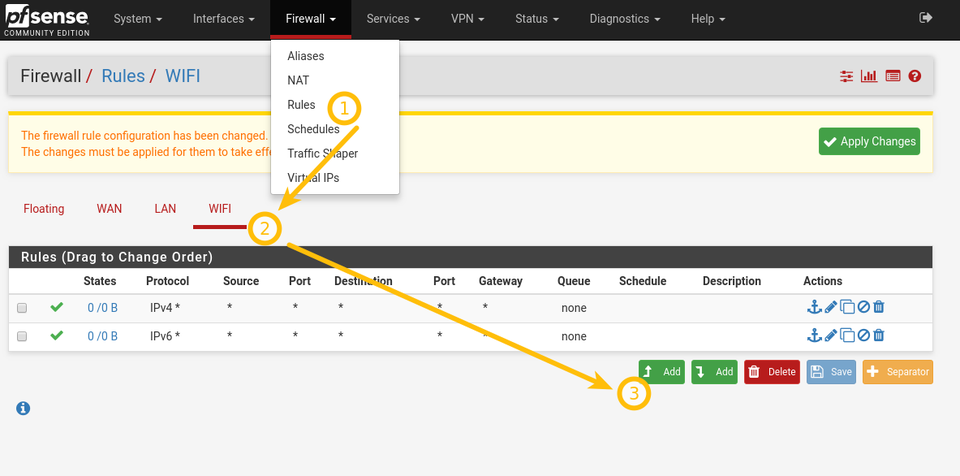
you may need to modify rules in the LAN tab as well.
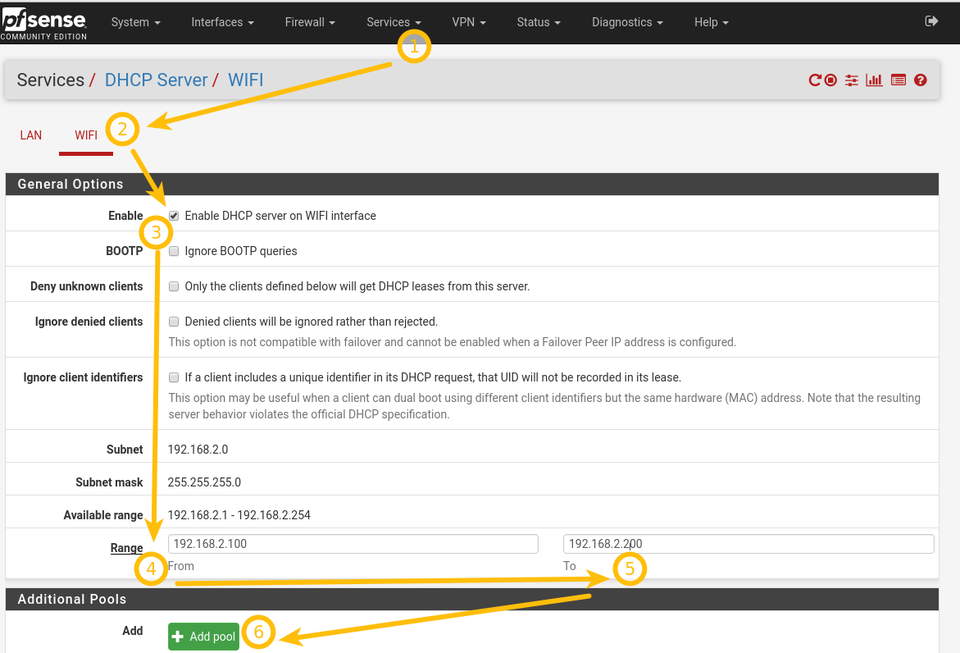
DHCP pool for WIFI network
You must configure DHCP pool for the newly created WIFI network, otherwise clients will be able to connect, but won’t get any IP address.
Go to Services -> DHCP server -> WIFI and follow the instructions on the screenshot.
If you followed all the steps, you should be able to see and connect to the «TekLager» wireless network. Since this network is bridged with LAN, you should be able to connect to the internet.
Wi-Fi troubleshooting
If you are not able to connect, check the Firewall logs in Status -> System Logs -> Firewall
wifi connected, but there’s no internet
If you are able to connect, but don’t get any internet n the conencted device, it most likely means that you have some firewall rules blocking your connection.
Remember that your WIFI and LAN networks are bridged. You need to make sure both your LAN rules and your WIFI rules don’t block your connection.
Go to Firewall -> Rules -> WIFI/LAN and see if there are any rules that look suspicious.
wifi network is up, but you can’t get an IP address
This means that your DHCP for the WFI network is misconfigured. Go to Services -> DHCP server -> WIFI and make sure the «Enable DHCP server on WIFI interface» checkbox is clicked.
Any other problem?
Pfsense wifi as lan
The pfSense® project is a powerful open source firewall and routing platform based on FreeBSD. Developed and maintained by Netgate®.
In my house, my network devices are all located upstairs however there’s now a few devices downstairs that only have Ethernet ports (or wifi if you spend a few hundred on proprietary wifi dongles). What I want to do is place something downstairs that these devices connect to which is linked over the wifi to the network upstairs (on the 192.168.0.0 subnet).
As a means of being frugal, and also impatient, I have an unused ALIX board that I used to use as a PFSense router before I moved onto Sophos’ UTM. I also have a USB wifi dongle that works with PFsense.
I tried a few scenarios with PFSense but the working solution I have is assigning the Wireless interface (Run0_wlan0) as a WAN connection that’s on my 192.168.0.0 subnet. Any device that’s plugged into the LAN port on the PFSense device gets an address on the 192.168.4.0 subnet and then PFsense routes between the two networks.
This works and I can browse devices on the 192.168.0.0 subnet just fine from the 192.168.4.0 subnet but I’m not sure what I’ve done is the most efficient way. Ideally I’d like to just simply pass through the Wifi connection to the LAN port transparently without the need for routing, so the LAN port is on the same network as the Wifi adapter. I figured bridging would do this but PFSense won’t let me bridge wireless adapter unless it’s configured as an access point.
Pfsense wifi as lan
EDIT: This is for using the pfSense box as a CLIENT to an AP, not as a bridge or repeater.
First off, I thought it was simple, I was wrong. If anyone ever needs this odd scenario, here’s how to do it.
- Install a fresh pfSense OS as normal and accept an Ethernet port (lan0, alc0, or eth0) as a WAN port initially to let it stop complaining. I did this without an actual internet connection, it still complained. I left the LAN blank.
- Log into pfSense web interface. I had to use the magic of auto-DHCP from a different source (Windows shared connection for instance). Having an intelligent Ethernet switch works wonders too.
- Navigate to Interfaces -> Assignments -> Wireless; make sure your Wireless adapter or embedded WiFi is recognize and set it up as «Infrastructure (BSS)»
4a) Navigate to Interfaces -> Assignments; add your WiFi as LAN, initially. save. then flip them: xxx_wlan0 as WAN and alc0/eth0 as LAN
4b) Make sure your private subnet, mask, and DHCP server is setup on LAN before or during these sequence of events, I forgot to document when I actually did this, it could have been before I flipped the WAN and LAN assignments.
5) Navigate to Interfaces -> WAN; Configure your Wireless settings and enter all information to CONNECT to the wireless Access Point. It may seem it is being setup as an Access Point, don’t worry, it’s not.
6) We’re not even close to being done. Mine might be buggy, so I needed a way to auto-connect on boot because it derps. So I created a file called «wifi.sh» in the folder «/usr/local/etc/rc.d» and had just two lines:
ifconfig _wlan0 down ifconfig _wlan0 up
Replace with the actual interface prefix.
Notes: I did try the way with «wpa_supplicant» and configuring, but it either worked half the time, or just threw continuous errors on the prompt.
7) Make some adjustments to the WAN wireless settings for quicker connection on boot (like setting the channel number to a fixed value if your wifi router will never change its channel).
What I have right now works 100% and I’m enjoying my firewall that is connected to a wireless access point and using that adapter as a WAN port while the Ethernet port goes directly to my switch and serving+protecting the internet to all my racks and devices connected via Ethernet.
If you’re too lazy like I was for over three years, you can always use Windows internet connection sharing (easy in 7/8.1/10/2008). :p I finally got the chance to re-purpose gear into a 1U just to pull this off. It would have been overkill before as pfSense on a 2U hosting a mid-high range CPU with a compliment of hard drives is kinda silly. It was easier just to enable ICS and have Wifi be the shared adapter at the time.