Прикладная некромантия в линукс или возвращаем из небытия удаленные файлы
Думаю, каждый из нас с вами сталкивался с проблемой, когда из-за глюка прошивки фотоаппарата, камеры, кпк, смартфона или просто из-за особого устройства /dev/hands карточка была отформатирована, данные были удалены. В свое время данную проблему я решал достаточно просто, используя Portable версию Ontrack Easy Recovery, но так как уже несколько лет являюсь пользователем linux систем, то использование данного нелицензионнного приложения через wine показалось не совсем кошерным, к тому же жажда исследований и приключений требовала найти бесплатный родной аналог для linux систем. Исследования закончились, даже не успев начаться, так как первая строчка в поиске Google привела к набору утилит TestDisk, о которых я расскажу далее подробнее.
И так, TestDist состоит из двух утилит:
testdisk и photorec; Официальный сайт утилит.
Краткое описание:
testdisk – мощная утилита, разработанная для восстановления удаленных разделов и для восстановления загрузочных записей mbr после программных ошибок, действий некоторых вирусов, человеческих ошибок (например, когда раздел был просто удален).
Возможности testdisk:
Исправление таблицы разделов; восстановление удаленных разделов Восстановление FAT32 загрузочного сектора из бэкапа Перестроение FAT12/FAT16/FAT32 загрузочного сектора Исправление FAT tables
Перестроение NTFS загрузочного сектора Восстановление NTFS загрузочного сектора из бэкапа Исправление MFT используя MFT зеркало Нахождение ext2/ext3 Backup SuperBlock
Восстановление удаленных файлов в FAT, NTFS and ext2 файловых системах
Копирование файлов из FAT, NTFS and ext2/ext3 удаленных разделов.
photorec – утилита восстановления данных таких, как файлы видео, документы, архивы с жестких дисков и cdrom дисков, а также фото (поэтому название программы Photo Recovery) со встроенной памяти камер. Список типов файлов для восстановления весьма внушителен и с ним можно ознакомиться тут.
Обе утилиты open source, распространяются под лицензией GNU General Public License (GPL). Имеются в наличие версии для linux, unix, а также для windows платформ.
В большинстве линукс дистрибутивов уже включены в состав стандартного репозитория. Для debian-based дистрибутивов установка командой:
В моем случае требовалось восстановить фотографии с карточки фотоаппарата после того, как фотоаппарат случайно отформатировал карточку. Вставив флешку в card reader и запустив с правами рута photorec в консоли, утилита предложила мне выбрать диск, на котором требуется восстановить данные. 
В моем случае это будет /dev/sdb.
Далее выбираем тип таблицы разделов на диске, для большинства пользователей это будет Intel/PC. 
И далее выбираем раздел или диск целиком для поиска удаленных файлов. Так как мне нужно было восстановить все удаленные файлы после форматирования, то я выбрал поиск по всему диску.
После этого photorec требуется указать тип файловой системы, в которой хранились удаленные файлы. В данном случае все просто, выбираем второй пункт. 
А затем на другом диске выбираем директорию, куда утилита сохранит восстановленные файлы. 
Далее нажимаем Y и программа начинает свою работу. Для 32Мб карточки ей потребовалось меньше минуты.
Теперь о результатах работы:
Честно говоря, по началу я весьма сомневался в способностях программы. Но открыв директорию с результатами работы утилиты, я с удивлением обнаружил, что были восстановлены не только нужные недавно сделанные 10 фотографий, но и еще 110 других, самая ранняя из которых была сделана 3 года назад и не была перезаписана при дальнейшем использовании карточки, хотя форматировалась карта неоднократно.
В итоге имеем очередную победу добра над злом, счастливую улыбку обладателя фотоаппарата, еще один факт доказательства того, что существует море полезных и качественных opensource утилит.
PhotoRec – Recover Deleted or Lost Files in Linux
When you delete a file accidentally or intentionally on your system using ‘shift + delete‘ or delete option or empty Trash, the file content is not destroyed from the hard disk (or any storage media).
It is simply removed from the the directory structure and you cannot see the file in the directory where you deleted it, but it still remains somewhere in your hard drive.
If you have the appropriate tools and knowledge, you can recover lost files from your computer. However, as you store more files on your hard disk, the deleted files are overwritten, you may only recover recently deleted files.
In this tutorial, we will explain how to recover lost or deleted files on a hard disk in Linux using Testdisk, is a remarkable recovery tool ships in with a free tool called PhotoRec.
PhotoRec is used to recover lost files from storage media such as hard drives, digital camera and cdrom.
Install Testdisk (PhotoRec) in Linux Systems
To install Testdisk by running the relevant command below for your distribution:
------- On Debian/Ubuntu/Linux Mint ------- $ sudo apt-get install testdisk ------- On CentOS/RHEL/Fedora ------- $ sudo yum install testdisk ------- On Fedora 22+ ------- $ sudo dnf install testdisk ------- On Arch Linux ------- $ pacman -S testdisk ------- On Gentoo ------- $ emerge testdisk
In case it is not available on your Linux distribution’s repositories, download it from here and run it on a Live CD.
It can also be found in rescue CD such as Gparted LiveCD, Parted Magic, Ubuntu Boot CD, Ubuntu-Rescue-Remix and many more.
Once the installation is complete, start PhotoRec in a text window as follows with root privileges and specify the partition from which the files where deleted:
You’ll see the interface below:
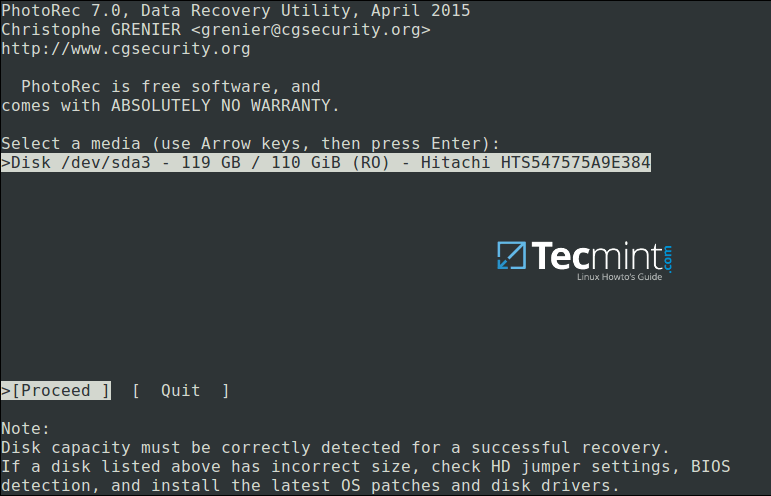
Use the right and left arrow keys to select a menu item, and press Enter. To continue with the recovery operation, select [Proceed] and hit Enter.
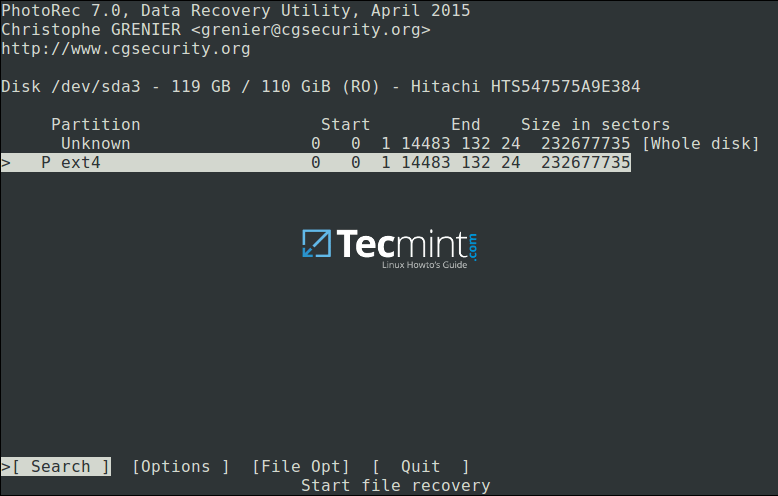
You will be at the following interface:
Select [Options] to view available recovery operation options as in the interface below:

Press Q to move back, at the interface below, you can specify the file extensions you want to search and recover. Therefore, select [File Opt] and press Enter.
Press s to disable/enable all file extensions, and in case you have disabled all file extensions, only choose types of files you want to recover by selecting them using right arrow keys (or left arrow key to deselect).
For instance, I want to recover all .mov files that I lost on my system.
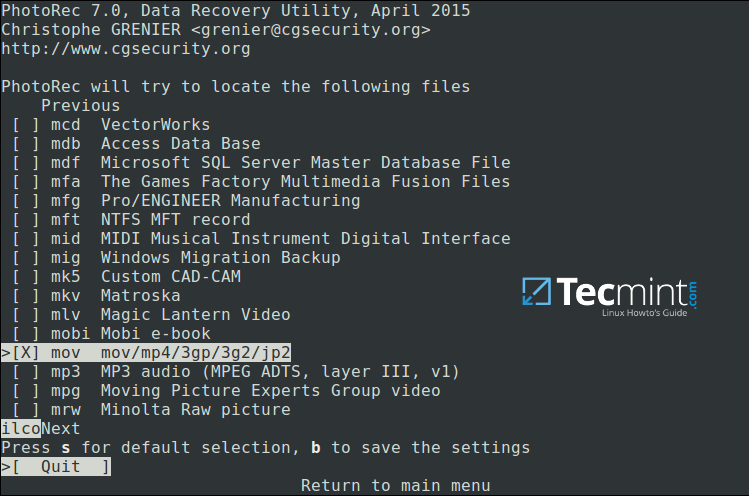
Then press b to save the setting, you should see the message below after pressing it. Move back by hitting Enter (or simply press Q button), then press Q again to go back to the main menu.

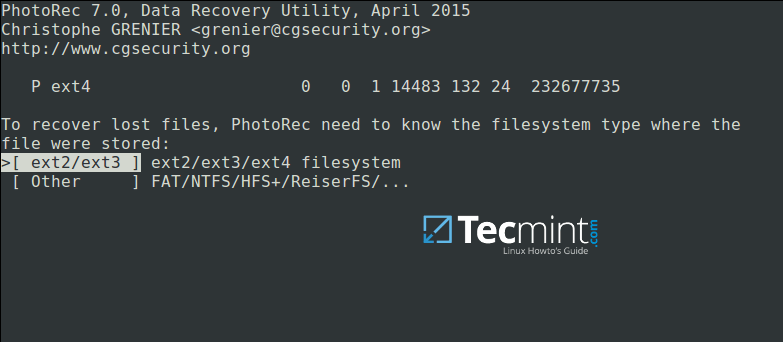
Now select [Search] to start the recovery process. In the interface below, choose the filesystem type where the file(s) were stored and hit Enter.
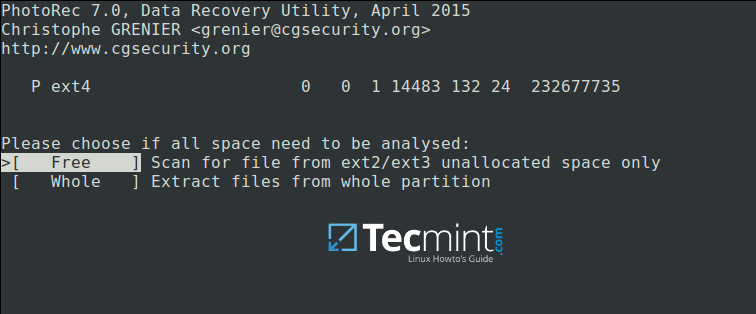
Next, choose if only free space or the whole partition needs to be analyzed as below. Note that choosing whole partition will make the operation slower and longer. Once you have selected the appropriate option, press Enter to proceed.
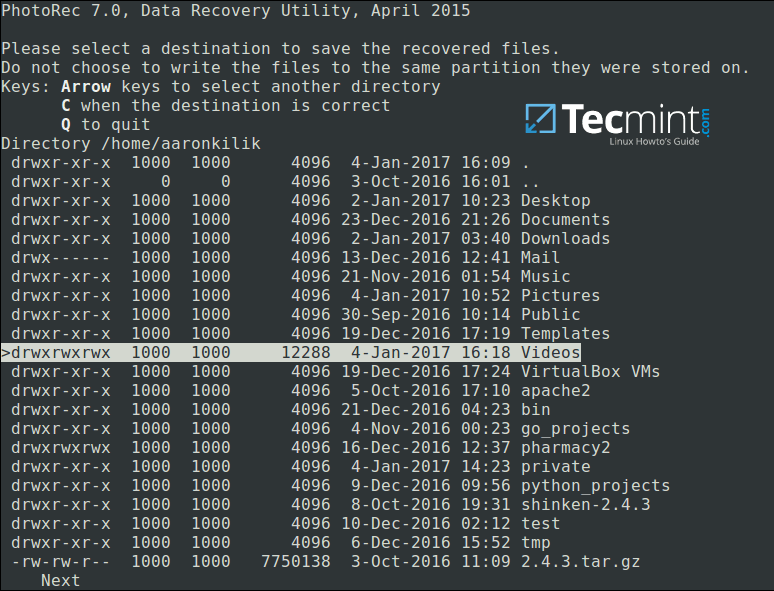
Closely select a directory where recovered files will be stored, if the destination is correct, press C button to continue. Choose a directory on a different partition to avoid deleted files being overwritten when more data is stored on the partition.
To move back until the root partition, use the left arrow key.
The screenshot below shows deleted files of the specified type being recovered. You can stop the operation by pressing Enter.
Note: Your system may become slow, and possibly freeze at certain moments, so you need to be patient until when the process is complete.
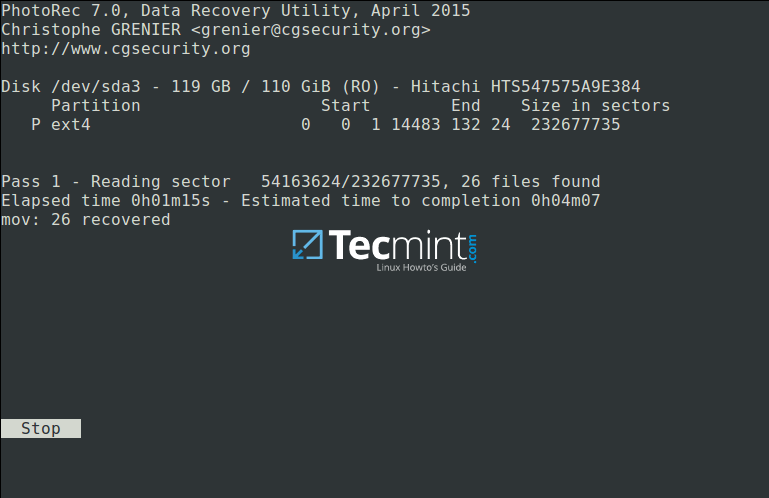
At the end of the operation, Photorec will show you the number and the location of files recovered.

The recovered files will be stored with root privileges by default, therefore open your file manager with elevated privileges to access the files.
Use the command below (specify your file manager):
$ gksudo nemo or $ gksudo nautilus
For more information, visit PhotoRec homepage: http://www.cgsecurity.org/wiki/PhotoRec.
That’s all! In this tutorial, we explained the necessary steps to recover deleted or lost files from hard disk using PhotoRec. This is so far the most reliable and effective recovery tool I have ever used, if you know any other similar tool, do share with us in the comments.
Aaron Kili is a Linux and F.O.S.S enthusiast, an upcoming Linux SysAdmin, web developer, and currently a content creator for TecMint who loves working with computers and strongly believes in sharing knowledge.
Each tutorial at TecMint is created by a team of experienced Linux system administrators so that it meets our high-quality standards.
Related Posts
37 thoughts on “PhotoRec – Recover Deleted or Lost Files in Linux”
Please delete my previous post. It is a wrong fact. My partition was only almost full so it scanned it in less than one second. Reply
Help, PhotoRec tool is powerful but sometimes it refuses to scan a partition again why? It answers by displaying the last results for this partition… Reply
My files got recovered but are in small sizes like very low resolution. How can I get them back as they were before? High resolution? Please help. Thank you! Reply
This program worked for me. I’m a storm chaser here in southern Louisiana. I went out Saturday evening to get some lightning shots and watch a storm that passed by my house. When I got home, I transferred the images from my SD card to my external hard drive. When I got up yesterday morning, the pictures weren’t there. I scanned my whole external drive yesterday to no avail. When I got up this morning, I scanned my SD card and the pictures were still on there. It even had pictures from earlier this year. Thanks for this. Reply
I have mounted a pen drive where the files were deleted from, but when i enter the file path it says “unable to open file or device”. Reply
specify the partition from which the files where deleted:
“sda3” us an example, put the drive you are trying to recover in that spot, whether sda1 or sda 2, an extended logical drive or a USB drive (i,e,sda1). Reply
I am limiting by filetype. I don’t see an option to select tgz guessing it will get the file if I select tar and or gz? I am searching an ext3 filesystem. Reply
I was just one step away from finishing a research project and all of sudden one of my students removed everything by «rm -rf *» command. I recovered all my python files and manuscript with this helpful guide you provide here. I don’t know how to say thank you for sharing this knowledge. Reply
Any Assistance would be greatly appreciated. Trying to recover a series of deleted MS Office files on a windows 10 system. I have booted the machine to a SystemRescueCD Live USB drive which includes TestDisk (PhotoRec) and Gparted. From the command line, I have mounted a second USB drive (to store the recovered files to) as well as the Windows partition on the ssd hard disk I am trying to recover files from. (Note: there are 4 partitions on this SSD hard drive – Recovery etc. I am only mounting the Windows partition). Once mounted I can view the files and folders of the windows partition through the Live USB file system (nautilaus I think). When I launch photorec from the command line I get the choice of log file type (I choose none) and am then presented with a list of drives to recover data from. I can see both USB drives (the Live USB boot drive and the blank USB drive, but cannot see the windows drive/partition I want to recover data from. NOTE: The windows drive is the internal drive of the laptop that I have mounted after boot to live USB drive. I tried unmounting the windows mount and running photorec again but it’s the same result. It doesn’t see the windows partition or the drive itself. I thought I would give Gparted a shot, and Gparted can see all 4 partitions (nvme0n1p1, nvme0n1p2, nvme0n1p3, and nvme0n1p4) however, it displays the device name as nvme0n1p1 which is the first partition and I can’t seem to choose the other partitions to attempt data rescue on. I can see them in the Gparted Window showing the device partitions, but can’t act on any of them, so i thought I would come back to Photorec to see if I can’t figure out why it isn’t seeing the windows partition whether I have it mounted or not. Additional, before booting to USB key, I turned off bitlocker in windows, and disabled hibernation and fast startup. Any advice you can provide to get Photorec to see the windows partition to recover this data would be greatly appreciated. Reply