- Php установить на линукс
- Использование APT
- Контроль конфигурации
- Стандартные проблемы
- User Contributed Notes 6 notes
- How To Install PHP On Ubuntu 20.04 or 22.04
- Installing PHP on Ubuntu
- 1. Install PHP with Apache on Ubuntu
- 2. Install PHP with Nginx on Ubuntu
- Installing PHP Modules on Ubuntu
- How to Uninstall PHP on Ubuntu
Php установить на линукс
Раздел содержит информацию и подсказки, относящиеся к установке PHP на » Debian GNU/Linux.
Неофициальные сборки от третьих лиц не поддерживаются. О любых ошибках следует сообщать разработчикам Debian, но перед этим стоит проверить, возможно они уже исправлены в новых релизах, которые можно скачать на » странице загрузки.
Хотя и существует универсальная инструкция по установке PHP на Unix/Linux, в этом разделе мы рассмотрим особенности специфичные для Debian, такие как использование команд apt или aptitude . В рамках этого руководства обе эти команды рассматриваются как взаимозаменяемые.
Использование APT
Во первых, обратите внимание на то, что некоторые пакеты связаны: libapache-mod-php нужен для интеграции с Apache 2, и php-pear с PEAR.
Во-вторых, перед установкой убедитесь, что список пакетов находится в актуальном состоянии. Как правило, это делается с помощью команды apt update.
Пример #1 Пример установки Apache 2 на Debian
# apt install php-common libapache2-mod-php php-cli
APT автоматически установит модуль PHP для Apache 2 и все их зависимости и, затем, активирует их. Apache должен быть перезапущен для того, чтобы изменения вступили в силу. Например:
Пример #2 Остановка и запуск Apache после установки PHP
# /etc/init.d/apache2 stop # /etc/init.d/apache2 start
Контроль конфигурации
Изначально, PHP устанавливается только с основными модулями ядра. Если вы хотите установить дополнительные модули, такие как MySQL, cURL, GD и т.д., это также можно сделать с помощью команды apt .
Пример #3 Способы получить список дополнительных пакетов PHP
# apt-cache search php # apt search php | grep -i mysql # aptitude search php
Будет выведен список большого числа пакетов, включая несколько специфичных, таких как php-cgi, php-cli and php-dev. Определите, какие вам нужны и установите с помощью apt-get или aptitude . И, так как Debian производит проверку зависимостей, вам будет выведен запрос на их установку.
Пример #4 Установка PHP с MySQL и cURL
# apt install php-mysql php-curl
APT автоматически добавит необходимые строки в соответствующие php.ini , /etc/php/7.4/php.ini , /etc/php/7.4/conf.d/*.ini , и т.д. В зависимости от модуля, будут внесены записи типа extension=foo.so . В любом случае, чтобы эти изменения вступили в силу, необходимо будет перезапустить сервер веб-сервер.
Стандартные проблемы
- Если скрипты PHP не разбираются веб-сервером, то скорее всего это означает, что PHP не был добавлен в конфигурацию веб-сервера. На Debian это обычно /etc/apache2/apache2.conf или похожий. Смотрите документацию Debian для выяснения подробностей.
- Модуль, по-видимому, установлен, а его функции всё равно не распознаются. В таком случае убедитесь, что соответствующий ini-файл был загружен и/или веб-сервер был перезагружен после установки модуля.
- Для установки пакетов в Debian существуют две основных команды (не считая стандартных вариантов Linux): apt и aptitude . Объяснения их синтаксиса, особенностей и отличий друг от друга выходит за рамки данного руководства.
User Contributed Notes 6 notes
To refresh this document, perhaps it would be worth mentioning more modern methods to serve php content under apache httpd.
Specifically, the preferred method is now fastcgi, using either of those recipes:
While the legacy mod_php approach is still applicable for some older installations, the fastcgi method is much faster, and require much less RAM to operate, based on similar traffic patterns.
Compiling PHP on Ubuntu boxes.
If you would like to compile PHP from source as opposed to relying on package maintainers, here’s a list of packages, and commands you can run
STEP 1:
sudo apt-get install autoconf build-essential curl libtool \
libssl-dev libcurl4-openssl-dev libxml2-dev libreadline7 \
libreadline-dev libzip-dev libzip4 nginx openssl \
pkg-config zlib1g-dev
So you don’t overwrite any existing PHP installs on your system, install PHP in your home directory. Create a directory for the PHP binaries to live
STEP 2:
# download the latest PHP tarball, decompress it, then cd to the new directory.
STEP 3:
Configure PHP. Remove any options you don’t need (like MySQL or Postgres (—with-pdo-pgsql))
./configure —prefix=$HOME/bin/php-latest \
—enable-mysqlnd \
—with-pdo-mysql \
—with-pdo-mysql=mysqlnd \
—with-pdo-pgsql=/usr/bin/pg_config \
—enable-bcmath \
—enable-fpm \
—with-fpm-user=www-data \
—with-fpm-group=www-data \
—enable-mbstring \
—enable-phpdbg \
—enable-shmop \
—enable-sockets \
—enable-sysvmsg \
—enable-sysvsem \
—enable-sysvshm \
—enable-zip \
—with-libzip=/usr/lib/x86_64-linux-gnu \
—with-zlib \
—with-curl \
—with-pear \
—with-openssl \
—enable-pcntl \
—with-readline
STEP 4:
compile the binaries by typing: make
If no errors, install by typing: make install
STEP 5:
Copy the PHP.ini file to the install directory
cp php.ini-development ~/bin/php-latest/lib/
cd ~/bin/php-latest/etc;
mv php-fpm.conf.default php-fpm.conf
mv php-fpm.d/www.conf.default php-fpm.d/www.conf
STEP 7:
create symbolic links for your for your binary files
cd ~/bin
ln -s php-latest/bin/php php
ln -s php-latest/bin/php-cgi php-cgi
ln -s php-latest/bin/php-config php-config
ln -s php-latest/bin/phpize phpize
ln -s php-latest/bin/phar.phar phar
ln -s php-latest/bin/pear pear
ln -s php-latest/bin/phpdbg phpdbg
ln -s php-latest/sbin/php-fpm php-fpm
STEP 8: link your local PHP to the php command. You will need to logout then log back in for php to switch to the local version instead of the installed version
# add this to .bashrc
if [ -d «$HOME/bin» ] ; then
PATH=»$HOME/bin:$PATH»
fi
How To Install PHP On Ubuntu 20.04 or 22.04
PHP stands for Hypertext Preprocessor, and it’s a script-based server-side programming language.
PHP helps automate various server tasks. It handles tasks such as dynamic content, database requests, and data preprocessing/display.
Read our tutorial on how to install PHP on Ubuntu 20.04 or 22.04 including integration with Apache and Nginx.
- A Linux system running Ubuntu 20.04 or 22.04
- Access to an Ubuntu user account with sudo privileges.
- Access to a command line/terminal window (Ctrl+Alt+T).
- A running web server (Apache or Nginx).
Installing PHP on Ubuntu
Like many developer tools, PHP has several different release versions. At the time of writing, PHP 7.4. and 8.1 are the currently supported and most used versions of the software.
The following command installs PHP using the apt package manager:
On Ubuntu 20.04, the command installs PHP 7.4 while Ubuntu 22.04 installs PHP version 8.1.
If you’re looking to choose the specific version of PHP on either system, follow one of the installation steps below.
1. Install PHP with Apache on Ubuntu
If you are running an Apache web server, install PHP with the Apache module. Below you will find installations for both PHP 7.4 and PHP 8.1.
1. Ensure you are using the latest repository updates by entering the following command into a terminal window:
sudo apt update && sudo apt upgrade2. Install software-properties-common to help you manage distributions and independent software sources:
sudo apt install software-properties-commonIf the package is already available, continue to the next step.
3. Next, add the ondrej/php PPA which provides different PHP versions for Ubuntu:
sudo add-apt-repository ppa:ondrej/phpAfter the PPA loads, press Enter to confirm adding the repository. The available PHP versions in the PPA are from 5.6 up to 8.2.
4. Update apt to include the new packages:
5. Now you can install specific PHP versions. For example:
Note: The command for installing PHP automatically installs the PHP module for Apache 2. If it fails to do so, run the following command instead:
sudo apt -y install libapache2-mod-php
6. Verify the installation with:
The output displays the PHP version you installed.
If you installed version 7.4, the output appears as in the image below.

If you installed PHP 8.1, the output shows:

2. Install PHP with Nginx on Ubuntu
The Nginx server does not have native PHP processing. If you are using an Nginx server instead of Apache, follow the steps below to install PHP 7.4 or 8.1 to work with Nginx.
1. Enter the following command into a terminal window to ensure you are using the latest software:
sudo apt update && sudo apt upgrade2. Add the ondrej/php PPA to include various PHP versions:
sudo add-apt-repository ppa:ondrej/phpWhen the PPA information loads, press Enter to continue.
2. To install PHP for Nginx, use one of the following commands:
sudo apt install php7.4-fpm -ysudo apt install php8.1-fpm -yThe system will reach out to download and install the package and its dependencies.

2. Once the installation finishes, restart the Nginx service to apply the changes by entering:
sudo systemctl restart nginx3. Next, enable PHP support by editing the server block. Open the server block with the command:
sudo nano /etc/nginx/sites-available/default4. Add the following code to your server block file for Nginx to make use of PHP:
Exchange the for your PHP version.
5. Finally, restart Nginx on Ubuntu and reload PHP:
sudo systemctl restart nginxsudo systemctl reload php-fpmInstalling PHP Modules on Ubuntu
To install additional PHP modules, use the following syntax:
sudo apt install php8.1-posixAlternatively, install multiple modules at once. For example, to install modules mysql, zip and bcmath on PHP 7.4, you would run:
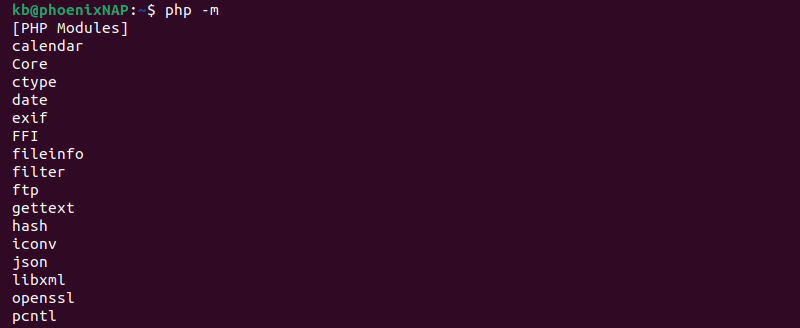
To list all loaded PHP modules run the command:
The output lists all compiled PHP modules, as in the example below.
How to Uninstall PHP on Ubuntu
To uninstall PHP from Ubuntu, follow the instructions below:
1. Run the following command in the terminal:
For example, if you installed the PHP 7.4 FPM version, run:
sudo apt-get purge php7.4-fpm2. Remove the orphaned packages with:
3. Lastly, check the PHP version to confirm the uninstall worked:
If the output does not show the version, the uninstall removed everything correctly.
After reading this article, you should have successfully installed PHP 7.4 or 8.1 with Apache or Nginx on your Ubuntu 20.04 and 22.04 system.
One important thing to remember is that PHP works in tandem with an existing server, so you need to install it specifically to your server software. Alternatively, you can always install a stable version from the default Ubuntu software repositories.
Sofija Simic is an experienced Technical Writer. Alongside her educational background in teaching and writing, she has had a lifelong passion for information technology. She is committed to unscrambling confusing IT concepts and streamlining intricate software installations.
If a script is not written correctly, or if something unusual happens, PHP can generate an error message. The .