- How do you empty the buffers and cache on a Linux system?
- 1 Answer 1
- Emptying the buffers cache
- Seeing what’s in the buffers and cache
- fincore
- Swap
- How to Clear Cache on Linux
- How Linux File System Cache Works
- Using Free command to view Cache Usage
- Proc Sys VM Drop Caches Command
- Experimental Verification that Drop Caches Works
- Conclusion
- About the author
- Linux Wolfman
How do you empty the buffers and cache on a Linux system?
Prior to doing some benchmarking work how would one free up the memory (RAM) that the Linux Kernel is consuming for its buffers and cache? Note that this is mostly useful for benchmarking. Emptying the buffers and cache reduces performance! If you’re here because you thought that freeing buffers and cache was a positive thing, go and read Linux ate my RAM!. The short story: free memory is unused memory is wasted memory.
@innocent-world — never saw these when I was searching, so it appeared to be a hole in the knowledge base on this site, and was attempting to fill it in.
@innocent-world — in looking at those 2 Q’s I think there is still room for this Q&A. This one acts as a canonical Q&A on the site. Those are fairly specific in what they’re addressing. Additionally this one shows information about analyzing the buffers & cache and also how to set the parameters using sudo. Neither of the other 2 questions address any of this.
Please read this article linuxatemyram.com If you understand the risk then you can do free && sync && echo 3 > /proc/sys/vm/drop_caches && free
1 Answer 1
Emptying the buffers cache
If you ever want to empty it you can use this chain of commands.
# free && sync && echo 3 > /proc/sys/vm/drop_caches && free total used free shared buffers cached Mem: 1018916 980832 38084 0 46924 355764 -/+ buffers/cache: 578144 440772 Swap: 2064376 128 2064248 total used free shared buffers cached Mem: 1018916 685008 333908 0 224 108252 -/+ buffers/cache: 576532 442384 Swap: 2064376 128 2064248 You can signal the Linux Kernel to drop various aspects of cached items by changing the numeric argument to the above command.
# echo 1 > /proc/sys/vm/drop_caches # echo 2 > /proc/sys/vm/drop_caches # echo 3 > /proc/sys/vm/drop_caches The above are meant to be run as root. If you’re trying to do them using sudo then you’ll need to change the syntax slightly to something like these:
$ sudo sh -c 'echo 1 >/proc/sys/vm/drop_caches' $ sudo sh -c 'echo 2 >/proc/sys/vm/drop_caches' $ sudo sh -c 'echo 3 >/proc/sys/vm/drop_caches' NOTE: There’s a more esoteric version of the above command if you’re into that:
$ echo "echo 1 > /proc/sys/vm/drop_caches" | sudo sh Why the change in syntax? The /bin/echo program is running as root, because of sudo , but the shell that’s redirecting echo’s output to the root-only file is still running as you. Your current shell does the redirection before sudo starts.
Seeing what’s in the buffers and cache
Take a look at linux-ftools if you’d like to analyze the contents of the buffers & cache. Specifically if you’d like to see what files are currently being cached.
fincore
With this tool you can see what files are being cached within a give directory.
fincore [options] files. --pages=false Do not print pages --summarize When comparing multiple files, print a summary report --only-cached Only print stats for files that are actually in cache. For example, /var/lib/mysql/blogindex :
root@xxxxxx:/var/lib/mysql/blogindex# fincore --pages=false --summarize --only-cached * stats for CLUSTER_LOG_2010_05_21.MYI: file size=93840384 , total pages=22910 , cached pages=1 , cached size=4096, cached perc=0.004365 stats for CLUSTER_LOG_2010_05_22.MYI: file size=417792 , total pages=102 , cached pages=1 , cached size=4096, cached perc=0.980392 stats for CLUSTER_LOG_2010_05_23.MYI: file size=826368 , total pages=201 , cached pages=1 , cached size=4096, cached perc=0.497512 stats for CLUSTER_LOG_2010_05_24.MYI: file size=192512 , total pages=47 , cached pages=1 , cached size=4096, cached perc=2.127660 stats for CLUSTER_LOG_2010_06_03.MYI: file size=345088 , total pages=84 , cached pages=43 , cached size=176128, cached perc=51.190476 stats for CLUSTER_LOG_2010_06_04.MYD: file size=1478552 , total pages=360 , cached pages=97 , cached size=397312, cached perc=26.944444 stats for CLUSTER_LOG_2010_06_04.MYI: file size=205824 , total pages=50 , cached pages=29 , cached size=118784, cached perc=58.000000 stats for COMMENT_CONTENT_2010_06_03.MYI: file size=100051968 , total pages=24426 , cached pages=10253 , cached size=41996288, cached perc=41.975764 stats for COMMENT_CONTENT_2010_06_04.MYD: file size=716369644 , total pages=174894 , cached pages=79821 , cached size=326946816, cached perc=45.639645 stats for COMMENT_CONTENT_2010_06_04.MYI: file size=56832000 , total pages=13875 , cached pages=5365 , cached size=21975040, cached perc=38.666667 stats for FEED_CONTENT_2010_06_03.MYI: file size=1001518080 , total pages=244511 , cached pages=98975 , cached size=405401600, cached perc=40.478751 stats for FEED_CONTENT_2010_06_04.MYD: file size=9206385684 , total pages=2247652 , cached pages=1018661 , cached size=4172435456, cached perc=45.321117 stats for FEED_CONTENT_2010_06_04.MYI: file size=638005248 , total pages=155763 , cached pages=52912 , cached size=216727552, cached perc=33.969556 stats for FEED_CONTENT_2010_06_04.frm: file size=9840 , total pages=2 , cached pages=3 , cached size=12288, cached perc=150.000000 stats for PERMALINK_CONTENT_2010_06_03.MYI: file size=1035290624 , total pages=252756 , cached pages=108563 , cached size=444674048, cached perc=42.951700 stats for PERMALINK_CONTENT_2010_06_04.MYD: file size=55619712720 , total pages=13579031 , cached pages=6590322 , cached size=26993958912, cached perc=48.533080 stats for PERMALINK_CONTENT_2010_06_04.MYI: file size=659397632 , total pages=160985 , cached pages=54304 , cached size=222429184, cached perc=33.732335 stats for PERMALINK_CONTENT_2010_06_04.frm: file size=10156 , total pages=2 , cached pages=3 , cached size=12288, cached perc=150.000000 --- total cached size: 32847278080 With the above output you can see that there are several *.MYD, *.MYI, and *.frm files that are currently being cached.
Swap
If you want to clear out your swap you can use the following commands.
$ free total used free shared buffers cached Mem: 7987492 7298164 689328 0 30416 457936 -/+ buffers/cache: 6809812 1177680 Swap: 5963772 609452 5354320 Then use this command to disable swap:
You can confirm that it’s now empty:
$ free total used free shared buffers cached Mem: 7987492 7777912 209580 0 39332 489864 -/+ buffers/cache: 7248716 738776 Swap: 0 0 0 And now reconfirm with free :
$ free total used free shared buffers cached Mem: 7987492 7785572 201920 0 41556 491508 -/+ buffers/cache: 7252508 734984 Swap: 5963772 0 5963772 How to Clear Cache on Linux
![]()
The linux file system cache (Page Cache) is used to make IO operations faster. Under certain circumstances an administrator or developer might want to manually clear the cache. In this article we will explain how the Linux File System cache works. Then we will demonstrate how to monitor the cache usage and how to clear the cache. We will do some simple performance experiments to verify the cache is working as expected and that the cache flush and clear procedure is also working as expected.
How Linux File System Cache Works
The kernel reserves a certain amount of system memory for caching the file system disk accesses in order to make overall performance faster. The cache in linux is called the Page Cache. The size of the page cache is configurable with generous defaults enabled to cache large amounts of disk blocks. The max size of the cache and the policies of when to evict data from the cache are adjustable with kernel parameters. The linux cache approach is called a write-back cache. This means if data is written to disk it is written to memory into the cache and marked as dirty in the cache until it is synchronized to disk. The kernel maintains internal data structures to optimize which data to evict from cache when more space is needed in the cache.
During Linux read system calls, the kernel will check if the data requested is stored in blocks of data in the cache, that would be a successful cache hit and the data will be returned from the cache without doing any IO to the disk system. For a cache miss the data will be fetched from IO system and the cache updated based on the caching policies as this same data is likely to be requested again.
When certain thresholds of memory usage are reached background tasks will start writing dirty data to disk to ensure it is clearing the memory cache. These can have an impact on performance of memory and CPU intensive applications and require tuning by administrators and or developers.
Using Free command to view Cache Usage
We can use the free command from the command line in order to analyze the system memory and the amount of memory allocated to caching. See command below:

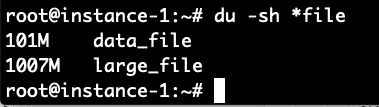
What we see from the free command above is that there is 7.5 GB of RAM on this system. Of this only 209 MB is used and 6.5 MB is free. 667 MB is used in the buffer cache. Now let’s try to increase that number by running a command to generate a file of 1 Gigabyte and reading the file. The command below will generate approximately 100MB of random data and then append 10 copies of the file together into one large_file.
# dd if=/dev/random of=/root/data_file count=1400000
# for i in `seq 1 10`; do echo $i; cat data_file >> large_file; done
Now we will make sure to read this 1 Gig file and then check the free command again:

We can see the buffer cache usage has gone up from 667 to 1735 Megabytes a roughly 1 Gigabyte increase in the usage of the buffer cache.
Proc Sys VM Drop Caches Command
The linux kernel provides an interface to drop the cache let’s try out these commands and see the impact on the free setting.

We can see above that the majority of the buffer cache allocation was freed with this command.
Experimental Verification that Drop Caches Works
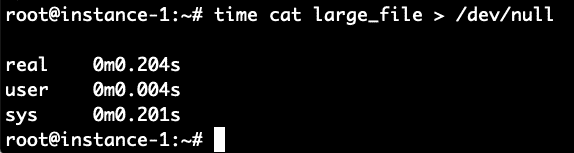
Can we do a performance validation of using the cache to read the file? Let’s read the file and write it back to /dev/null in order to test how long it takes to read the file from disk. We will time it with the time command. We do this command immediately after clearing the cache with the commands above.

It took 8.4 seconds to read the file. Let’s read it again now that the file should be in the filesystem cache and see how long it takes now.
Boom! It took only .2 seconds compared to 8.4 seconds to read it when the file was not cached. To verify let’s repeat this again by first clearing the cache and then reading the file 2 times.
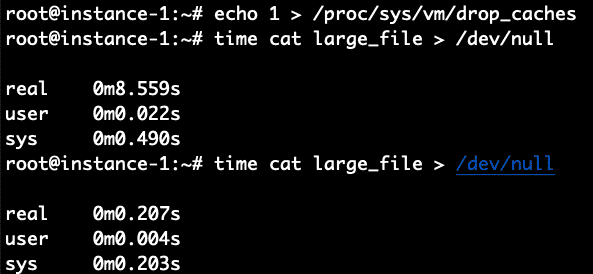
It worked perfectly as expected. 8.5 seconds for the non-cached read and .2 seconds for the cached read.
Conclusion
The page cache is automatically enabled on Linux systems and will transparently make IO faster by storing recently used data in the cache. If you want to manually clear the cache that can be done easily by sending an echo command to the /proc filesystem indicating to the kernel to drop the cache and free the memory used for the cache. The instructions for running the command were shown above in this article and the experimental validation of the cache behavior before and after flushing were also shown.
About the author
Linux Wolfman
Linux Wolfman is interested in Operating Systems, File Systems, Databases and Analytics and always watching for new technologies and trends. Reach me by tweeting to @linuxhint and ask for the Wolfman.