- How to enable a Virtualbox shared folder for Linux guest systems
- INTRODUCTION
- VIDEO TUTORIAL
- Enable a shared folder in VirtualBox for Arch Linux guest
- Prepare the system
- Add the shared folder
- Enable a shared folder in VirtualBox for Debian guest
- Prepare the system and add a shared folder
- Install the GuestAddition CD Image
- Setting the permissions to the shared folder
- Enable a shared folder in VirtualBox for Linux Mint / Ubuntu guest
- CONCLUSION
- Как сделать общую папку в VirtualBox
- Настройка общей папки VirtualBox для Windows
- Настройка общей папки VirtualBox для Linux
How to enable a Virtualbox shared folder for Linux guest systems
VirtualBox is a very useful tool to install operating systems inside the main system. However, configuring the Virtualbox to share files between your main system and the system you installed in a VirtualBox is not trivial. So, I will show you how to enable a shared folder in Virtualbox for Debian, Linux Mint/Ubuntu, and Arch Linux as guest systems. I will also show a universal way that should work for any Linux guest distribution.
INTRODUCTION
There are several essential steps you need to follow, to enable a shared folder between the real machine (host) and the virtual machine (guest):
- Install guest additions for your guest system.
- Create a shared folder.
- Change the user permission for the shared folder.
In this tutorial, my host system is Arch Linux, but the host system does not matter in this case because we will do all the setting in the guest systems. So, I will show you the settings for Arch Linux, Linux Mint and Debian as guest systems. If you use some other distributions as a guest, look at the instructions for Debian. It is a universal way to enable a shared folder and it should work for all distributions.
VIDEO TUTORIAL
Enable a shared folder in VirtualBox for Arch Linux guest
Prepare the system
First, make sure your Arch Linux guest system is up to date. Open a terminal and update it:
Next, install kernel headers. I use the Linux kernel LTS, so I have to install the linux-lts-headers package. If you use the standard kernel, install linux-headers .
sudo pacman -S linux-lts-headers Then, install the virtualbox-guest-utils package. It will make you choose a package: either virtualbox-guest-modules-arch or virtualbox-guest-dkms . The Arch Linux wiki recommends choosing the virtualbox-guest-modules-arch package if you use the Linux kernel and virtualbox-guest-dkms for others kernels like LTS. Again, I use the linux-lts kernel so I needed to install the virtualbox-guest-dkms package.
sudo pacman -S virtualbox-guest-utils 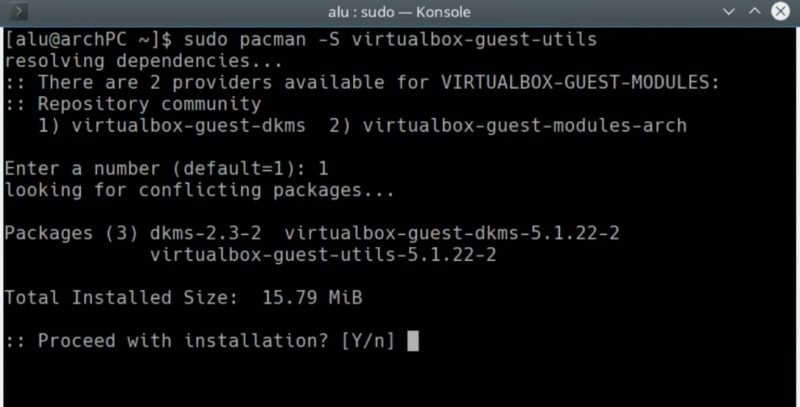
After that, enable the VirtualBox kernel modules:
sudo systemctl enable vboxservice Add the shared folder
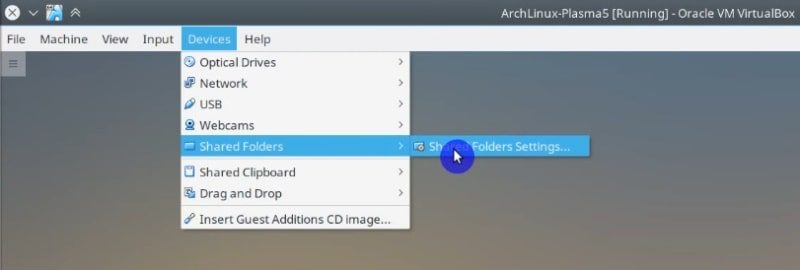
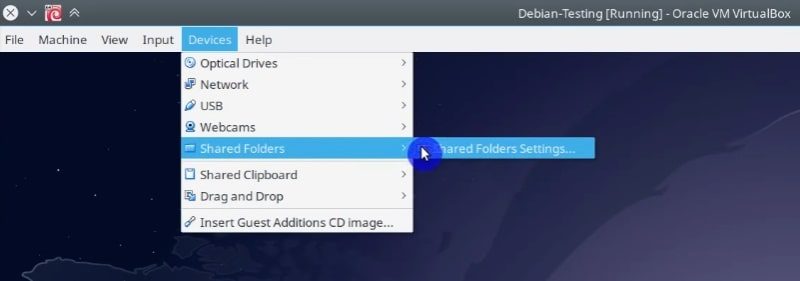
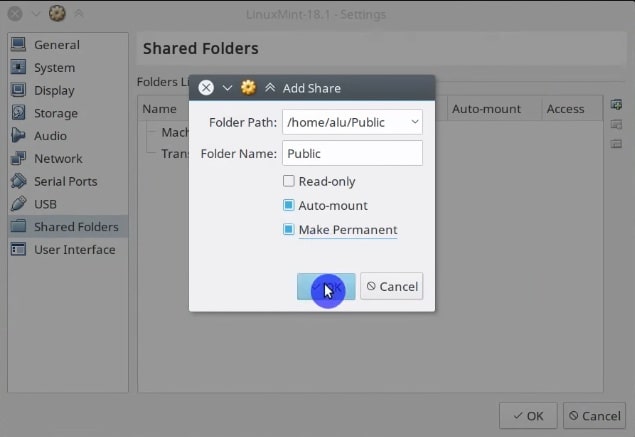
In VirtualBox, go to the Devices menu -> Shared Folders menu -> Shared folders settings.
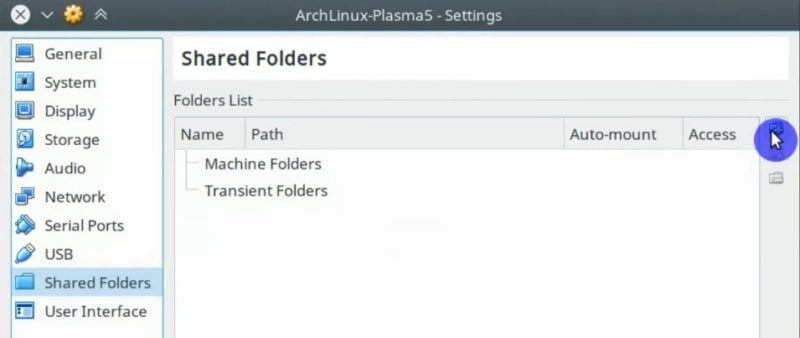
In the window that opens, on the right side, you will find the button to add a new shared folder. Click on it.
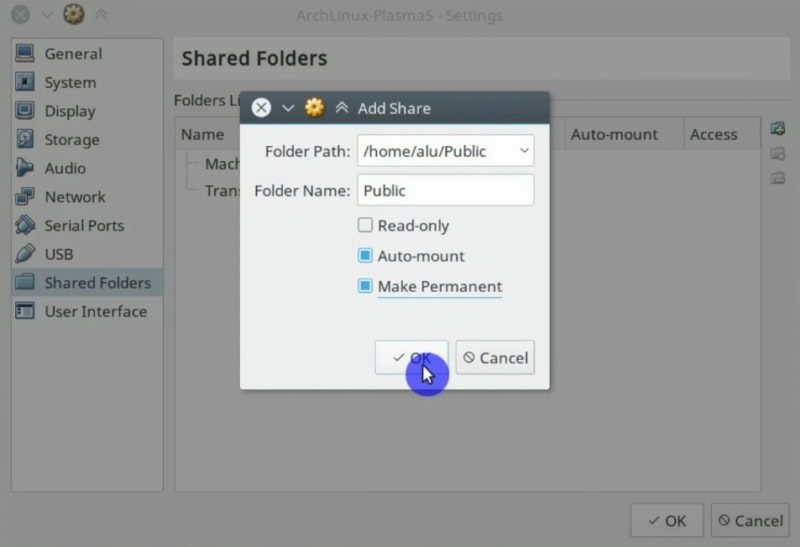
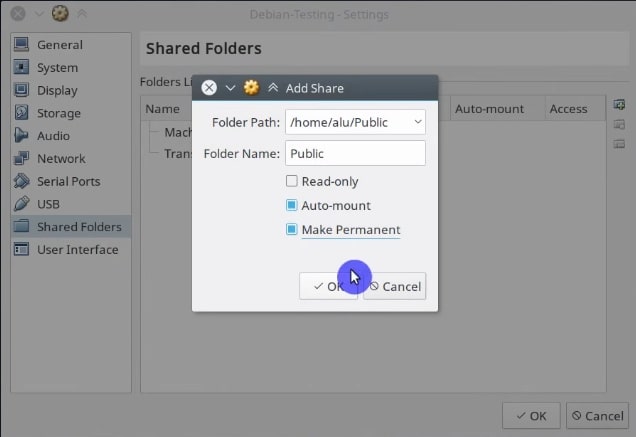
And select the folder you want to share between systems. For example, I usually share my Public folder. Make it permanent and activate auto-mounting by clicking on the options.
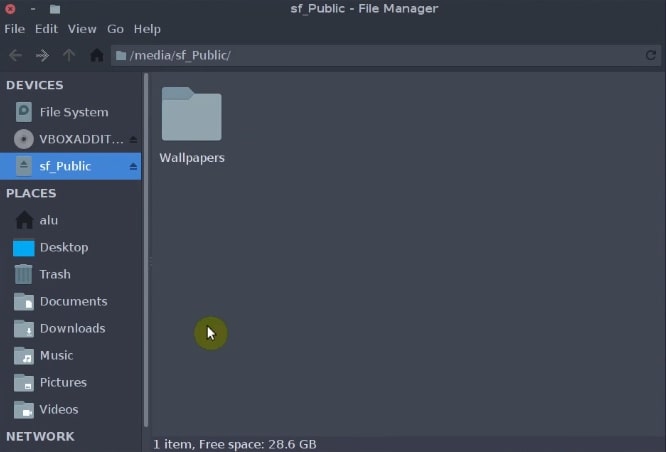
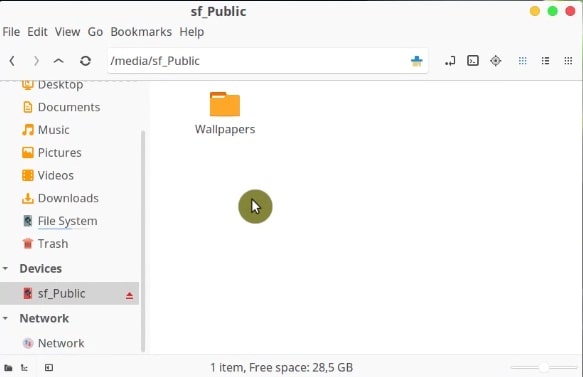
Then, you need to reboot the guest system. Once the guest system has rebooted, you can find the shared folder in the /media folder.
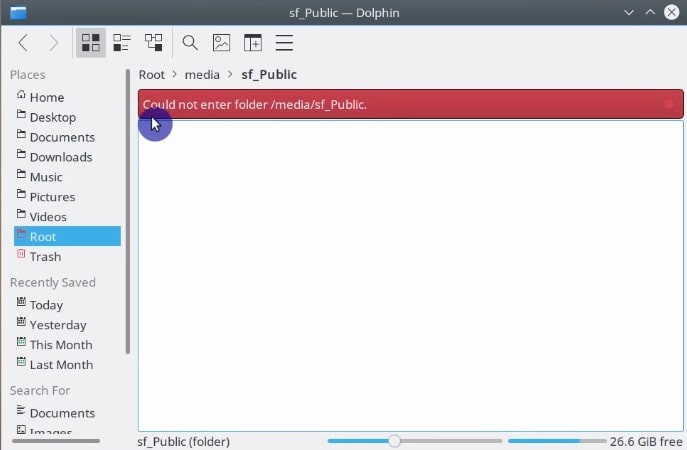
The problem is, however, that only the root user can access the folder. To gain access to this folder as a regular user, open the terminal in your guest system and add your user to the vboxsf group.
sudo usermod -a -G vboxsf `whoami` `whoami` stand there to automatically paste your username. You can also type your username directly.
Next, give that user a permission to access the media folder.
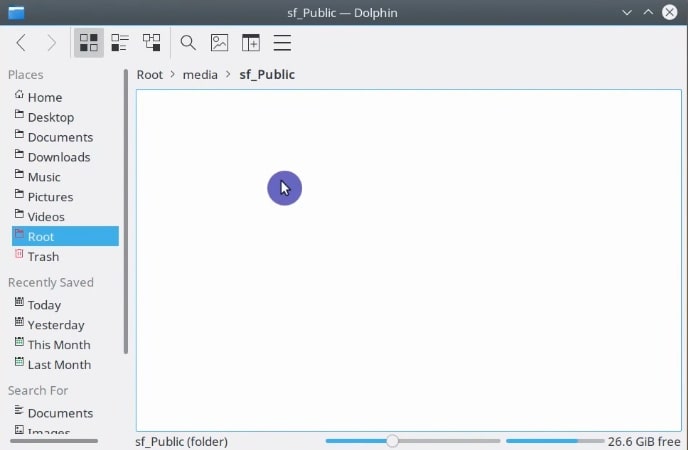
sudo chown -R `whoami`:users /media/sf_Public/ Finally, log out, and log in again. Open the file manager and you should be able to access the shared folder as a regular user.
So, this is the whole process to enable a shared folder in VirtualBox using Arch Linux. You can start placing files there.
Enable a shared folder in VirtualBox for Debian guest
Installing guest addition in Debian is a little different from in Arch Linux. For Debian, I will show you a more universal way that you can apply to any other distro including Arch Linux. However, the way I showed before is preferable for Arch Linux.
Prepare the system and add a shared folder
In Debian guest, open a terminal and install the build-essential, dkms, and linux-headers packages.
sudo apt install build-essential dkms linux-headers-$(uname -r) 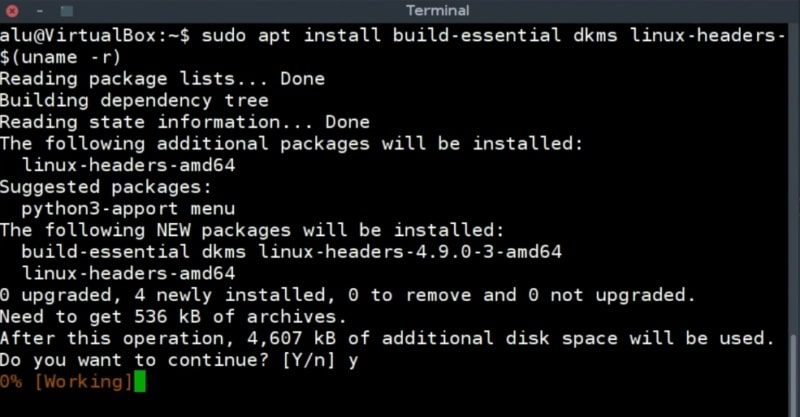
After that, you can add a shared folder. It is the same procedure as before. Go to the Devices menu -> Shared folders -> click on the Shared folder settings option.
Again, click on the button at the right to add the shared folder. Set the folder options you want and click on the Ok button.
After the packages are installed and the shared folder is added, reboot the system.
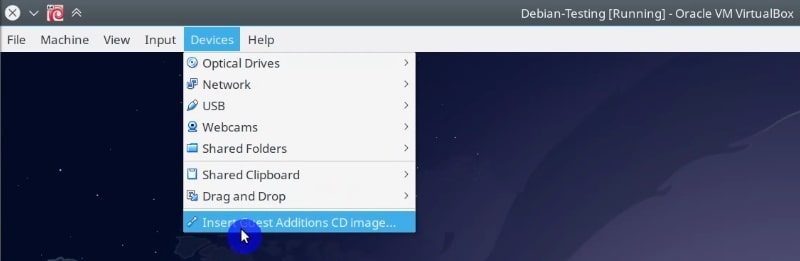
Install the GuestAddition CD Image
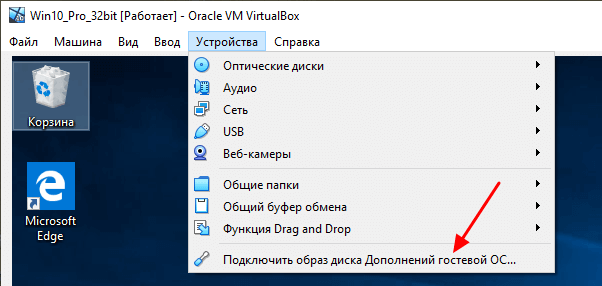
When your guest system has started. Go to the Devices menu and click on the Insert Guest addition image option.
Then, open a file manager, navigate to VBOXADDITION CD, right click in that directory and click on the open Terminal here option.

In the terminal, run the following command to install the VirtualBoxLinuxAddtions:
sudo sh VBoxLinuxAdditions.run 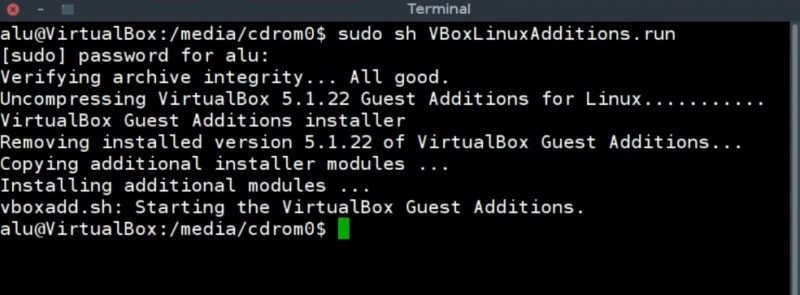
Make sure it is installed without errors. If some errors occur, read the message, most likely the instruction for a fix will be provided. If the install is successful, you need to reboot the system.
Setting the permissions to the shared folder
If you go to the /media folder in the file manager and check if a shared folder is mounted, most likely you will not be able to access it as a regular user.
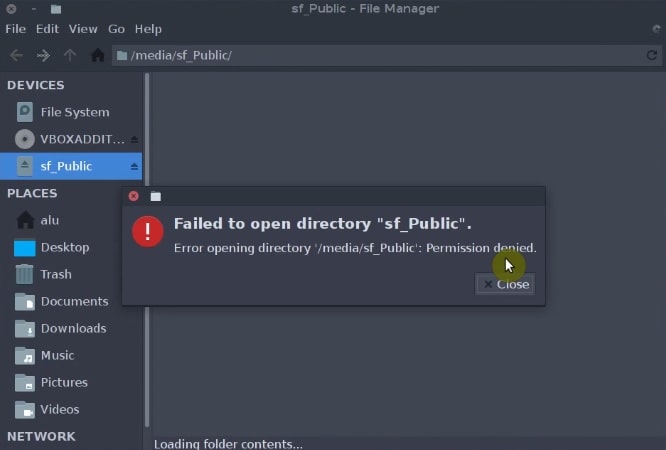
To enable the access to this folder for a regular user, do the same what we did for Arch Linux, add your user to the vboxsf group.
sudo usermod -a -G vboxsf `whoami` And change the permission of the media folder.
sudo chown -R `whoami`:users /media/ 
Log out, log in and you should be able to access the shared folder.
This method to enable a shared folder in VirtualBox for Debian is universal and it should work for any other distributions.
Enable a shared folder in VirtualBox for Linux Mint / Ubuntu guest
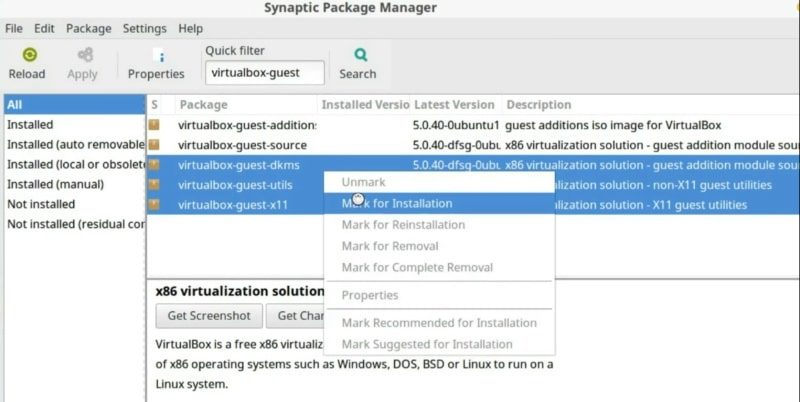
Linux Mint and Ubuntu usually come with VirtualBox guest addition pre-installed by default. If not, you can install it using a software manager like Synaptic.
Open the software manager, search and install virtualbox-guest-X11 , virtualbox-guest-utils , and virtualbox-guest-dkms .
Then do the same steps I showed for Arch Linux and Debian. First, add a shared folder.
Reboot the system. Then, add your user to the vboxsf group.
sudo usermod -a -G vboxsf `whoami` sudo chown -R `whoami`:users /media/ 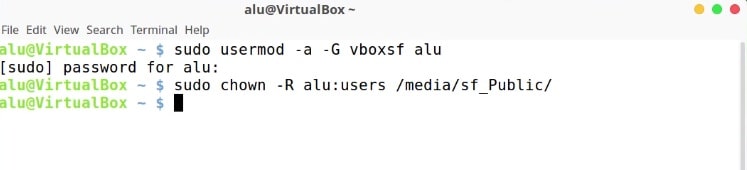
Finally, log out and log in, and you should have the shared folder working.
CONCLUSION
Now, you can use your VirtuaBox systems more extensively by sharing files between your host and guest systems.
If you use any other distro than Ubuntu-based ones, Arch Linux or Debian, try the way I show for Debian and let me know how it worked.
I recommend for the next read to learn how to clean Arch Linux.
Average Linux UserFollow I am the founder of the Average Linux User project, which is a hobby I work on at night. During the day I am a scientist who uses computers to analyze genetic data.
Как сделать общую папку в VirtualBox
VirtualBox – это бесплатная программа для создания виртуальных машин. С ее помощью можно создать виртуальную операционную систему, внутри которой можно проводить эксперименты без риска повреждения основной системы. Но, для полноценного использования виртуальной машины необходим способ передачи файлов из основной системы в виртуальную и наоборот. В этой инструкции мы рассмотрим именно эту проблему. Здесь вы узнаете, как сделать общую папку в VirtualBox, которая будет доступна как в обеих операционных системах и позволит выполнять обмен файлами.
Настройка общей папки VirtualBox для Windows
Процесс настройки общих папок в VirtualBox немного отличается, в зависимости от того, какая операционная система установлена на виртуальной машине. Для начала рассмотрим вариант, когда и основная и гостевая операционные системы это Windows. В нашем случае это будет Windows 10, но инструкция будет актуальной и для других версий Windows.
Для того чтобы сделать общую папку доступной как в основной, так и в гостевой системе, необходимо установить дополнения для гостевой системы. Для этого открываем меню « Устройства » и выбираем опцию « Подключить образ диска Дополнений гостевой ОС ».
После этого на виртуальной машине с Windows 10 появится оптический дисковод с программным обеспечением от VirtualBox.
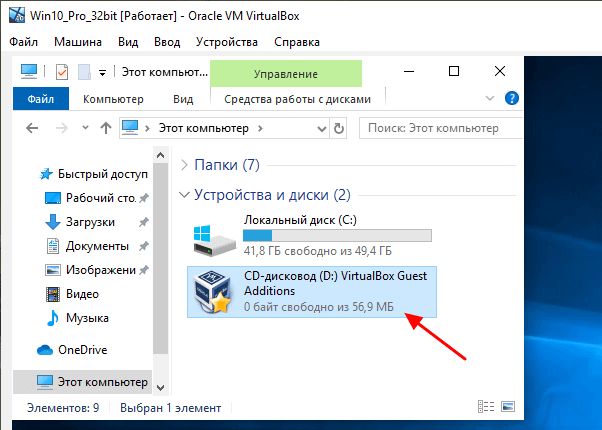
Если открыть данный дисковод, то мы увидим установочные файлы для разных операционных систем. Для Windows нам необходимо установить программу « VBoxWindowsAdditions ».

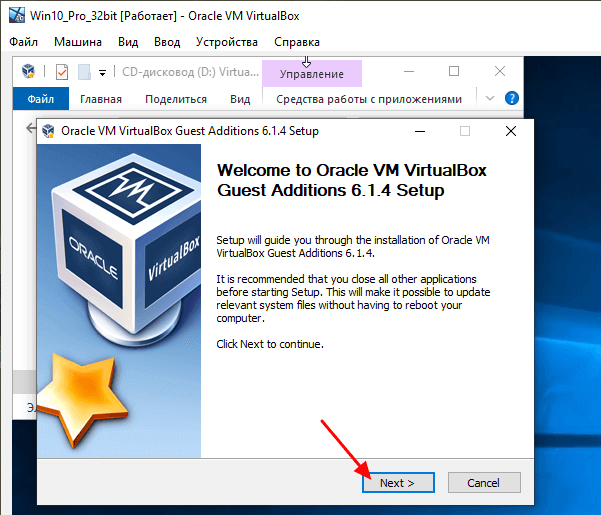
Процесс установки не представляет ничего сложного. Просто нажимаем на кнопку « Next » и в конце перезагружаем виртуальную машину.
После установки дополнений для гостевой системы можно приступать к созданию общей папки. Для этого выключаем виртуальную машину и переходим к ее настройкам в основном окне VirtualBox.
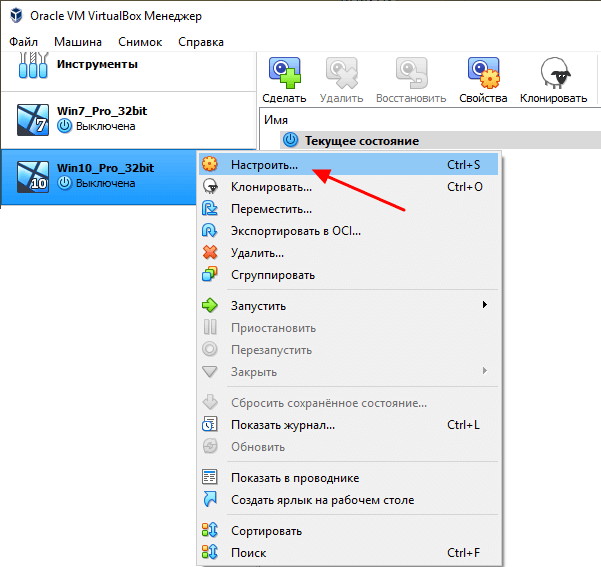
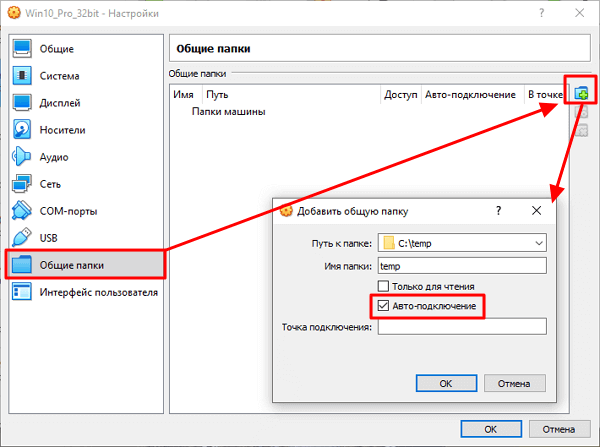
Настройках виртуальной машину нужно перейти в раздел «Общие папки», сделать новую общую папку и включить опцию « Авто-подключение ». После этого сохраняем настройки и снова запускаем виртуальную машину.
На этом настройка общей папки закончена. На виртуальной машине должен появиться сетевой диск, который будет указывать на общую папки из основной операционной системы.
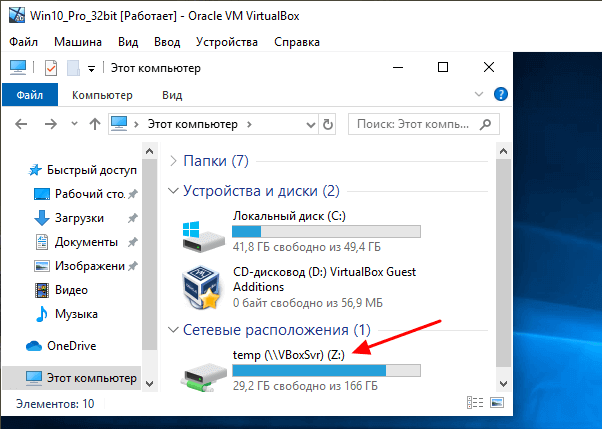
С помощью данного сетевого диска можно переносить файлы из основной Windows на виртуальную машину и обратно.
Настройка общей папки VirtualBox для Linux
Теперь рассмотрим ситуацию, когда вашей основной операционной системой является Windows, а на виртуальной машине VirtualBox установлена Linux. В нашем примере в качестве Linux будет использоваться Lubuntu 19.10, но с другими дистрибутивами процесс настройки должен быть схожим.
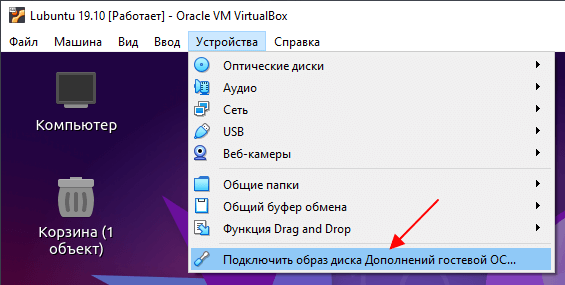
Для начала, как и в предыдущем случае, нужно подключить образ диска с дополнениями VirtualBox. Для этого используйте меню « Устройства – Подключить образ диска Дополнений гостевой ОС ».
После этого подключенный диск должен быть автоматически примонтирован и система предложит его открыть в диспетчере файлов. Соглашаемся с предложением, для того чтобы посмотреть, куда был примонтирован данный диск.

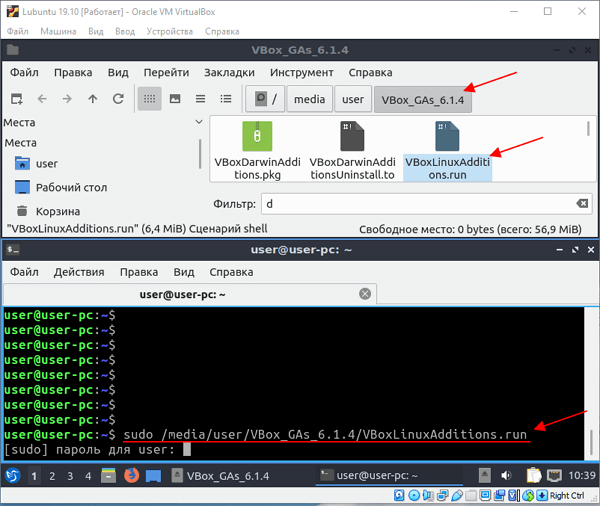
В нашем случае диск был примонтирован в каталог « /media/user/VBox_Gas_6.1.4 ». В этом каталоге есть файл « VBoxLinuxAdditins.run », который нужно выполнить (с правами ROOT) для установки дополнений гостевой ОС. Поэтому запускаем терминал и выполняем следующую команду:
sudo /media/user/VBox_Gas_6.1.4/VBoxLinuxAdditions.run
Обратите внимание, в вашем случае путь к файлу может отличаться, а после выполнения необходима перезагрузка.
Следующий шаг – настройка общей папки в свойствах виртуальной машины VirtualBox. Для этого выключаем виртуальную машину и открываем ее настройки. Здесь в разделе нужно добавить новую общую папку, указать к ней путь на вашем компьютере и включить опцию « Авто-подключение ». В общем, все точно также как в случае виртуальной машины с Windows.

После настройки общей папки снова запускаем виртуальную машину с Linux. Созданная общая папка должна быть автоматически примонтирована в « /media/sf_foldername ». В нашем случае это « /media/sf_temp ».
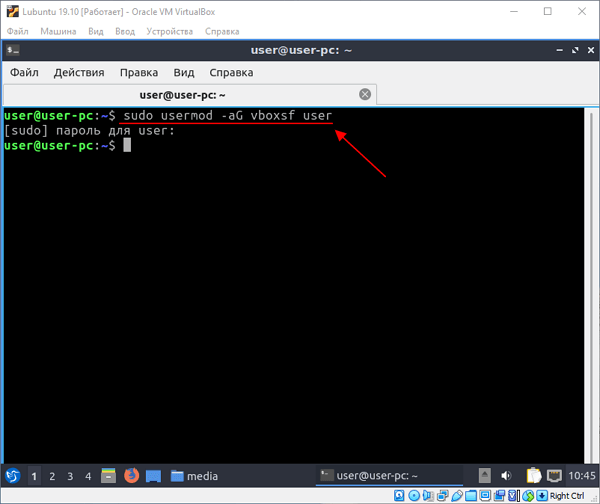
Но, данную папку пока нельзя открыть, поскольку нет доступа. Чтобы получить право на доступ к общей папке нужно добавить своего пользователя в группу « vboxsf ». Для этого запускаем терминал и выполняем следующую команду:
sudo usermod -aG vboxsf user
Обратите внимание, « user » — это имя вашего пользователя на виртуальной машине Linux.
На этом настройка общей папки завершена. Папка « /media/sf_foldername » должна появиться в диспетчере файлов и доступ к ней должен быть открыт.
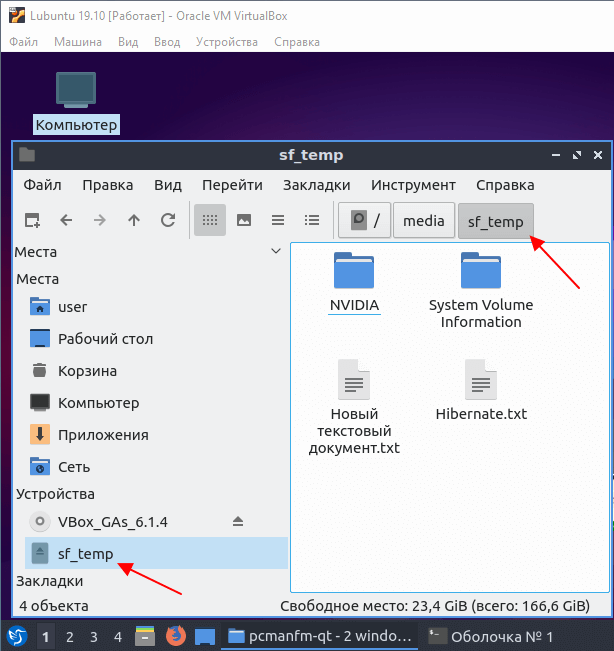
С помощью этой общей папки вы сможете перемещать файлы между вашей основной операционной системой и виртуальной машиной VirtualBox.