Linux Mint Forums
Intro:
This howto is not a complete guide, but it contains some useful hints I learned over the last three weeks of setting up my own Linux Mint server. I hope this will be useful to you if hit a wall at some point. (And you will, belive me).
Audience:
This howto is for people with little Linux experience, but with good general server and networking knowledge, who want to set up a fully functional linux server with varius services like DHCP, DNS, etc.
Notice: I will use a » Boooo » sign in this howto to indicate well known problems, and bugs I encountered.
Quick FAQ:
There are many server distros, why use Mint for a server?
Cons:
— Linux Mint was designed to be an out-of-the-box experience for desktops. You will need to do some work to turn it into a server.
Pros:
— More stability compared to Ubuntu (because Mint is very careful in pushing updates to your computer).
— All the benefits of Mint we love. Admins are users too God Damn It. This is 21 century. We CAN have a server with GUI, Firefox with Flash and OpenOffice. Admins listen to MP3s too. And we CAN have Compiz on our server because it is so cool.
Step 1: Installing Mint
(I used 64-bit edition of Mint Gloria)
- 80 GB for / (this is where your system will reside)
- 8 GB for swap (because I have 4 GB of Ram)
- 20 GB for /home (your private data and all user preferences will be here — very useful to have them on a separate partition. You will be able to reinstall your system or upgrade to Mint 8 in the future and keep all your settings).
- — 200 GB for important — I will store all my important files there, this partition will be regularly backed up together with the system partition (root partition /)
- — 628 GB for data — I will store all not so important data there. I will not backup that partition.
— Boooo If you have both SATA and PATA drives on your server, then Linux will not even boot after installed because of a bug in Grub — the boot loader. In the last installation step click Advanced. and change hd0 to the partition where your system is installed. Grub will still fail and cry that it cannot find an installed system after reboot. You must edit the startup command and by trial and error find the correct partition number where your system resides. More details here: http://linux.knightnet.org.uk/2008/01/m . a-and.html. Search Google for even more details.
At this point you should have a working Linux Mint installed. Weeee .
Step 2: Setting up Network configuration
— First enable routing:
Boooo — I did not find any GUI for that. To enable routing now you need to execute command:
sudo echo 1 > /proc/sys/net/ipv4/ip_forwardAfter reboot it will be turned off again. To enable it permanently you must edit a config file as root: /etc/sysctl.conf
Find the line:
and uncomment that line and save the file.
— Boooo Unfortunately you must uninstall the user friendly NetworkManager and configure your network the hard way. NetworkManager prevents DHCP server from starting at boot as described here: http://ubuntuforums.org/archive/index.p . 94344.html
Caution! After this point you will loose Internet access! Read the next steps first and after that follow them. Prepare all the needed information in advance (like your ISP nameservers IP).
— Uninstall NetworkManager with the Package Manager.
— Manually configure your network interfaces. You will need to edit the file /etc/network/interfaces:
— My file looks like this:
auto lo iface lo inet loopback post-up iptables-restore < /etc/iptables.up.rules auto eth0 iface eth0 inet static address 192.168.0.1 netmask 255.255.255.0 auto eth1 iface eth1 inet dhcp Where lo is the loopback interface - I did not edit that, it was there before. eth0 is my LAN interface. eth1 is my Internet interface, which is configured by my ISP using DHCP.
You must also edit the file /etc/resolv.conf. It should look more or less like that:
domain yourisp.com search yourisp.com nameserver 10.20.30.40 nameserver 10.20.30.41Replace the IP addresses with the actual nameserver of your ISP.
After that you need to restart the Networking service for the configuration to be applied. Run the command:
sudo /etc/init.d/networking restartStep 3: Installing Remote Desktop ( freenx )
- Use this tutorial to install freenx on your server: https://help.ubuntu.com/community/FreeNX - it works.
- Do not forget to create a custom SSH key for security and copy it to your pendrive.
- You can now download and install NX Client from here: http://www.nomachine.com/download.php (I use my laptop to access my server remotely)
- In the advanced settings of your NX Client import the client.id_dsa.key, which you have copied on your pendrive.
- Enable the possibility to connect to multiple NX servers at the same time. Take a look at the file /etc/nxserver/node.conf on your server. Inside this file find a variable called DISPLAY_BASE. You will not be able to connect to two servers with the same DISPLAY_BASE at the same time. To fix this: Make sure that the # comment sign in front of the line is removed. Now change the number to some random value. For example:
I don't know what is the limitation here, but any number between 1000 and 9999 should be ok. Perhaps even larger numbers will also be ok, but I didn't test that.
Also make sure that numbers for all your servers are far apart, so you can have many simultaneous connections to each of your machines. I think nxserver takes DISPLAY_BASE for the first connection, DISPLAY_BASE + 1 for the second connection and so on.
Now you can sit back with your laptop and a beer and play with your server from a remote location.
Step 4: Installing Webmin
Webmin is the best GUI for configuring almost everything on your server I have found so far. You connect to it via a web page. You can use this tutorial to install it: http://www.webmin.com/deb.html I used the "Using the Webmin APT repository" part. Of course I did not use these stupid commands to add a new repository. Instead I used the Package Manager and added the repository the GUI way .
From here you are on your own. Browse through all the options Webmin has. In general it works like that: You use the Package Manager to install something, say PostgreSQL database and then you hit "Refresh modules" in Webmin. Ta, da. A new option just appeared on the list. If it did not, then you can look for many third-party Webmin modules on their webpage. I for example installed a very useful OpenVPN module to configure my VPN.
Webmin removes the pain of manually editing tons of obscure config files, but you still need to understand how DHCP,DNS,etc. works to configure them. In particular I had to read a lot about how Linux Firewall works to configure it correctly.
I successfully installed and configured:
- DHCP (dhcp3)
- DNS (bind9)
- HTTP (Apache, with PHP)
- Linux Firewall
- PostgreSQL
- OpenVPN Server
- Subversion Server
- Mercurial Server
- Samba Server (Windows shares)
- SpamAssasin
- Team Speak server
- Complete System backup using dar and some scripts
- Incremental backup of some important data using rsnapshot
- I failed at Dovecot, because it has a very poor GUI at Webmin and extremely obscure config files, which you have to edit manually.
I still plan to install:
- FTP server
- Glassfish
I tried to cover most of typical tasks one will have to complete to set up an admin friendly server based on Linux Mint.
I can produce more howtos and answer many questions about the installation process as needed. It took me almost a month to resolve all the Boooos I encountered. Maybe thanks to that you will configure your Mint Server faster.
Как в Linux Mint 20.1 установить и настроить сервер Samba
С помощью Samba можно организовать общий доступ к папке в локальной сети. Создать файловое хранилище (файловый сервер). Установить Samba можно в любой системе Linux. Процесс установки и настройки практически везде одинаковый за исключение некоторых моментов. Сегодня расскажу как установить сервер Samba в ОС Linux Mint 20.1 и настроить общий доступ как папкам.
Вообще для организации файлового хранилища лучше использовать NAS. Но так как он стоить недешево, можно воспользоваться FreeNAS как относительно бесплатной альтернативой. Это операционная система которая устанавливается на обычный компьютер. С её помощью можно организовать более менее надежное файловое хранилище.
Так же рекомендую прочитать следующие статьи касающиеся этой темы.
Файловый сервер Samba на Linux Mint
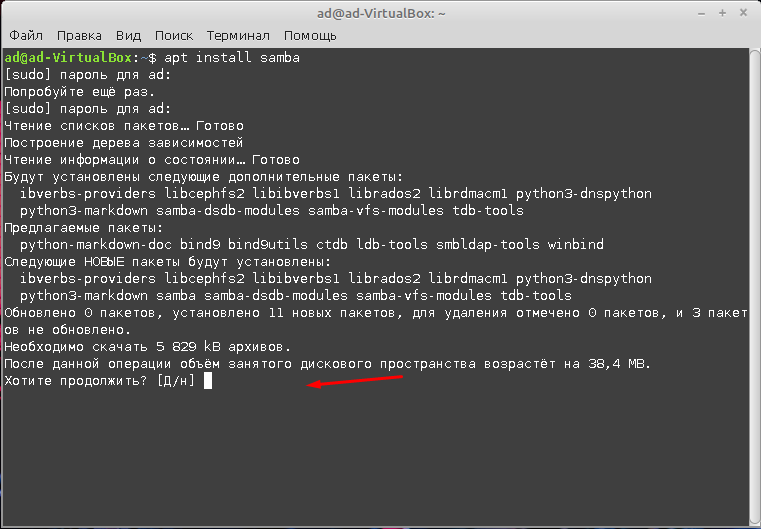
Устанавливать Samba лучше через терминал, для этого нужно ввести соответствующие команду и пароль суперпользователя.

Дальше подтверждаем установку.
После установки нужно настроить файл smb.conf. Сделать это будет намного удобней используя файловый менеджер MC (Midnight Commander). Для того чтобы его установить нужно ввести команду.
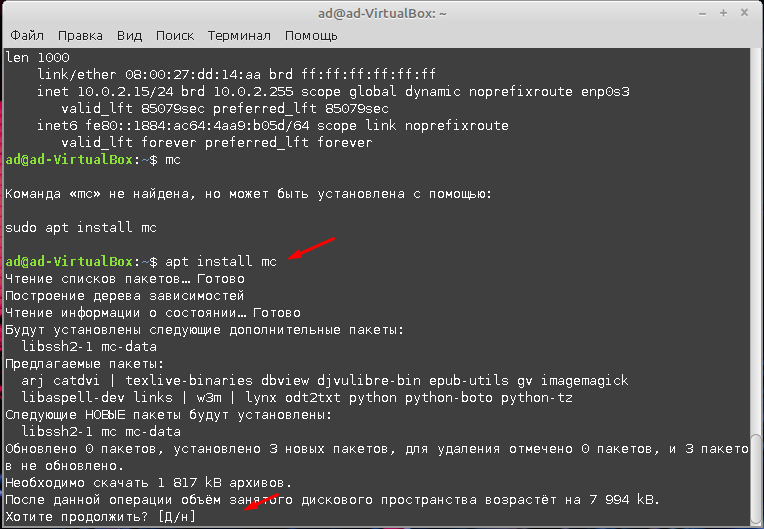
Дальше запускаем установленный файловый менеджер введя команду
Для начала создадим папку к которой будем открыть общий доступ, назовем её для примера, «Share», располагаться она будет тут /home/ad/share. Создать её можете через графически интерфейс, либо используя MC для этого нужно нажать клавишу F7.
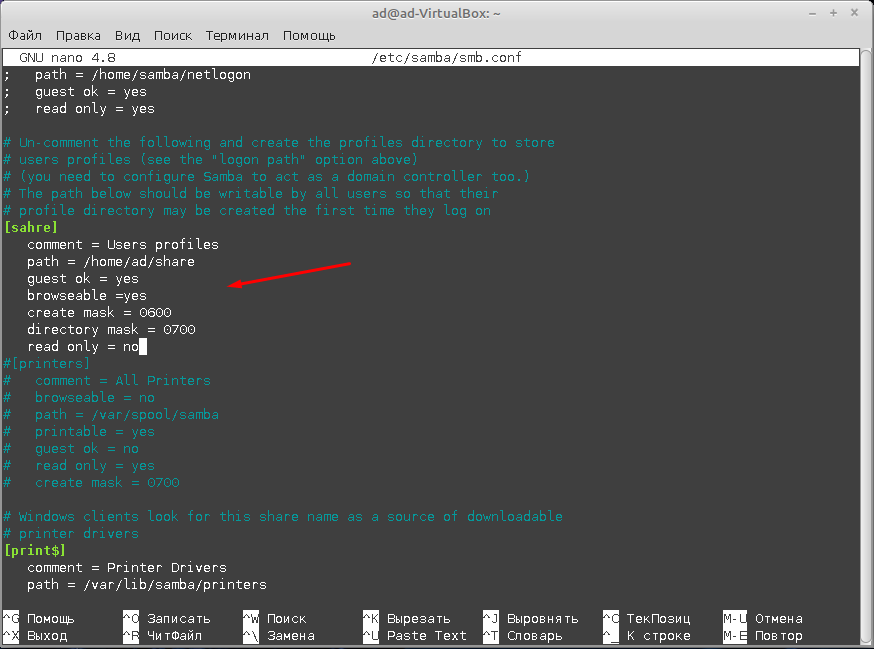
Дальше нам нужно открыть и отредактировать файл smb.conf, найти его можно по этому пути /etc/samba/, для редактирования нажимаем клавишу F4.

В открывшемся файле пишем следующие.
comment = Users profiles — комментарий не обязательно!
path = /home/ad/saher — путь до созданной ранее папки
guestok = yes — разрешаем гостевой доступ
browseable = yes — разрешаем отображение папки
create mask = 0600 — не обязательно!
directiry mask = 0700 — не обязательно!
read only = no права на запись
После чего сохраняем файл нажав сочетание клавиш Win + O.
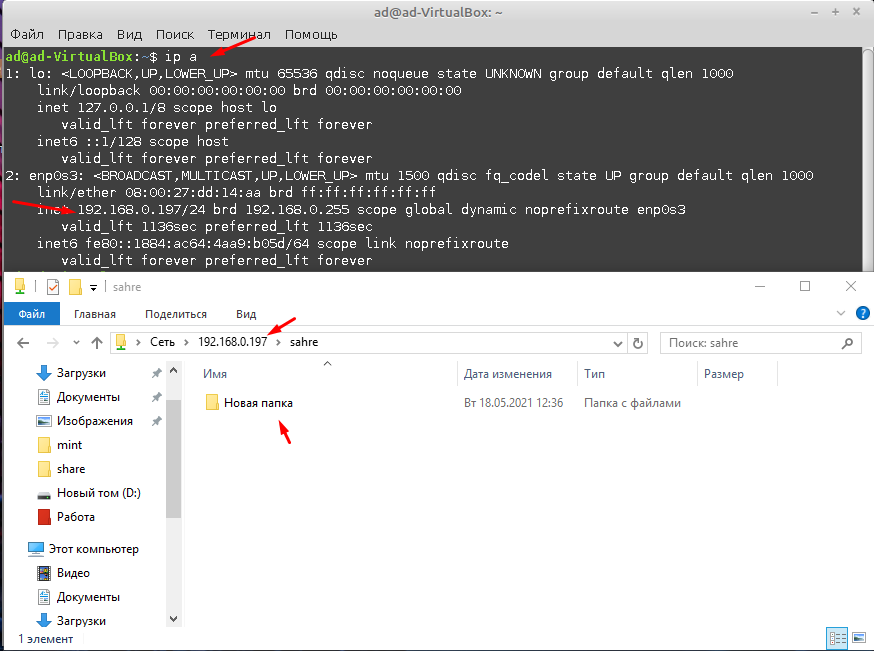
Далее пере запускаем службу командой.
И проверяем доступность созданной общей папки. Для этого можно открыть проводник Windows и ввести IP адрес сервера Samba. После чего должна отобразиться папка «Share», оно должна открываться и быть доступной для записи, т.е. создания файлов и папок.
Это минимальная настройка Samba которая позволяет создать общий ресурс для всех пользователей сети. При необходимости можно ограничить доступ по пользователям с различными правами, но об этом уже в следующей статье.