- Бэкап Linux и восстановление его на другом железе
- 1. Создание бэкапа
- Восстановление бэкапа на другом железе
- How To Back Up A Linux Server
- #Backing Up The Server With The Tar Method
- #Tar Command for Creating Backup
- #Tar Command for Extraction
- #Backing up the Server with Bera Backup
- #Features of Bera Backup
- #Bera Backup Properties
- #The Command for Creating Backup
- #The command for Restoring Backup
- #Conclusion
- Marius Rimkus
- Join Cherry Servers Community
Бэкап Linux и восстановление его на другом железе
Я работаю в организации с маленьким штатом, деятельность тесно связана с IT и у нас возникают задачи по системному администрированию. Мне это интересно и частенько я беру на себя решение некоторых.
На прошлой неделе мы настраивали FreePBX под debian 7.8, нанимали фрилансера. В процессе настройки оказалось, что сервер (да, я так называю обычный PC) не хочет грузится с HDD при подключенных USB 3G модемах, которые мы используем для звонков на мобильные, колупание BIOSа не помогло. Непорядок. Решил, что нужно перенести его на другую железяку. Так появилось сразу две связанные задачи:
Опыт общения с linux-системами у меня небольшой: настройка VPN сервера на open-vpn, ftp-сервера и еще пара мелочей. Сам себя я характеризую как человека умеющего читать маны и править конфиги 🙂
Ниже я описываю свой частный случай и почему я поступил именно так. Надеюсь, новичкам будет полезно, а бородатые админы улыбнутся вспомнив молодость.
Начинаем копать теорию:
По созданию бэкапов уйма статей, я для себя отметил два способа: tar — упаковывает и сжимает все файлы, при этом не сохраняется MBR, мой бэкап будет весить около 1.5 Gb; dd — делает полную копию раздела, включая MBR и всю область, где нет файлов, архив будет равен размеру раздела, в моем случае ~490 Gb.
Второй способ требует наличия внешнего жесткого диска объемом не меньше раздела, который архивируем. Да и что с ним потом делать, непонятно, хранить на полочке? Остановился на tar, чуть сложнее в реализации, нужно будет создать MBR, но время создания/восстановления архива существенно меньше, хранить бэкап проще, полтора гига можно закинуть в облако и скачать, когда будет нужно. Записывать его можно на ту же live-флэшку, с которой буду грузиться.
Итак, план действия:
- создание бэкапа;
- форматирование, разметка диска, создание файловой системы;
- восстановление бэкапа;
- создание MBR;
- тестирование и устранение неполадок.
1. Создание бэкапа
Грузимся с live-флэшки, у меня это debian-live-7.8.0-amd64-standard.
Монтируем раздел, который будем архивировать, у меня это sda1, чтобы случайно не наломать дров, монтируем только для чтения. Посмотреть все свои разделы можно при помощи команд ls /dev | grep sd или df -l
Наша флэшка уже примонтирована, но в режиме только чтения, нужно перемонтировать для чтения-записи, чтобы писать туда бэкап.
mount -o remount,rw /dev/sdb1 /lib/live/mount/medium Все готово для создания архива
tar -cvzpf /lib/live/mount/medium/backupYYYYMMDD.tgz --exclude=/mnt/var/spool/asterisk/monitor --exclude=/mnt/var/spool/asterisk/backup /mnt/ Здесь у нас параметры: c — создать архив, v — выводить информацию о процессе, z — использовать сжатие gzip, p — сохраняем данные о владельцах и правах доступа, f — пишем архив в файл, путь к файлу, —exclude — исключаем из архива каталог (я исключил каталоги с записями разговоров и каталог с бэкапами FreePBX), /mnt/ — каталог, который архивируем.
Ждем… у меня вся подготовка и создание архива заняли 10 минут. Будь флэшка быстрее, уложился бы в 7-8 минут.
Складываем архив в надежное место за пределами офиса.
Восстановление бэкапа на другом железе
2. Размечаем диск, создаем файловую систему
Грузимся с live-флэшки, у меня все та же debian-live-7.8.0.
Размечаем диск. Мне понравилась утилита с псевдографическим интерфейсом cfdisk. Там все просто и понятно.
Удаляем все имеющиеся разделы. Я создал два новых раздела, один на 490 Gb под / (sda1) и 10 Gb под swap (sda2) в конце диска, т.к. он практически не будет задействован. Проверим типы разделов. Который под систему должен иметь тип 83 Linux, второй — 82 Linux swap / Solaris. Помечаем системный раздел загрузочным (bootable), сохраняем изменения и выходим.
Cоздаем файловую систему на первом разделе.
3. Распаковываем архив.
Монтируем отформатированный раздел
Распаковываем архив прямо с флэшки
tar --same-owner -xvpf /lib/live/mount/medium/backupYYYYMMDD.tgz -C /mnt/ Параметр —same-owner — сохраняет владельцев у распаковываемых файлов, x — извлекаем из архива, v — выводить информацию о процессе, p — сохраняем права доступа, f — указываем файл, который распаковываем, C — распаковываем в категорию.
4. Создаем MBR на новом диске.
Чтобы корректно создать загрузочную запись, монтируем рабочие каталоги к нашему будущему root-каталогу, у меня это /mnt. Каталоги /dev и /proc сейчас используются live-системой, используем параметр bind, чтобы они были доступны сразу в двух местах:
mount --bind /dev /mnt/dev mount --bind /proc /mnt/proc Переключаемся на новую систему используя chroot:
Делаем swap-раздел для новой системы:
Чтобы grub работал, нужно указать ему правильные UUID разделов в fstab, сейчас там прописаны разделы предыдущей системы:
Открываем второй терминал (Alt+F2) под root:
И видим текущие UUID разделов.
Вручную переписываем их в fstab переключаясь между Alt+F1 и Alt+F2. Да, муторно, но попытки копировать занимали у меня больше времени, чем переписывание. Сохраняем fstab.
Устанавливаем grub2. У меня один физический диск, поэтому ставим его на sda:
На чистый диск должно встать без ошибок. Обновляем информацию из fstab:
Возвращаемся в Live-систему:
Размонтируем все каталоги:
umount /mnt/dev umount /mnt/proc umount /mnt Если вылазят процессы, которые используют эти каталоги, убиваем их используя fuser.
Все, поехали. Грузимся с жесткого диска:
Здесь статья должна была закончиться, но у меня возникли проблемы с подключением к интернету. Сервер видит сеть, видит компьютеры в ней, но в интернет не ходит… а это как бы важно для телефонии.
5. Тестирование и устранение неполадок.
Показывет интерфейсы eth1 и lo, гугление сказало, что gateway можно прописать только подключению eth0, остальные рассчитаны только на работу внутри сети.
Похоже, отсутствие eth0 вызвано способом переноса системы. Находим файл, который отвечает за нумерацию интерфейсов, смотрим туда:
nano /etc/udev/rules.d/70-persistent-net.rules Действительно, там два активных интерфейса, определенных MAC’ами. Комментируем первый, второму прописываем eth0.
Перезапуск /etс/init.d/networking не помог, поэтому перезагружаемся:
How To Back Up A Linux Server
With the growth of public cloud infrastructures, Linux has risen in importance as the most compatible open-sourced operating system that takes full advantage of what the cloud has to offer by stretching its capabilities.
Linux servers are known for providing high-end security, and that’s why many developers use these to keep backups of their sites. Just like conventional open-sourced Linux systems, these servers are chosen for their stability, security, and flexibility advantages.
Backups are important because they help prevent permanent loss of valuable data, making it imperative for system admins to know all their Linux server backup options. This is even more critical for people who work with enterprise-level data.
However, with security and flexibility as its attributes, backing up a Linux server is not easy. Several utilities and software can be used, and we’ll show you how to make backups using two of the easiest methods: the ‘Tar’ approach and the ‘Bera’ backup method.
#Backing Up The Server With The Tar Method
For this tutorial, we opt for an Ubuntu operating system, one of the more popular Linux-based servers used.
#Tar Command for Creating Backup
sudo tar –cvpzf backup.tar.gz –exclude=/home/server/backup.tar.gz –one-file-system This is a simple tar command that initiates backup. It will archive all the files you have on your server into a g-zipped compressed format. We’ve chosen backup.tar as the name for your backup and wrote -exclude to not ‘include’ this backup into a backup created earlier.
This command will also create a new directory for you to back up your Linux server as file permissions are preserved. This makes it easier to not only restore your server but save time configuring files and folders the way you opted initially.
After you’ve typed the code mentioned above, hit Enter .
You’ll see the system beginning to archive all the files on your server system. By backing up the root directory, it tends to recourse itself back into other previous directories.
Make sure your server is not performing maintenance procedures. Otherwise, the backup will take hours.
#Tar Command for Extraction
sudo tar –xvpzf /home/server/backup.tar.gz –C / --numeric-owner The system will start un-archiving as it overwrites all the files you backed up before and rewrite the files that were installed before if you had a functioning system.
In case of a complete system re-installation, all the files will be restored to how they were.
The -f option is for the name of the drive you used to store your backup. In this case, since it was Home-Back-Server chosen as the location and it was a root backup, try restoring it to the same folder to avoid confusions and simultaneously uncompressing the files too.
Once the extraction is finished, just reboot and your system will be restored to the way it was when you backed it up.
Note: You can also make backups and store them onto a USB drive, but it is not recommended if it is a massive backup, and the speed of the transfer will be slower as compared to a system-root/server location.
#Backing up the Server with Bera Backup
Bera Backup is a tool that can help make comprehensive Linux server backups and allows more file extensions than the normal Tar method.
This way, you can save a lot of time in case of server migration. The process is also more straightforward compared to the Tar method.
#Features of Bera Backup
You can migrate an entire server in less than ten minutes. The simplicity of the Bera backup tool makes it a much easier to understand method for backing up your server.
You can include tabs, folders, and receive periodic notifications during backups. Since Bera is based on RSync, the process is more secure than the conventional ‘Tar’ method.
#Bera Backup Properties
File Backups – For the important files and folders to include them in the backup
System Configurations – For Files like iptables, crontabs, users and all installed packages
#The Command for Creating Backup
./bera-backup.sh _path_config_backup Hit Enter and Bera will start with the backup process. You’ll see the program execute the following:
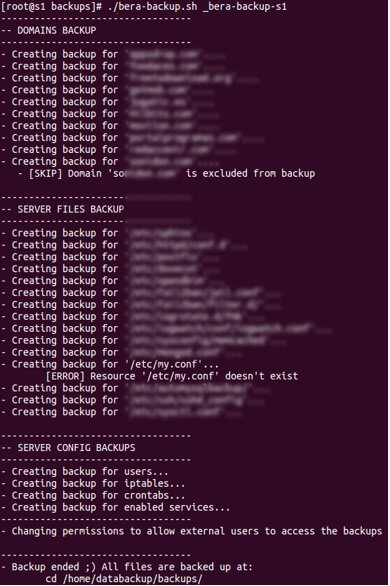
Note: It is highly recommended to have root permissions enabled before starting with the backup, to remove any permission problems that may occur during and after restoring the backup of your Linux server.
#The command for Restoring Backup
Type the following command:
./bera-restore.sh _path_config_restore Don’t forget the path you chose before you made the backup; this will replace ‘_path’ to extract the backup from the location.
While defining the backup, you can take your pick from several configurable parameters for server commands for Bera Restoration Procedure, these are highlighted below:
| Parameters | Description |
|---|---|
| backupOrigin | Indicates ‘local’ if the backup is on the server itself, or ‘ssh’ for download from another location |
| backupLocalDir | Local directory where the backup is (or where it will be downloaded via SSH). |
| backupRemoteUser | User for the SSH connection to the server where the backup is |
| backupremoteserver | Remote SSH server where the backup is |
| backupRemotePort | SSH server port |
| backupRemoteDir | Remote directory where the backup is |
#Conclusion
You should have website backups just for the peace of mind that your content is safe at all times.
Backups also help ensure that your website remains available to your visitors at all times, even if something terrible has happened.
Creating backups for your Linux server might seem complicated, but you can get the job done in a variety of ways. In addition to the methods mentioned above, also try Linux server backup tools such as Rsync Commands or Bacula and NAKIVO Hyper-V Backup for users using Hyper-V virtualized environments
While making backups is not difficult, choosing the right path and the right configurations is what gets challenging. It is also important to ensure that you don’t choose a cheap hosting service for your website.
If you’d like more information about using Linux Servers to their full potential or backing them up properly, get in touch with us today. Our Linux Server specialists are here to help you 24/7.

Marius Rimkus
I’m a keen technology enthusiast with strong interest in GPU computing and DevOps culture. I believe Agile development helps companies reach utmost customer satisfaction and makes their services stand out in the market.
Join Cherry Servers Community
Get monthly practical guides about building more secure, efficient and easier to scale systems on an open cloud ecosystem.