- How to install Pop!_OS LTS edition on a virtual machine or physical PC
- Install Pop OS on Virtual Machine VirtualBox or PC
- Pop os system requirements
- Step 1: Downloading Pop!_OS Linux ISO
- Step 2: Select the POP OS image with Intel or AMD graphics drivers
- Step 3: Create a Virtual Box virtual machine for PoP OS
- Step 4: Assign a name to the virtual machine
- Step 5: Set Virtual Memory for Pop!_OS
- Step 6: Create a virtual hard disk
- Step 7: Start the PoP OS VM
- Step 6: Installing Pop!_OS
- Use AMD FidelityFX SuperResolution (FSR) on Pop!_OS
- AMD FSR
- Resolution and Quality
- Sharpening
- Setup Steam Launch Options
- Setup your In-game Resolution
- Lutris
- Bottles
How to install Pop!_OS LTS edition on a virtual machine or physical PC
Linux is a great platform, and one big reason for its popularity is the diversity it has to offer. Whatever may be your point of interest or the way you want to use your computer, Linux will have a solution for you in almost all the cases. Debian is the most popular distribution of Linux and most users, even I find it comfortable to be on a Debian-based distribution of Linux as it has a rich repository and Ubuntu, which is a Debian-based Linux distribution is also the most popular Linux distribution available out there. But if you are into gaming, Linux might not be the best solution, however, there is a handful of distributions that are optimized for gaming on Linux.
One of them is Pop!_OS. It is yet another Debian-based distribution of Linux, which you can install on your computer, and the best part is it comes with the native Nvidia and AMD graphics drivers for your system. Even though the catalogue of games available for Linux is yet to balloon, but the option to get the full potential of your graphics drivers is one of the biggest reasons you should at least try out the Pop!_OS on your computer. I will show you how you can install Pop!_OS on a virtual machine as well as on a physical computer here.
Note : If you are planning to install this LINUX OS on your PC then skip the Virtual Box part and jump directly to Step 6 of this tutorial.
Install Pop OS on Virtual Machine VirtualBox or PC
So, without any further delay, let’s get started with you can download and install Pop!_OS on your computer on a virtual machine for testing.
Pop os system requirements
- 64-bit CPU (on x86 architecture)
- To install it we need 2GB RAM minimum and recommended is 4GB
- 16GB of minimum is hard drive while 20GB is recommended
Step 1: Downloading Pop!_OS Linux ISO
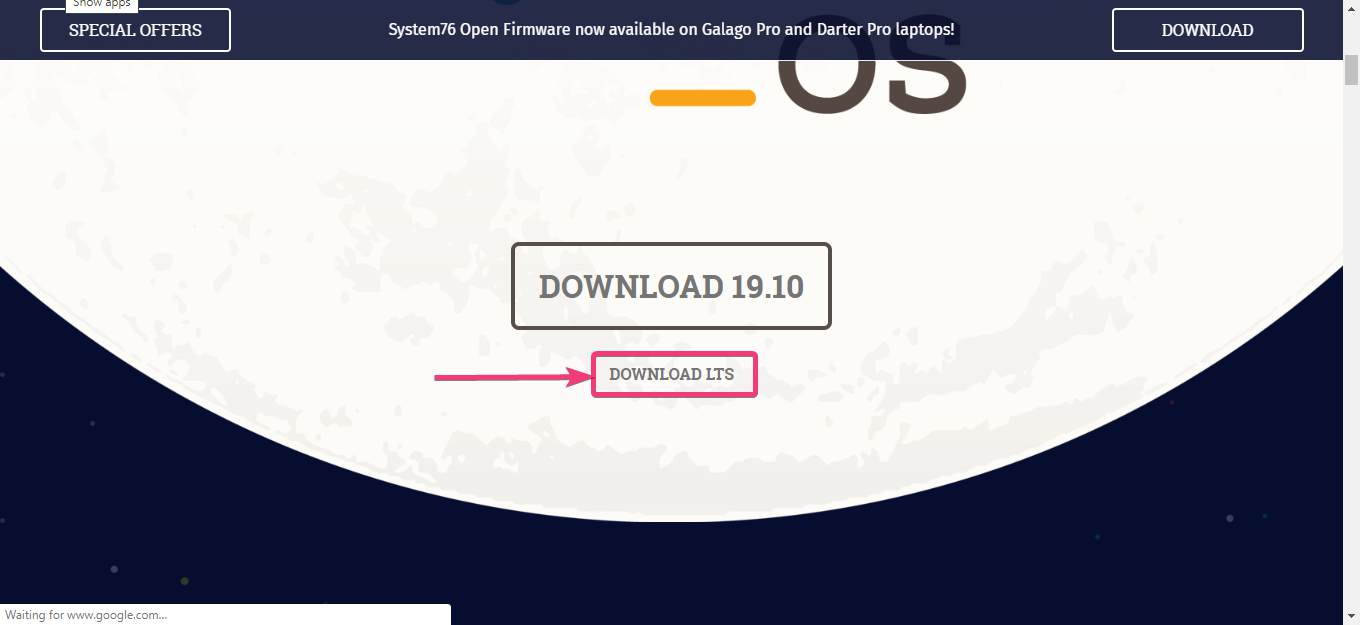
The first step is to download a copy of Pop!_OS. Just follow the link to open the download page of Pop!_OS, and scroll down a little to get the option for download. The 19.10 is the latest version, however, that isn’t an LTS version. So, just click on ‘ Download LTS ’ to download Pop!_OS 18.04.
Step 2: Select the POP OS image with Intel or AMD graphics drivers
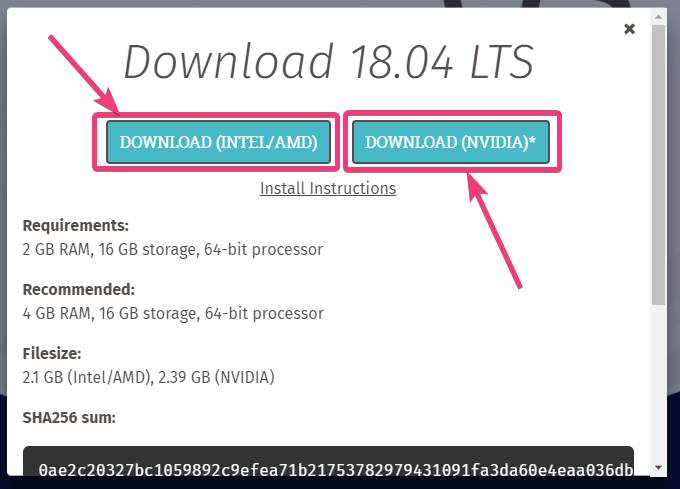
Now you can either download the copy that comes with the NVIDIA graphics drivers, or the one that comes with Intel or AMD graphics drivers. Just choose the one as per your hardware, and if you want to run Pop!_OS on a virtual machine, just go with the ISO that comes with Intel or AMD graphics drivers.
Step 3: Create a Virtual Box virtual machine for PoP OS
After you have downloaded Pop!_OS, which should take some time, you will now need to configure the virtual machine, or you can directly skip to, how you can install Pop!_OS on a physical machine.
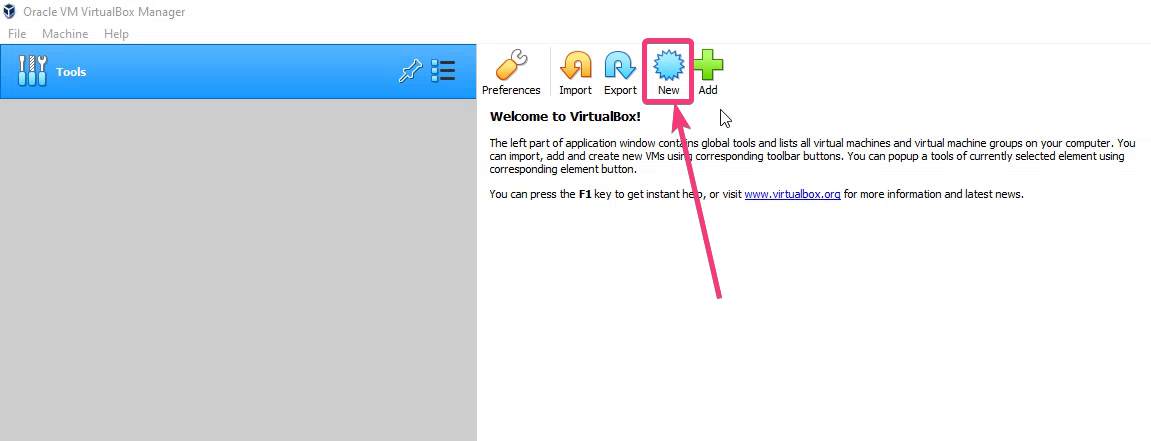
Open VirtualBox, and click on ‘New’ .
Step 4: Assign a name to the virtual machine
In the next step, assign a name to the virtual machine, choose the location of the virtual machine on your storage, and assign a type and version of the virtual machine that you are going to create. Just set the type to ‘Linux’ , and the version to ‘ Debian (64-bit) ’.

Step 5: Set Virtual Memory for Pop!_OS
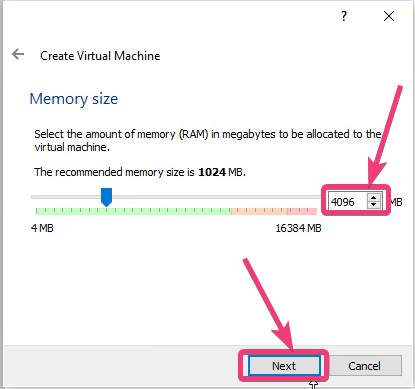
Pop!_OS recommends at least 2 GB of RAM, however, 4 GB RAM is the recommended requirement. So, I am setting it to 4 GB. You can set it to a higher size, or choose any RAM, above 2 GB at least. Now, click on ‘Next’ , after you set the RAM.
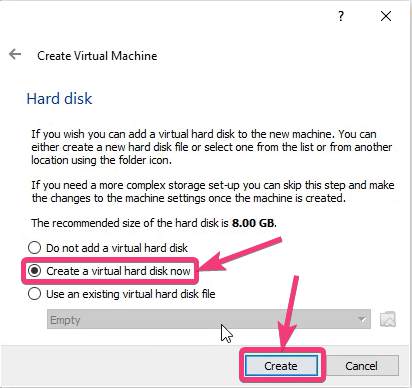
Step 6: Create a virtual hard disk
In the next step, you will have to choose whether you want to create a virtual hard drive. Select ‘ Create a virtual hard disk now ’, and click on ‘Create’ .
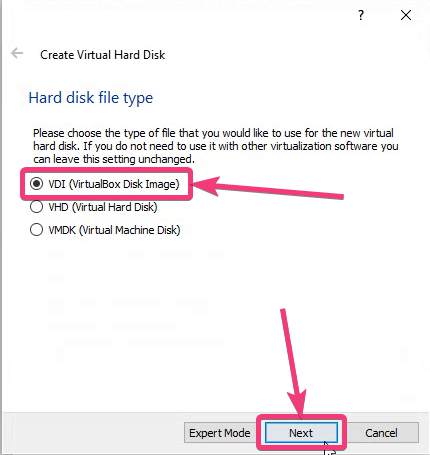
Choose ‘ VirtualBox Disk Image ’ or ‘VDI’ as the type of virtual disk, and click on ‘Next’ .
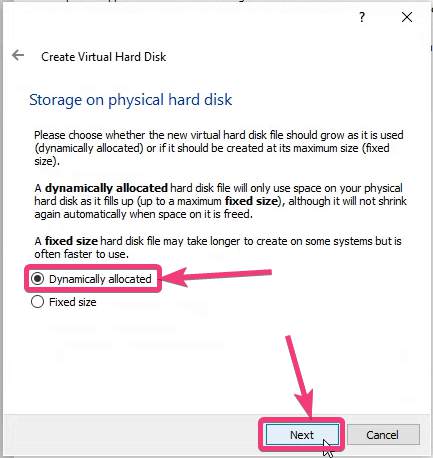
You can create a hard drive that will automatically expand with new content or the one with a fixed size. Just choose ‘ Dynamically allocated ’, and click on ‘Next’ .
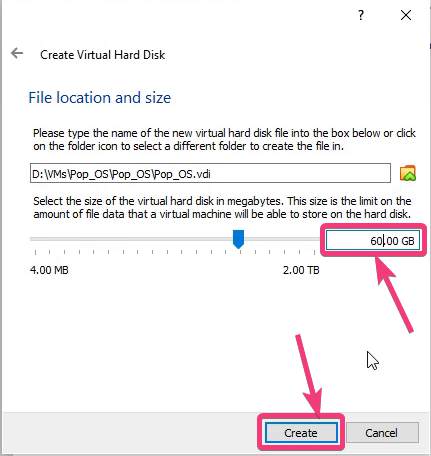
Now, you will have to choose the size of the virtual hard drive. Any value bigger than 16 GB should work just fine. I am choosing 60 GB here, which should be more than enough. Now, click on ‘Create’ .
Step 7: Start the PoP OS VM
Now, click on ‘Start’ after you select the virtual machine created by you.

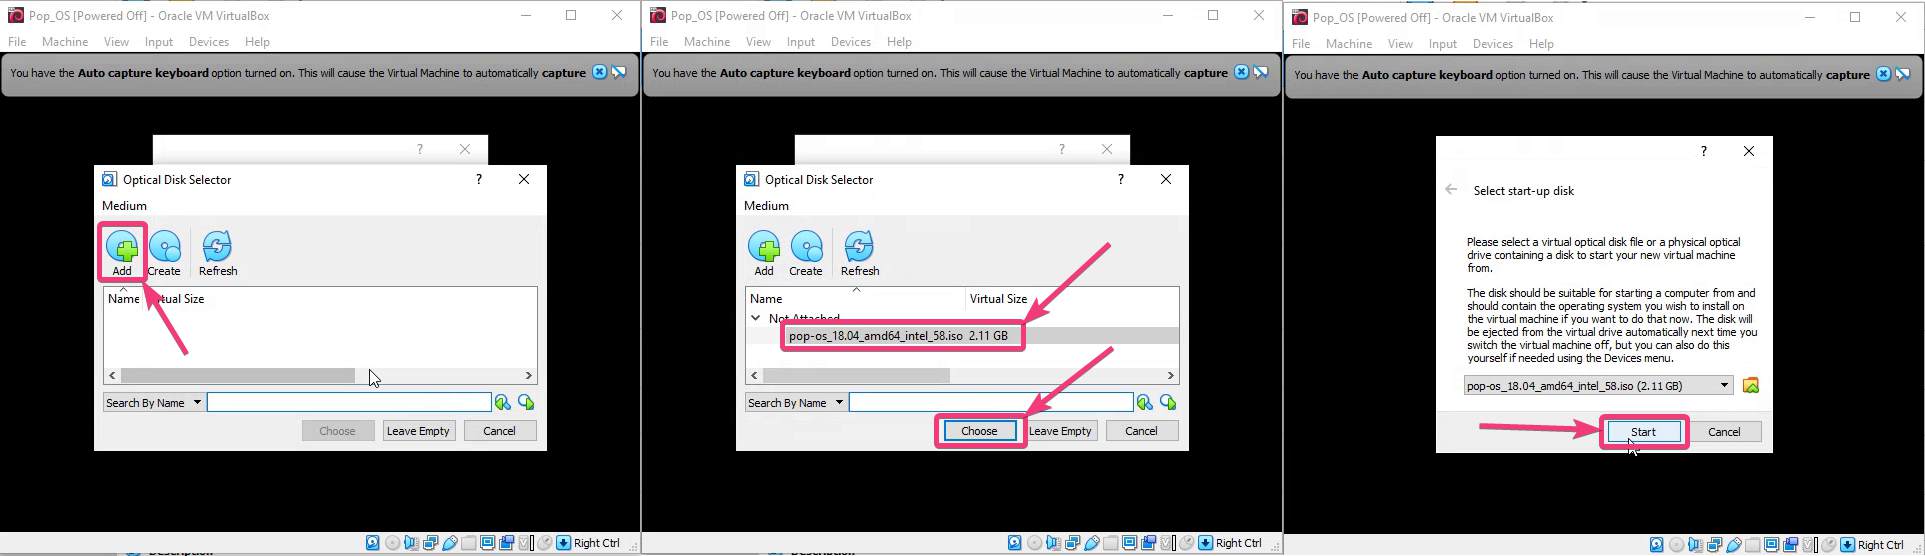
Now, you will have to choose the ISO or the drive, where Pop!_OS is there. Just click on the small folder icon.

Next, click on ‘Add’ , and choose the Pop!_OS ISO, and finally click on ‘Start’ .
Now the virtual machine is configured. Now it is the time for installation. The next steps are going to be the same, even if you are installing it on your physical machine.
Step 6: Installing Pop!_OS
Note: If you want to install this Linux operating system on PC or Laptop then first create bootable USB drive of PoP OS (link) and then plug that into your system. Boot the drive using Esc or F12 or any other key as per your system BIOS and select the created bootable drive. After that, the below-given steps will be the same for Virtual Machine or Physical PC or Laptop.
Now, the final steps are pretty simple, and the installation of Pop!_OS is significantly simpler than the installation of most other Debian-based Linux distributions.
If you are installing Pop!_OS on a physical machine, just make sure, you have configured your computer to boot from the media where Pop!_OS installer is present.
After your computer starts booting from the Pop!_OS installer, just wait for the basic steps to be executed. The option to install Pop!_OS should appear after the basic steps, however, there can be a small problem on some computers.
The screen resolution might not be good enough to even initiate the installation. So, it is recommended that you increase the screen resolution to at least 1280×960. To do that, just exit the installer, click on ‘Activities’ , and search for ‘Display’ . Now change the screen resolution, and click on ‘Apply’ .
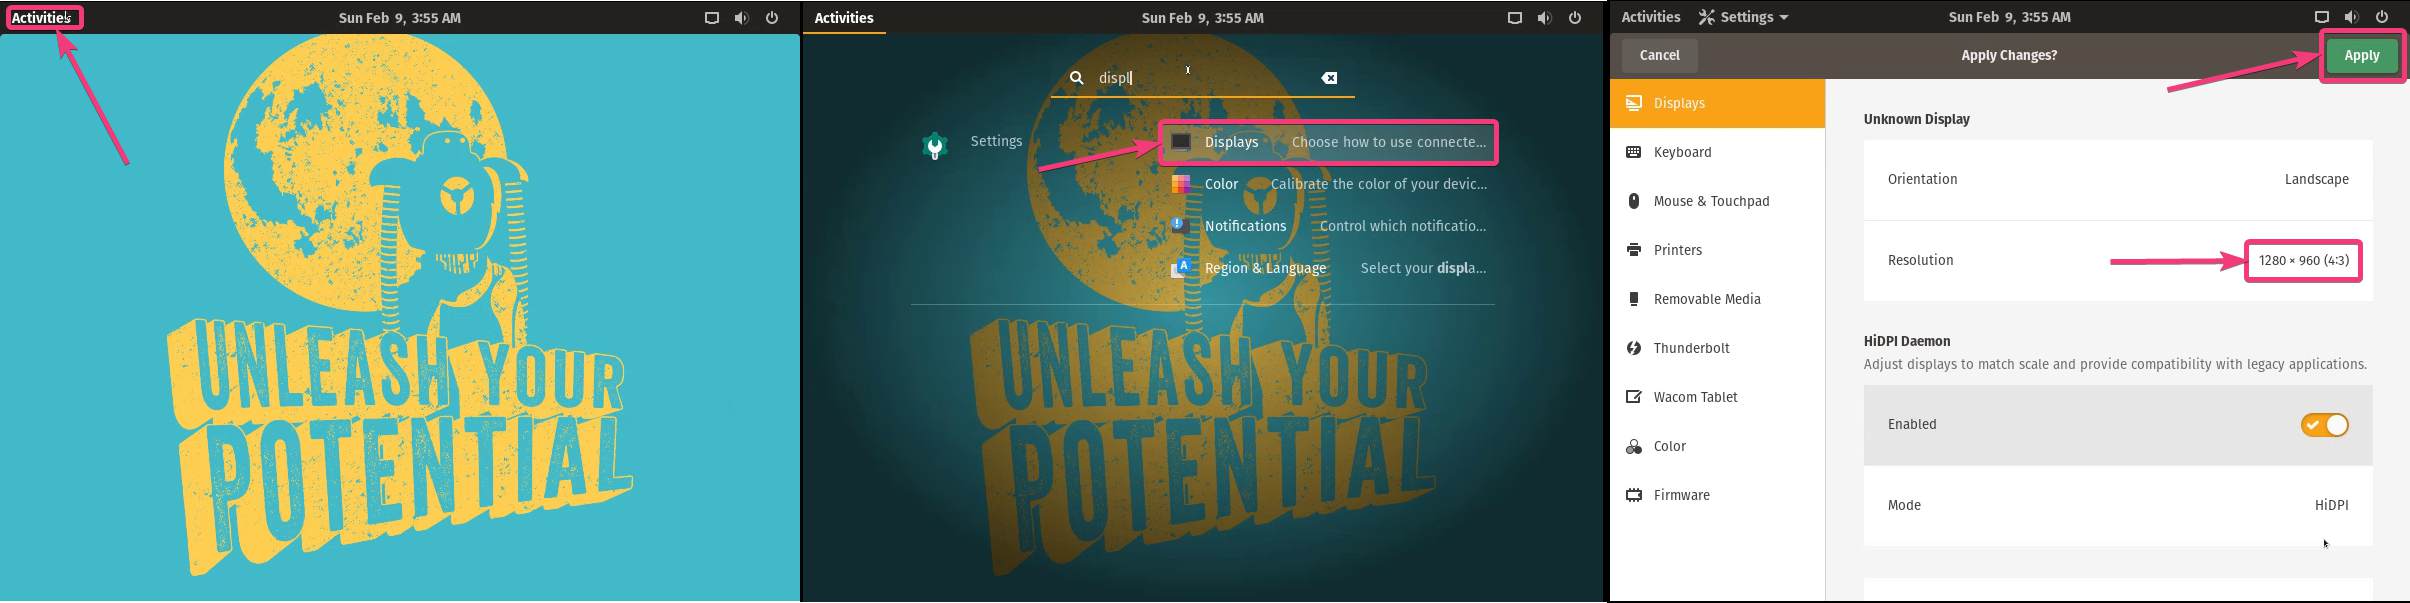
Please note that the change is not permanent. After the installation is complete, you will again have to change the screen resolution. After setting the screen resolution is set, click on ‘Activities’ , and click on ‘ Install Pop!_OS ’.

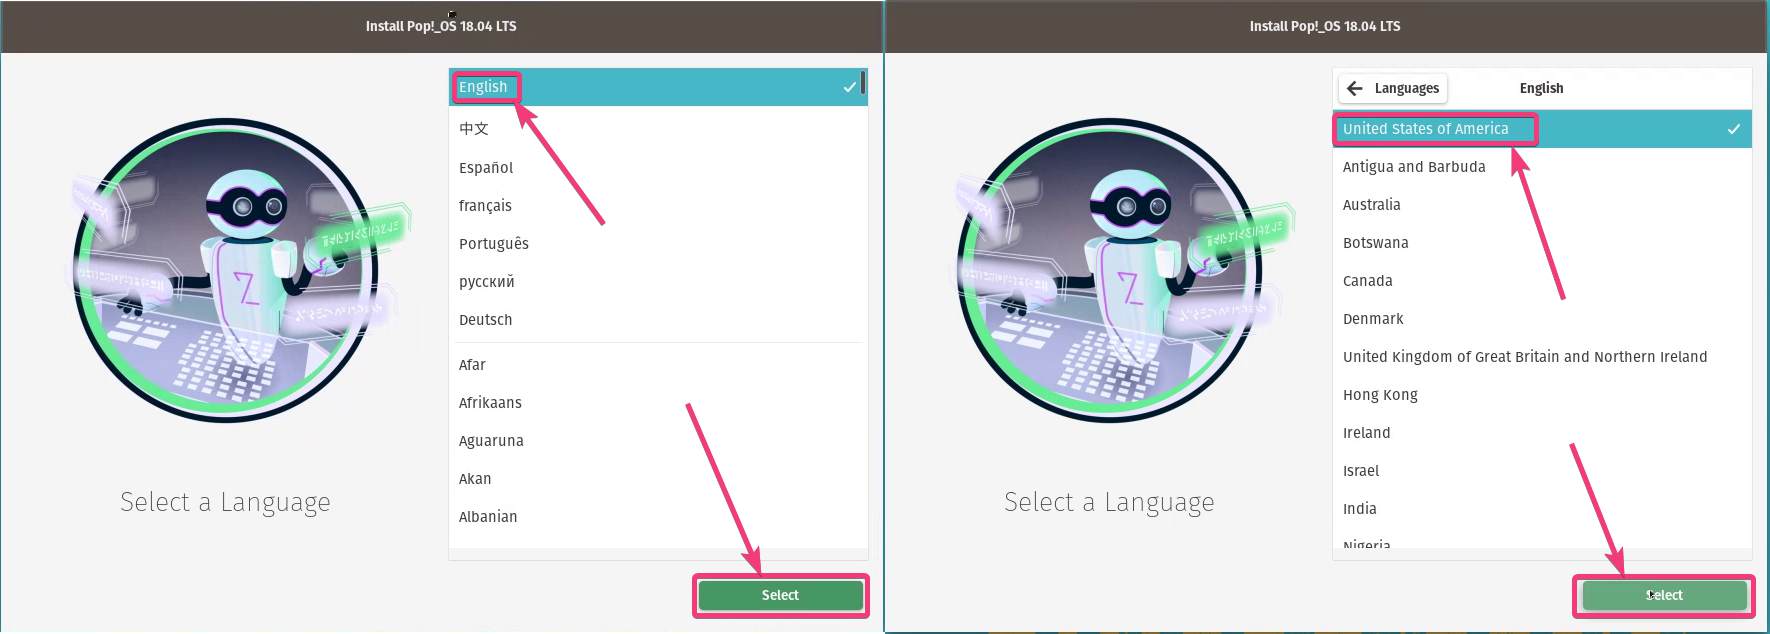
The first step is to select the language. Just choose ‘English’ and click on ‘Next’ . In the next step, click on the locale, which is ‘ United States of America ’ for me, and click on ‘Next’ again.
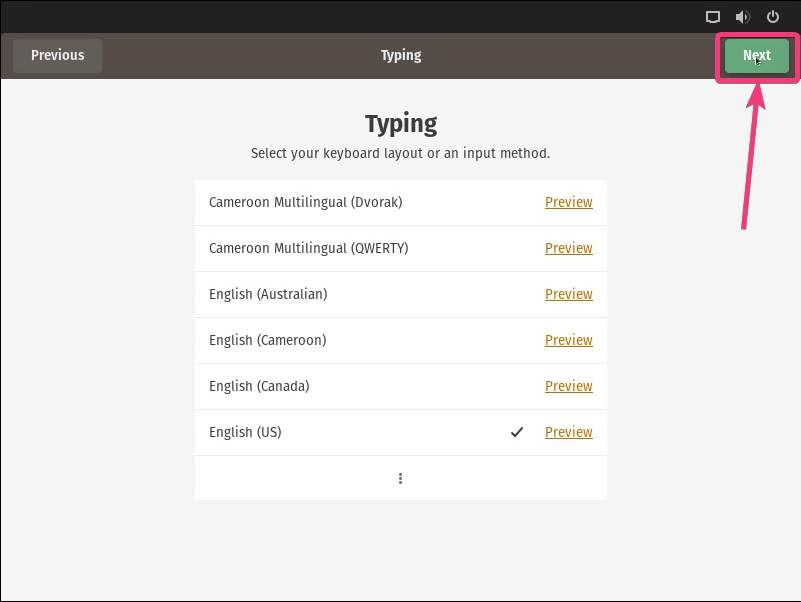
Now, choose the keyboard layout, which is ‘ English (US)… ’, and click on ‘Next’ . The keyboard layout can be set to ‘Default’ .

You can choose to do a clean install or can create partitions. Just choose ‘ Custom (Advanced) ’ to create partitions, or ‘ Clean Install ’ to install the operating system without creating multiple partitions. Just choose the respective option.

In the next step, you will have to choose the drive where you want to install Pop!_OS. Just select the drive, and click on ‘ Erase and Install ’.

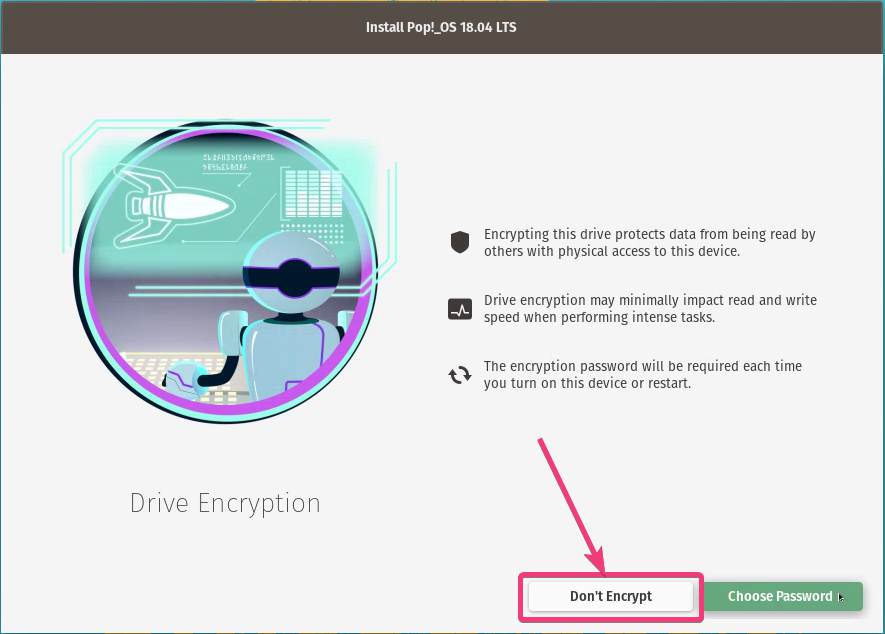
Now, you can choose to encrypt the disks. Just click on ‘ Choose Password ’ if you want to encrypt the disks, or simply click on ‘ Don’t Encrypt ’ to proceed without encrypting the disks.
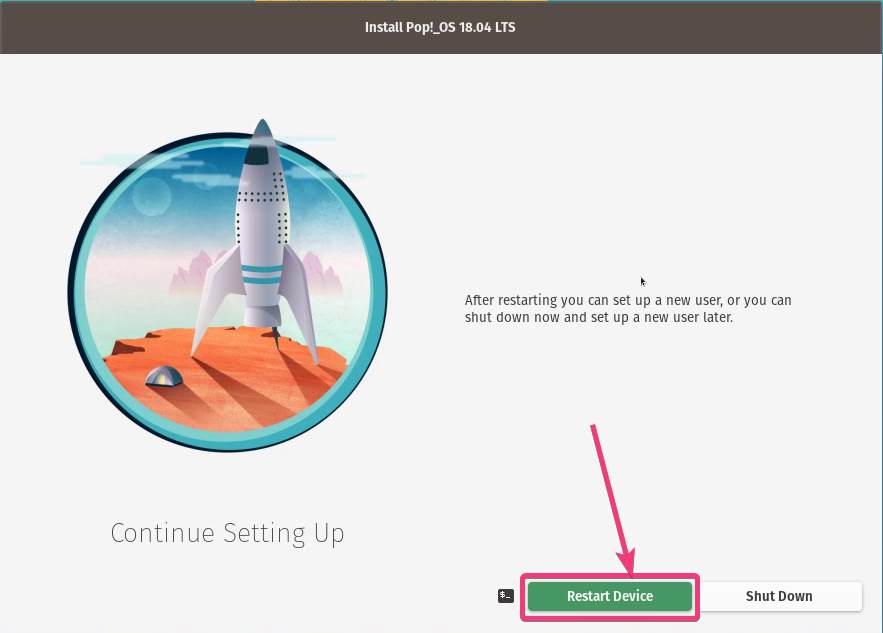
The installation will immediately start and after the installation is complete, just click on ‘ Restart Device ’.
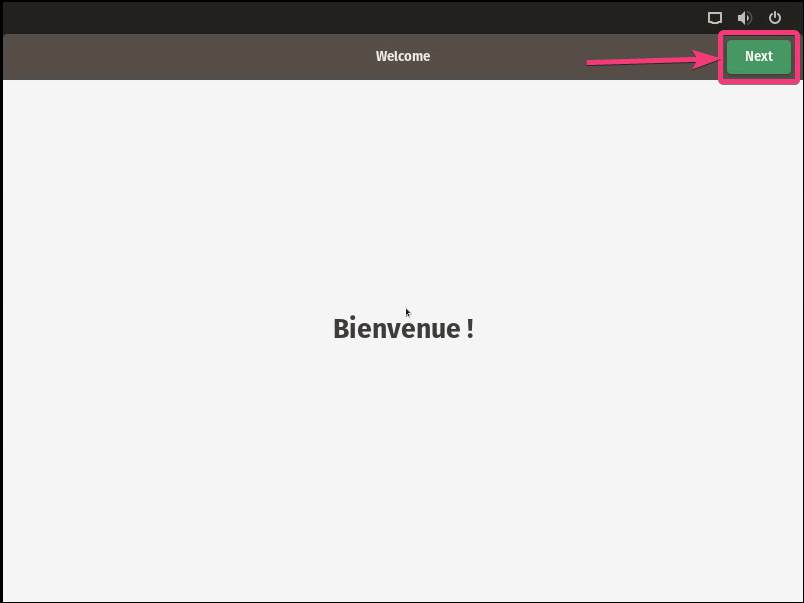
After the system restarts, you will see the welcome screen. Just click on ‘Next’ .
In the next step, select the input method, and click on ‘Next’ .
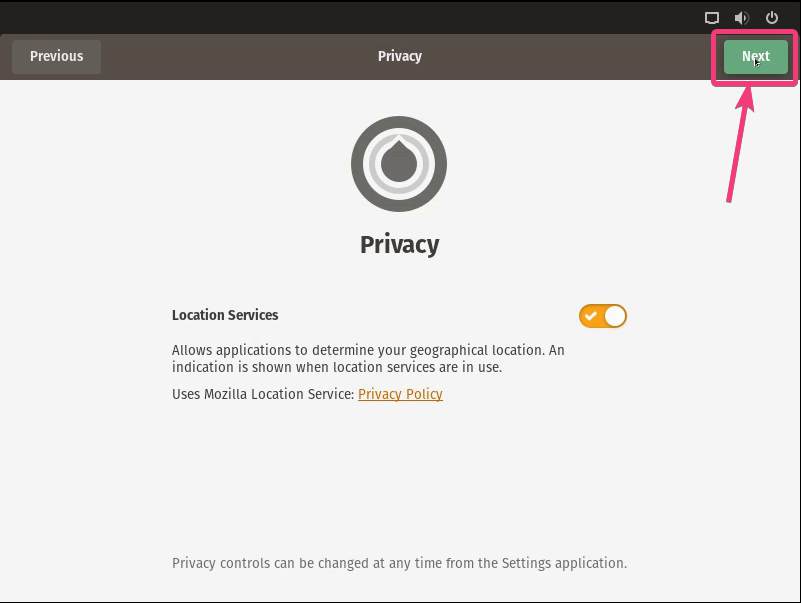
Now, you will have to choose, whether you want to keep the locational service enabled. It should be enabled by default. If you want to change the settings, you can do that, and click on ‘Next’ .
Now, choose the time zone, which should be selected automatically. You can even change the zone if you find it necessary. After that, click on ‘Next’ .

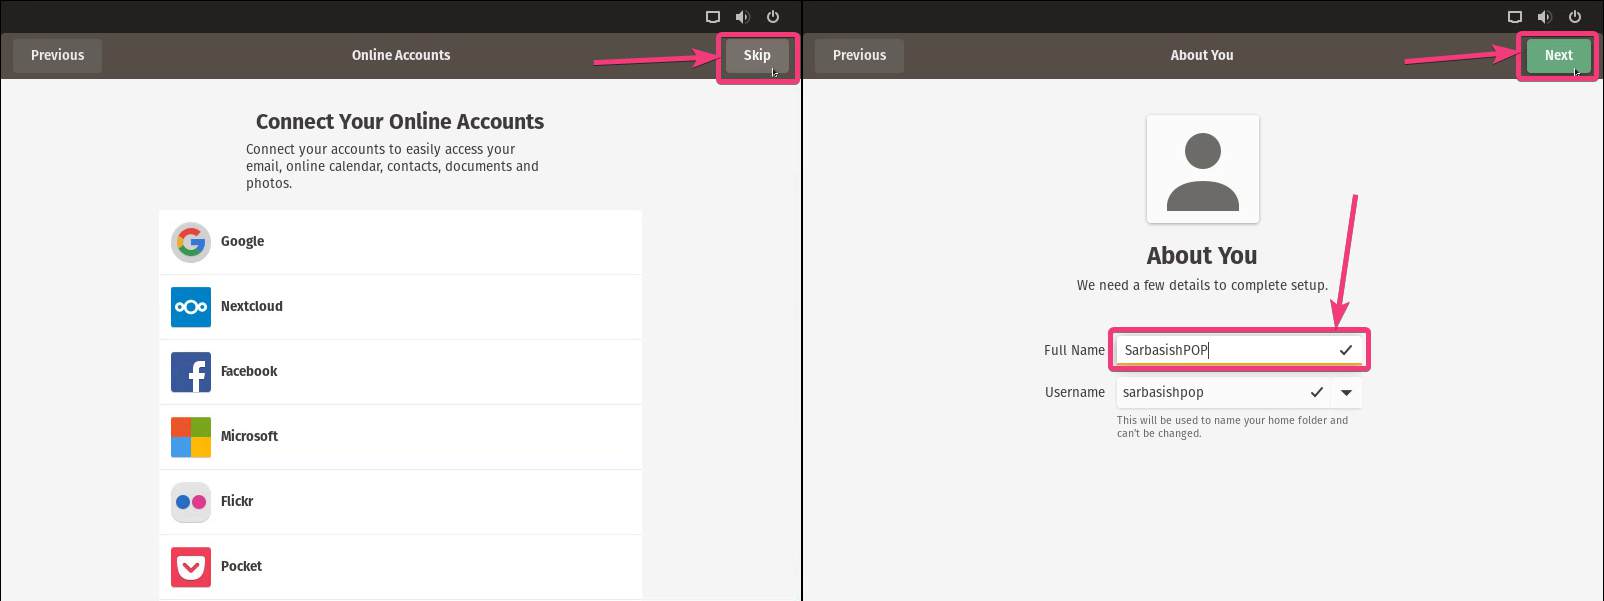
You can then connect your online accounts, or just click on ‘Skip’ . In the next step, you will have to assign a name to the computer, and click on ‘Next’ again.
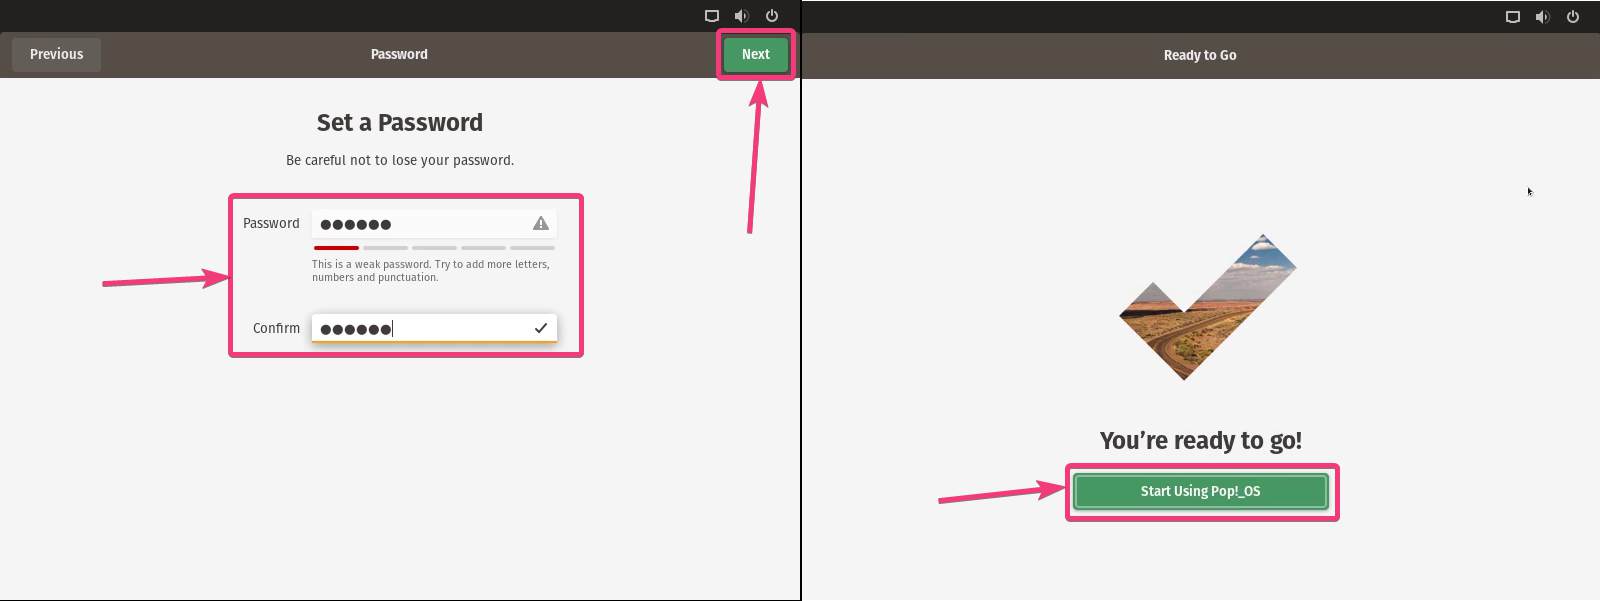
Now, choose a password, and click on ‘Next’ . You are now ready to use Pop!_OS. Just click on the ‘ Start Using Pop!_OS ’ to start using Pop!_OS.
Pop!_Shop is a great store, where you can download a number of apps for Pop!_OS, and the UI is GNOME, making it familiar to Debian-based Linux distributions. Pop!_OS is worth using on your computer. Furthermore, you can always use the command line to download your favourite packages in the usual way, just like other Linux distributions out there.

So, that was all about, how you can install Pop!_OS. Do you have any questions? Feel free to comment on the same below.
Other Articles:
Use AMD FidelityFX SuperResolution (FSR) on Pop!_OS
Following the steps in Gaming for Linux article will ensure your system is setup and ready to use AMD’s Fidelity SuperResolution (FSR). The most important steps are:
- Enable Steam Play (Proton)
- Get the latest version of Proton-GE via Protonup
- Enable the latest version of Proton-GE by changing the Proton version for each game
AMD FSR
Resolution and Quality
AMD’s FSR works by running the game in a lower resolution (thereby increasing performance), then using AI to upscale the image to your output resolution. AMD has recommended specific resolutions at which your game should run, depending on your screen resolution. Here is a handy image.
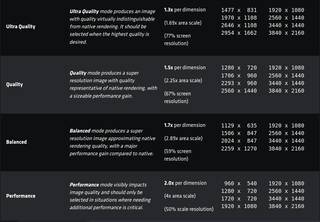
The Quality preset, on the furthest left column, is determined by which resolution you select in-game. The higher the quality, the better the image! Conversely, the lower the quality, the higher your performance gains. Which you choose depends on your own goals and system!
As an example, if your screen is 1920×1080, and you want the Quality preset, you would set your in-game resolution to 1280 x 720. Alternatively, for that same 1920 x 1080 screen, if you want the Ultra Quality preset, your in-game resolution should be 1477 x 831.
Sharpening
You can optionally add an additional parameter, WINE_FULLSCREEN_FSR_STRENGTH to increase the sharpening effect of FSR. The range is 0-5, 0 having the most sharpening, and 5 having the least. If this parameter is not set, it defaults to 2.
More sharpening will increase the quality of the image, but at a slight cost to performance!
Setup Steam Launch Options
Right-click on the selected game and select «Properties». Then, under the General Tab, input into the Launch Options:
WINE_FULLSCREEN_FSR=1 %command% If you wish to modify FSR’s sharpening strength, add it just before %command%. Example:
WINE_FULLSCREEN_FSR=1 WINE_FULLSCREEN_FSR_STRENGTH=1 %command% Setup your In-game Resolution
Once the game is launched, go to the game’s Options menu and set the following, typically under «Video Options»:
- Set the display to Fullscreen (not Bordered or Borderless Window!)
- Set the resolution to your quality preset resolution (ex. Ultra-Quality for a 1920 x 1080 monitor would be 1477 x 831)
- If necessary, restart your game!
Congratulations! You’ve successfully set up and are using AMD’s FidelityFX SuperResolution! Enjoy the increased performance on your Linux-based gaming machine!
Lutris
Lutris version 0.5.9 includes a toggle for AMD FSR in each game’s preferences. This requires the FSHack version of Lutris-Wine.
- Right-click your installed game and select «Configure».
- Select the Runner Options tab at the top
- For Wine Version, ensure you have lutris-fshack-6.13 or newer. It will mention «fshack» in the name.
- Enable the «Enable AMD FidelityFX Super Resolution (FSR)» toggle in the options below.
Then follow the «Setup your In-game Resolution» steps above, and enjoy FSR via Lutris!
Bottles
For more information about the Bottles app refer to this article.
Bottles version 2021.10.14 and greater includes a toggle for AMD FSR in the preferences of each bottle.
- Go to the bottle preferences.
- Enable the «Enable FSR» toggle in the «Graphics» section and choose the quality level.
Then follow the «Setup your In-game Resolution» steps above, and enjoy FSR!