- How to start and stop the PowerChute Network Shutdown service
- Published for: APC USA
- Вики IT-KB
- Установка агента ИБП APC для автоматического выключения ОС Debian GNU/Linux 9 (Stretch) — APC PowerChute Network Shutdown
- Устанавливаем поддержку Java
- Устанавливаем APC PowerChute Network Shutdown
- Удаление APC PowerChute Network Shutdown
- Обсуждение
- Software / Firmware Download
- Unknown Model
How to start and stop the PowerChute Network Shutdown service
Solution:
NOTE: Enter the commands below in a command prompt with administrator privileges.
- Click Start > Run
- Type Services.msc to, and click OK.
- Click on the service named PowerChute Network Shutdown
- Click on Start the service or Stop the service to start or stop the PowerChute service.
net start pcns1
net stop pcns1
Mac OS X
To start or stop the PowerChute service on the latest version of Mac OS X for PowerChute v4.x or higher, use the following commands:
sudo launchctl start com.apcc.pcns
sudo launchctl stop com.apcc.pcns
To start or stop the PowerChute service on earlier versions of PowerChute or Mac OS X, use the following commands:
sudo /Library/StartupItems/comapcpcns/comapcpcns start
sudo /Library/StartupItems/comapcpcns/comapcpcns stop
CentOS & AlmaLinux
To check if the PowerChute service is running use the following command:
sudo service PowerChute status
or
sudo systemctl status PowerChute
To start or stop the PowerChute service, use the following commands
sudo service PowerChute start
sudo service PowerChute stot
or
sudo systemctl start PowerChute
sudo systemctl stop PowerChute
RedHat/SuSE Linux
To check if the PowerChute service is running on RedHat or SuSE Linux, use the following command:
sudo service PowerChute status
To start or stop the PowerChute service, use the following commands:
sudo service PowerChute start
sudo service PowerChute stop
Debian Linux
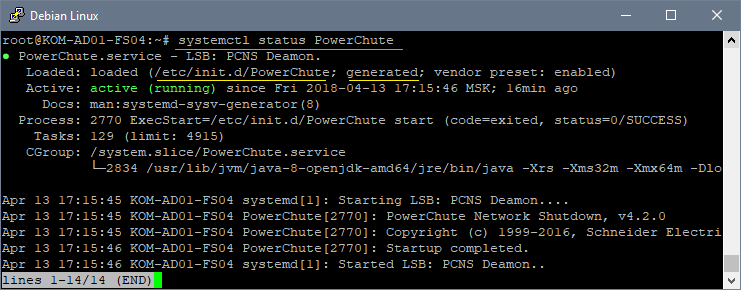
To check if the PowerChute service is running on Debian Linux, use the following command:
sudo systemctl status PowerChute
To start or stop the PowerChute service, use the following commands:
sudo systemctl start PowerChute
sudo systemctl stop PowerChute
Solaris
To start or stop the PowerChute service on Solaris, use the following commands:
sudo /etc/rc2.d/S99PowerChute start
sudo /etc/rc2.d/S99PowerChute stop
HP-UX
To start or stop the PowerChute service on HP-UX, use the following commands:
sudo /sbin/init.d/pcns start
sudo /sbin/init.d/pcns stop
IBM AIX
To star or stop the PowerChute service on AIX, use the following commands:
sudo /etc/rc.APCpcns start
sudo /etc/rc.APCpcns stop
Other Linux
Some Linux distributions place the PowerChute service script in the /etc/init.d directory, and others place it in the /etc/rc.d/init.d/ directory. To start or stop the PowerChute service in the particular directory, use the commands:
sudo /etc/init.d/PowerChute start
sudo /etc/init.d/PowerChute stop
sudo /etc/rc.d/init.d/PowerChute start
sudo /etc/rc.d/init.d/PowerChute stop
Published for: APC USA
Did this answer your question?
Вики IT-KB
Установка агента ИБП APC для автоматического выключения ОС Debian GNU/Linux 9 (Stretch) — APC PowerChute Network Shutdown

В случае если физические серверы на базе Debian GNU/Linux 9 «Stretch» подключены к ИБП APC, и эти ИБП имеют контроллеры управления APC Network Management Card (NMC), мы можем настроить автоматическое штатное выключение ОС Linux в случае проблем с электропитанием. Для этого на стороне Linux-сервера нам потребуется установить и настроить специального программного агента, управляемого о стороны ИБП — APC PowerChute Network Shutdown (PCNS). Здесь приведён пример установки последней актуальной версии агента APC PCNS 4.2 for Linux на сервер Debian Linux 9.3.
Устанавливаем поддержку Java
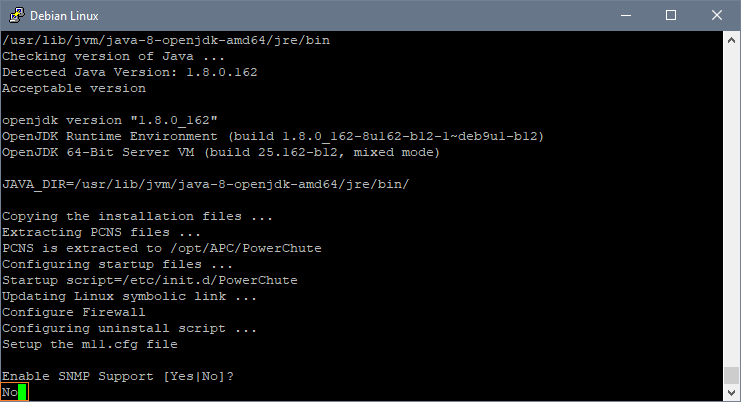
Программный пакет PCNS для своей работы требует предустановленной среды Java Runtime Environment (JRE). Хотя устанавливать его предварительно и не обязательно, так как JRE имеется в составе основного дистрибутива PCNS, однако стоит учесть то обстоятельство, что поставляемая в составе PCNS версия JRE не будет в дальнейшем автоматически обновляться в системе (например на неё не будут накладываться исправления безопасности), что само по себе не всегда допустимо. Поэтому мы установим сводобный аналог JRE — OpenJDK Runtime Environment из официальных репозиториев Debian. Это позволит нам в дальнейшем получать обновления безопасности для данного ПО из репозиториев Debian.
# apt-get update # apt-get install default-jre
Посмотрим текущую установленную версию Java:
# java -version
 openjdk version "1.8.0_162" OpenJDK Runtime Environment (build 1.8.0_162-8u162-b12-1~deb9u1-b12) OpenJDK 64-Bit Server VM (build 25.162-b12, mixed mode)
Посмотрим какой путь к исполняемым файлам Java используется в системе на данный момент:
# update-alternatives --display java
 java - auto mode link best version is /usr/lib/jvm/java-8-openjdk-amd64/jre/bin/java link currently points to /usr/lib/jvm/java-8-openjdk-amd64/jre/bin/java link java is /usr/bin/java slave java.1.gz is /usr/share/man/man1/java.1.gz /usr/lib/jvm/java-8-openjdk-amd64/jre/bin/java - priority 1081 slave java.1.gz: /usr/lib/jvm/java-8-openjdk-amd64/jre/man/man1/java.1.gz
Как видим, фактический путь к исполняемым файлам java: /usr/lib/jvm/java-8-openjdk-amd64/jre/bin/java . Запомним этот путь, так как он потребуется нам в дальнейшем при установке PCNS.
Устанавливаем APC PowerChute Network Shutdown
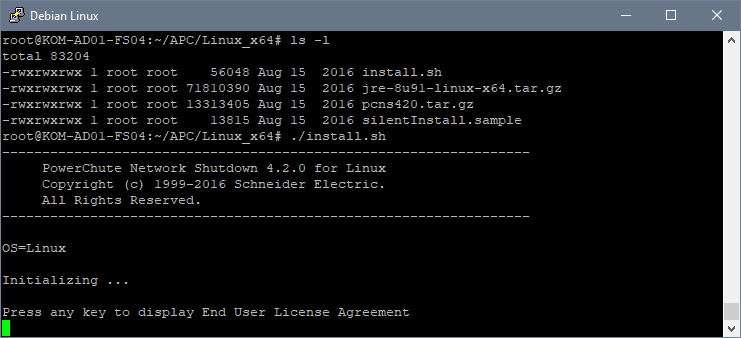
Загружаем пакет pcns420Linux-x86-64.tar.tar с официального сайта APC и распаковываем во временный каталог. В распакованном каталоге ../Linux_x64 запускаем скрипт установки install.sh :
# mkdir ~/APC # cd ~/APC # mv pcns420Linux-x86-64.tar.tar pcns420Linux-x86-64.tar.gz # gunzip pcns420Linux-x86-64.tar.gz # tar -xf pcns420Linux-x86-64.tar # cd ~/APC/Linux_x64/ # ./install.sh
На первый запрос скрипта установки жмём любую клавишу, например Enter, чтобы ознакомиться с лицензионным соглашением:
Просмотрев лицензионное соглашение набираем yes, чтобы принять его положения:

Соглашаемся с установкой в каталог по умолчанию /opt/APC/PowerChute

Далее скрипт установки предложит нам либо согласиться с использованием версии Java, поставляемой в составе PowerChute, либо указать путь ранее предустановленной версии. Вводим ранее полученный путь к исполняемым файлам Java:

Далее будет задан вопрос о необходимости настройки службы SNMP. В нашем случае это не требуется, поэтому мы отказываемся от данного пункта:
В завершении скрипт установки скопирует исполняемые файлы PCNS в каталог /opt/APC/PowerChute и мы получим сообщение о том, что дальнейшую настройку установленного агента PCNS можно провести через веб-интерфейс, доступный по адресу https://ServerName:6547
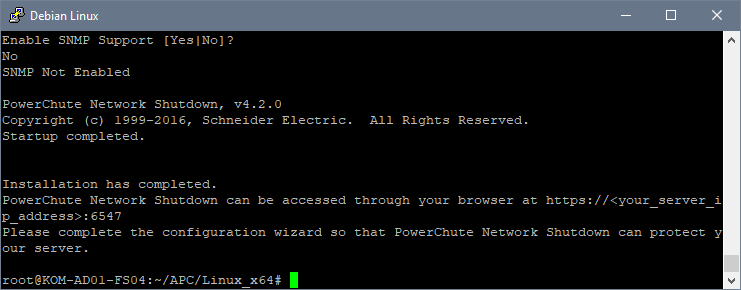
В процессе установки скрипт инициализации, который используется для автоматического запуска службы PowerChute в процессе запуска системы, будет скопирован в /etc/init.d/PowerChute .
Убедимся в том, что в нашей Linux-системы появились TCP-прослушиватели, созданные процессом java:
# ss -lnptu | sort | grep java
 tcp LISTEN 0 50 0.0.0.0:3052 0.0.0.0:* users:(("java",pid=14780,fd=57)) tcp LISTEN 0 50 0.0.0.0:6547 0.0.0.0:* users:(("java",pid=14780,fd=59)) udp UNCONN 0 0 0.0.0.0:3052 0.0.0.0:* users:(("java",pid=14780,fd=56)) udp UNCONN 0 0 0.0.0.0:60316 0.0.0.0:* users:(("java",pid=14780,fd=55))
Добавим правила Iptables, разрешающие подключения к портам TCP/UDP 3052 и TCP 6547
# iptables -A INPUT -m state --state RELATED,ESTABLISHED -j ACCEPT # iptables -A INPUT -s 10.1.2.0/24 -i eth0 -p udp \ -m state --state NEW -m udp --dport 3052 -m comment \ --comment "Allow access to APC PowerChute Network Shutdown service from UPS NMC" -j ACCEPT # iptables -A INPUT -s 10.1.2.0/24 -i eth0 -p tcp \ -m state --state NEW -m tcp --dport 3052 -m comment \ --comment "Allow access to APC PowerChute Network Shutdown service from UPS NMC" -j ACCEPT # iptables -A INPUT -s 10.1.2.0/24 -i eth0 -p tcp \ -m state --state NEW -m tcp --dport 6547 -m comment \ --comment "Allow access to APC PowerChute Network Shutdown Web UI over HTTPS" -j ACCEPT
Теперь попробуем перейти к веб-странице управления агентом PCNS, которая должна быть доступна по адресу https://ServerName:6547 .
Мы должны увидеть приглашение мастера первоначальной настройки PCNS:
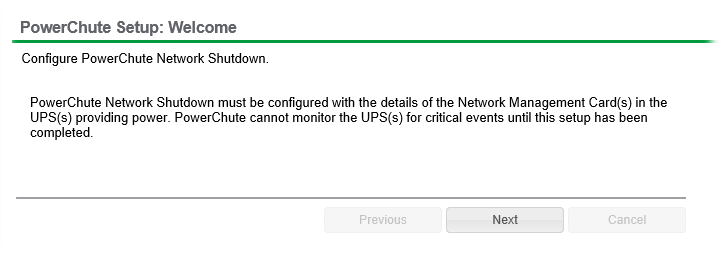
Пройдём шаги мастера по подключению PCNS к контроллерам управления NMC от источников бесперебойного питания, к которым подключен наш Linux-сервер:

Обратите внимание на то, что если ранее не были открыты порты TCP/UDP 3052, то попытки подключения контроллеров NMC к агенту PCNS будут завершаться ошибками.
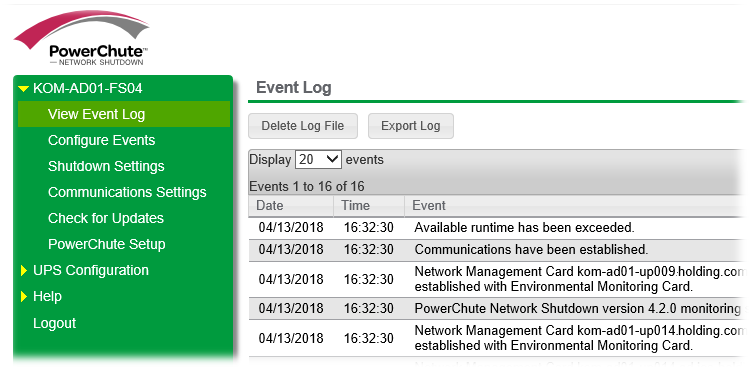
По завершению процедуры первичного подключения к контроллерам управления ИБП мы получим доступ к основному веб-интерфейсу ПО PowerChute Network Shutdown, где сможем произвести дополнительные настройки реагирования на события связанные с изменением режима электропитания:
Перезагрузим сервер, чтобы убедиться в том, что автоматический запуск службы PowerChute успешно работает после запуска ОС. Ранее упомянутый init-скрипт /etc/init.d/PowerChute должен быть подхвачен службой systemd и преобразован в юнит с именем PowerChute:
Удаление APC PowerChute Network Shutdown
В случае возникновения необходимости удаления APC PowerChute Network Shutdown из Linux-системы, можно воспользоваться вызовом скрипта:
# /opt/APC/PowerChute/uninstall
Дополнительные источники информации:
Проверено на следующих конфигурациях:

Автор первичной редакции:
Алексей Максимов
Время публикации: 16.04.2018 08:44
Обсуждение
unix-linux/debian/stretch/how-to-install-java-jre-and-ups-agent-apc-powerchute-network-shutdown-on-debian-linux-9-3-stretch.txt · Последнее изменение: 16.04.2018 11:13 — Алексей Максимов
Software / Firmware Download
The model number is not on the front of the unit, but can be found on a sticker on either the bottom or rear of your product. The location of the label as well as letter and number sequences will vary by model and product type.


- Linux (9)
- Red Hat Enterprise Linux (5)
- Solaris (1)
- SUSE Enterprise Linux (5)
- UPS-Link (5)
- Virtual Machine Image (1)
- VMware ESXi (6)
- VMware Virtual Appliance (1)
- Windows 10 (7)
- Windows 2003 (3)
- Windows 2008 (2)
- Windows 2008 Server Core (1)
- Windows 7 (4)
- Windows 8 (4)
- Windows Home Server (1)
- Windows Server 2012 (1)
- Windows Server 2016 (3)
- Windows Vista (3)
- Windows x86 / x64 (2)
- Windows XP (3)
The model number is not on the front of the unit, but can be found on a sticker on either the bottom or rear of your product. The location of the label as well as letter and number sequences will vary by model and product type.
- Linux (9)
- Red Hat Enterprise Linux (5)
- Solaris (1)
- SUSE Enterprise Linux (5)
- UPS-Link (5)
- Virtual Machine Image (1)
- VMware ESXi (6)
- VMware Virtual Appliance (1)
- Windows 10 (7)
- Windows 2003 (3)
- Windows 2008 (2)
- Windows 2008 Server Core (1)
- Windows 7 (4)
- Windows 8 (4)
- Windows Home Server (1)
- Windows Server 2012 (1)
- Windows Server 2016 (3)
- Windows Vista (3)
- Windows x86 / x64 (2)
- Windows XP (3)
Please use the filters on the left to find your software or firmware
Unknown Model
Your product number and serial number are required when submitting your purchase order for service-only orders. Please, contact your local service sales representative if you do not currently have an active factory warranty or service entitlement on your product.
The information provided in the APC Software / Firmware Download is provided for general informational purposes only. It is subject to change without notice and is provided “as is” without warranty of any kind, express or implied. Different solutions address different needs; please contact an APC sales representative to discuss the best solution for your specific needs.
Get monthly updates from Schneider Electric delivered right to your inbox.
I’d like to receive news and commercial info from Schneider Electric and its affiliates via electronic communication means such as email, and I agree to the collection of information on the opening and clicks on these emails (using invisible pixels in the images), to measure performance of our communications and improve them. For more details, please read our Privacy Policy.