Tydus / howto-standalone-toolchain.md
NDK (Native Develop Toolkit) is a toolchain from Android official, originally for users who writes native C/C++ code as JNI library. It’s not designed for compiling standalone programs (./a.out) and not compatible with automake/cmake etc.
What is Standalone Toolchain
«Standalone» refers to two meanings:
- The program is standalone (has nothing connect to NDK, and don’t need helper scripts to run it)
- The toolchain is made for building standalone programs and libs, and which can used by automake etc.
(Optional) Why NDK is hard to use
By default, NDK uses android flavor directory structure when it’s finding headers and libs, which is different from GNU flavor, so the compiler cannot find them. For Example:
/home/tyeken8/Desktop/elab/geo/android-ndk-r9d/toolchains/arm-linux-androideabi-4.8/prebuilt/linux-x86_64/bin/../lib/gcc/arm-linux-androideabi/4.8/../../../../arm-linux-androideabi/bin/ld: error: cannot open crtbegin_dynamic.o: No such file or directory /home/tyeken8/Desktop/elab/geo/android-ndk-r9d/toolchains/arm-linux-androideabi-4.8/prebuilt/linux-x86_64/bin/../lib/gcc/arm-linux-androideabi/4.8/../../../../arm-linux-androideabi/bin/ld: error: cannot open crtend_android.o: No such file or directory /home/tyeken8/Desktop/elab/geo/android-ndk-r9d/toolchains/arm-linux-androideabi-4.8/prebuilt/linux-x86_64/bin/../lib/gcc/arm-linux-androideabi/4.8/../../../../arm-linux-androideabi/bin/ld: error: cannot find -lc /home/tyeken8/Desktop/elab/geo/android-ndk-r9d/toolchains/arm-linux-androideabi-4.8/prebuilt/linux-x86_64/bin/../lib/gcc/arm-linux-androideabi/4.8/../../../../arm-linux-androideabi/bin/ld: error: cannot find -ldl collect2: error: ld returned 1 exit status Although we can manuall specify the path (someone wrote a program called «agcc» to handle this automatically, but still not good), it’s really annoying.
- Download Android NDK
from https://developer.android.com/tools/sdk/ndk/index.html - Extract the NDK
tar xf android-ndk-r9d-*.tar.bz2 && cd android-ndk-r9d - Make GNU Android Toolchain from NDK
build/tools/make-standalone-toolchain.sh —toolchain=arm-linux-androideabi-4.8 —platform=android-19 —install-dir=../toolchain - Delete the NDK (Yes, we don’t need it any more)
cd .. && rm -rf android-ndk-r9d - Test the native toolchain
cd toolchain/bin
echo «main()<>» | ./arm-linux-androideabi-gcc -x c —
file a.out # a.out: ELF 32-bit LSB executable, ARM, version 1 (SYSV), dynamically linked (uses shared libs), not stripped - (Optional) Now you can use it as a standard GNU toolchain
For example: ./configure —prefix=/opt/android —host=arm-linux-androideabi && make && make install
How To Setup the Linux x86 Cross-Compile Toolchain for UE4 On Windows
This document serves as a lean and mean guide to setting up the Linux x86 Cross-Compile Toolchain for Windows. The process is already mostly animated by Epic but the existing documentation is a bit verbose.
Requirements
- For 4.9.X or older, you need Visual Studio Community Edition 2013
- For 4.10 or newer, you need Visual Studio Community Edition 2015
- Make sure you install Visual C++. 2015 doesn’t do this by default
- During installation, choose Custom, not Typical
- Make sure Visual C++ and all children are selected
- If you skipped installing Visual C++ and Unreal Engine 4 is complaining about not being able to find it, you can fix this by: re-running the downloaded installer and choosing «Modify», then selecting Visual C++ and clicking «Update».
- Epic’s Documentation on how to do this
- A Tutorial I wrote on how to do this
Installation
- Open the automated PowerShell script in your browser.
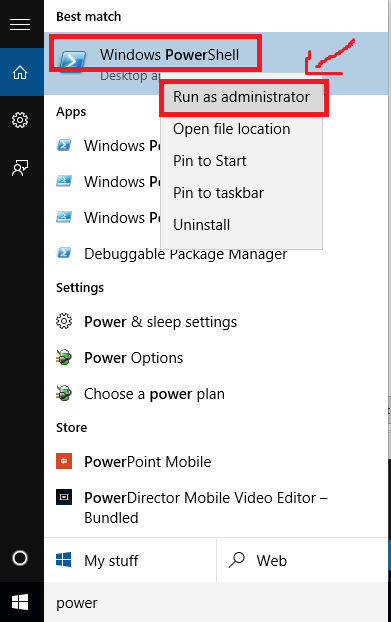
- Open up an instance of PowerShell as an Administrator. You can do this by searching for PowerShell in your start menu, right clicking it, and clicking Run As Administrator.

- In your browser, copy the entire script to your clipboard. You can do this by hitting Control+A and then Control+C.
- Paste the script into Powershell using Control-V, and then hit Enter to execute the script.
- PowerShell will then download and automatically install the Linux x86 Cross-Compile Toolchain. This will take some time. The download is around 200MB.
- When the PowerShell script is done, it will look something like this.
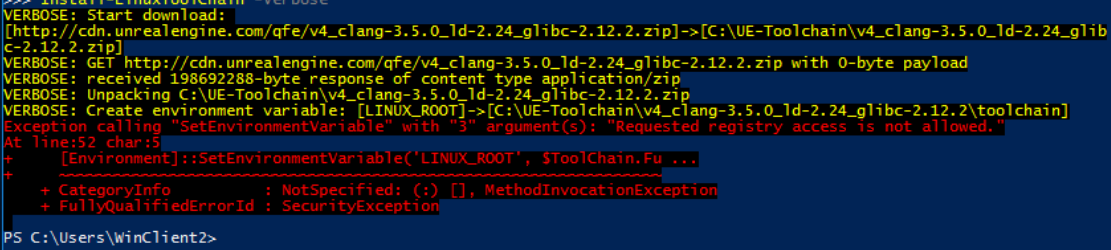
If you get a big red error that looks something like this, you did not run PowerShell as an administrator in Step 2.
Please go back to Step 2 and repeat the process. The script will ask you if you would like to overwrite and replace files if you run it a second time, please do. Go to jail, do not pass go, do not collect $200.
- You can then close the window, PowerShell is no longer needed.
- With the Linux x86 Cross-Compile Toolchain installed, you need to download the Linux UE4 dependencies. To do this, go to your Engine build where you should have a batch file called Setup.bat that you used to initially set up your Engine. Go ahead and simply run this again. If it asks you if you want to overwrite changes you have, I recommend saying Yes as you can always rebuild those files later if needed, but saying No should also work. Setup.bat will now download all the Linux dependencies you need.
- Regenerate your project’s Visual Studio project files by right-clicking your project’s .uproject file and choosing «Generate Visual Studio Project files». This is the same as Step 6 in the «Convert your BP Project to a C++ Project» tutorial.
Verify It Works By Compiling for Linux x86
- Open up your project’s Visual Studio solution file. This is the .sln file that you opened in the «Convert your BP Project to a C++ Project» tutorial if you came from there.
- Make sure your project is selected in the Solution Explorer.
- You should now see the Linux option under the Platforms drop-down. Select it. If you don’t see it, then your toolchain is not installed correctly, you did not run Setup.bat after installing the toolchain to pull down the Linux dependencies, or you did not regenerate your project files.
- Change the Build Configuration drop down to «Development». This tells Visual Studio to build the Linux binary for your packaged game.
- Right-click your project in the Solution Explorer and hit Build.
- Your build should succeed without issues, unless you have some custom code causing problems on Linux.
- Now you can package Linux x86 builds of your game using the UE4 editor! To do this, use File -> Package Project -> Linux, and the rest is the same as packaging for Windows.
Блог
ВНИМАНИЕ: Всё действия, описанные в данной статье, вы будете делать на свой страх и риск. Автор не несёт никакой ответственности за повреждение вашего устройства.
Рекомендую тщательно изучить специализированный материал по вашему аппарату.
Приведённые ниже команды нужно выполнять в терминале.1.1. Для начала нужно установить 64-разрядный Linux дистрибутив Ubuntu (для компиляции ядра я использовал Ubuntu 13.04 x64). В принципе, если у вас нормальный ПК, то можно поставить на виртуальную машину. Как установить Ubuntu в VirtualBox по версии Google.
1.2. Также нужно иметь исходный код ядра вашего устройства (например, для Nook Color). Вот несколько ссылок, по которым вы можете получить исходники:
1.6. После установки нужно создать необходимые папки в домашней директории:
Kernel — Корневая директория исходного кода ядра вашего устройства. Его можно получить через git clone (например, если располагается на github.com) или просто распаковав скачанный архив c исходниками.
ПРИМЕР: Получения нужных файлов с GitHub.com для планшета B&N Nook Color (encore):
Kernel_output — Здесь будет итоговый файл ядра после компиляции (uImage).
Kernel_output/modules — А здесь будут располагаться модули ядра (*.ko) после компиляции.
NDK — Корневая директория NDK. Сюда распаковываем скаченный ранее NDK Linux 32-bit (x86).
LINARO — Корневая директория Linaro. Сюда распаковываем скаченный ранее Linaro инструментарий.II. Компиляция ядра с помощью NDK или Linaro
2.1. Переходим в корневую папку ядра
2.2. Делаем экспорт системных переменных (работают только на сессию с текущим терминалом)
2.2.1. Во первых, объявим переменную, которая указывает на целевую архитектуру компиляции (ARM)
2.2.2. Во вторых, также объявим переменную, которая указывает на сами исполняемые файлы инструментария для NDK (пункт 2.2.2.1) или для Linaro (пункт 2.2.2.2).
Для заметки: Можно использовать только одну переменную CROSS_COMPILE, если вы введёте все ниже следующие команды, то последняя окажется действующей. Можно проверить командой export без параметров и посмотреть ваши переменные.
2.2.2.1. Для NDK (GCC 4.4.3, GCC 4.6.x или GCC 4.7.x соответственно)export CROSS_COMPILE=~/NDK/toolchains/arm-linux-androideabi-4.4.3/prebuilt/linux-x86/bin/arm-linux-androideabi-
export CROSS_COMPILE=~/NDK/toolchains/arm-linux-androideabi-4.6/prebuilt/linux-x86/bin/arm-linux-androideabi-
export CROSS_COMPILE=~/NDK/toolchains/arm-linux-androideabi-4.7/prebuilt/linux-x86/bin/arm-linux-androideabi-
На некоторых 64 разрядных дистрибутивах Ubuntu необходимо установить 32 битные библиотеки, чтобы избежать ошибку «. : Command not found»
2.4. Получаем файл конфигурации
2.4.1. Он обычно находится в ~/Kernel/arch/arm/configs, где нужный файл будет примерно таким: *_defconfig или *.defconfig (где * — (кодовое) название вашего устройства)
2.4.1.1. Для того, чтобы получить файл конфигурации, который использовался при компиляции ядра вашего устройства, можно:Способ 1. На самом девайсе в Terminal Emulator набрать
На microSD карте появиться архив config.gz, распаковываем его в корневую директорию исходников ядра (~/Kernel) и переименовываем файл из config в .config
Если вы получили файл конфигураций с устройства, то переходите к пункту 2.5
2.4.2. Введите следующую командуНа некоторых дистрибутивах Ubuntu (например, 12.04) чтобы использовать «make menuconfig» необходимо установить ncurses
Если требуется подгружать в ядро собственные модули, то необходимо выбрать соответсвующий пункт в меню:
После внесённых изменений необходимо сохранить файл конфигурации.
Выполняем подходящую команду компиляции. В случаем компиляции uImage или zImage не cжатый образ ядра Image компилируется автоматически.
Цифра после -j означает количество ядер центрального процессора ПК (у меня 4).
uImage, zImage или просто Image — образ скомпилированного ядра.
Если в процессе компиляции uImage у вас выходит ошибка «mkimage» command not found — U-Boot images will not be built, то установите недостающий пакет:
и начните с пункта 2.3
2.7. Если необходимы модули ядра, то компилируем и их
Выполняем команду соответствующую нужному скомпилированному ядру.
2.9. Если компилировали и модули, то копируем их в директорию ~/Kernel_output/modules
III. Установка ядра (и модулей к нему) на устройство
Для устройств с boot.img — нужно сначала собрать соответствующий вашему устройству образ boot.img, а только потом уже проводить нижеследующие операции.
Несколько ссылок для размышлений:
Инструкции по распаковке, редактированию и запаковке boot.img
Очень удобные скрипты для редактирования boot.imgСпособов установки ядра (и модулей к нему) на устройство несколько, рассмотрим основные:
3.1. Простая замена файлов *.zip архив обновления ядра или прошивки для ClockworkMod Recovery (CWM)
Нужно заполучить *.zip архива обновления ядра или прошивки для CWM под ваше устройство и произвести замену файлов на новые. В корне архива может находится kernel или uImage или zImage или boot.img — нужно его удалить и взамен поместить ваши файлы с названием удалённого файла (если был kernel, то конечный файл тоже должен быть kernel). А модули поместить в директорию system\lib\modules\. Произвести инсталляцию через CWM.
3.2. Поместить скомпилированные файлы на девайс с помощью ADB и Fastboot. Более подробно можно почитать здесь.
Если вы снова захотите скомпилировать ядро, то повторите все шаги начиная с пункта 2.1