Linux 101: Printing
To most users the system of printing on a PC is a simple, point-and-click process that should be automatically set up upon first use and does but one thing and one thing only – enables a PC to print. This is typically the case, and when printing with a Windows machine this system is often complimented by the installation of a piece of software written specifically for the printer to be used. Even if the printer was not set up and configure upon purchase, all the end user needs to do is insert the included CD (that came with the printer), install the software, plug in the printer, and begin printing.
With Linux this task may or may not be as simple. New Linux end users are often surprised to find out that, out of the box, many printers are already supported by their operating system. For those printers that are not supported out of the box, sometimes getting one to work is just a matter of finding the right driver to install. Sometimes, to the dismay of the user, their printer is not supported. Fortunately the latter scenario is becoming more and more rare.
But even with Linux printing becoming easier and easier to set up, it’s always good for the new user to see how they can install their new printer on a Linux box and begin printing. Now, if you understand how many and varied the Linux flavors are, you will understand how imposing of a task it would be to cover all possible printer configuration systems. Fortunately the Common Unix Printer Service (CUPS) offers a web-based, universal set up tool that is found on all distributions that use CUPS for printing.
In this tutorial you will be introduced to CUPS and see how to setup a printer for a Linux desktop machine. 
CUPS
What is CUPS? CUPS is a modular printer system for the UNIX-like operating systems that serves as a print server. But don’t think that a print server is a network-only system. The CUPS system can act as a printer server for a local machine or a network of machines. This means with one system you can set up printing for a local machine or for a group of networked machines.
- Print spooler/scheduler: Lines up printing jobs to be sent to the printer.
- Filter system: Converts data so that the attached printer can understand and format the data being printed.
- Backend system: Transports data from filters to printer.
The flow of data looks like that shown in Figure 1. As you can see application (OpenOffice.org, Firefox, Evolution, Nano, etc.) sends its data to the scheduler, which then begins the CUPS process.
By default cups installs the following directories:
- /etc/cups: Configuration directory.
- /var/spool/cups/: The spooler directory where print jobs are held for printing.
- /var/spool/cups-pdf: The spooler directory where CUPS-generated PDF files are held for printing.
CUPS also installs an executable binary in /etc/init.d/ (or /etc/rc.d/init.d) called cups. This binary is started with the command:
And restarted with the command:
For the basic usage that is really all you would need to know. Of course the next step is to understand how to set up your printer. As I said earlier, because each distribution contains different tools for printer setup, I am going to demonstrate this process with the integrated CUPS web-based tool. This knowledge should easily translate over to your distributions’ set up tools.
Printer Setup
When you set up a printer in UNIX, the configuration creates a Postscript Printer Description file (ppd). This file contains all of the descriptions of a printers’ features as well as the PostScript code used to invoke features for a print job for that printer. A typical PPD file will look like this file for a Samsung ML-1710. This ppd file will be created no matter which setup tool you use. Most likely you will not have to touch this file. There¬† have been a few occasions where I have had to take care of a couple of very minor changes to this configuration file. Those are very rare instances however.¬†
Now, let’s move on to the actual configuration.
In order to configure your printer with the CUPS web-based tool you need to open up your web browser and point it to http://localhost:631. What will appear is the main page for the CUPS web-based tool (see Figure 2). The set up of a printer is simple. Here are the steps:
- Click the Add Printer button.
- Enter the name, location, and description of the printer.
- Select the device.
- Enter the device URI (this instructs the backends where the printer is located).
- Select the Manufacturer of your printer.
- Select the Model of your printer.
- Configure any general settings for your ptiner.
That’s it. Now let’s examine each step more closely.
Step 1
From the main page click Add Printer button. You will also notice a Manage Printers button. From that screen you can manage all printers that have already been added.
Step 2
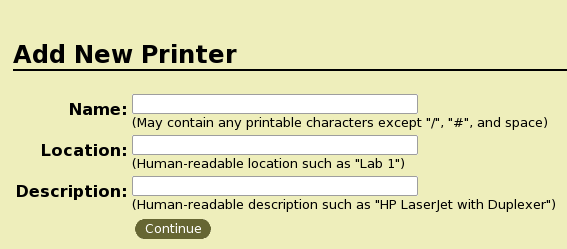
There are three pieces of information that you need to enter in this window (see Figure 3):
- Name: This is the name of the printer that can not include the characters “#”, “/”, or a SPACE. In my case, for the Samsung ML-1710, I could enter SamsungML1710.
- Location: This is a description where the printer is located. This is just for ease of management. And human-readable characters are valid. 
- Description: A human-readable description of your printer. This can contain spaces.
Once you have filled out all of this information, click Continue to move to the next step.
Step 3
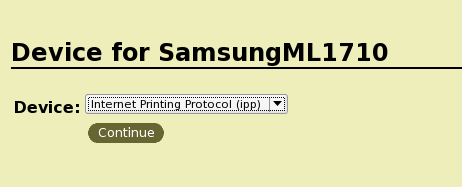
In this window (see Figure 4) you are going to select the Device URI for the printer. This will most likely fall under one of two categories: local or remote. If the printer is local it will be listed in the drop down, so all you need to do is select that printer. If the printer is remote (as we are going to setup – since it is the more difficult process). Since I am going to illustrate using a remote printer, I will select the Internet Printing Protocol as my Device URI.
Once you have selected the proper URI click the Continue button to move on to the next step.
Step 4
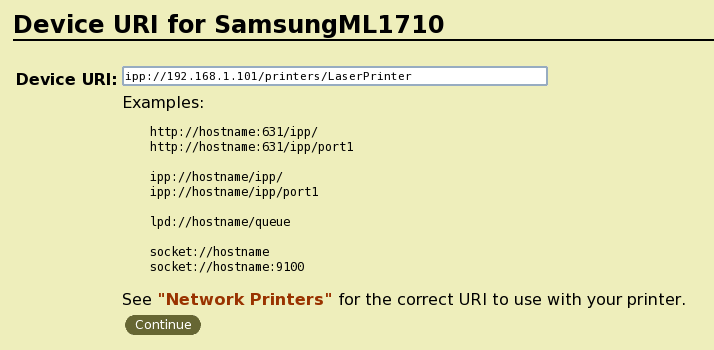
In the next window (see Figure 5), since we are configuring a remote printer, you will need to enter the address of the printer. In the case of my remote printer I knew before hand that the printer in question was located in the /printers/ spool and was called LaserPrinter. If you are connecting to a printer server, you will need to know this information.
Obviously the CUPS system offers you examples of the types of URI addresses that are valid. Even though you have already instructed CUPS that you are using ipp (from the previous window), you still have to include the ipp:// section of the address for your remote printer. Without that your machine will not be able to connect to the remote printer.
After you have entered the address click Continue to move on to the next step.
Steps 5 and 6
In these two steps you only need to select the Manufacturer (Step 5) and the Model (Step 6) of your printer. Pay close attention when selecting your Model because there might be different selections for different languages. So choose the proper language. If you do not find your Model for your printer then you might have to install a driver for it. In my case (for the Samsung ML-1710) I had to go back and install the Splix driver. To do this I followed these steps:
- Open up Synaptic
- Search for “splix” (no quotes).
- Install the resulting application.
The SPLIX package is the driver package for Samsung SPL2 and SPLC laser printers.
If your printer is not a Samsung, and it does not appear in the Model selection, you might need to search for either a proprietary driver or a compatible driver. Google is your friend.
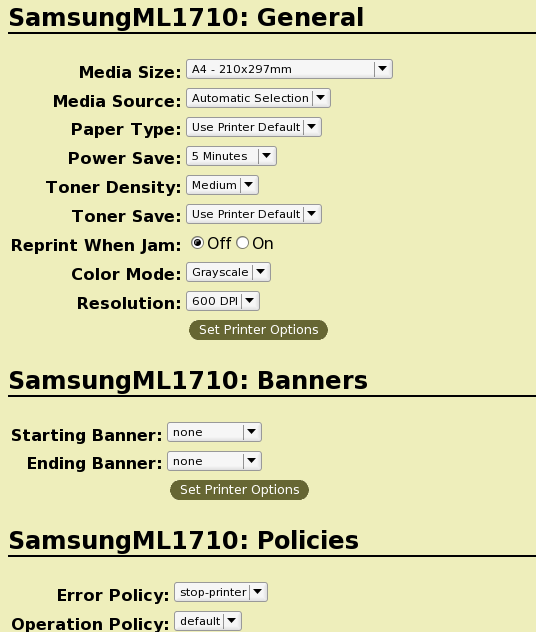
Once you have completed this step you can click the Add Printer button to add your printer. Most likely you will be asked to enter your administrator username and password. When that authentication succeeds a new page will open up (see Figure 6) that allows you to further configure your printer. This page is really only necessary if you have specific needs from your printer. If you do not need to refine your configuration you can close out the CUPS web interface and begin using your printer.
Final Thoughts
Congratulations, you just set up your printer on a Linux machine. Of course this walk-through instructed you how to set up a remote printer. The reason for this is that the remote printer setup has a few more steps to complicate the issue, so knowing how to accomplish this will make configuring a local printer a snap.
And even if your distribution has a tool specific for printer configuration, you can still use the CUPS web-based interface for this job. In some ways this tool is much easier to use. 
MNorin.com
Блог про Linux, Bash и другие информационные технологии
Настройка принтера в Linux.
Одна из задач, которую часто выполняют компьютеры под управлением операционных систем на базе ядра Linux — это печать на принтере. На компьютер устанавливается операционная система, подключается принтер, настраивается служба печати, и всё, принтером можно пользоваться. Настройка принтера в Linux обычно не зависит от того, какой дистрибутив вы используете и занимает достаточно мало времени. Давайте посмотрим, как это делается при установке принтера, подключенного к другой машине в сети.
Установка CUPS
В первую очередь необходимо установить систему печати CUPS. Для этого необходимо установить пакет cups, а все зависимости будут установлены автоматически вашим менеджером пакетов.
После установки пакетов сервис cups запускается автоматически. Если он не запустился, то его надо запустить вручную:
В зависимости от того, какой марки у вас принтер, может потребоваться установить дополнительные пакеты. В Debian’е можно сразу установить все доступные драйвера:
apt-get install printer-driver-all
В CentOS вам придется ставить драйвера для разных производителей попакетно, найти их можно обычно по словам «CUPS driver». Если вы по какой-то причине не нашли в пакетах подходящего драйвера, вы можете попробовать найти его на странице http://www.openprinting.org/drivers.
Настройка принтера в Linux
Откройте в браузере адрес http://127.0.0.1:631. У вас будет запрошен пароль пользователя root, либо пароль пользователя, если пароль root не задан (как, например, в Ubuntu). Вы должны увидеть следующую страницу:
Кликните на вторую вкладку (Administration)
Нам нужно добавить принтер. Можно попробовать найти принтер автоматически, нажав на кнопку «Find New Printers», но это не всегда работает. Поэтому кликаем по кнопке «Add Printer».
Выбираем, каким образом принтер должен быть подключен к компьютеру. В моем случае это принтер, который подключен к другому компьютеру и настроенный как принтер общего доступа. Поэтому я выбираю «Windows Printer via SAMBA». Нажимаем кнопку «Continue».
Примера задания пути для принтера с доступом по SAMBA нет. Вводим руками: smb://192.168.0.7/RX610 (принтер подключен к хосту 192.168.0.7 и называется RX610). Нажимаем кнопку «Continue». Если принтер подключен к локальному компьютеру, то он обычно может быть определен автоматически.
Теперь Нужно ввести имя принтера, под которым он будет виден в системе (обязательно), также его описание и местоположение (необязательно). Вот как это должно в итоге выглядеть:
Теперь можно нажать кнопку «Continue».
Теперь нам нужно выбрать производителя и модель принтера. В первую очередь выбираем производителя (в моем случае это Epson).
Теперь выбираем драйвер, который будем использовать (драйвер, соответствующий вашему принтеру) и нажимаем кнопку «Add Printer». Теперь надо установить настройки принтера по умолчанию (как минимум установить формат бумаги A4).
После этого нажимаем кнопку «Set Default Options». После сообщения о том, что принтер был успешно добавлен вы увидите страницу с информацией о принтере.
Для проверки вы можете сразу отправить тестовую страницу на печать, выбрав пункт «Print test page» в первом выпадающем меню (Maintenance).
Если страница успешно выведена на печать, значит настройка произведена правильно.


